
Fine line Japanese dragon tattoos look gorgeous on a feed, but they do not always age the same way. The pieces that keep their personality for years usually start with placement, spacing, and realistic expectations during the consultation. Read these 17 feminine japanese dragon tattoo ideas with practical notes on what to ask, how they heal, and small wardrobe moves that make the art sing.
1. Neo-traditional Dragon with Cherry Blossoms on the Thigh

I often recommend a neo-traditional dragon on the outer thigh when someone wants bold color without constant exposure. Tell your artist you want 6 to 10 inches of breathing room around the dragon so the scales and blossoms do not crowd each other as the piece settles. Expect two to three sessions and moderate pain for the thigh. One common mistake is forcing tiny floral details into a compact wrap. That causes muddiness at year two. For the session wear loose shorts you can shift easily and later show the piece off with a high waisted a line skirt in black or deep red to frame the design.
2. Fine Line Dragon Coiling Around a Peony on the Forearm
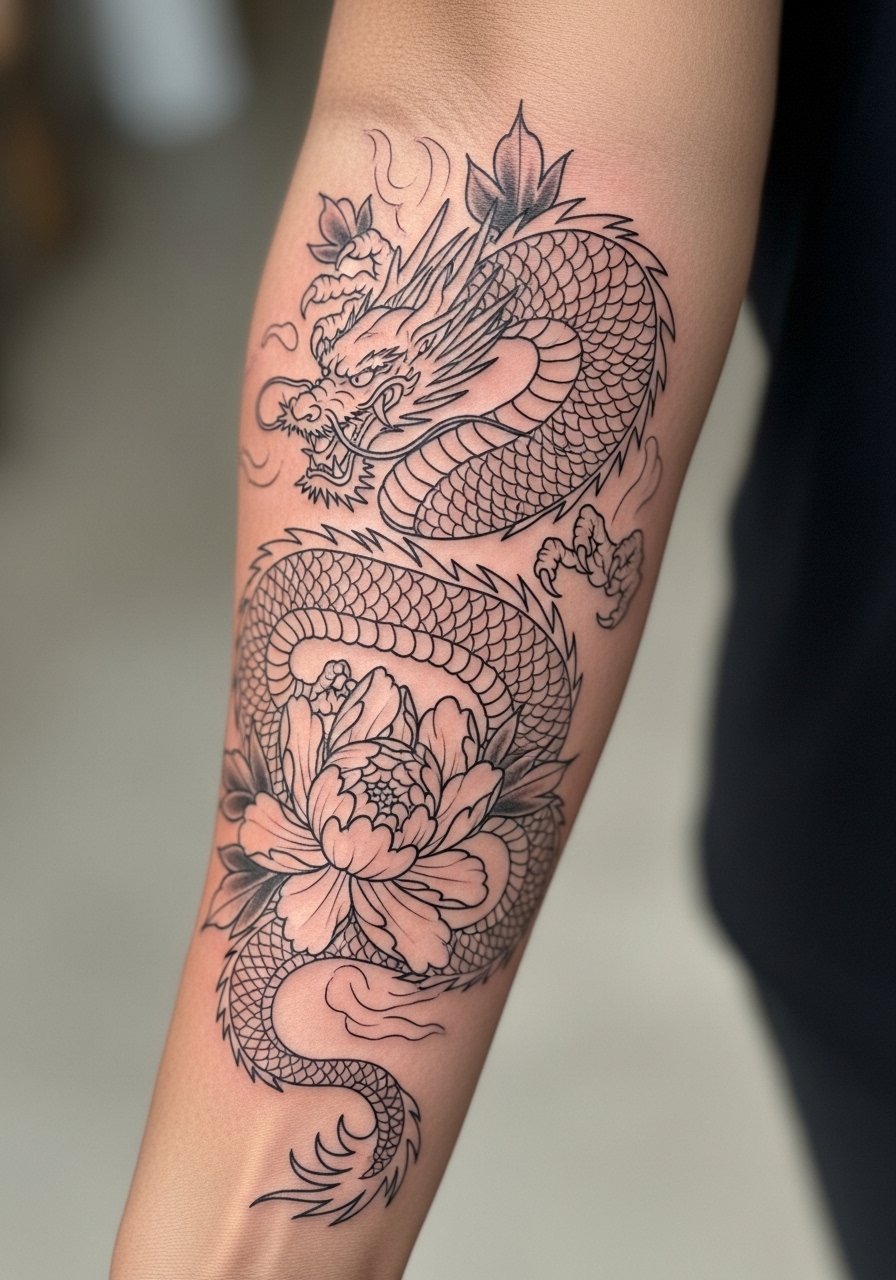
Fair warning: the inner forearm is forgiving but still sees sun and abrasion, so fine line needs spacing to last. Ask for slightly heavier primary contour lines around the dragon and lighter internal hairlines to preserve detail without collapsing into a blur. Expect one to two sessions and a touch-up at year two to maintain crispness. A mistake I see is asking for ultra-tiny scales that look great fresh and then merge over time. For showing this off, roll up your sleeves and add a rolled cuff blouse, and during the session wear a short sleeve button up shirt so the artist can work without the fabric in the way.
3. Watercolor Dragon Paired with a Koi on the Shoulder Blade
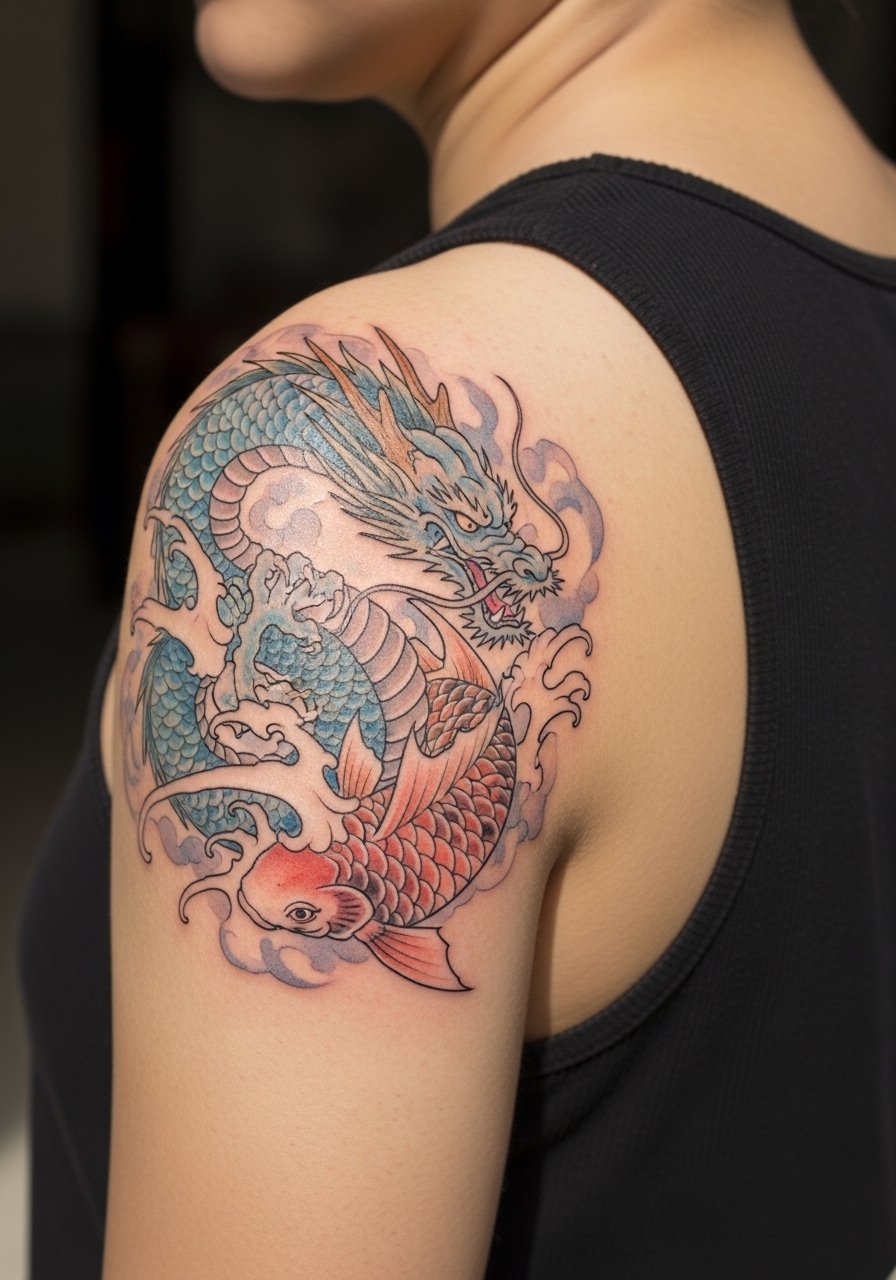
There is a real aging reality with watercolor work. The style looks ethereal fresh and can soften into a washed patch if saturation and placement are not handled well. I suggest keeping the watercolor as an overlay on a subtle black outline for anchor points, and telling the artist you want more saturation near the dragon head where details matter. Sessions usually run into two to three appointments and the shoulder blade is a comfortable placement. For evenings wear an off shoulder top in a soft pastel to echo the tattoo colors and for the session a sleeveless tank top makes access simple.
4. Blackwork Oni-Dragon Mask Hybrid on the Ribcage

Pain warning: the ribcage rates high on the scale for most people. The payoff is dramatic contrast and longevity if the saturation is deep and the artist spaces negative areas well. There is a split among artists on fine line here. One camp says fine detail on ribs blurs as skin stretches. The other camp says with careful depth and spacing it holds. Name both concerns in consultation and ask how they handle needle depth around cartilage. A common mistake is compressing too many tiny motifs into the side torso. For showing the mask without competing patterns, pair it with a black crop top or a side slit dress.
5. Ornamental Dragon with Lotus Wrapping the Ankle
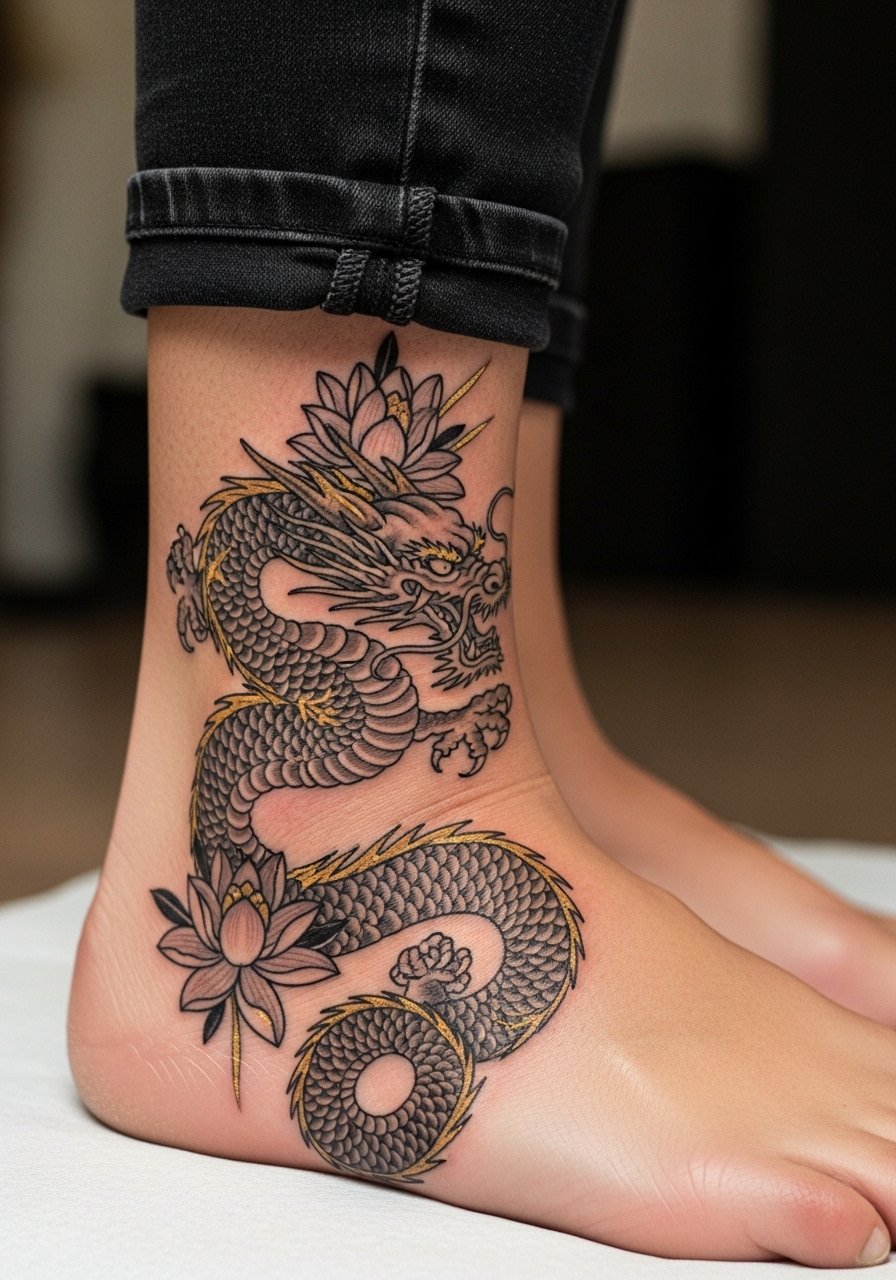
This compact ornamental approach works well for first-timers who want symbolism without a large commitment. The ankle has friction from shoes, so discuss a design that avoids too many micro details along the joint. A common mistake is requesting fine stippling right where shoes rub. That area needs a little negative space and slightly bolder linework to endure. Session time is typically one appointment under two hours and touch-ups are common at year one for edge wear. For summer show-offs try strappy heeled sandals or cropped jeans and an ankle bracelet on the opposite foot.
6. Micro-Realism Dragon Claw Emerging from a Chrysanthemum on the Wrist
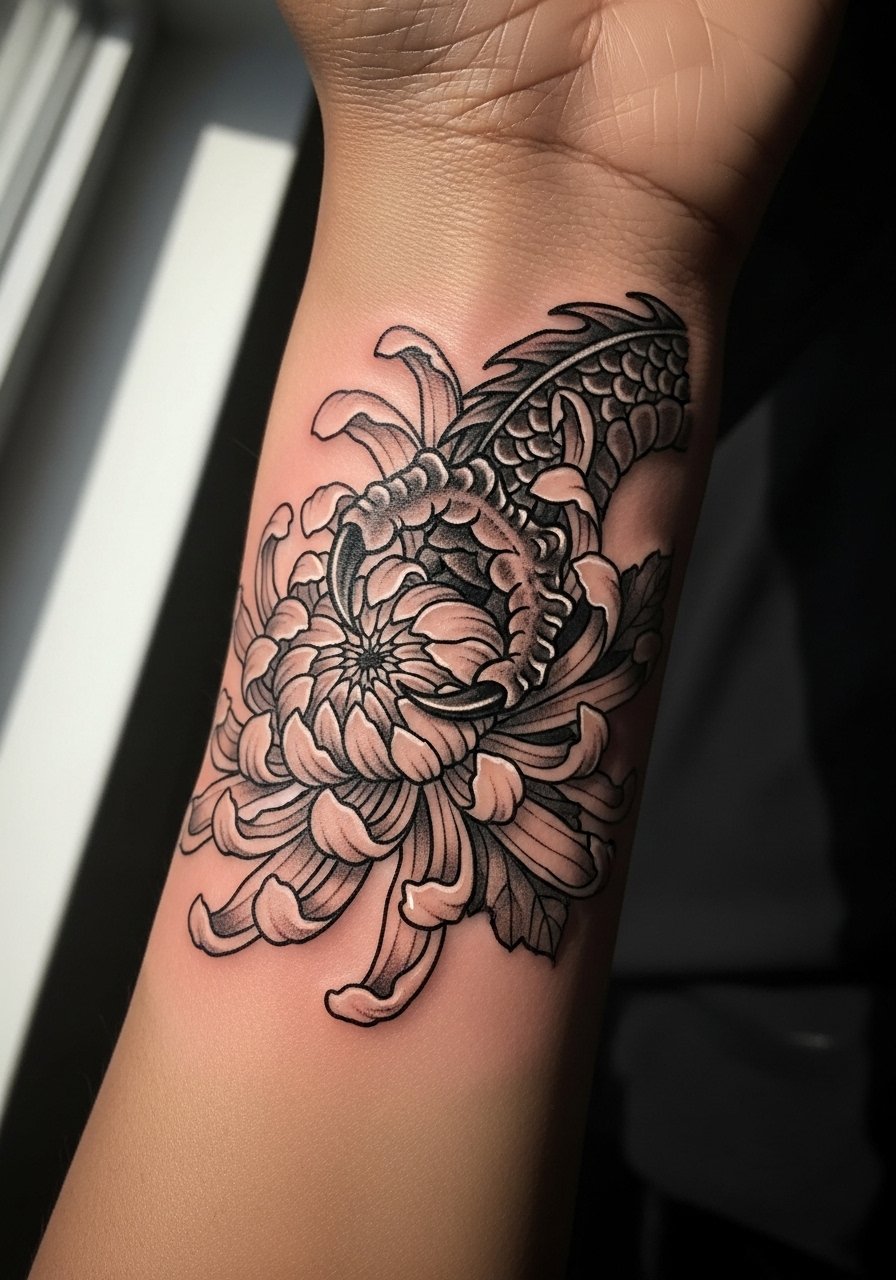
Most clients underestimate how much the wrist moves and washes. Expect one to two sessions and a touch-up at year one for such high-motion placements. Tell your artist you want strong contrast at the claw tips and softer gradients in the chrysanthemum petals so the focal points endure. The common mistake is packing too much tiny texture into the wrist band. That often resolves into a muddy patch after heavy use. During the appointment remove all jewelry and wear a sleeveless top or a top with easy arm access, and later pair the wrist art with a thin cuff bracelet on the opposite hand to let the tattoo breathe.
Studio Day Picks
The wrist, ankle, and ribcage pieces above need different prep and small tools that make sessions and the first week easier.
-
Stencil transfer paper kit. Lets you preview the linework on skin before committing, especially helpful for the forearm and wrist pieces above.
-
Topical numbing cream. Applied 45 minutes before can ease sensitivity for small but intense sites like the wrist and ribs.
-
Thin protective film roll. Useful for ankle and wrist placements where friction from shoes and watches is an early problem.
-
Fragrance free gentle body wash. Cleanses healing areas without irritating delicate fine line work on the forearm and ankle.
-
Aquaphor healing ointment. Thin layer in the first days helps keep moisture consistent on tiny texture work like micro-realism claws.
7. Ignorant Style Dragon Wave on the Collarbone

Visual impact lead: thick naive lines across the collarbone read bold and wearable. The collarbone sits on a curve that flatters sweeping shapes, so request the dragon wave to follow the bone rather than cut across it. Expect a single session and moderate pain near the bone. A frequent error is asking for thin hairlines there. Those tend to soften into a faint streak with time. For showing off, a v neck blouse or a halter top frames the curve. For the session, consider a strapless option or an easily unbuttoned shirt so the artist has clear access.
8. Shoulder-to-Back Flowing Dragon with Peonies
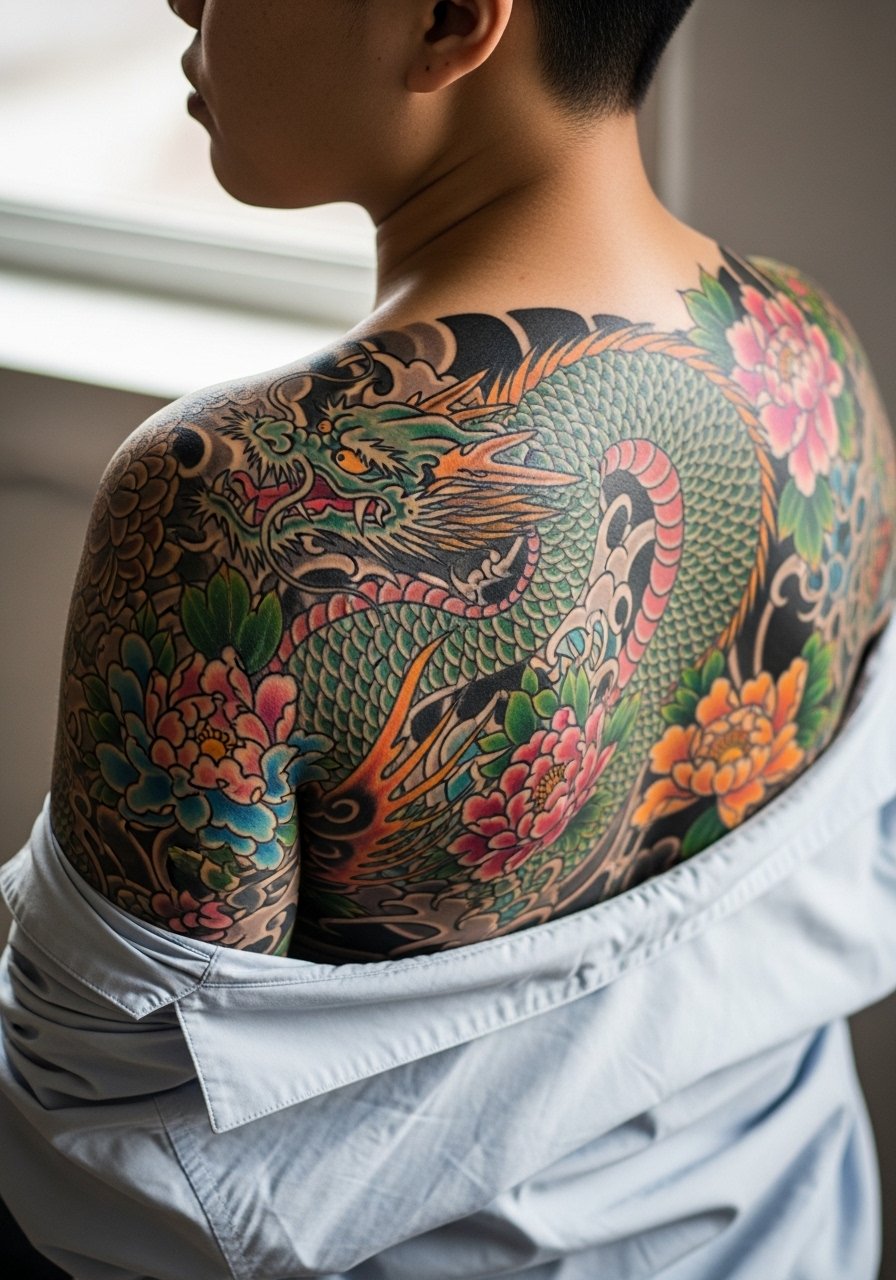
Visual impact matters for shoulder-to-back pieces because movement changes the silhouette. Ask for anchor points near the shoulder blade and for the tail to taper so it does not disappear into clothing folds. Plan for three sessions if you want full color saturation. A practical mistake is compressing a sleeve-like density into the shoulder pad. That causes inconsistent healing where muscle and soft tissue meet. A wardrobe tip is off-shoulder or open-back dresses but for the session choose a loose button-down you can pull aside without rubbing the area.
9. Vertical Calf Dragon Winding Down the Lower Leg
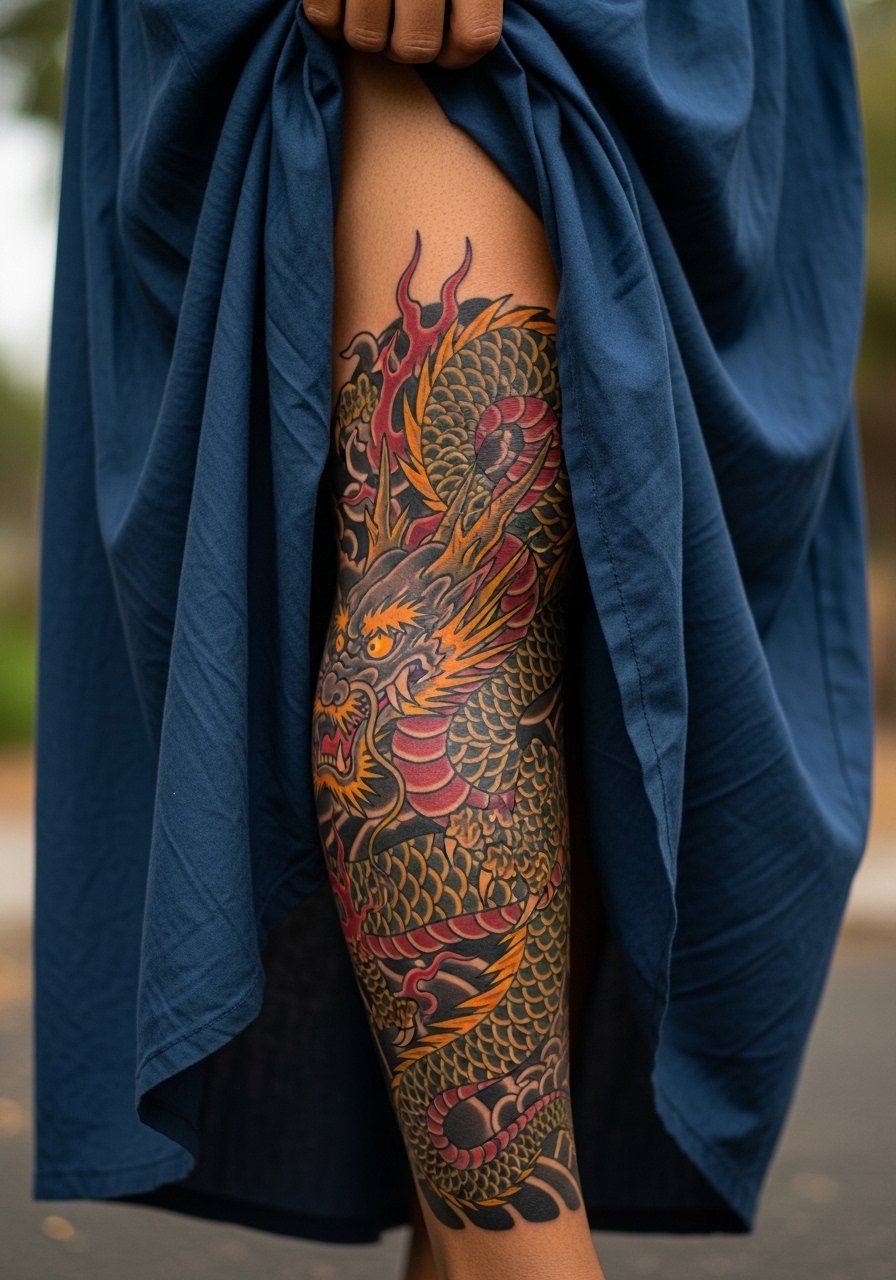
Consultation lead: the calf is great for vertical compositions that read from a distance. Tell your artist you want the dragon to read clearly at eight to twelve inches tall so scales and waves stay legible. The calf tolerates longer sessions with lower perceived pain than ribs. A common error is requesting tiny scale work that loses definition after heavy activity. Expect a touch-up window at year two if you train heavily. For showing it off, a flowy maxi or a skirt that lifts slightly works well, and for the session wear loose joggers you can roll up.
10. Small Coiled Dragon Behind the Ear and Nape Transition

Consultation lead: behind-the-ear placements need precise stencils because the area is small and the skin there can be bumpy. Ask for a simple silhouette that reads as a dragon instead of packed detail. Expect a quick session and a touch-up within a year if you expose the area to sun or friction from collars. A mistake is choosing dense shading behind the ear which looks heavy as hair grows. Professionally, mention you want the work placed just below the hairline on the neck. Small accessories like simple studs keep attention off the spot if you need discretion.
11. Sternum Dragon with Floral Anchor
Aging and healing lead: sternum pieces settle differently across skin types because the area moves with breath. Expect moderate to high pain and plan two short sessions. Ask the artist to avoid ultra-fine lines right on the midline where stretch from breathing is highest. The common mistake is treating the sternum like flat skin. It is not. For showing it selectively, pair the design with a fitted bandeau or a cropped top in solid colors. During the appointment wear a sports bra or bandeau so the artist can work cleanly.
12. Half-Sleeve Dragon Interlaced with Waves and Peonies

Mistake lead: people often try to cram a full back-piece level of detail into a half-sleeve. The result is overcrowding and early blurring. I advise prioritizing three focal elements, like the dragon head, one peony, and a wave area, and leaving open bands for negative space. Sessions are usually multiple and the arm sees sun, so expect a touch-up at year three. For daytime wear, rolled-up sleeves and slim bangles on the opposite arm balance the composition.
13. Small Wrap Dragon on the Side Hip
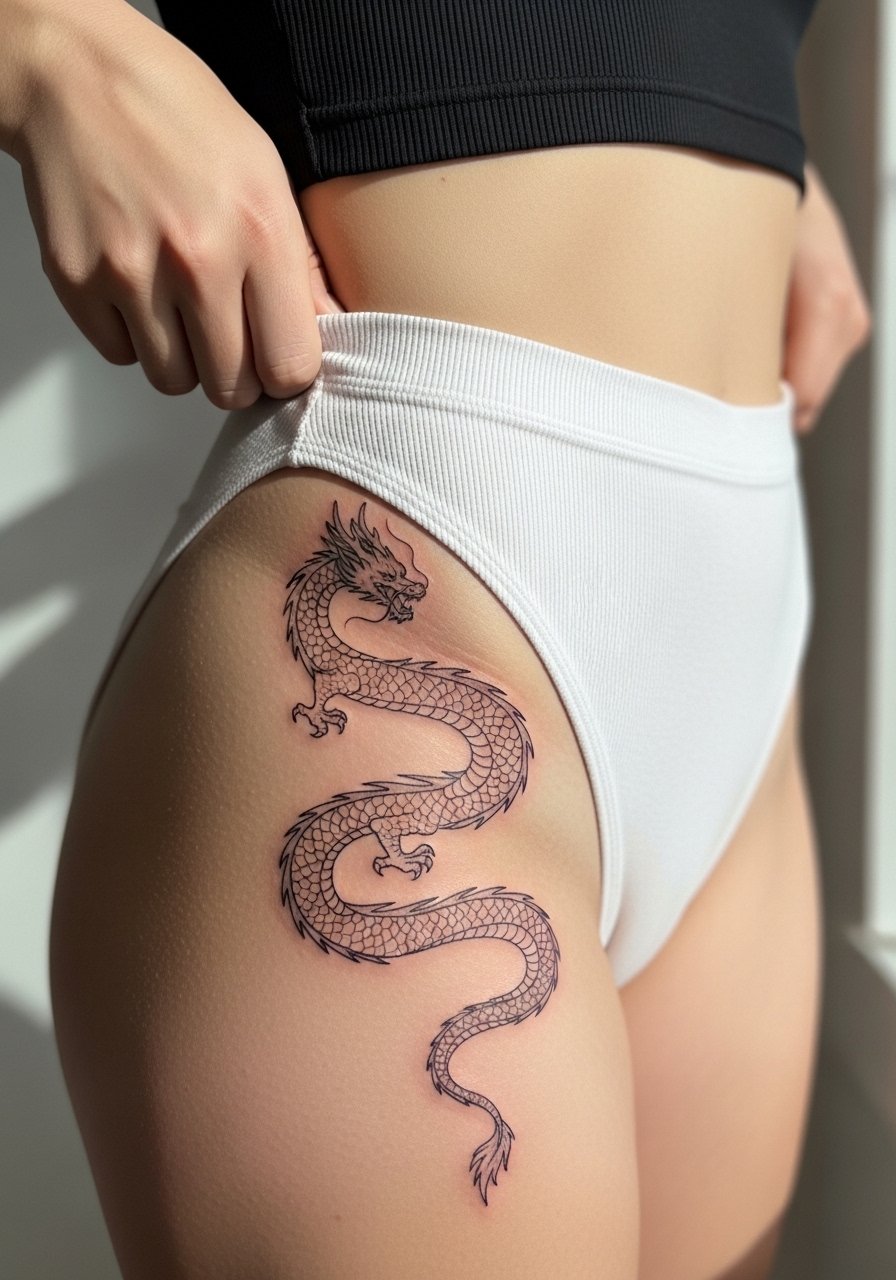
Personal observation lead: hip wraps age well if you allow space for body changes. Tell your artist you want scale size that can survive small weight shifts and avoid ultra-dense stippling at the waistband where friction is constant. Session time is usually under two hours for a compact wrap. Mistakes include placing the most detailed parts directly under tight waistbands. For showing this piece, a high-waisted a-line skirt frames the artwork. For the appointment, choose high-cut shorts or jeans you can lower slightly.
14. Tiny Finger Dragon That Wraps a Single Digit
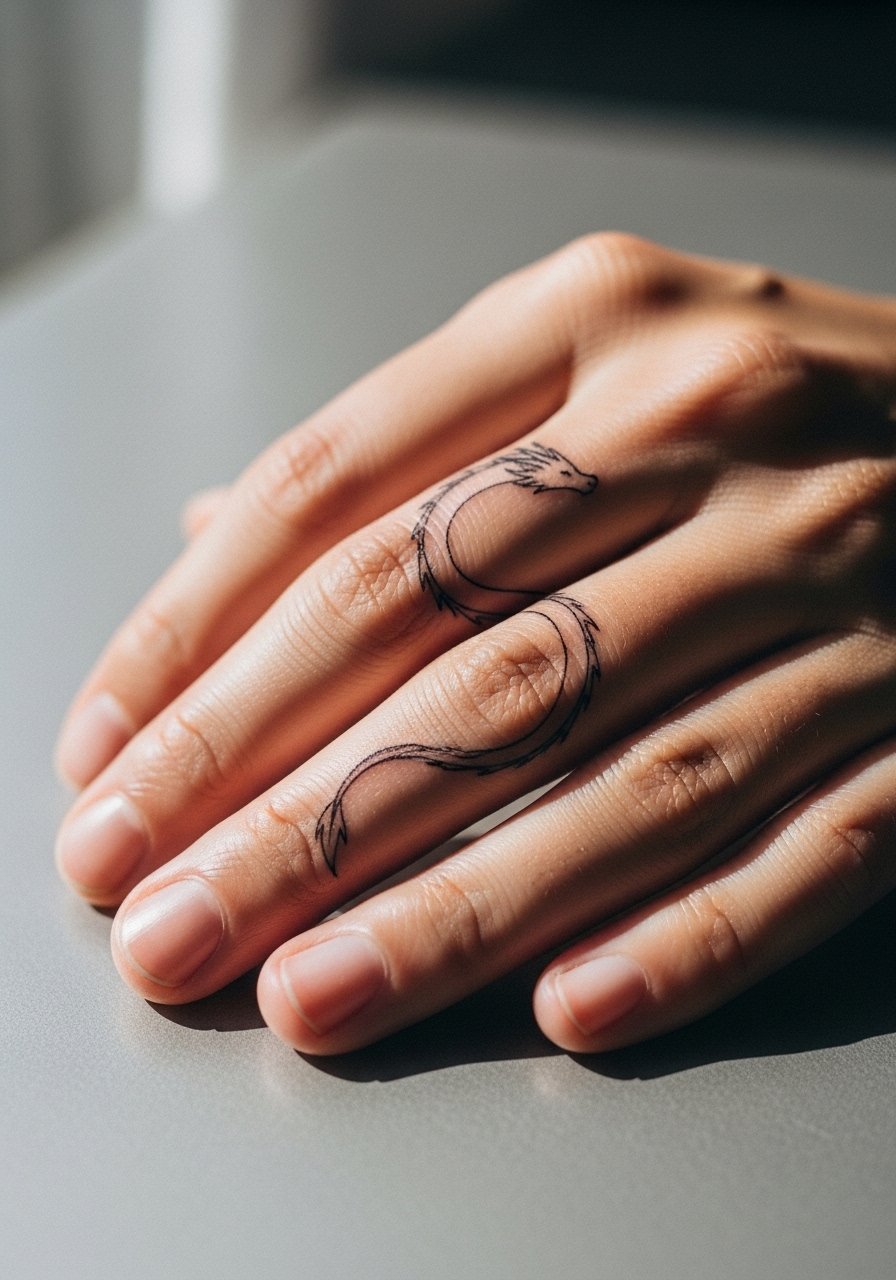
Pain warning: finger work hits bone fast and fades quicker than arm pieces. The big trade-off is visibility versus longevity. Ask for a simplified silhouette and accept that touch-ups every one to two years will be likely. A common mistake is cramming scales into a tiny circumference which creates blurring and increased touch-up frequency. Keep the design minimal and avoid heavy shading on knuckles. For showing off, minimalist stacking on the opposite hand works better than crowding the finger with rings that rub the ink.
15. Back of Neck Dragon Script and Tail
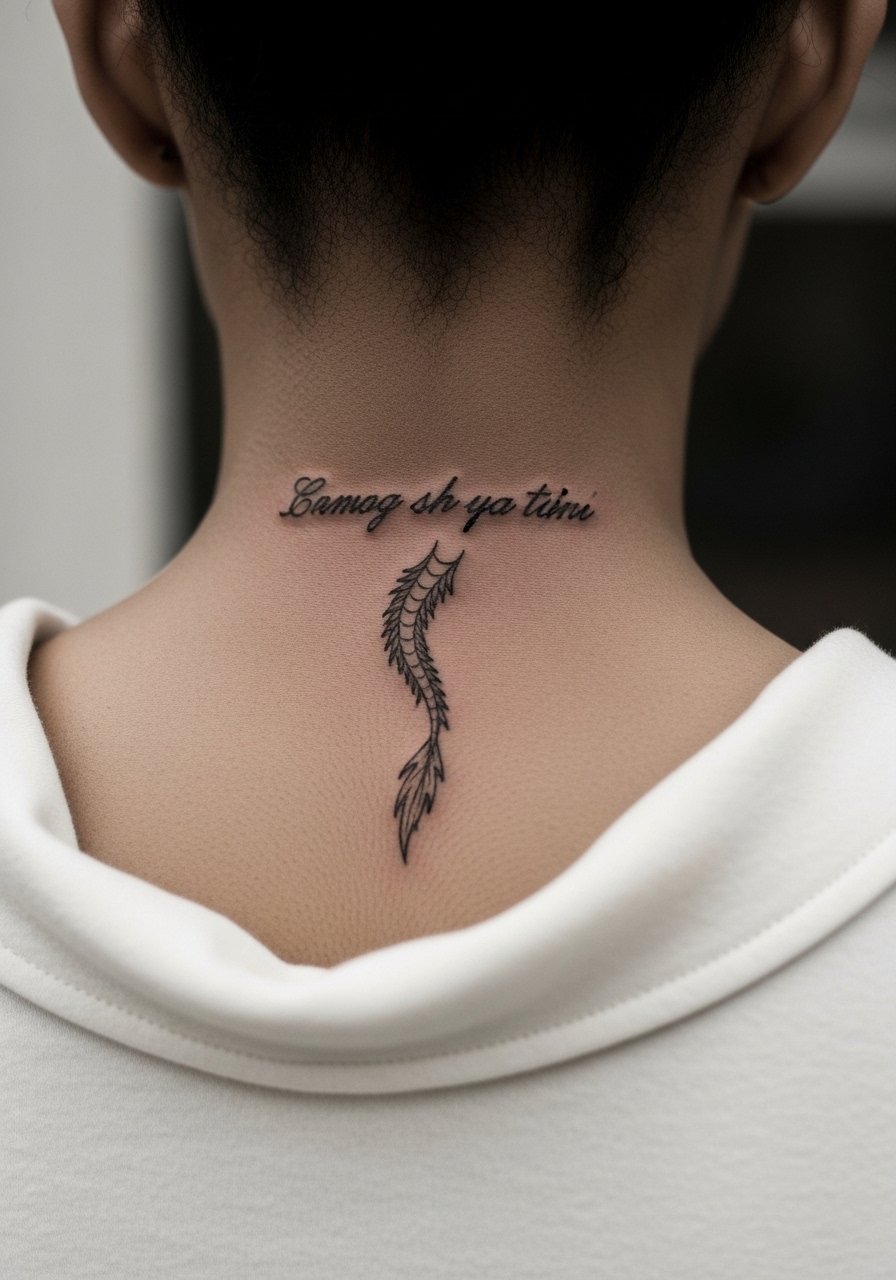
Consultation lead: the back of neck needs decisive line weight that can survive hair growth and friction from collars. Ask the artist to place the most delicate elements lower on the nape where they get less sun and rubbing. Mistakes include very thin micro script directly under a shirt collar. For the session wear a wide-neck shirt you can adjust and later pair with a simple pendant to frame the area without covering it.
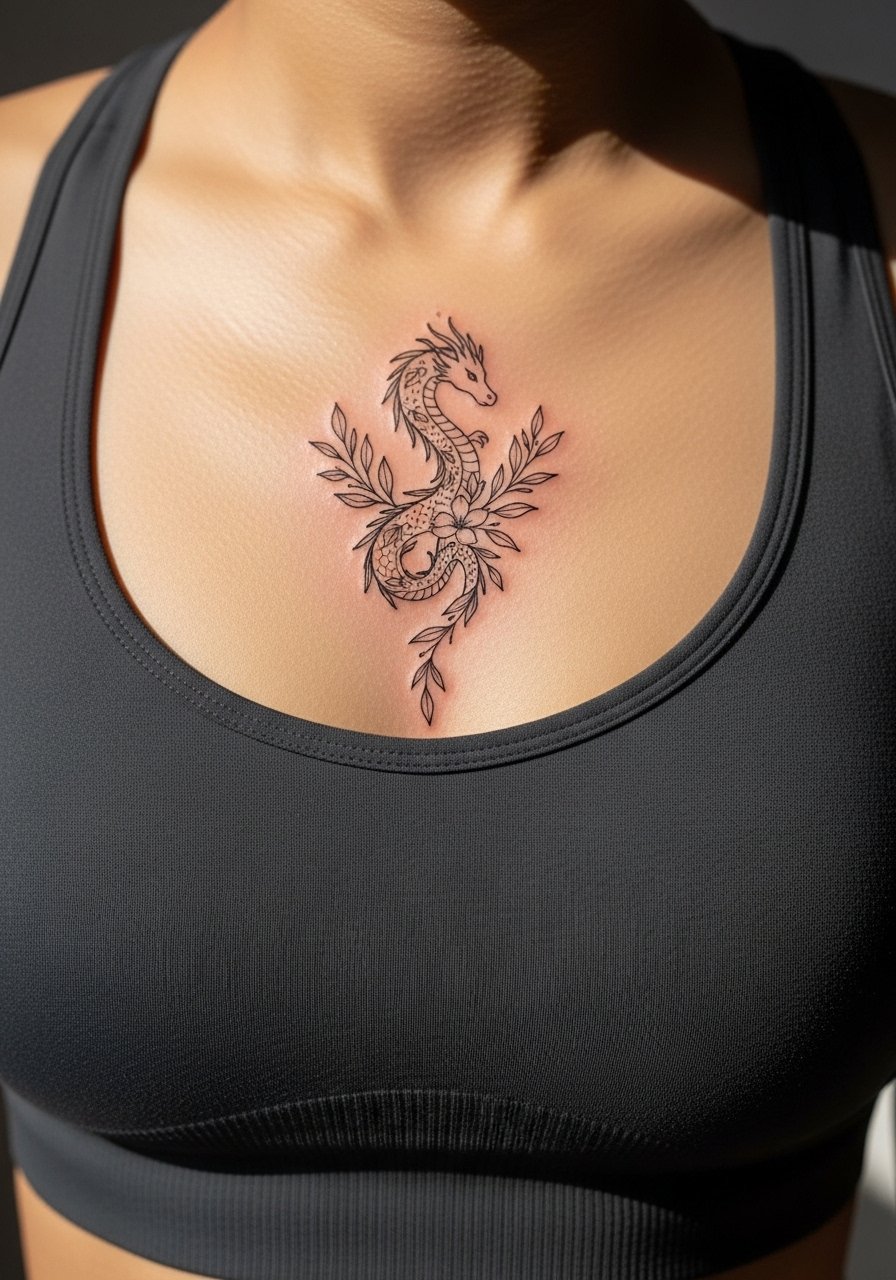
16. Subtle Chest Pocket Dragon Nestled near the Collarbone

Mistake lead: chest skin varies a lot and can shift with posture. Request slightly stronger anchor lines and ask the artist to avoid dense cross-hatching in the pocket area. Pain is variable depending on proximity to the bone. A good session plan is a single focused appointment with the option for a short touch-up. For show-off pairing choose a simple pendant necklace that sits above the dragon so the art reads clearly.
17. Oni Mask and Dragon Combo for Extra Protection Vibes on the Upper Arm
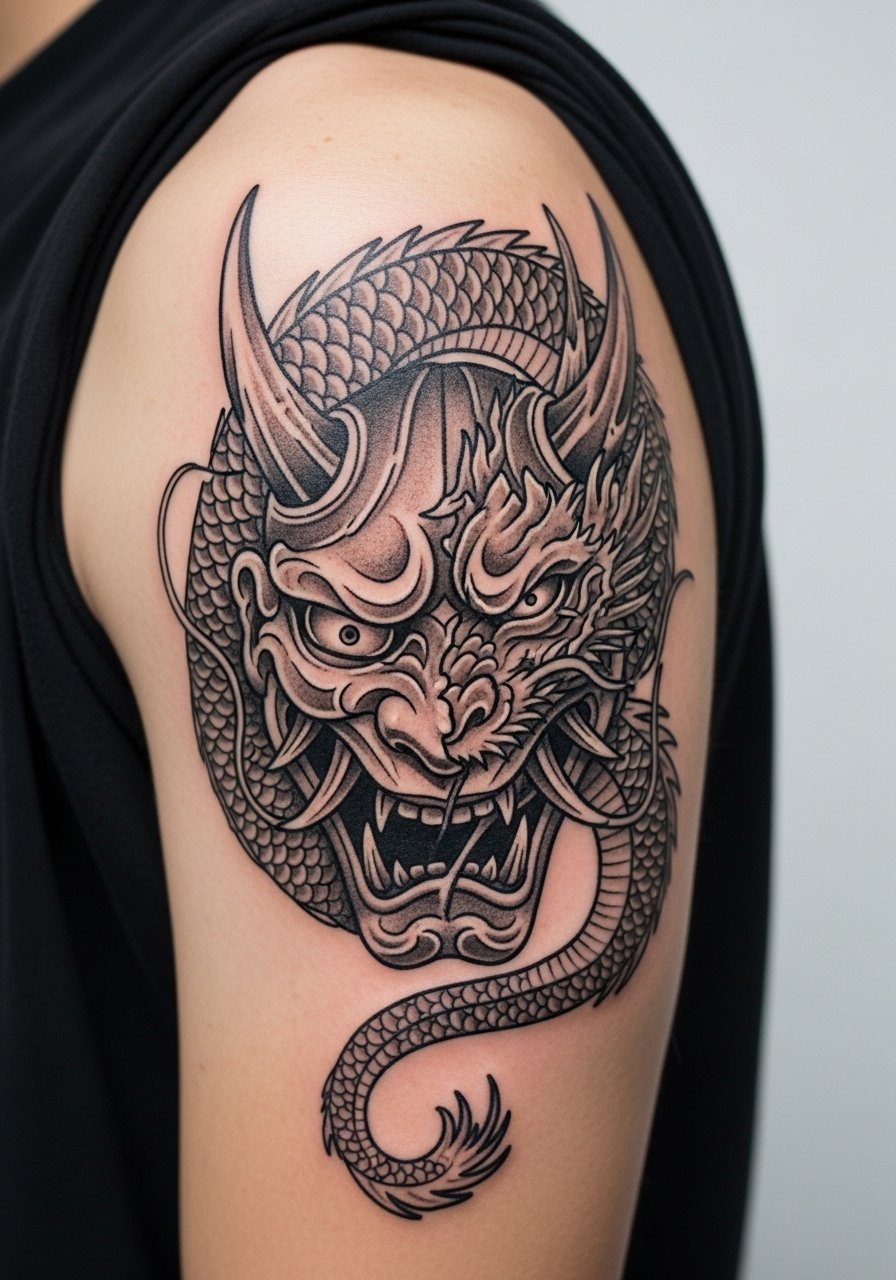
Controversy lead: some purists argue mixing Oni masks with dragons dilutes traditional meaning. The other side says pairing them creates a layered narrative of warding and personal myth. I recommend a hybrid only if you and your artist agree on which motif leads visually. A common error is stacking both at equal weight so they compete. The upper arm handles bold blackwork well and sessions can be spaced to manage soreness. For showing it off, a short-sleeve button-up left open at the collar balances the bold imagery.
Frequently Asked Questions
Q: Will a fine line Japanese dragon on my ribs blur faster than a blackwork piece?
A: It depends on needle depth and spacing. Fine line on ribs is riskier because the skin stretches with breathing and the area sits over cartilage. If you want detail there ask your artist about slightly heavier contour lines and plan for a possible touch-up at year two.
Q: How should I prepare clothing-wise for a thigh neo-traditional dragon session?
A: Wear loose shorts or a skirt you can shift so the artist has clear access without fabric compressing the area. A flowy skirt or loose joggers reduce friction during the appointment and keep the leg comfortable afterward.
Q: Do watercolor-style dragons need different long-term care than traditional ones?
A: From what I have seen, watercolor relies more on delicate saturation so sun protection matters earlier. Both styles need sunscreen once healed but watercolor benefits from a higher-SPF habit since the soft washes lose contrast faster with UV exposure.
Q: Is an ankle dragon a good first tattoo if I want something discreet?
A: Yes for size and discretion but be ready for friction from shoes and socks. Ask for slightly bolder outer lines and expect a touch-up if you wear tight footwear a lot.
Q: How do I find an artist who specializes in Japanese-style dragons without naming someone directly?
A: Use style-specific hashtags and location tags on social platforms, search for "Japanese tattoo [city]" on map directories, and check tattoo directories to filter portfolios by irezumi or neo-traditional work. Look for healed photos that show consistent linework and saturation across different skin tones.
Q: Will a micro-realism dragon claw on my wrist still look good after heavy daily handwashing?
A: It will change faster than an upper-arm piece. Micro realism on wrists sees more wash cycles and hand friction which softens tiny textures. Plan for a touch-up at about year one and consider minimal surrounding detail to keep the focal claw crisp.
