
The tattoos that still read clean at year ten are usually the ones that started with thick linework and space built into the design, not the hyper-detailed pieces that burn up likes on day one. People complain about muddy black on darker skin, bad scale on forearms, and flaky guest-spot scheduling. Read on for 21 hard-won design directions that factor skin tone, placement, session wear, and what to ask for at consultation so your piece actually ages the way you want.
1. Bold Blackwork Ophanim Wheel on the Forearm
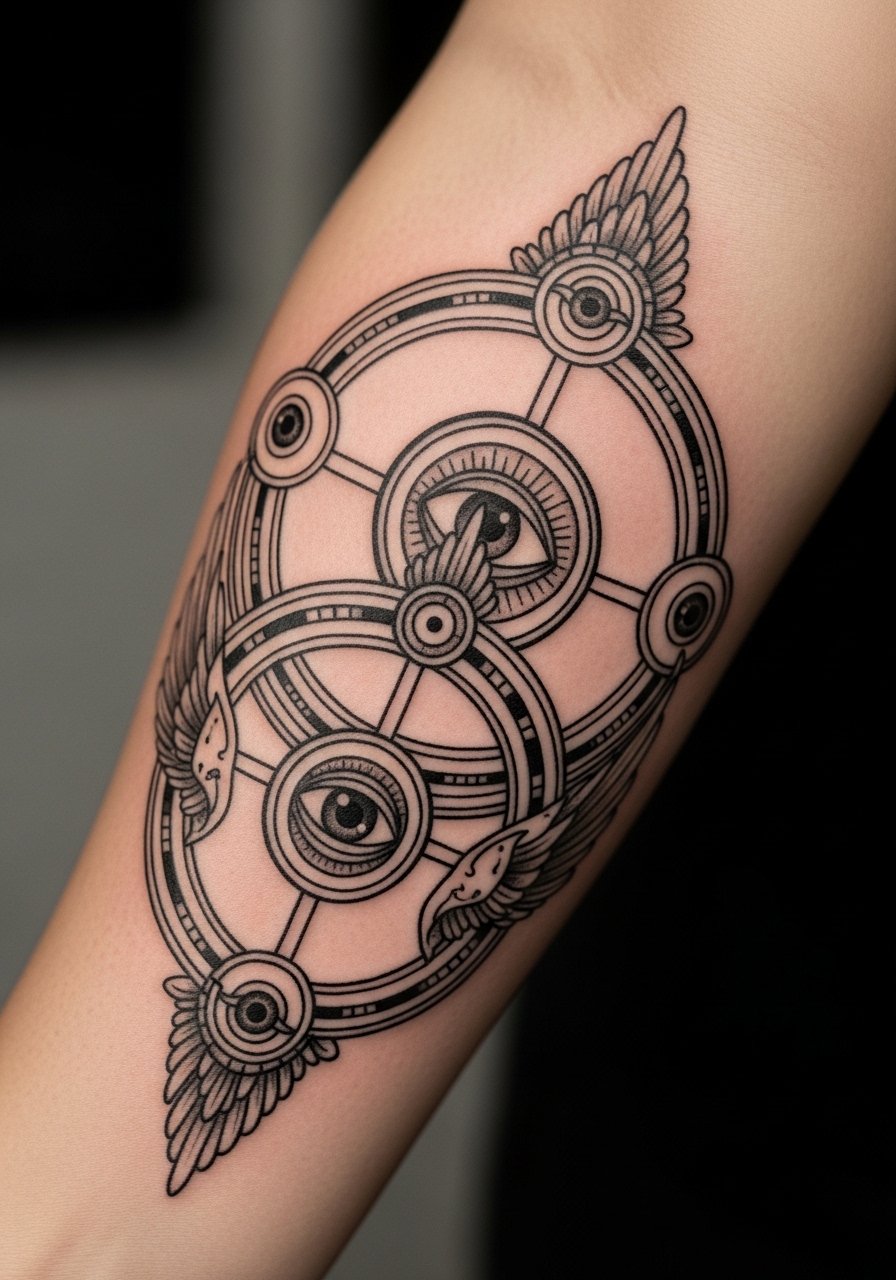
I recommend this one when you want geometry that still reads in photos months later. Tell your artist to use slightly heavier linework for the inner spokes and to leave breathing room between eye motifs so the wheel does not merge during healing. Common mistake is shrinking the wheel to fit a "small" price bracket. Tape a mockup on the skin for 24 hours to confirm scale. Expect two sessions if you want dense black fills and solid saturation. Pain is manageable on the outer forearm and touch-up at six weeks is normal for crisp blackwork. For the session wear, pull on a sleeveless button-down shirt so the artist has full access without rubbing fresh ink.
2. Micro-Realism Seraphim with Multiple Eyes on the Inner Bicep
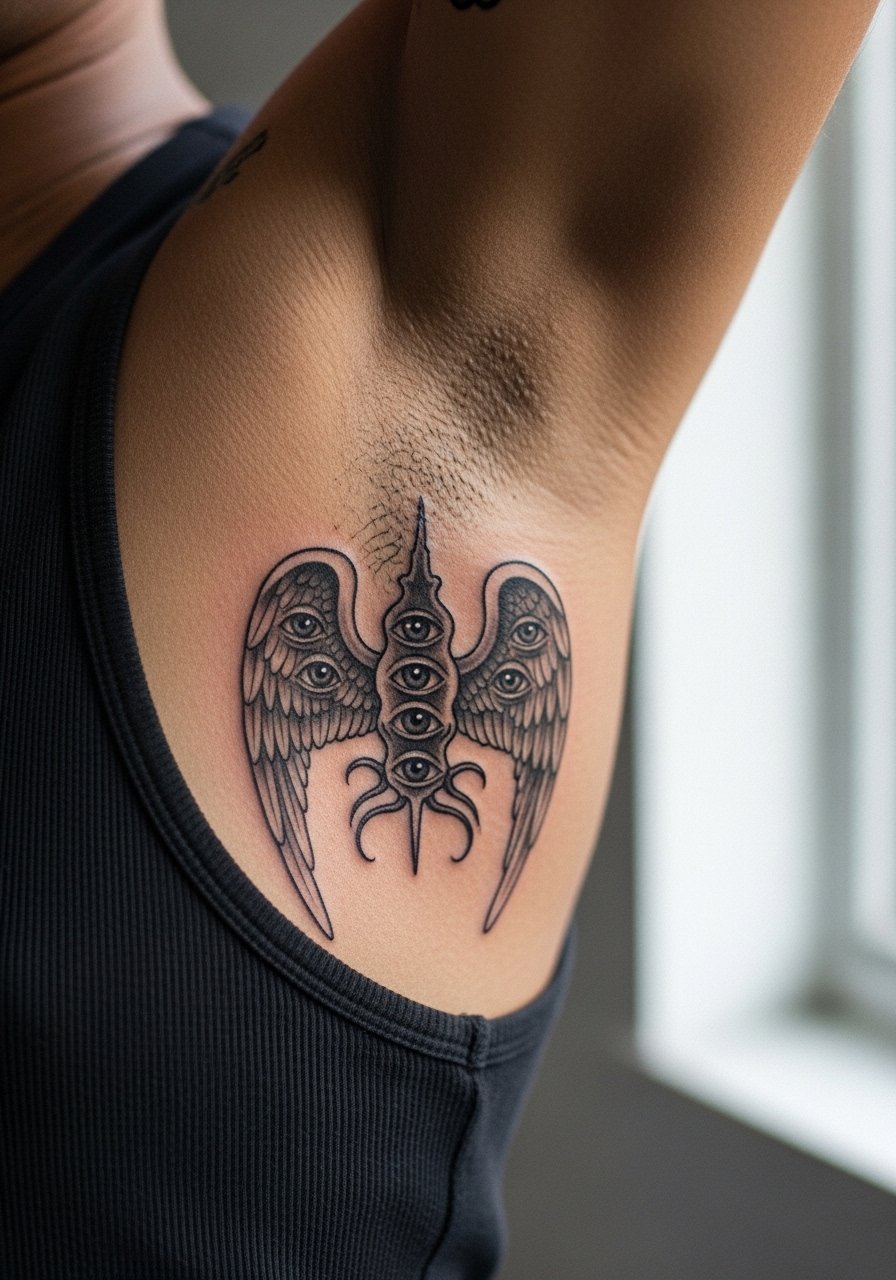
This style is for collectors who want biblical eeriness in a compact spot. The inner bicep can hide a detailed seraphim but it also moves and sweats more than other spots. Ask your artist to prioritize contrast between darks and midtones rather than endless fine detail. The mistake is asking for tiny eyes with shallow spacing, which blur quickly. Expect a one to two hour session and a potential touch-up at six weeks if shading softens. Be aware of blowout risk if the needle goes too deep on the soft inner arm. For session comfort, wear a loose tank top so the artist can reach the area without tight fabric pressing the fresh work.
3. Neo-Traditional Seraphim with Flames on the Shoulder
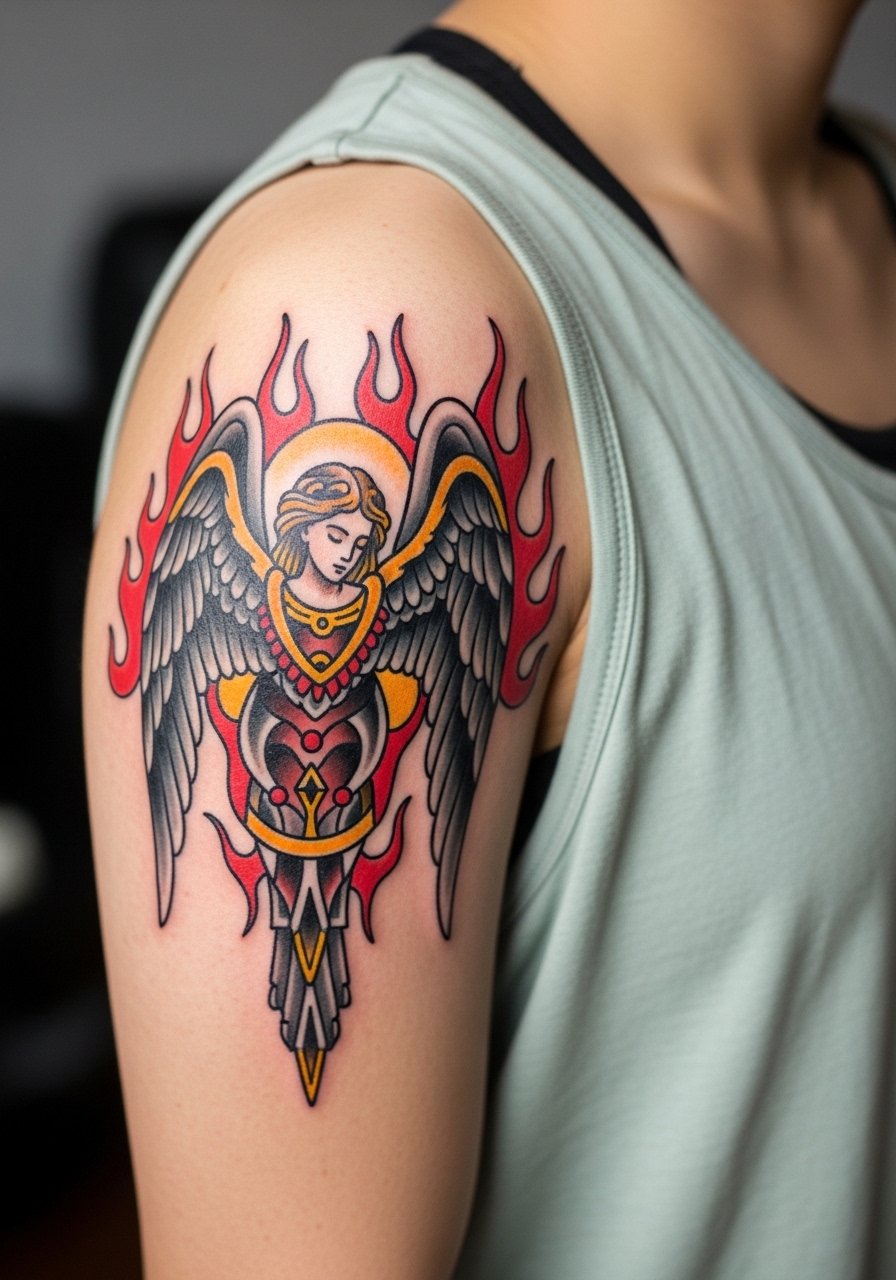
This is the pick when you want bold outlines but still want color accents that last. Tell the artist to lock in strong outlines and to avoid heavy, layered shading near the edge of color fields. The common aging problem is small color patches placed too close to the edge, which fade into the black over time. Shoulder sessions run longer because of the canvas size, typically split across two appointments. Pain is moderate and session wear should be a loose tank top or button-down you can pull aside. If you have darker skin, ask for saturated contrast rather than soft gradients to avoid muddiness.
4. Dotwork Throne Angel Silhouette on the Collarbone
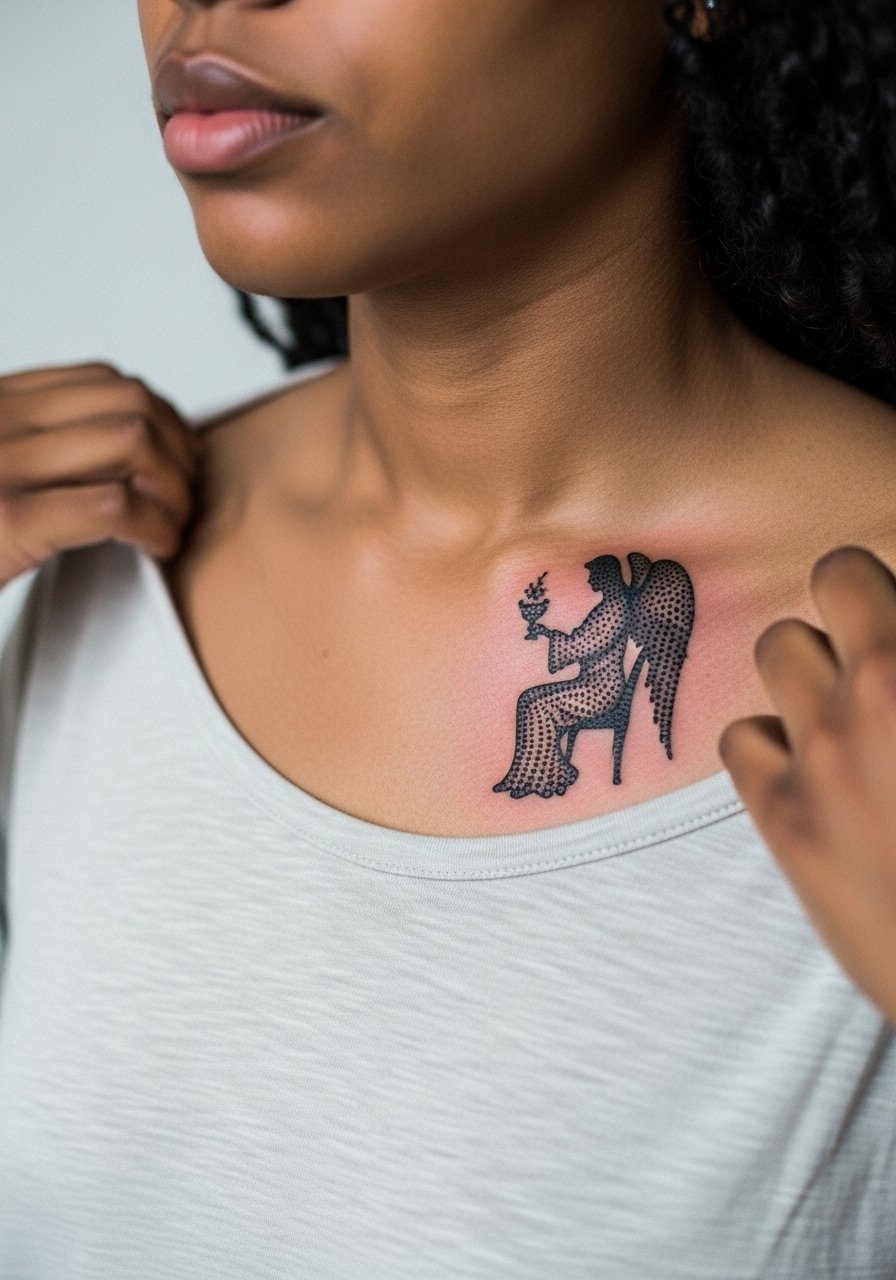
Dotwork breathes on the collarbone because the negative space helps the pattern age without bleeding. The collarbone can be painful so expect a steady, vibratory sensation during stipple shading. Ask the artist for slightly larger dot spacing than you see on-screen so the texture holds at 6 months. A common mistake is to cram too many tiny dots in a compact silhouette which turns into gray wash after a year. This style heals gracefully with a single longer session and needs a careful six-week look to confirm crisp edges. For showing it off, wear a V-neck tee or strapless top that frames the silhouette without covering it.
5. Ignorant Style Multi-Winged Beast on the Thigh
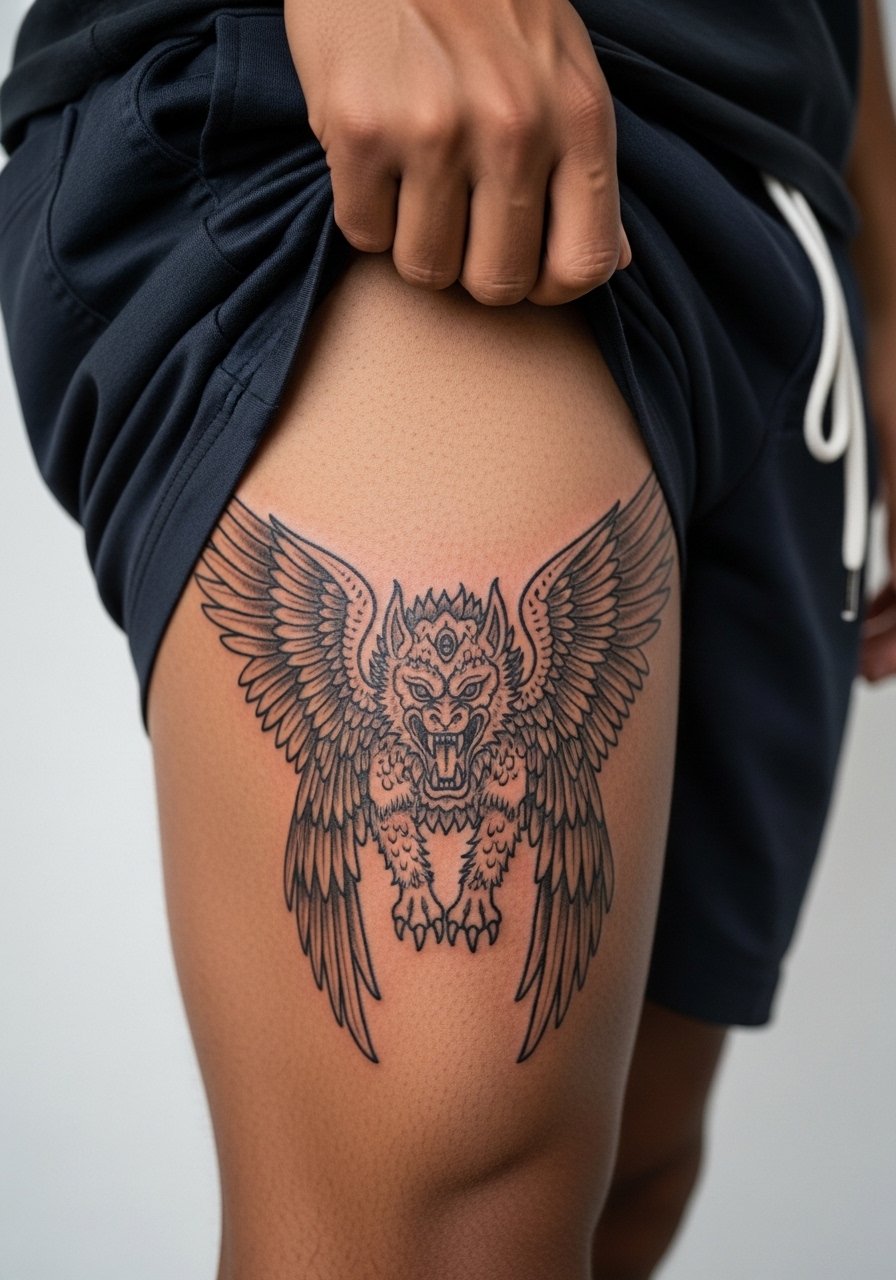
If you want chaotic energy that survived beach days, this is for you. Ignorant style uses raw line energy and bold black outlines with minimal shading, which makes it more sun resistant than large washes. Tell the artist to emphasize uneven hand-drawn line weight for that intentional roughness. The mistake is asking for tiny, delicate wings in this style. For thigh work plan two sessions and wear loose shorts so no underwear lines press the area during the session. Expect medium pain and a touch-up at six to eight weeks if any outline softened. Pair with high-waisted shorts or ripped jeans in warm months to show the work.
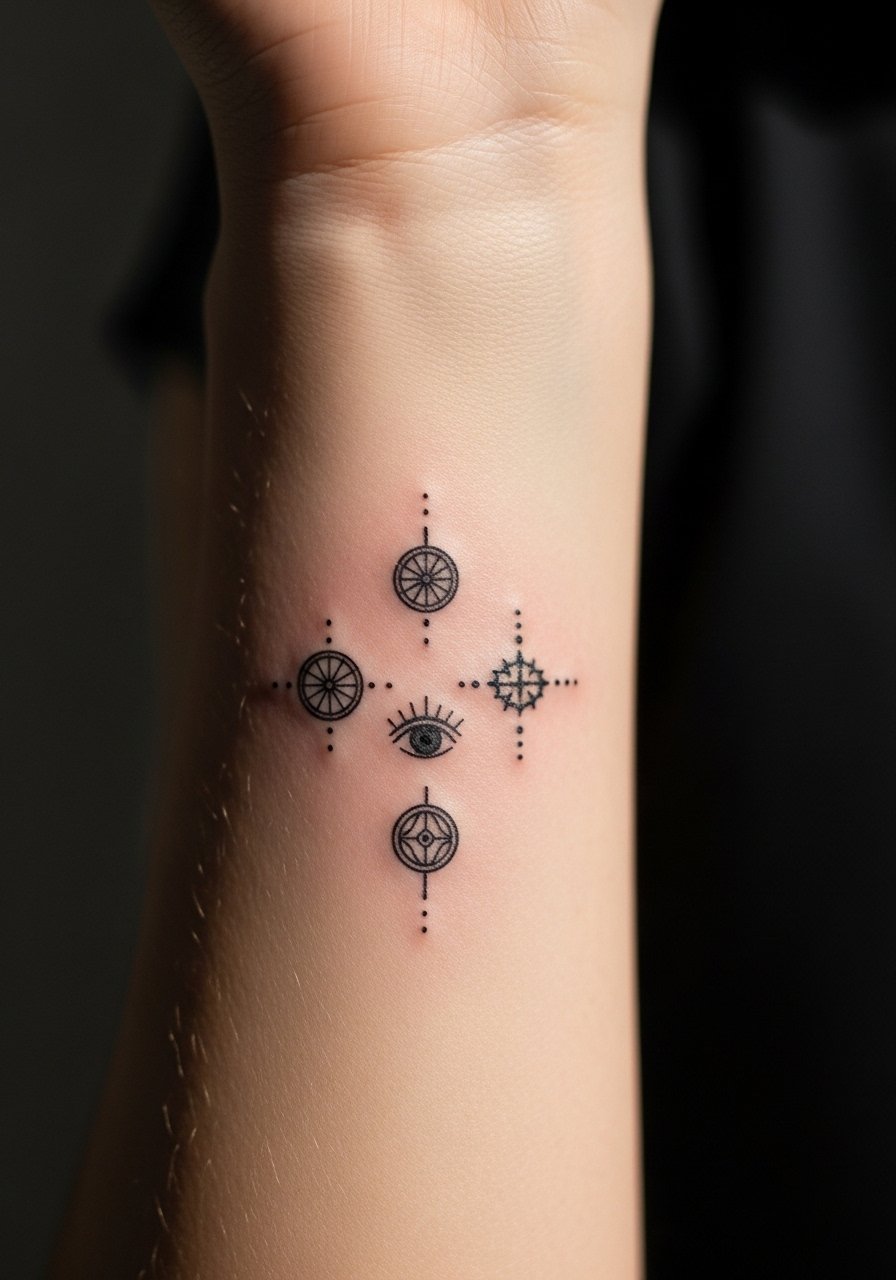
6. Ornamental Geometric Seraph for the Wrist

Wrist-friendly ornamental pieces need heavy main lines and open negative space to avoid early blur. This is a good option if you want minimalist geometry but worry about fast fading. Ask your artist to scale up primary strokes and place thicker anchor lines at the edges. The common error is trying to cram a dense mandala into a two-inch rectangle. Expect a short single session, with touch-up likely at six weeks for edge clean-up. Friction from watches and sleeves can dull edges, so for show-off pairing consider a thin cuff bracelet to sit opposite the tattoo and draw attention without covering it.
Studio Day Picks
The forearm, inner bicep, and shoulder pieces above demand different prep, and a small pack of session essentials smooths the chair day. Below are a few under-the-radar items people have found useful for bold blackwork and sensitive placements.
-
Frida Aftercare Balm. A lighter absorption profile that folks on darker skin tones report avoids the greasy buildup some thicker balms create during humid heals.
-
Tattoo Goo Citrus. A thinner summertime balm alternative that feels less sticky on calves and thighs after long sessions.
-
Cicaplast Baume B5. Gentle option for itchy rib or sternum heals where over-moisturizing has been a problem for some people.
-
Manuka Honey Salve. Anecdotal reports suggest it reduces scabbing on forearm fills compared with standard petroleum products.
-
Hustle Butter Deluxe. A mainstream balm alternative that many people use in place of Aquaphor for initial moisture without the heavy residue on bold blackwork.
7. Black and Gray Ezekiel Wheel with Eyes on the Upper Arm

This is the dramatic option when you want cinematic shading that reads at a distance. For longevity, ask for heavier outlines around each eye and a slightly lighter interior gradient so contrast survives UV exposure. The typical session is two to three appointments for deep grayscale saturation. A common mistake is layering too much subtle texture in the eyes that looks incredible fresh and turns mushy by year two. Upper arm movement is friendly to shading, and touch-ups at six weeks and possibly year two keep the eyes crisp. For session wear choose a loose button-down shirt you can pull aside for prone or seated work.
8. Bold Traditional Angel of Death Wings on the Back
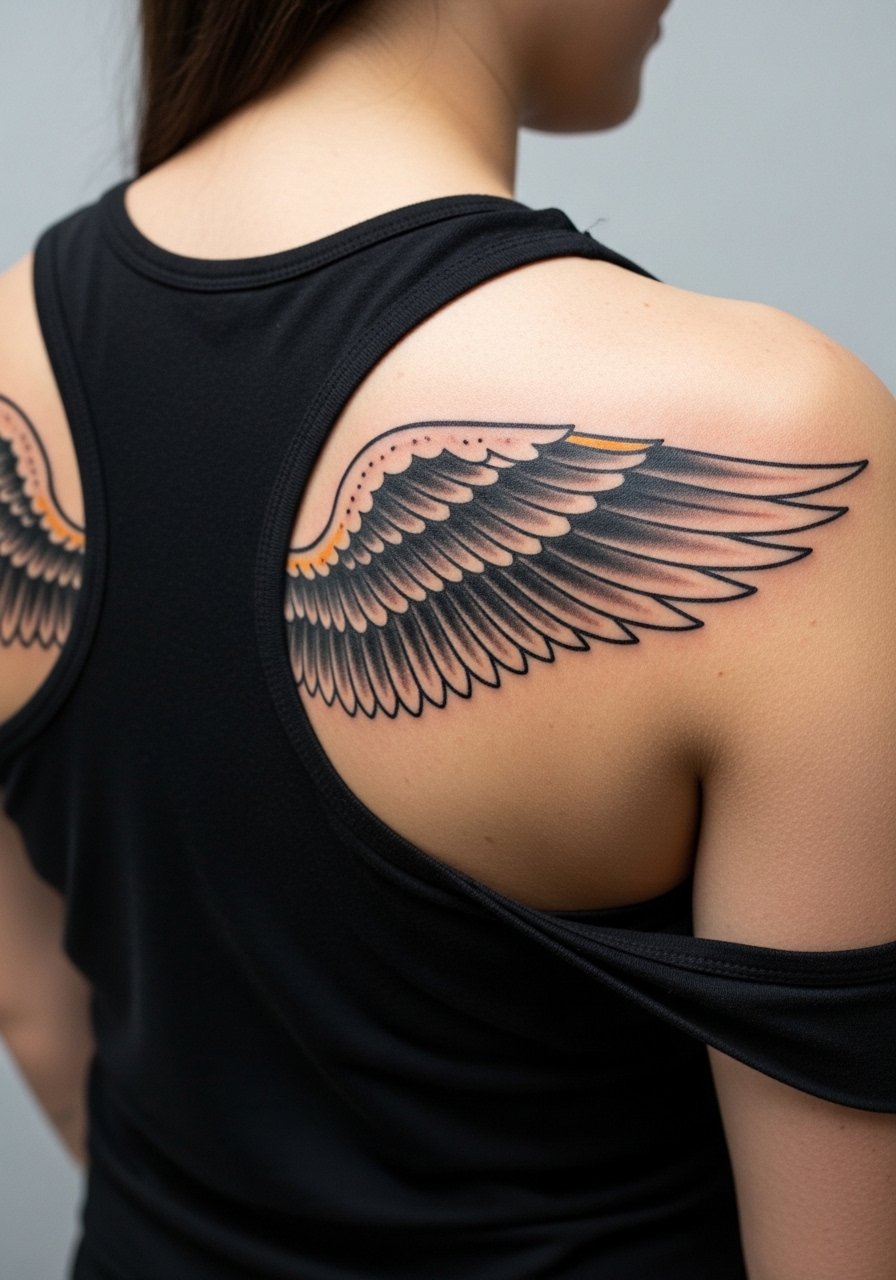
Traditional approaches scale well and age into a classic look for large back pieces. If you want the old-school silhouette with modern biblical motifs, ask for limited color fields and heavy black anchors so the piece reads from across the room. The mistake is over-detailing feathers in tight groups which lose separation during healing. Sessions usually span two appointments for coverage and saturation. Back placements allow larger touch-ups later if you plan to expand into a full backpiece. For showing off, racerback tanks and backless halters work well with this placement.
9. Fine Line Multi-Faced Angel Outline on the Ankle

Fine line ankle pieces answer the "small but specific" request, but they come with trade-offs. The ankle is a high-friction zone with boots and socks causing wear. Artists are split on whether fine line holds up here. One camp warns that skin movement blurs thin strokes fast. The other argues that with correct depth and slightly bolder anchor points, small pieces can last. I recommend asking for a slightly heavier single-line anchor and limiting tiny internal details. Expect a short session, and plan for a touch-up at six weeks or year two depending on wear. For session comfort, roll your jeans and wear low socks or sandals so the area stays accessible and clean. Pair with an ankle bracelet or cuff when you want to frame the work without covering it.
10. Watercolor Ophanim with Rainbow Halo on the Ribcage
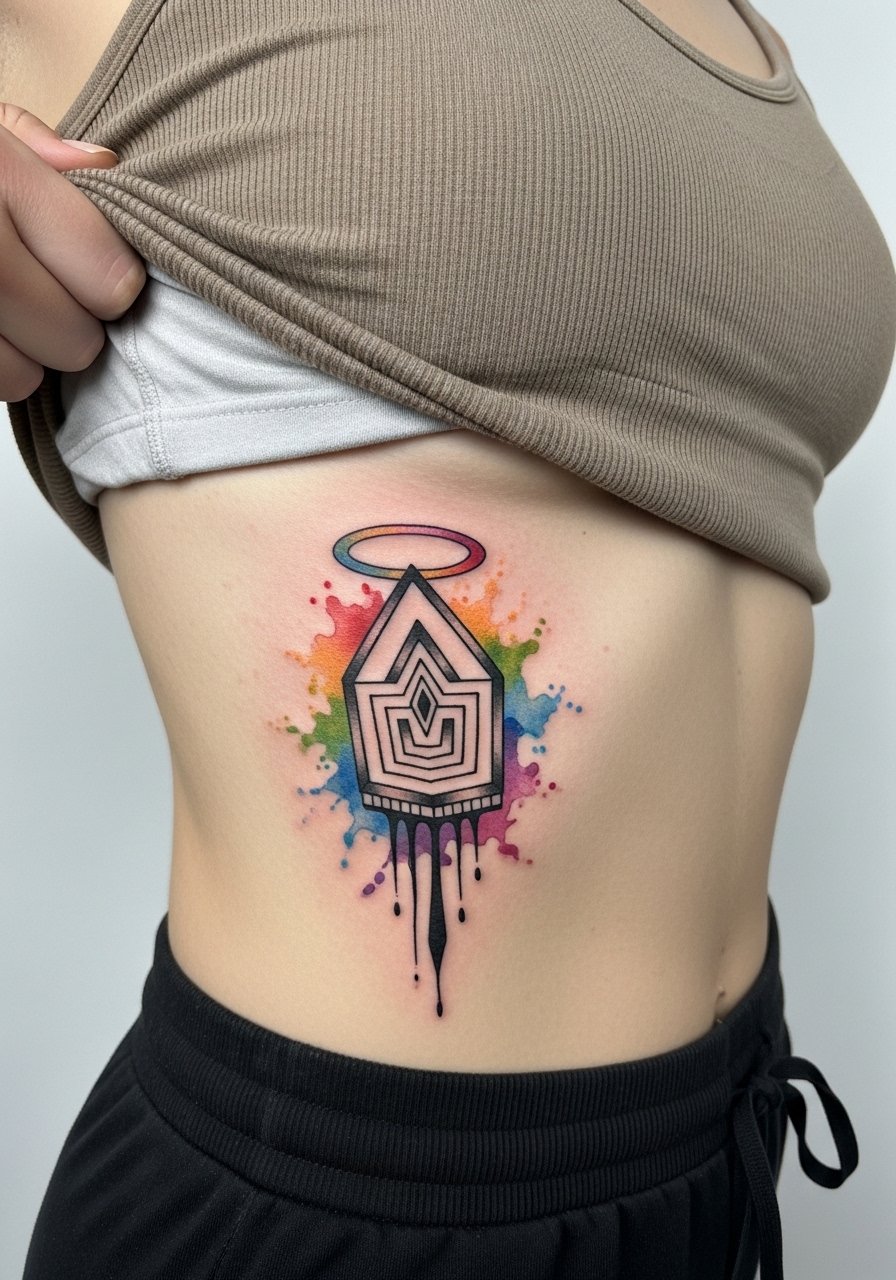
Watercolor ribs are visually stunning but they demand care and planning. The ribcage stretches and moves with breathing so ask your artist to anchor the piece with bold black outlines where the color sits. A common problem is relying on soft washes without anchors which fade unevenly. Expect longer sessions and a higher pain rating. There is an ongoing controversy about healing wraps versus dry healing for watercolor on ribs. One group favors moisture seals for humid climates to reduce infection risk. The other favors dry healing to avoid maceration. Ask the artist which method they use for rib work and why. For session wear, a loose sports bra you can shift is ideal. If you want the color to endure, plan on color refresh at year two to three.
11. Patchwork Blackwork Cherubim Cluster for a Sleeve Starter
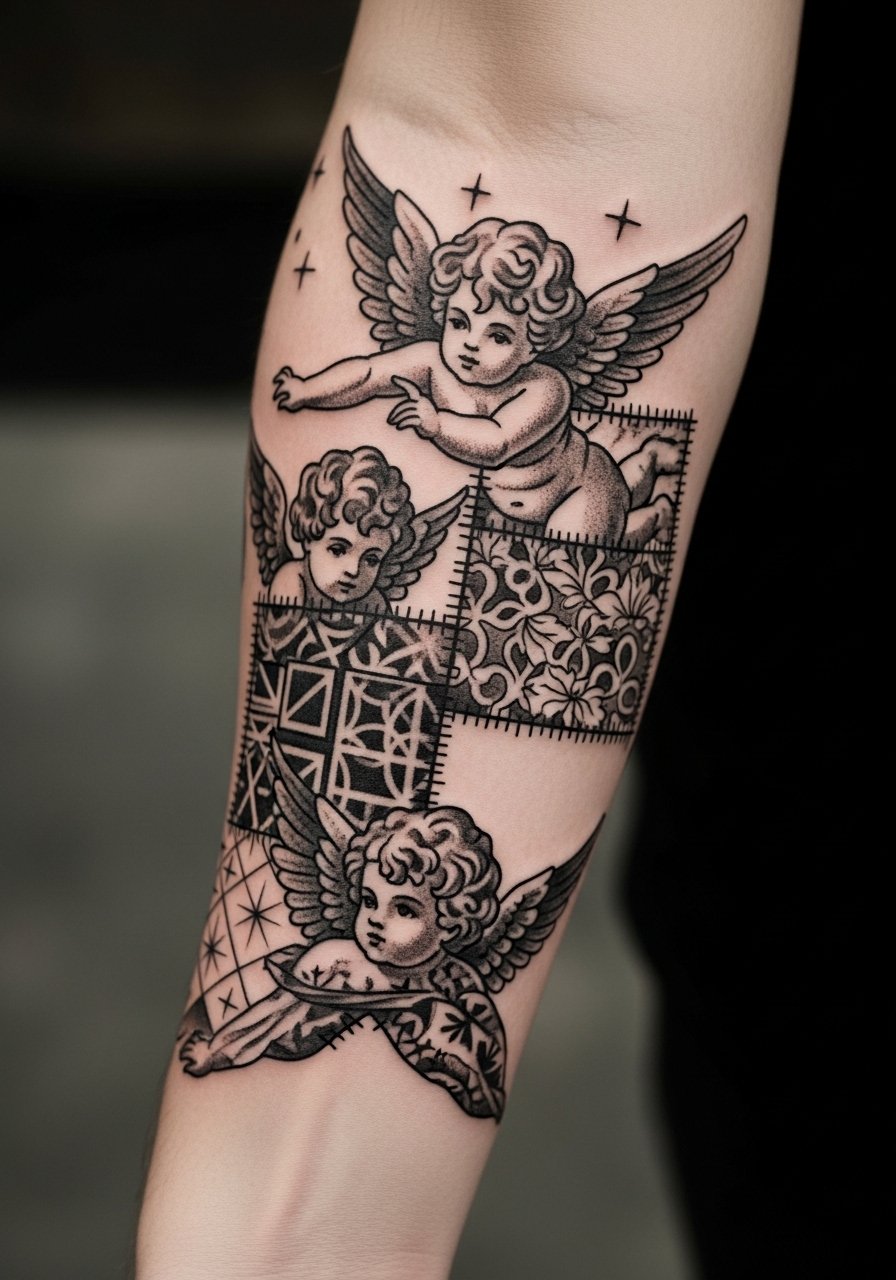
This modular approach is great for building a collected sleeve over time. The idea is to make each cherubim comparatively bold with negative space between pieces so future fills do not merge. Tell your artist you want clear margins for later additions. The common mistake is designing interlocking micro-details too close together which collapse into gray after a few sessions. Plan multiple sessions spaced months apart and tape mockups when combining old and new modules. For session wear use a sleeveless tank or fitted muscle tee that you can roll without rubbing the fresh work.
12. Minimalist Wheel Symbol with Eyes for the Finger
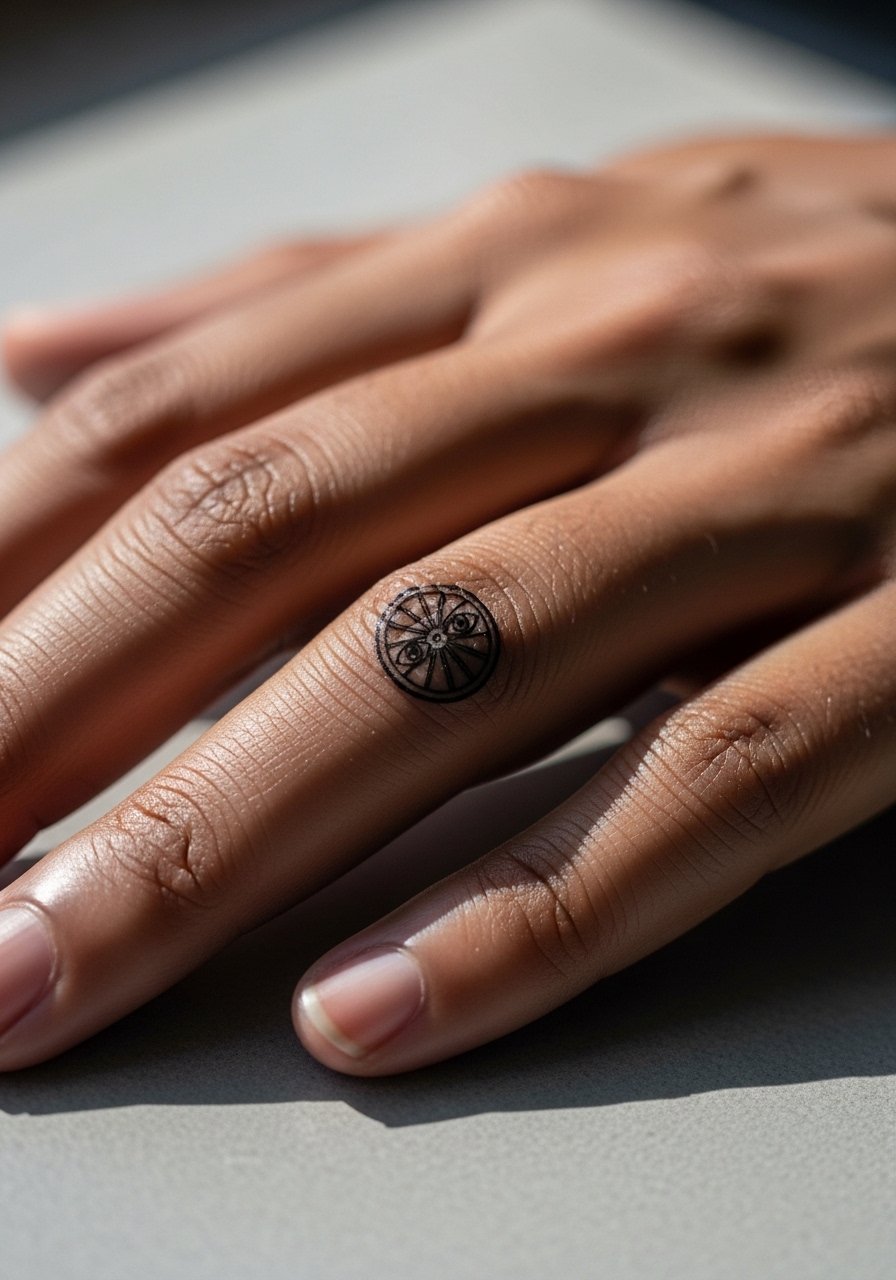
Finger placements are tempting for tiny icons but they face heavy abrasion. For a small wheel ask for thicker anchor lines and to avoid tiny internal dots that will wear away. The usual mistake is copying a palm-sized design into fingertip scale. Expect a very short session with potential fading within months. Many people plan a touch-up at six to eight weeks and another at year one. If you want it to last longer, a slightly larger scale placed on the side of the finger rather than the pad holds better. Keep in mind that hand washing and friction with rings are daily realities.
13. UV-Reactive Mini Ophanim for a Finger Accent

This under-covered idea uses UV-reactive ink to add a secret flash to small wheel designs. It is best used as an accent rather than the primary pigment because UV ink can be finicky under bright sun and may require touch-ups. Tell your artist you want blackwork for long-term contrast and a thin UV highlight tucked inside the eye motifs for special occasions. The mistake is relying on UV alone for visibility. Expect a short add-on session and plan periodic refreshes. For session wear, keep the hand accessible and avoid lotions that can block adhesion for the first week.
14. QR-Code Paired Ophanim Linking to Personal Scripture on the Upper Arm
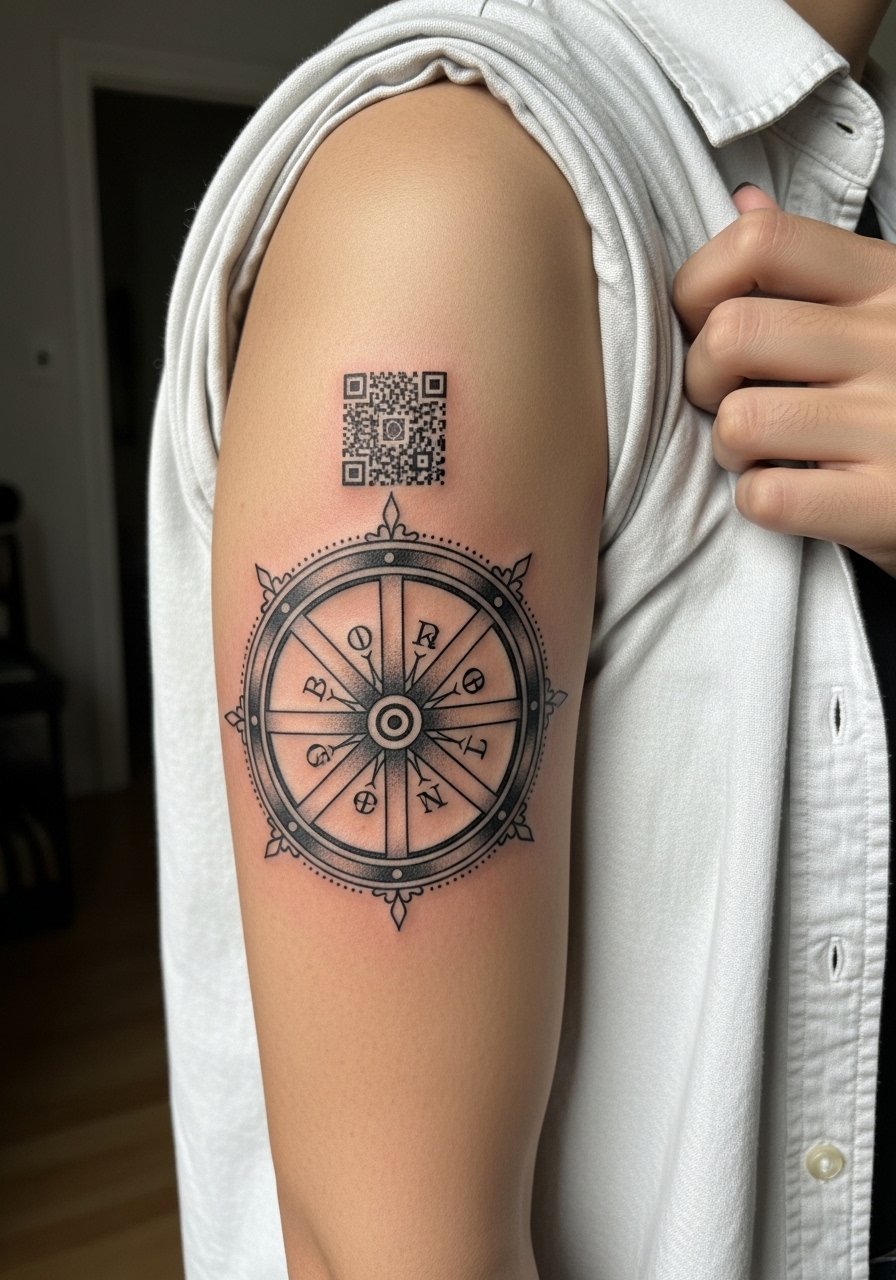
Pairing a wheel with a tiny QR code that links to a private audio message or scripture is a modern memorial option. The QR needs to be designed so scanners will read it even after some wear. Ask your artist to simplify the code into a vetted tattoo-ready graphic and to test a printed mockup on skin for several days. The mistake is trying to tattoo a dense, unmodified digital QR at skin scale without testing. This one is best on an upper arm panel where the scanner has flat skin to read. Expect a consultation to prepare the code, plus a single session for the final work.
15. Expansion-Safe Bold Lines for Pregnancy and Belly Stretching
If you plan pregnancy or significant body changes, choose compositions with radial symmetry and thick anchor lines that tolerate expansion. Designers who work with this constraint avoid long thin tendrils and instead center weight in the hub of the wheel. The common mistake is placing delicate filigree across a high-stretch zone. Ask for a plan that keeps the central motif intact and leaves decorative elements removable in later touch-ups. Session wear should be comfy athletic tops so you can adjust positioning. Expect the tattoo to stretch but remain readable if you prioritize thicker linework.
16. Ignorant-Style Calf Panel That Survives Beach Time
Calf panels in ignorant style are workhorse designs for people who want a rough, lived-in look that survives sun and sand. The technique uses raw outlines that do not rely on subtle shading, so they resist sun-fade better than watercolor. Ask for bold outer anchors and minimal interior washes. The typical mistake is asking for cream-to-black gradients in this style. Calf sessions are comfortable for most clients and often finish in one or two sittings. Pair with cropped joggers or sandals to show off the panel when healed.
17. Micro BAA Clusters for Patchwork Starters on the Inner Forearm
Micro clusters let you build a sleeve slowly while keeping each piece bold enough to age well. When placing multiple tiny motifs, plan consistent negative space between modules. The error is making each micro-icon too detailed for its size. Ask the artist for slightly larger anchor shapes and consistent scale across elements so the cluster reads as a unit at six months. Inner forearm sessions are pleasant with moderate pain and short durations. For showing off, roll a sleeve or wear a fitted tee with rolled cuffs.
18. Thick-Line Calf Wheel Wrapped Around the Muscle
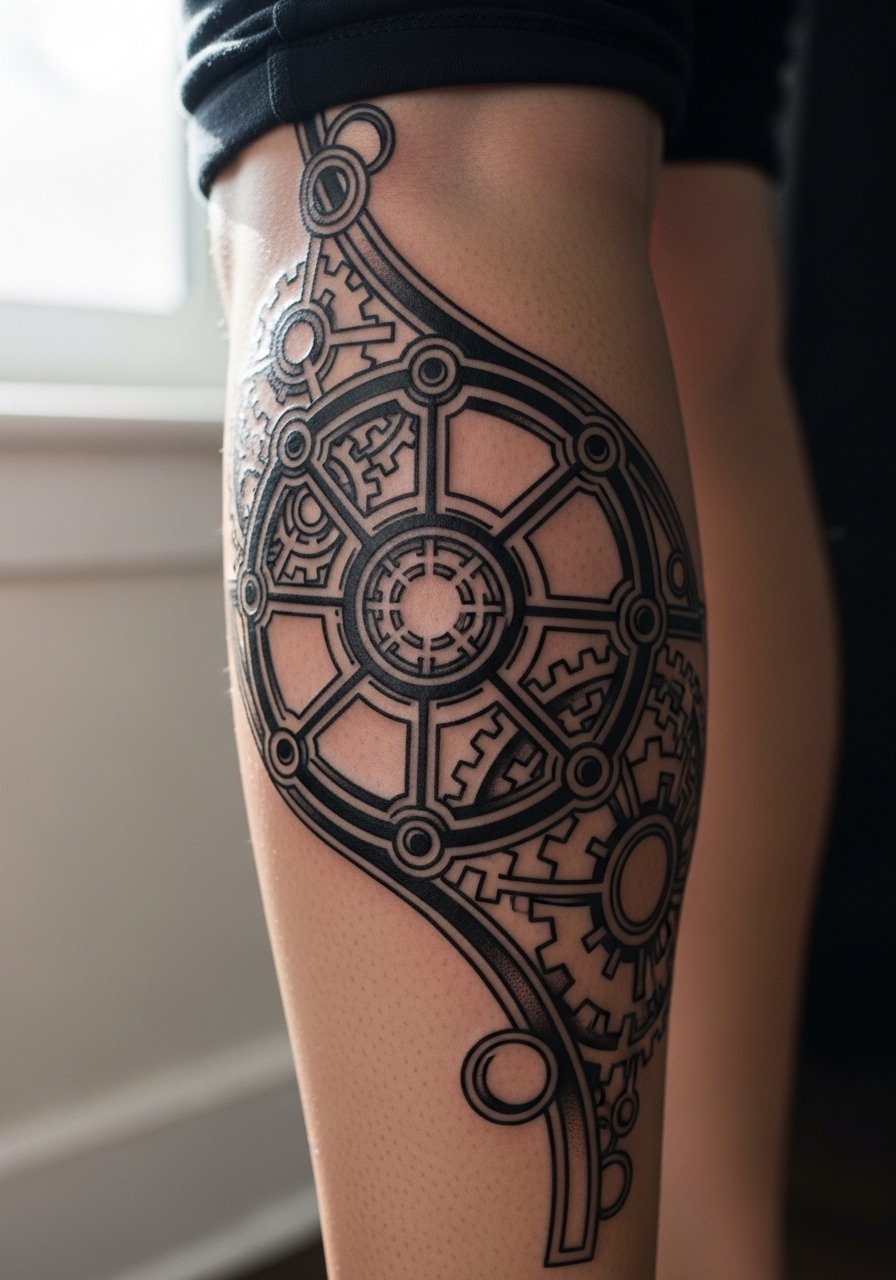
Wrapping a wheel around the calf plays with motion and catches eyes in shorts. Ask your artist to contour the spokes to the muscle curve and to prioritize bold outer lines so the shape reads after movement. A common mistake is forcing a flat, circular reference onto rounded anatomy without adapting line weight. Calf sessions tolerate longer fills and are forgiving for saturation. Expect one longer session for the contouring and a follow-up touch-up if any section needs filling. For session wear bring pull-up sweatpants or shorts so the artist can access the area without tight seams.
19. High-Contrast Ignorant Thigh Work for Darker Skin

This one directly addresses the common issue where shading looks muddy on darker skin tones. For clearer heals choose high-contrast blackwork and avoid heavy gray fades. Tell the artist you want solid black anchors and limited midtone gradients. The main mistake is leaning on soft shading instead of contrast. Thigh pieces sit nicely under shorts and handle sun better than exposed chest work. For session wear pick loose shorts so you can move without seams pressing the fresh tattoo. Expect two sessions for a large panel and a touch-up at six weeks to lock edges.
20. Large Backpiece Ezekiel Wheel with Flame Accents

This is the go-big option if you want a dramatic statement across the back. Large compositions allow for deliberate spacing that prevents merging as the years pass. Ask for bold anchor outlines and leave negative space between dense areas. A common mistake is crowding too many eye motifs without separation. Expect multiple long sessions and a clear roadmap from the artist on coverage and touch-ups. For the session wear bring a front-open robe or a shirt you can remove to give the artist full dorsal access. For showing off, backless halter tops or racerbacks frame the piece cleanly.
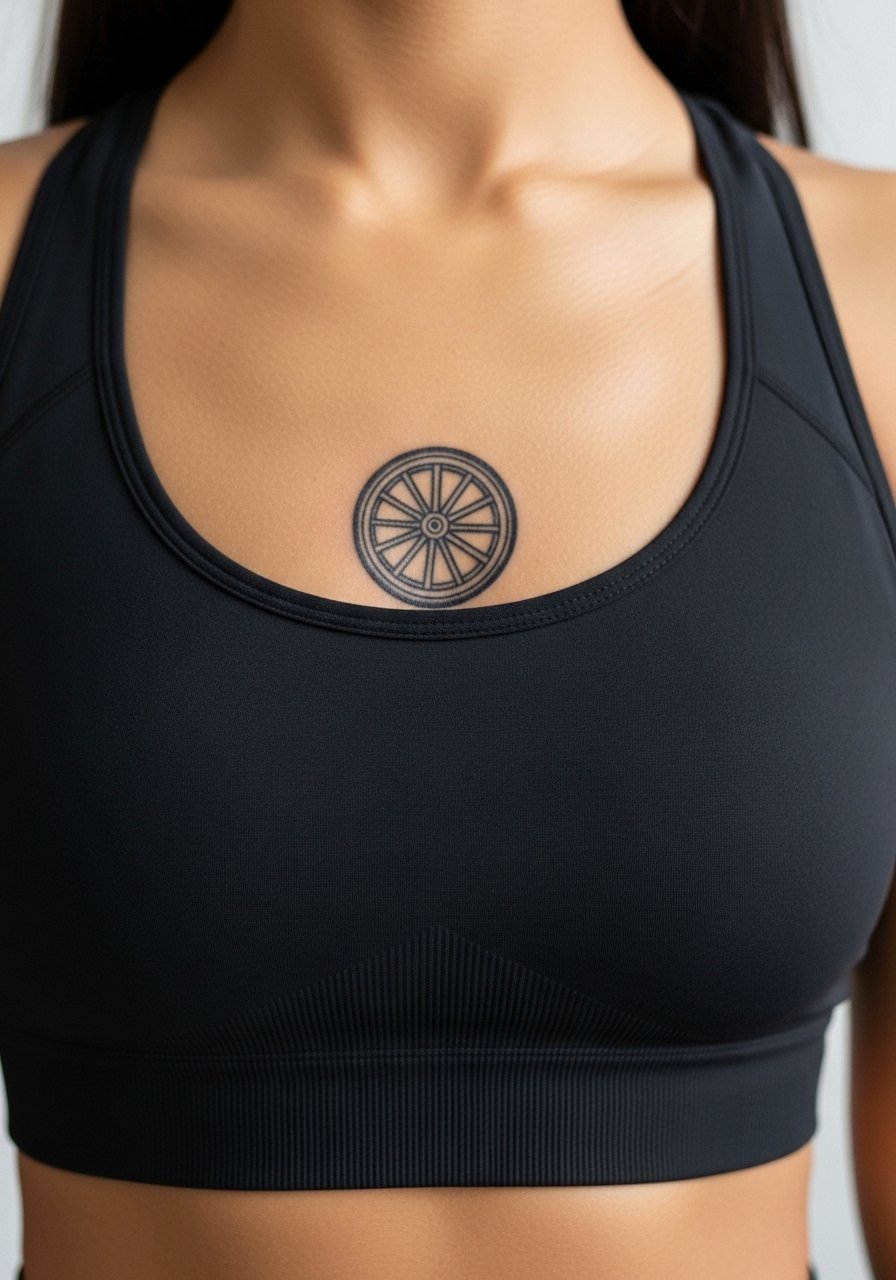
21. Tiny Sternum Wheel as an Alternative to Behind-the-Ear

If you want a subtle spot with less public exposure than a hand or face area, a tiny sternum-adjacent wheel can be intimate and symmetrical. The sternum area feels sharp during the session so expect higher pain for a small piece. Ask the artist to use slightly thicker anchor lines and to keep filigree minimal. The usual mistake is requesting hairline script or tiny internal dots right on the bone. Session wear should be a fitted sports bra that the artist can shift. If you plan future expansion, leave room above or below the motif for complementary modules.
Frequently Asked Questions
Q: Will a blackwork ophanim wheel fade fast on darker skin tones?
A: From what I have seen, solid blackwork with strong anchor outlines holds better than soft shading on darker tones. Ask for heavier contrast and avoid extensive gray gradients. A six-week touch-up is common to lock edges and plan for yearly checks if you spend lots of time in direct sun.
Q: Do watercolor ribcage pieces need different healing than traditional blackwork?
A: Yes, watercolor areas often need less occlusive ointment and more gentle moisture control to avoid maceration. There is a split between people who prefer moisture seals in humid climates and those who swear by dry healing. Ask your artist which method they use for ribs and follow their rationale.
Q: How do I prevent a small wrist or finger wheel from blurring into a smudge?
A: Make the primary strokes slightly thicker than the reference and keep internal details minimal. The wrist and finger see a lot of friction. Tape a mockup, and plan for frequent short touch-ups rather than expecting a micro-design to last untouched for many years. Wearing thin jewelry on the opposite wrist can frame rather than rub the fresh work.
Q: Is it smart to put a QR code beside a wheel if I want long-term readability?
A: It can work but only with a tested, tattoo-ready QR graphic scaled for flat skin. Upper arm or forearm panels scan best because they offer a flat read surface. Confirm the printed test on skin for several days before committing and ask your artist to simplify the code for tattoo translation.
Q: What should I wear to a shoulder or back session to make the artist's life and the healing easier?
A: Choose a loose tank or a button-down you can pull aside. For back work a racerback or a front-open robe is ideal so you can position yourself comfortably without rubbing seams against fresh ink. Comfortable, breathable fabrics make longer sessions more tolerable.
Q: If I plan pregnancy or major weight change, which placements and line choices age best?
A: Centered, radial designs with thicker anchor lines tolerate expansion better than elongated filigree. Collarbone, upper arm, and calf placements typically cope better with body changes than ribcage or inner thigh. Design with planned negative space so the main motif keeps its shape as the skin shifts.
