
Fine line horse tattoos are everywhere on saved boards, and the trend has a bright, fragile look that makes people book appointments fast. The trade-off is real. Tiny silhouettes and single-needle details need careful placement and touch-up planning or they can soften into an unrecognizable smudge in a couple of years. Read on for wear-tested ideas and what to say at your consultation to make each design age better.
1. Realistic Galloping Horse on the Inner Forearm
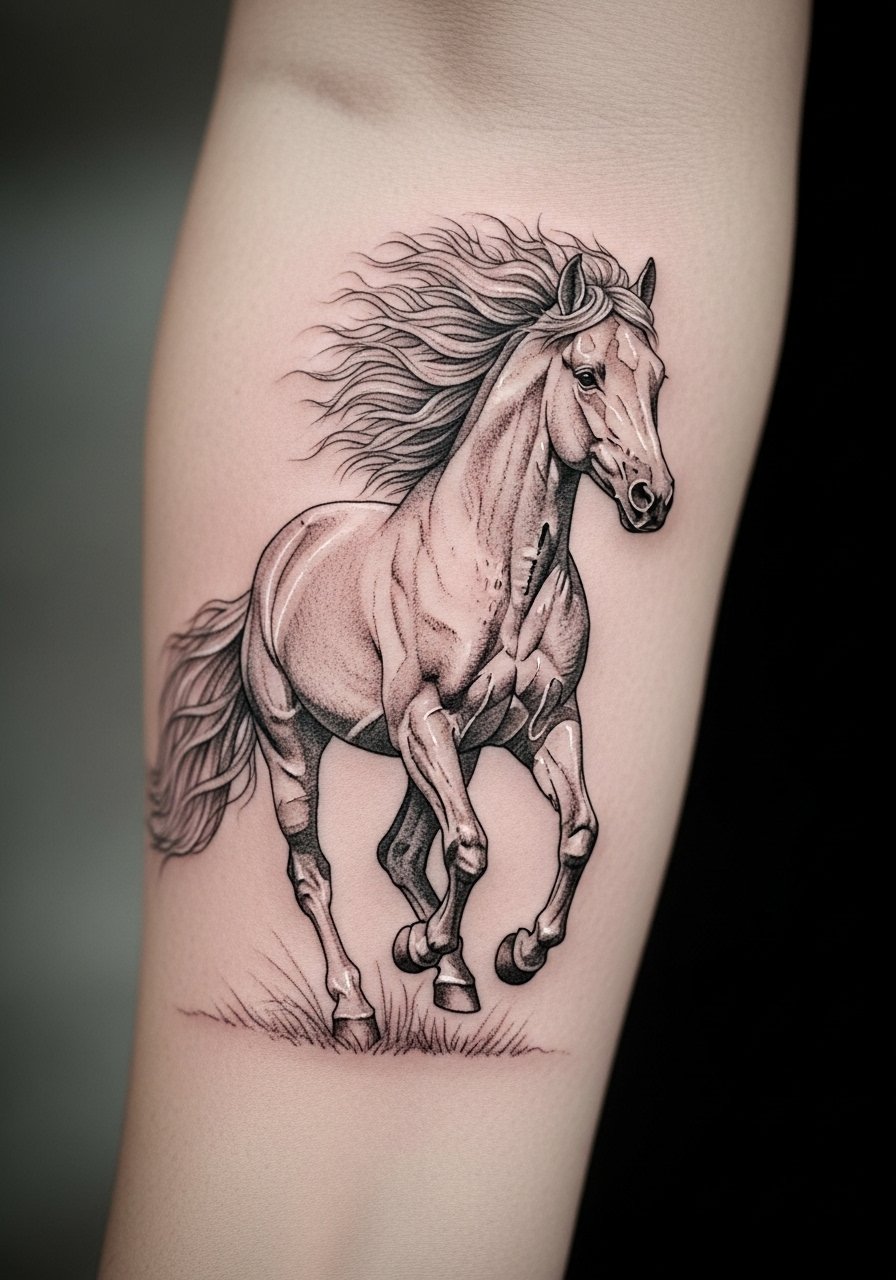
I see this one in portfolios a lot because forearm movement shows motion. Expect a two-session build for the mane and muscle shading and a moderate pain level. Tell your artist you want slightly heavier linework in the lower contrast areas so the mane keeps definition at year two. The common mistake is asking for micro hairlines throughout the body, which blur on the forearm after weight changes and sun exposure. Plan for a touch-up at year three if you wear shirts that rub the area often. For the appointment wear a sleeveless muscle tank so the artist has clean access without fabric bunching.
2. Neo-Traditional Gallop on the Shoulder
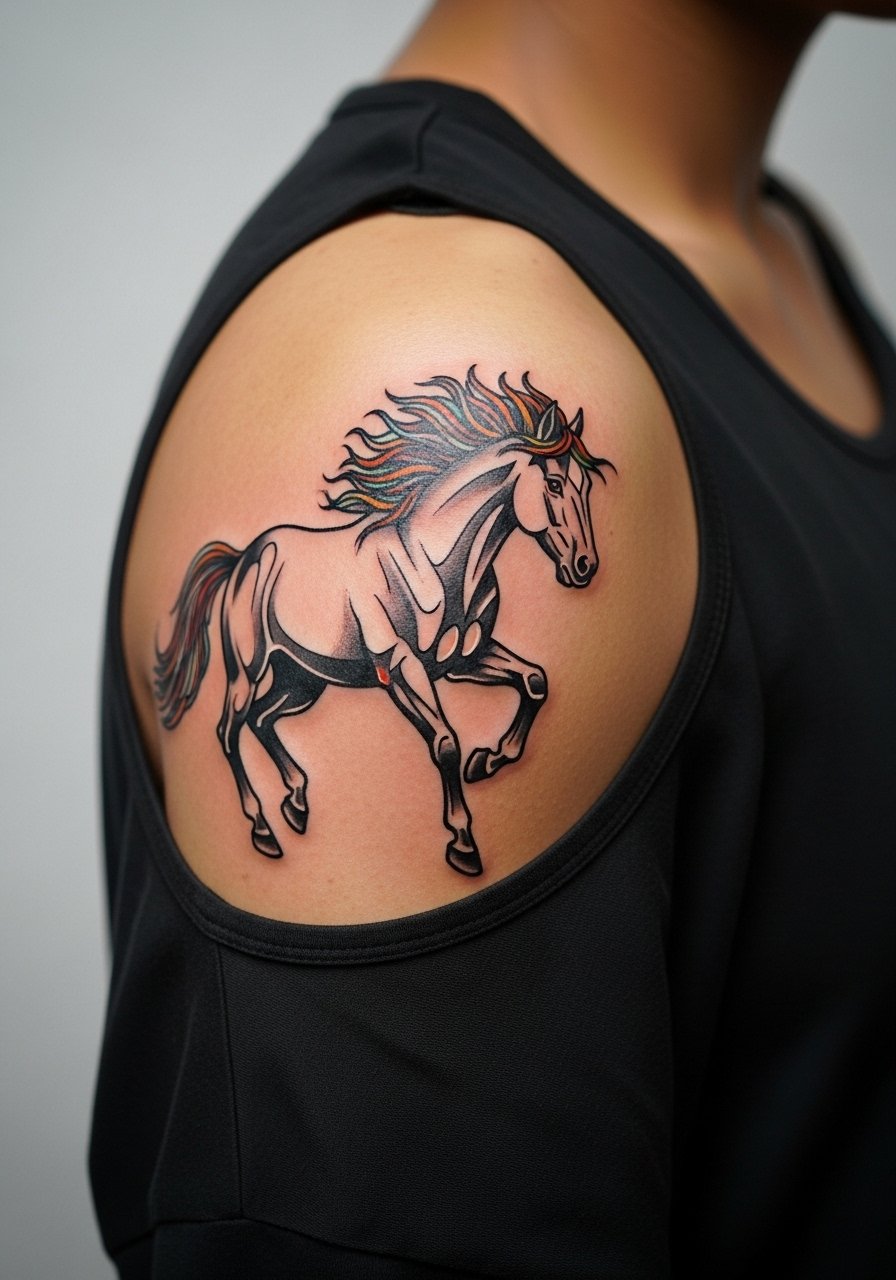
There's a showroom feel to neo-trad color saturation on the shoulder because the canvas is generous and the skin flexes less. Pain is friendly and sessions run two to three hours for layering color and clean outlines. Ask for 3-4 millimeter outline thickness to preserve contrast on darker tones. The debate about color saturation versus black and gray pops up here, with people noting color ages slightly faster in sun-exposed zones. Bring reference shots that show movement angles so the artist can map muscle flow. For showing it off pair the tattoo with an off shoulder crop top that frames the cap without covering the linework.
3. Fine Line Silhouette Against a Tiny Horizon, Wrist
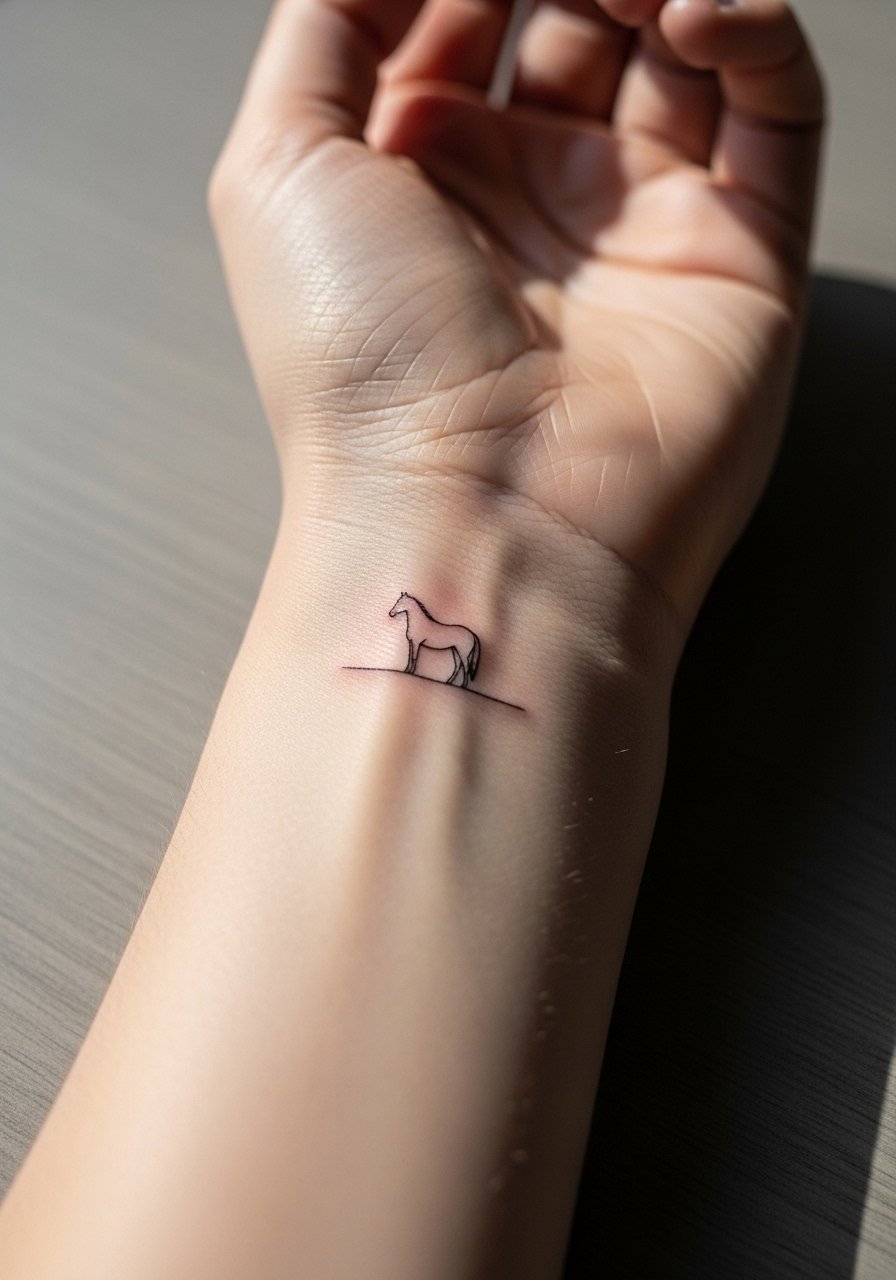
Fine line silhouettes read delicate on wrists and are a common choice for first-timers, but they carry a higher fade risk. Expect a short session under an hour and mild discomfort. One common mistake is placing dense horizon detail too close to the silhouette, which creates visual merging after six months. Ask your artist to leave breathing space around the silhouette and to opt for slightly deeper needle depth near the outer contour to cut down on early fading. Daily hand washing and jewelry friction will determine if you need a small touch-up at year two. For outfits that highlight the wrist, try a thin silver bangle set on the opposite wrist so the tattoo remains the focal point.
4. Dotwork Horse with Geometric Mane on the Calf

Calf pieces suit dotwork because the leg gives room for stippling and pattern. The sessions will be longer, usually split into two or three blocks, and the pain is tolerable for most. A frequent error is compressing dots too tightly, which makes the geometric mane blur into a flat tone after heavy summer sweating. Tell the artist you want dot spacing that reads at arm's length and ask about touch-up timing for dense black sections. On warm days show off the calf with cuffed slim jeans or a midi wrap skirt to keep the stipple visible without rubbing.
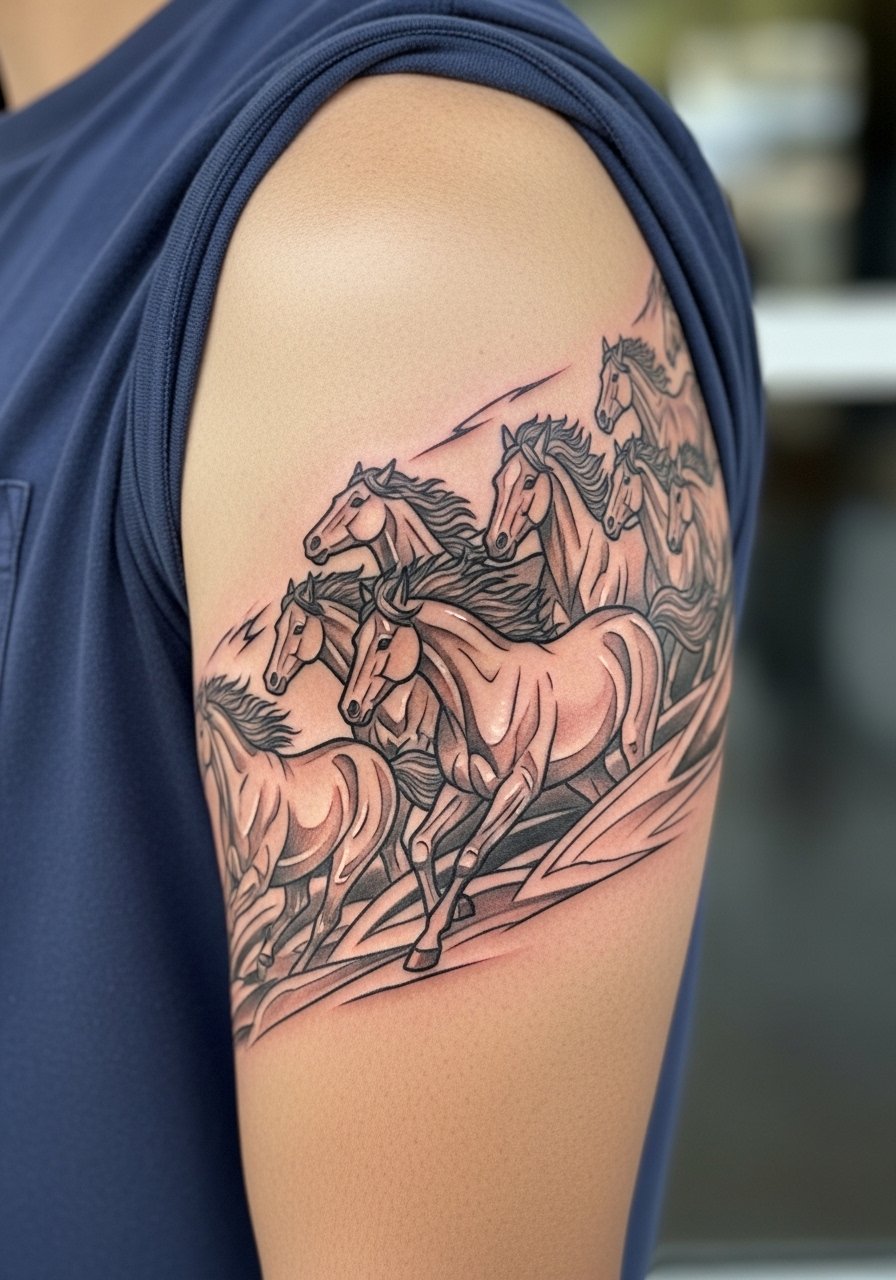
5. Blackwork Tribal Stampede Across the Upper Arm
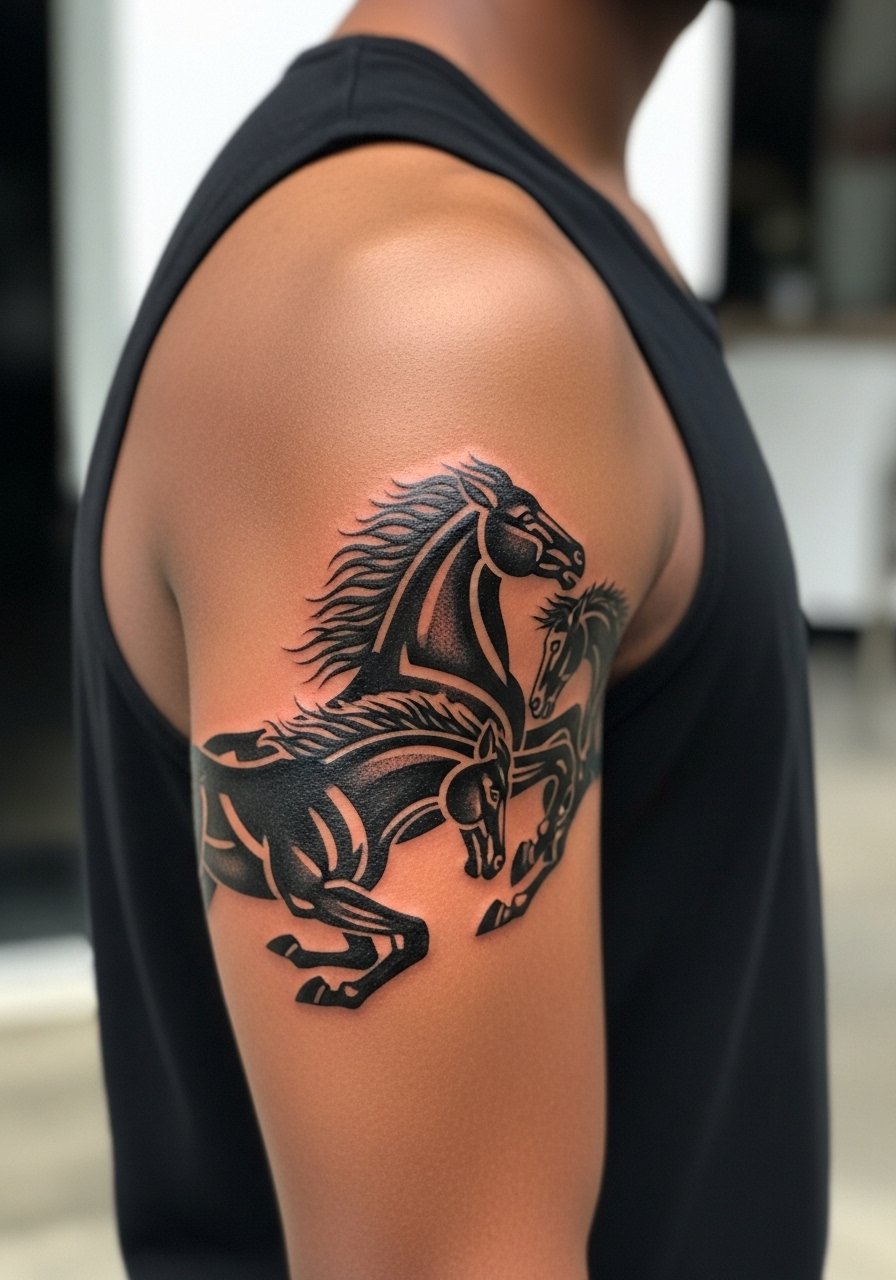
Bold blackwork holds up exceptionally well on high-movement areas like the upper arm. Expect 2-4 sessions depending on scale and a medium pain score. The common mistake is tiny negative shapes within large fills; these can collapse with time. During consultation say you want large, readable negative spaces and crisp edges so the stampede reads at a distance. Because this is solid black, touch-ups are less frequent but heavy fills can feel intensive during sessions. Pair the finished piece with a loose button-down tank when you want to show shoulder and arm silhouette without competing jewelry.
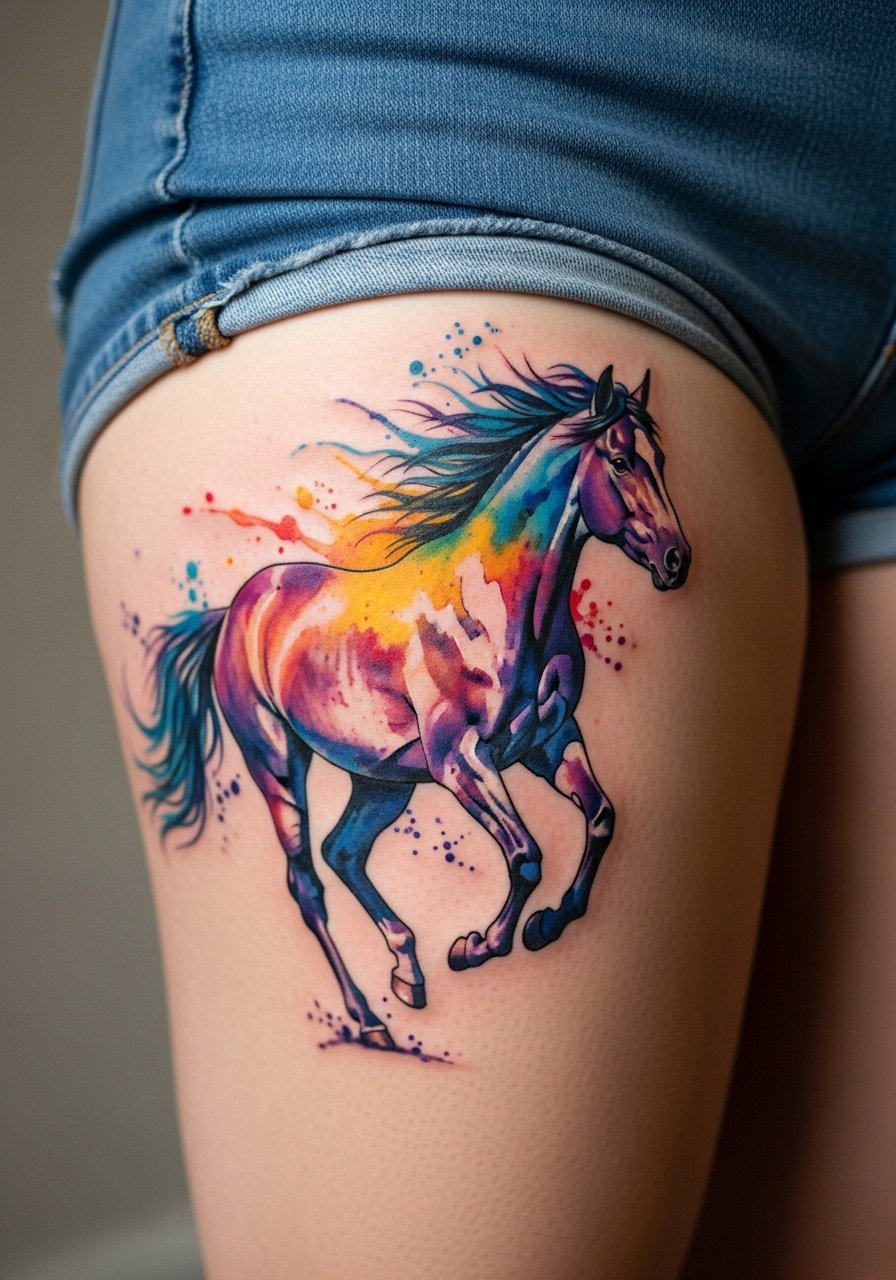
6. Watercolor Horse Splashing Through Waves on the Thigh
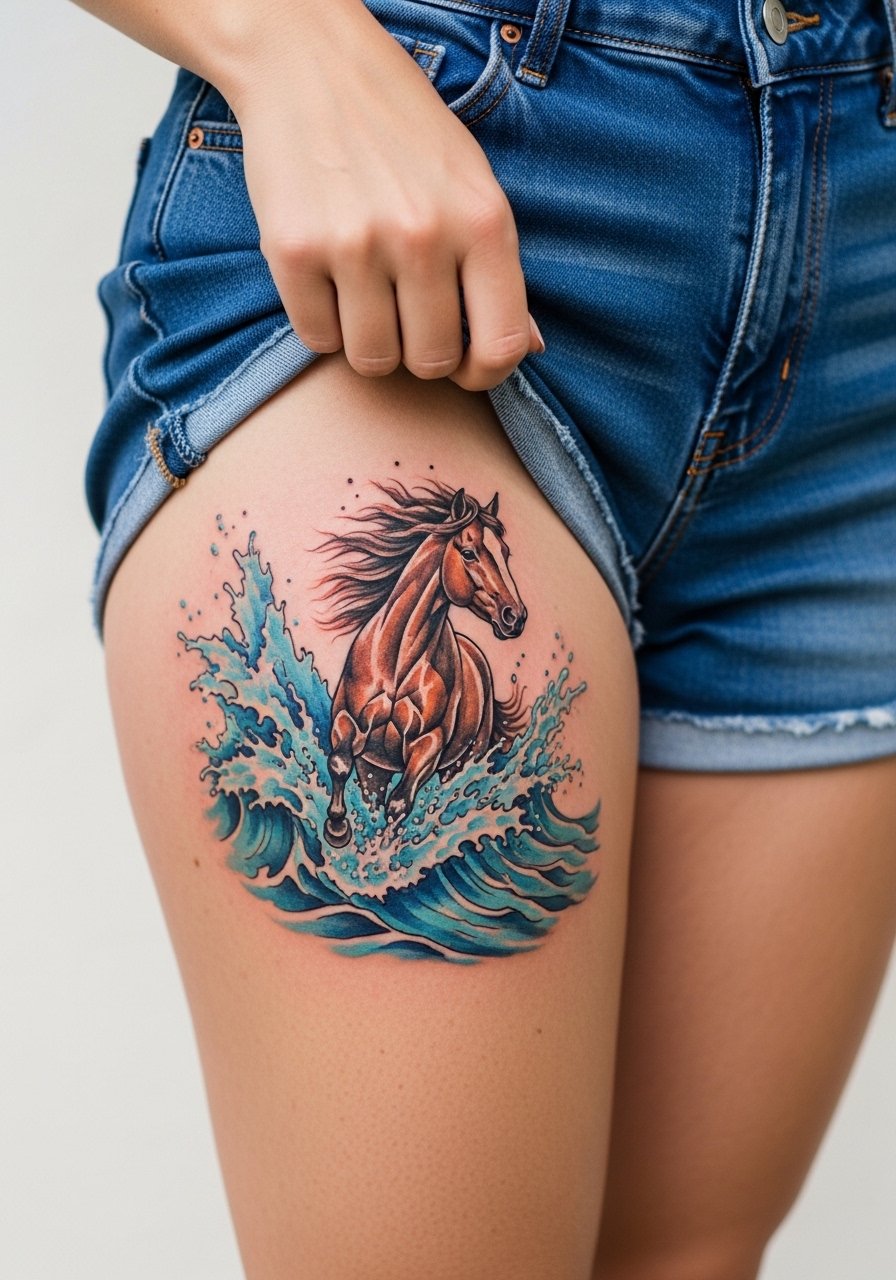
Watercolor on the thigh looks dreamy but requires planning because color saturation can shift through weight changes and pregnancy. Pain here ranges low to moderate and sessions run two hours for saturation layers. The biggest mistake is asking for feathered watercolor across scarred or very elastic areas without planning for touch-ups. Ask the artist to anchor the composition with subtle black outlines under the color where you want longevity. If you gain or lose weight the panel will move, so expect possible rework in future. For summer styling use high waist denim shorts so the piece reads as a designed patch rather than a hidden work.
Studio Day Picks
The forearm, wrist and thigh pieces above heal differently from upper arm and calf sessions, so a few targeted items smooth the prep and first week.
-
Indie Sheep Rescue Balm. A thinner texture than heavy petroleum helps outer thigh color breathe during the first week without feeling greasy.
-
Ink-Ice Cooling Spray. Useful for reducing forearm swelling right after long micro-realism sessions without the sting some gels cause.
-
Australian Tea Tree Aftercare Salve. Breathable salves can be better than heavy ointments for calf dotwork that needs to avoid pore-clogging while healing.
-
Japanese Rice Bran Oil Moisturizer. Absorbs quickly for fine line wrist work, helpful in winter when dry skin steals needle definition.
-
Aquaphor Healing Ointment. A thin layer in the first couple of days locks in moisture for small detailed work that relies on crisp needle channels.
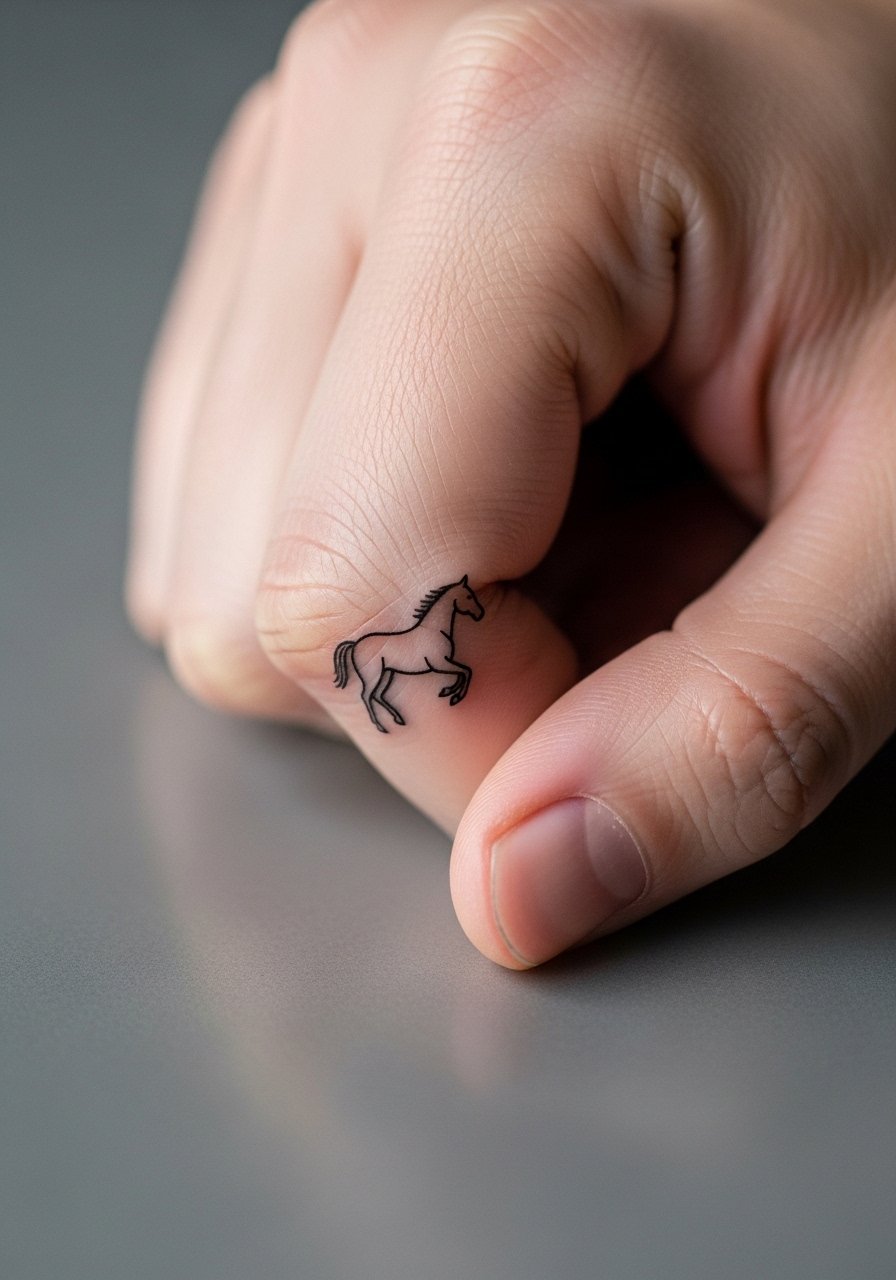
7. Minimalist Single-Line Horse Head, Inner Wrist

This tiny single-line head is a good first tattoo if you want something subtle and hideable. Session time is short and pain is low to mild. The mistake is asking for needle-thin continuity without asking for slightly reinforced break points; uninterrupted hairlines can fade faster on hands. Tell your artist to deepen the primary contour slightly and keep peripheral strokes minimal. Expect a touch-up around year two if you wash hands often. For the appointment wear a short sleeve tee you can roll up easily and remove any wrist jewelry before sitting.
8. Ornamental Horse with Patterned Borders on the Back
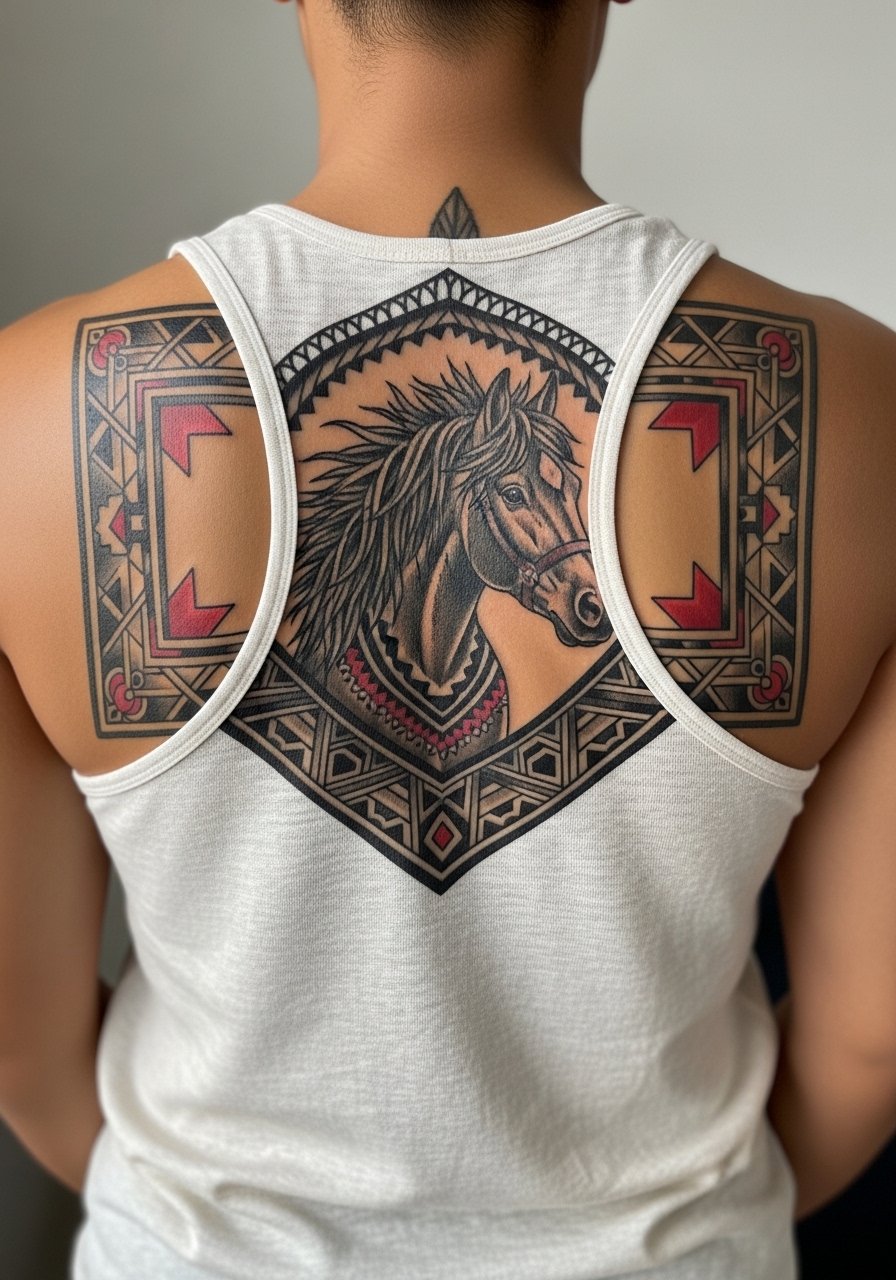
Large back placements let ornate framing breathe and reduce stretch distortion. This is high-commitment work that runs multiple sessions and involves mild to moderate pain. For respectful use of indigenous patterns, ask how the motifs are being adapted and suggest variations instead of direct replication. One common error is compressing too much cultural detail into a single panel, which makes elements lose their meaning. Because the back moves less, this style often needs fewer touch-ups than extremity pieces. Show it off with a racerback linen tank that reveals the pattern without constant sun exposure.
9. Ignorant-Style Rough Stallion on the Ribcage
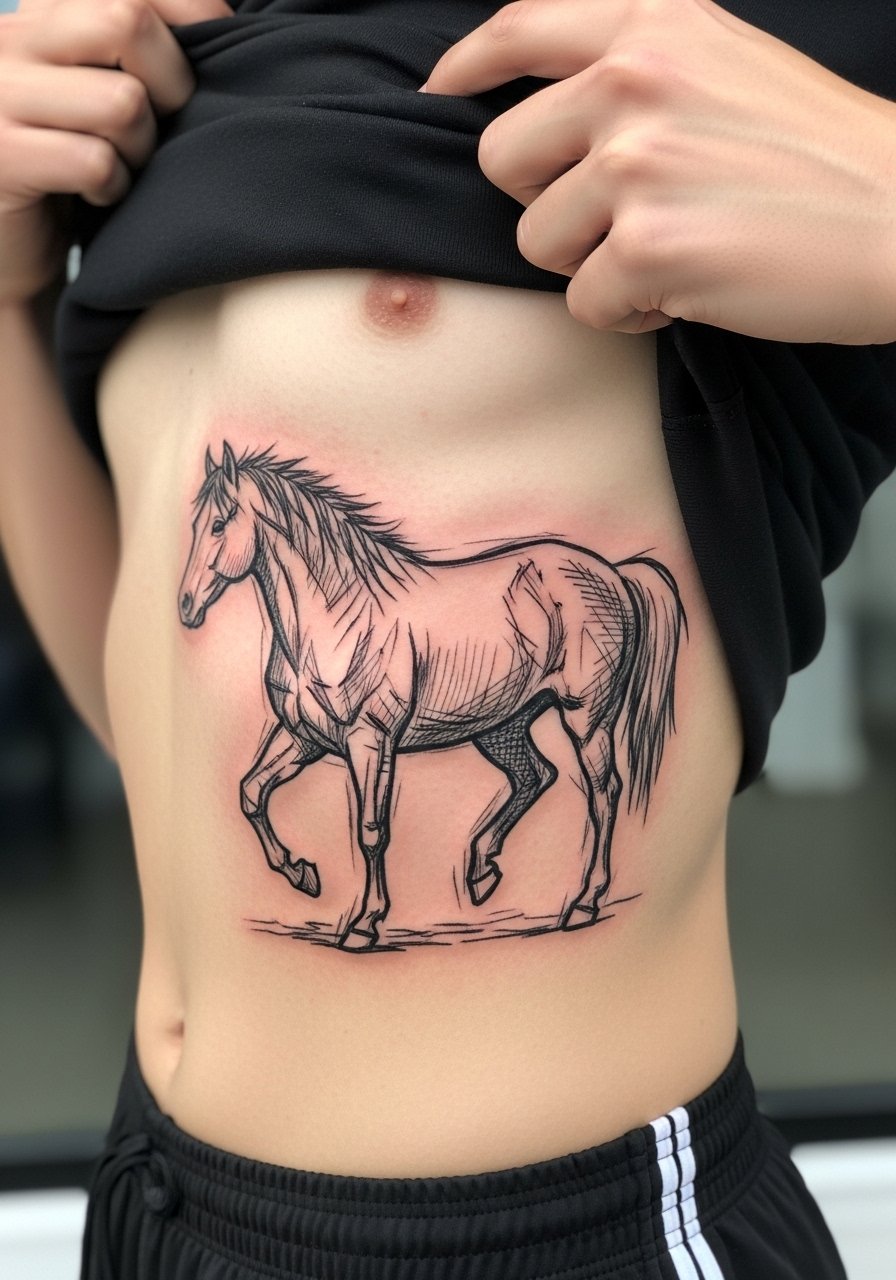
Fair warning, ribs are a high-pain zone, usually a 7 or 8 on common charts, and ignorant style leans into imperfect strokes that read raw. Sessions can be split to manage pain. The mistake is wanting perfectly placed sketch strokes as if they were printed; the aesthetic works because of intentional inconsistency. Because ribs stretch with breathing and weight shifts, ask how the artist plans for muscle expansion so the sketch feels cohesive after healing. Many artists recommend spacing larger irregular strokes so the lines do not merge. If you have career concerns about visible ribs when revealing clothing is worn, discuss placement visibility ahead of booking.
10. Traditional American Roundup Scene on the Outer Forearm
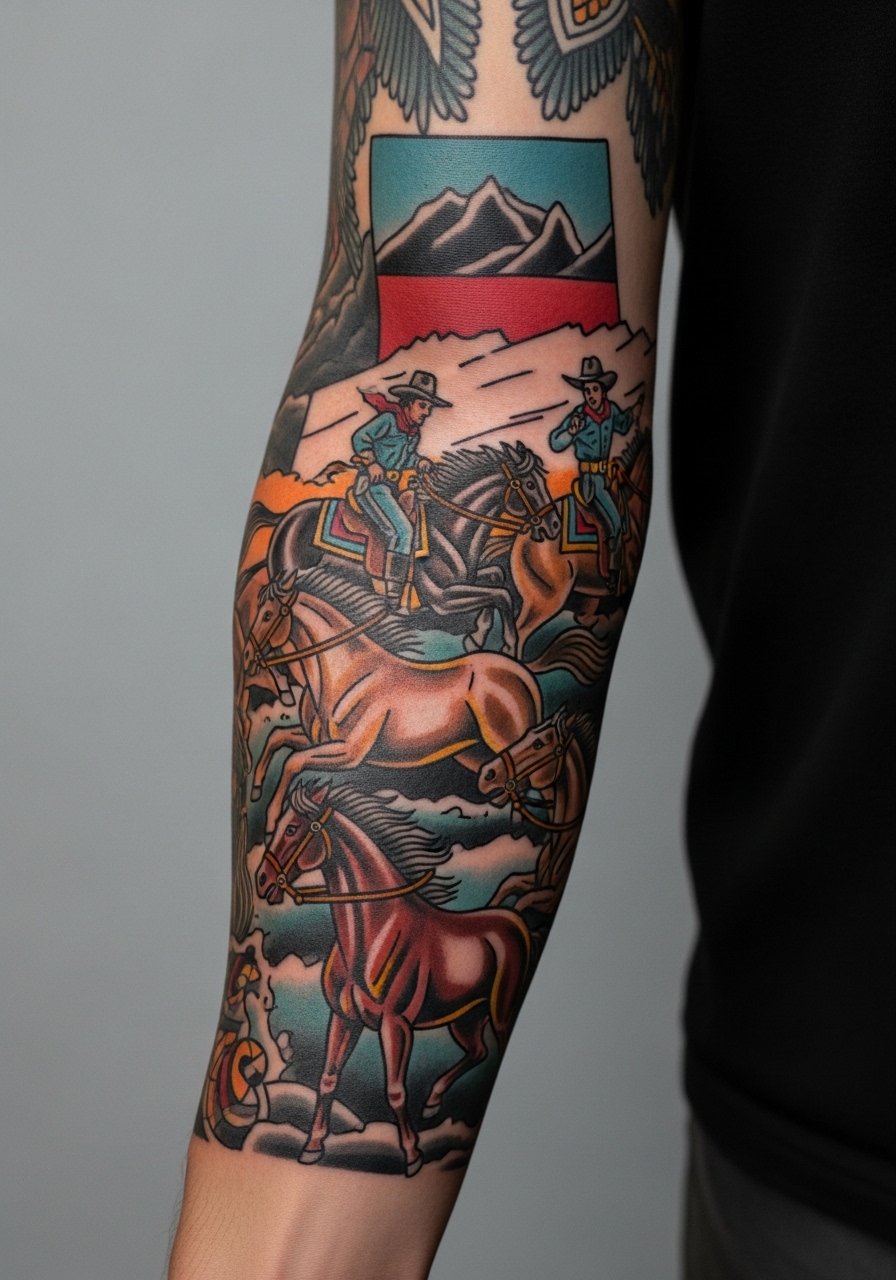
Traditional scenes age predictably because strong outlines and saturated fills resist fade in high-contact zones. Expect three short sessions and a medium pain level. A common error is overloading a small forearm panel with tiny narrative elements; keep story beats large and readable for longevity. Ask your artist to prioritize outline thickness in primary figures and to keep secondary details simplified. Because forearms see sun and friction, plan a maintenance check at year three. For a casual reveal, roll up a chambray shirt sleeve so the scene reads cleanly without covering the narrative.
11. Topographic Contour Horse for Hikers, Calf Panel

This topographic idea marries adventure symbolism with clean line work and suits the calf because hikers and runners like the movement. Expect a medium session length and tolerable pain. The unusual pitfall is compressing contour lines too tightly, which turns them into a gray wash after sweat-heavy seasons. Tell your artist you want clear contour intervals with breathing space and to avoid overly thin interior cross-lines. If you hike often, mention friction from gaiters so the artist can advise on placement higher on the calf. Pair this with breathable trail shorts on reveal and for session ease pull on loose joggers you can roll up.
12. Knuckle-Focused Tiny Horse Glyph with UV Ink
Knuckle and finger work is high-maintenance because of constant washing and abrasion. Pain is sharp but brief and sessions are usually under an hour. A common mistake is expecting fine internal detail to survive the first year. For knuckles, ask for simplified glyph shapes and consider UV accents as an optional visual layer rather than a primary element. Discuss career visibility because hand tattoos remain sensitive in some professional settings. For sessions wear no rings and keep hands clean, and plan to retouch at year one if daily duties involve heavy hand use.
13. Constellation Overlay with a Night-Sky Horse, Shoulder Blade
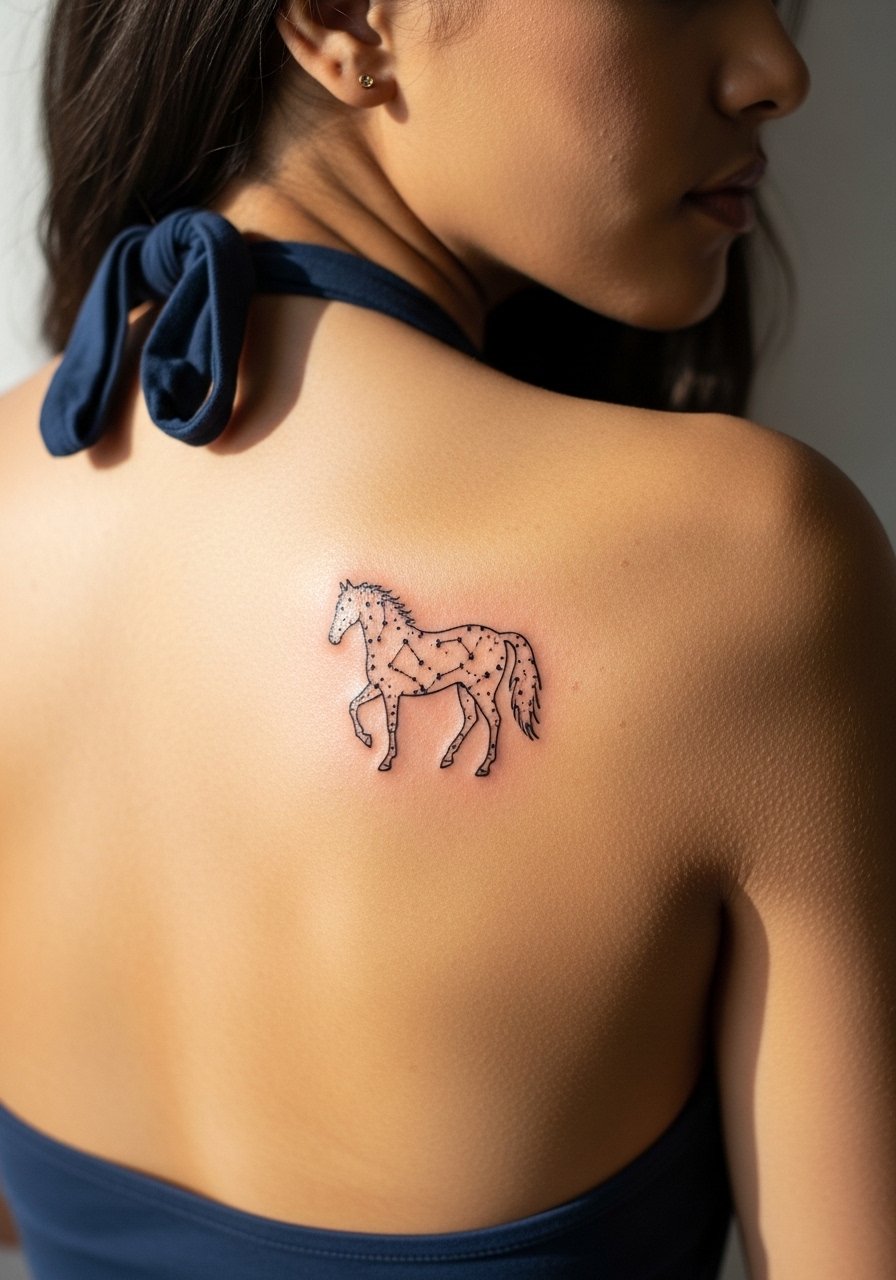
Layering constellations over a horse creates a subtle night-sky theme that reads best on the shoulder blade since the skin there flexes less. Sessions run 1.5 to 2 hours with mild pain. The mistake people make is packing dotwork constellations too close to the main figure, which confuses the eye after one year. Ask the artist to map star spacing before inking and to reserve negative space around the silhouette. Because shoulder blades can be shown off with summer tops, try a backless halter top that frames the overlay without rubbing against straps.
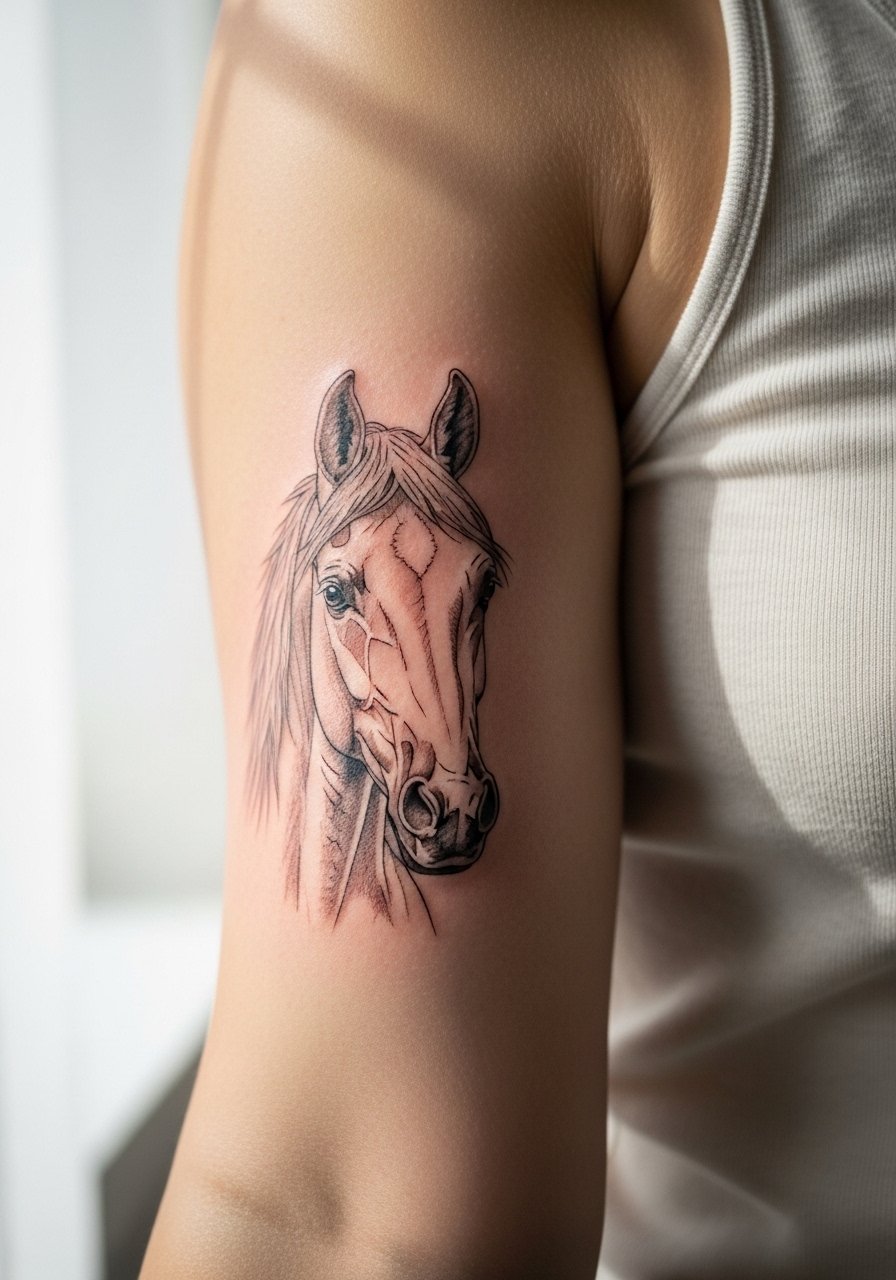
14. Micro-Realism Profile with Mini Landscape, Bicep
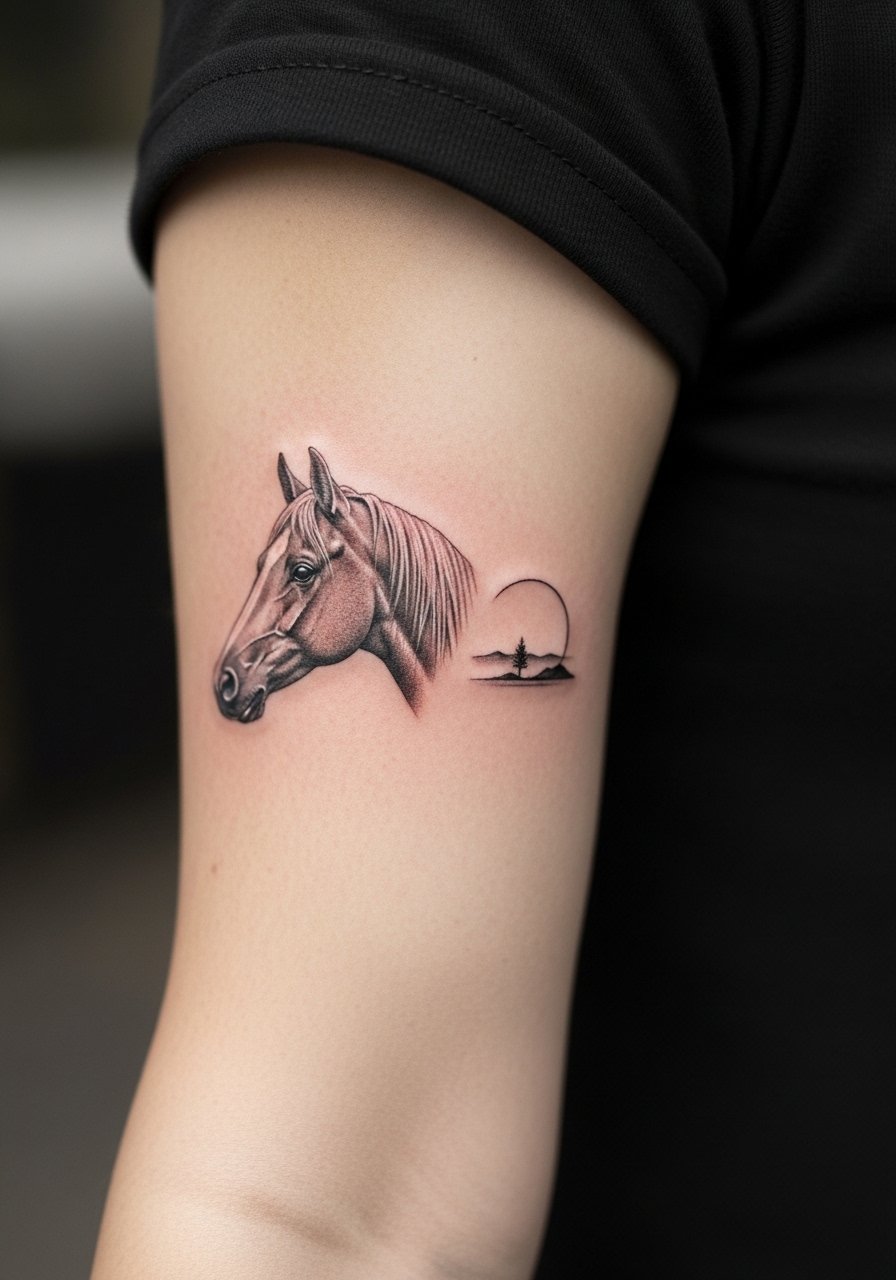
Micro-realism on the bicep delivers delicate tonal shifts while avoiding the extreme friction zones of wrists and ankles. Sessions need steady handwork and run longer to capture subtle shading. The common error is relying solely on single-needle hair strokes across the face. Instead, ask for a mix of tiny shading and subtle contour lines so the nose and eye retain definition. Biceps handle touch-ups well because the area sees less direct outfit rubbing. For the session, wear a loose button-down shirt you can pull aside so the artist has clear access.
15. Stipple-Styled Lone Mare on the Ankle
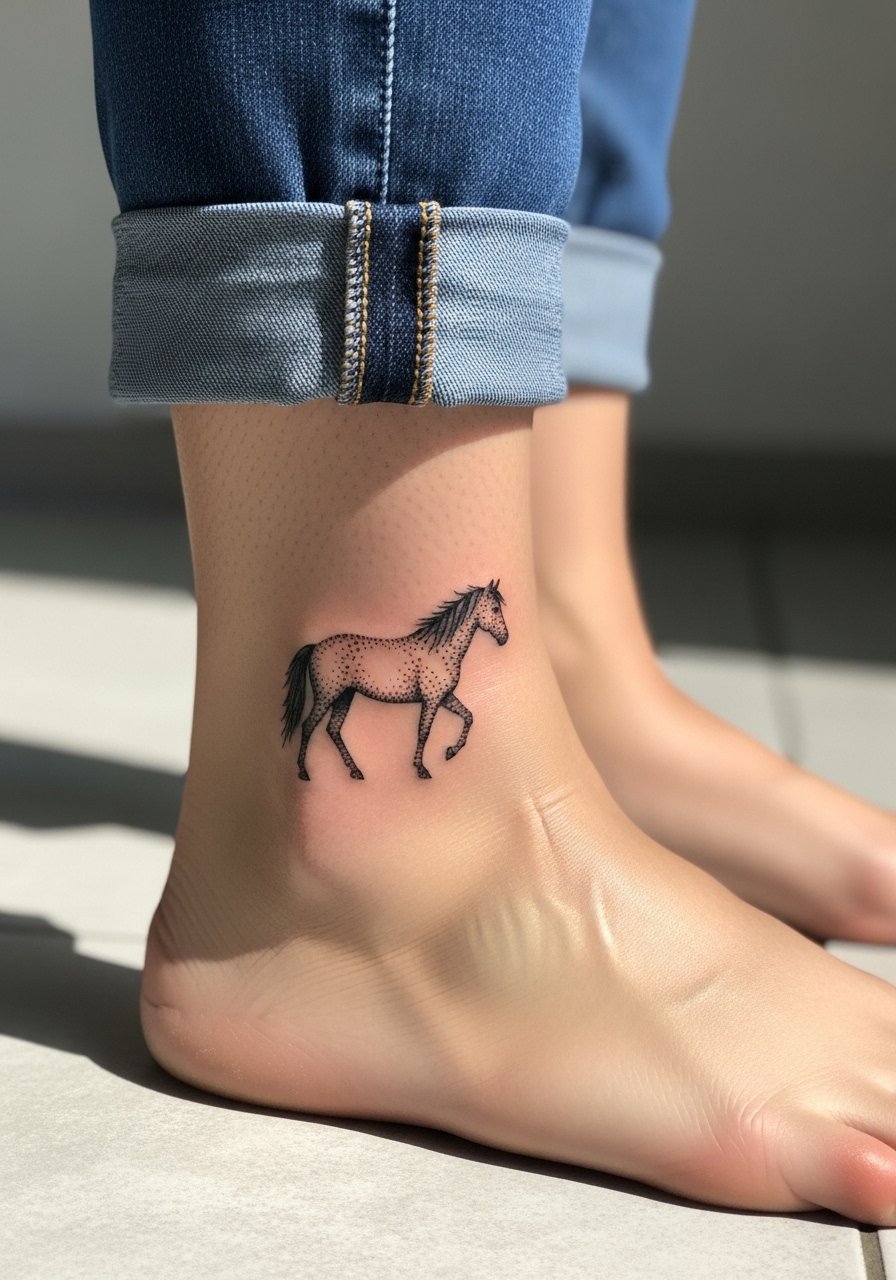
Ankle tattoos face heavy shoe and sock friction, which accelerates fading. Expect a short session and a higher chance of touch-ups due to daily abrasion. The mistake is cramming too many stipple gradients into a very small ankle panel. Ask for stronger outer contour dots and conservative interior gradation so the silhouette reads from a short distance. Plan for a small touch-up at year two if you wear boots daily. Showing off with rolled jeans or sandals highlights the mare while minimizing constant rubbing.
16. Thigh Panel That Ages Through Stretch and Pregnancy
Outer thigh is forgiving for large watercolor pieces because it expands and contracts less visibly than the lower abdomen. Sessions are longer and you may want multiple sittings. The real issue is planning for future stretch events, so discuss how the piece will look through weight gain or pregnancy. A common misstep is centering very fine detail across areas likely to stretch. Ask the artist to design color flow that camouflages linear stretch changes. Many clients report blackwork anchors within watercolor help the piece read better over time. For sessions bring loose shorts and change into them so the artist can access the outer thigh easily.
17. Inner Bicep Miniature Realism Head
Inner bicep pieces hurt more because the skin is softer and thinner. Expect a medium-high pain score and focused, shorter sittings. Artists split work into shorter passes so you can rest. The common error is over-detailing the muzzle and eye area which can blur with perspiration in summer. Tell the artist to prioritize contrast and to place darker anchors in the shadow areas to keep depth. Because inner biceps are private, this placement suits people who want less daily visibility. For the session wear a sleeveless tank top that you can lift slightly without shifting the shoulder.
18. Lower Back Blackwork Horse Panel
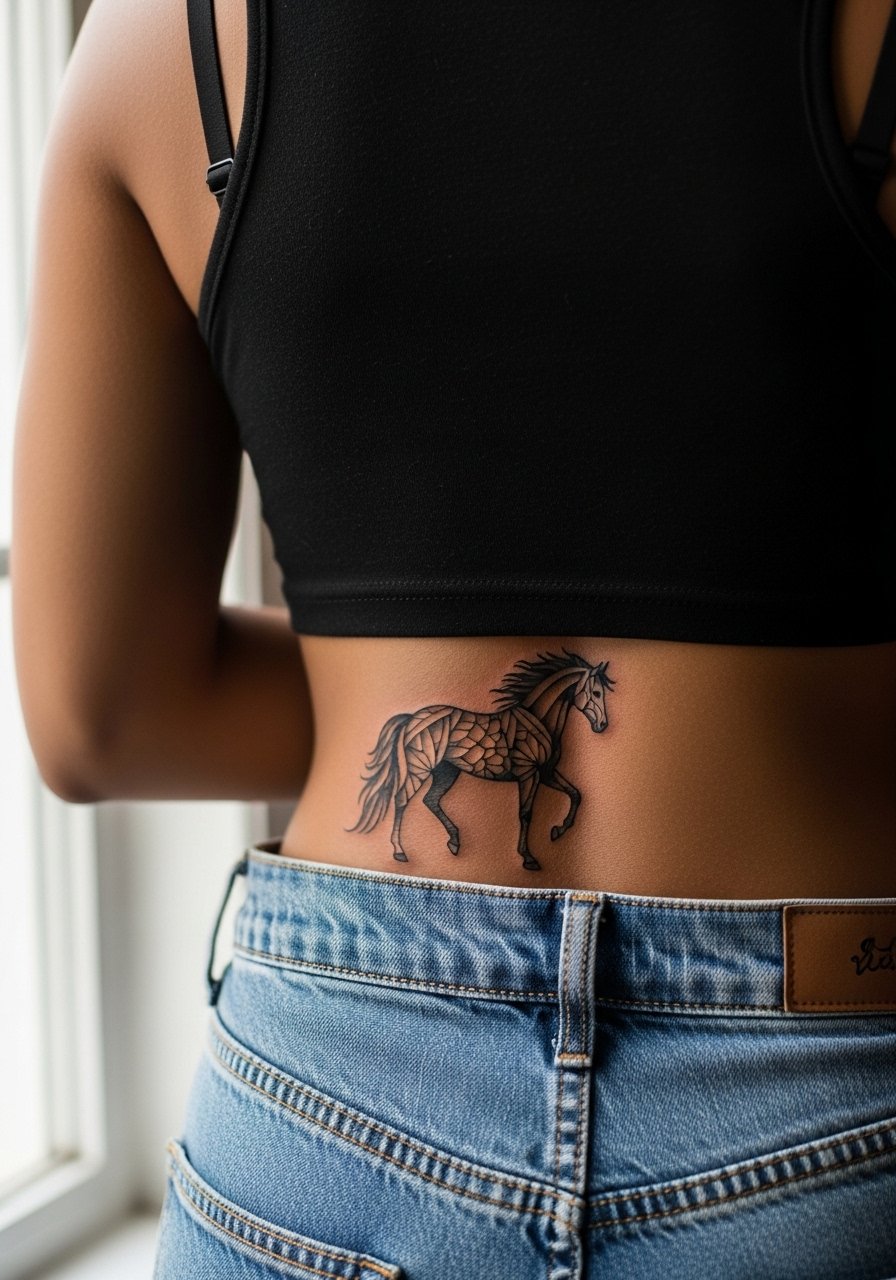
Lower back panels let you go large and bold with blackwork while keeping the piece mostly private. Sessions are moderate in length and pain is low to moderate. A typical mistake is placing too many small internal shapes inside a large black silhouette, which can make the design muddy over time. Ask your artist to plan large readable masses and to keep negative highlights clear. Because this area is often under clothing, be mindful of waistbands during healing. When you want to show the piece pick a [tank top and low-slung jeans] you feel comfortable adjusting so the art is visible without catching on fabric.
19. Sternum Pair of Foals, Delicate Linework
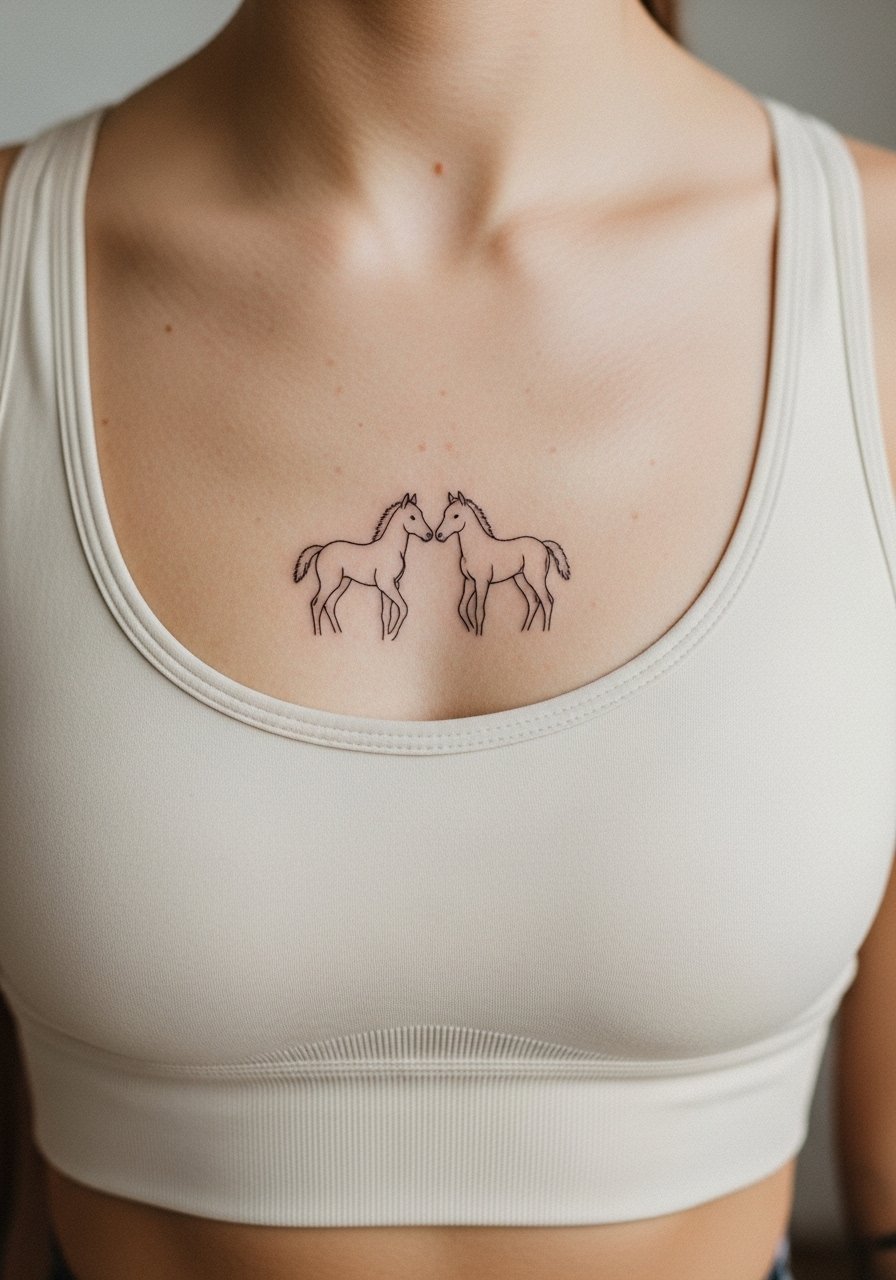
Sternum work requires a fitted top for session privacy and careful planning. Pain ranges moderate to high and artists often split sessions. The controversy about fine line on flexible chest areas applies here because one camp warns lines blur with breathing and movement and the other camp says precise depth and spacing can prevent merging. Ask your artist where they fall and request mapped spacing and slightly reinforced outer contours. Because of sensitive placement, only seek an artist experienced with chest anatomy. For the appointment wear a fitted sports bra so the area is visible without full exposure.
20. Minimalist Gallop Chain on the Ankle

Ankle chains are cute but face constant contact from socks and shoes. Expect a short session and sharp pain. The simple mistake is adding micro ornaments that fail under abrasion. Ask for a slightly thicker outer contour and simplified inner rhythm so each gallop reads after daily wear. Plan for a touch-up at year one if you exercise in tight sneakers. For revealing the ankle try ankle boots or rolled pants so the chain stays visible without constant rubbing.
21. Herd-in-Motion Partial Sleeve Element
Partial sleeves let you mix styles and time out sessions while retaining cohesion. Expect multiple sittings and medium pain across sessions. The number one mistake is trying to combine three disparate reference images without a unifying composition. During consultation request a compositional sketch that shows rhythm and negative space so the herd reads as a single motion. Over time, the sleeve will age depending on how much sun each area gets, so plan touch-ups in specific panels rather than the whole sleeve. For the session wear a short sleeve shirt you can roll up easily so the artist can access the upper arm without fabric interference.
Frequently Asked Questions
Q: Will fine line wrist silhouettes blur faster than blackwork on the forearm?
A: It depends on placement, skin type and daily abrasion. Fine line wrists often need touch-ups sooner because the area sees frequent washing and jewelry friction. Choosing slightly reinforced outer contours and avoiding ultra-tiny internal detail helps, and blackwork on forearms typically resists fade longer.
Q: How should I plan sessions for a realistic galloping horse on the forearm?
A: Expect two sessions spaced four to six weeks apart for shading and mane detail. Ask for a sketch mapping muscle flow so the motion reads correctly and request a staged healing review to catch any lines that need reinforcement before final saturation.
Q: Saniderm versus dry healing for these horse pieces, which camp is correct?
A: Both camps make valid points. The Saniderm camp favors protective film for active lifestyles to keep the area clean and speed early healing. The dry healing camp says leaving scabs to form reduces maceration risk and can prevent trapped moisture. Talk with your artist about your daily routine and pick the approach they use regularly for similar placements.
Q: What should I wear to a shoulder or upper back neo-traditional session?
A: Wear layers you can remove or pull aside without shifting the tattooed area. A loose button-down tank or an off-shoulder top you can slide is ideal because it gives full access while keeping you comfortable.
Q: How do I find a realistic horse specialist without getting ghosted on deposits?
A: Use discovery pathways like search hashtags and local studio filters, and prefer booking platforms that enforce cancellation policies. Ask shops about their guest spot calendar and deposit refund rules in writing, and consider apprentices or flash days if you need a quicker turnaround rather than waiting months for a realism guest.
Q: Do watercolor thigh pieces hold up through weight changes better than chest watercolors?
A: Thigh panels often tolerate moderate weight shifts better because the tissue distribution changes less dramatically than the chest. That said, any watercolor relying on thin washes needs reserve outlines or anchors if you expect significant body changes.
Q: Are hand and knuckle horses still risky for jobs that require professional presentation?
A: Hand and knuckle tattoos remain visible and can affect first impressions in some industries. If that concerns you, choose placements that can be covered by sleeves or jewelry, or pick minimalist motifs that read discreetly under a watch or band.
