
Fine line trends keep blowing up feeds, but the armband choices that still look crisp years later are often the ones people scroll past. I see two recurring problems in consultations: a band warped by body changes, an artist who flakes on a simple booking, and black bands that disappear on darker skin tones in photos. This list skips fluff and gives practical choices, what to tell your artist, and simple wardrobe tips so the design you pick actually reads the way you expect when it heals.
1. Classic Tribal Armband
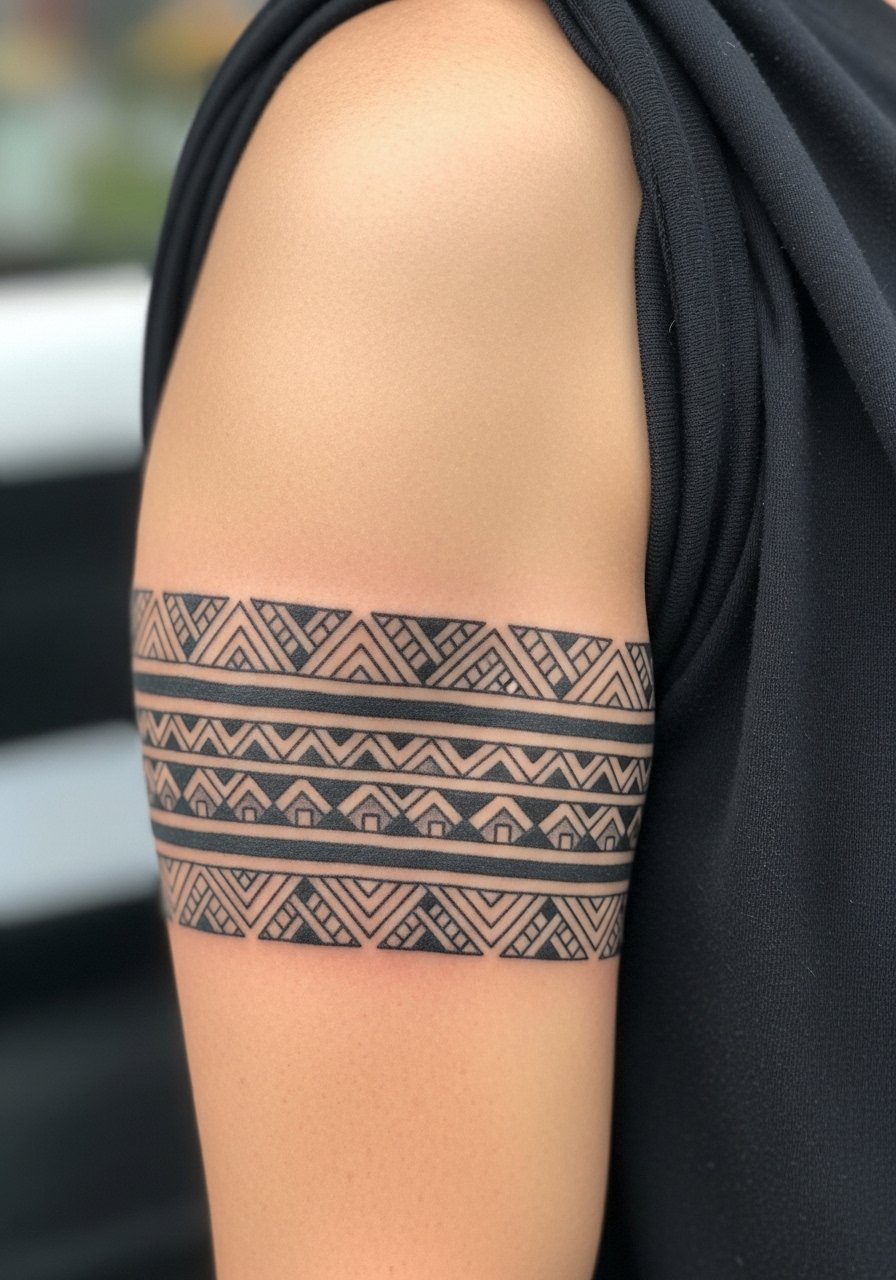
I've seen tribal armbands hold up decades when the linework is sized for the curve of the bicep. Tell your artist you want 2–4 inches of band width and a mockup wrapped on the arm so the geometry reads when you flex. Common mistake is asking for tiny repeating patterns that blur after weight fluctuations. Pain is usually low to moderate on the outer bicep. For session wear pick a fitted black tank top so the artist can move the arm freely and you can check the wrap in real time.
2. Celtic Knot Armband

When a knot runs uninterrupted around the arm it depends on clean spacing more than intricate detail. In consultation ask for a nodal pattern that repeats every 2.5–3 inches so the negative space prevents crowding as the piece settles. This style ages well if you avoid ultra-fine inner lines that can merge. Expect a couple of sessions for shading and touch-up at year three if you want the gray wash refreshed. Show-off pairing includes an open flannel shirt worn open with sleeves rolled.
3. Solid Black Band
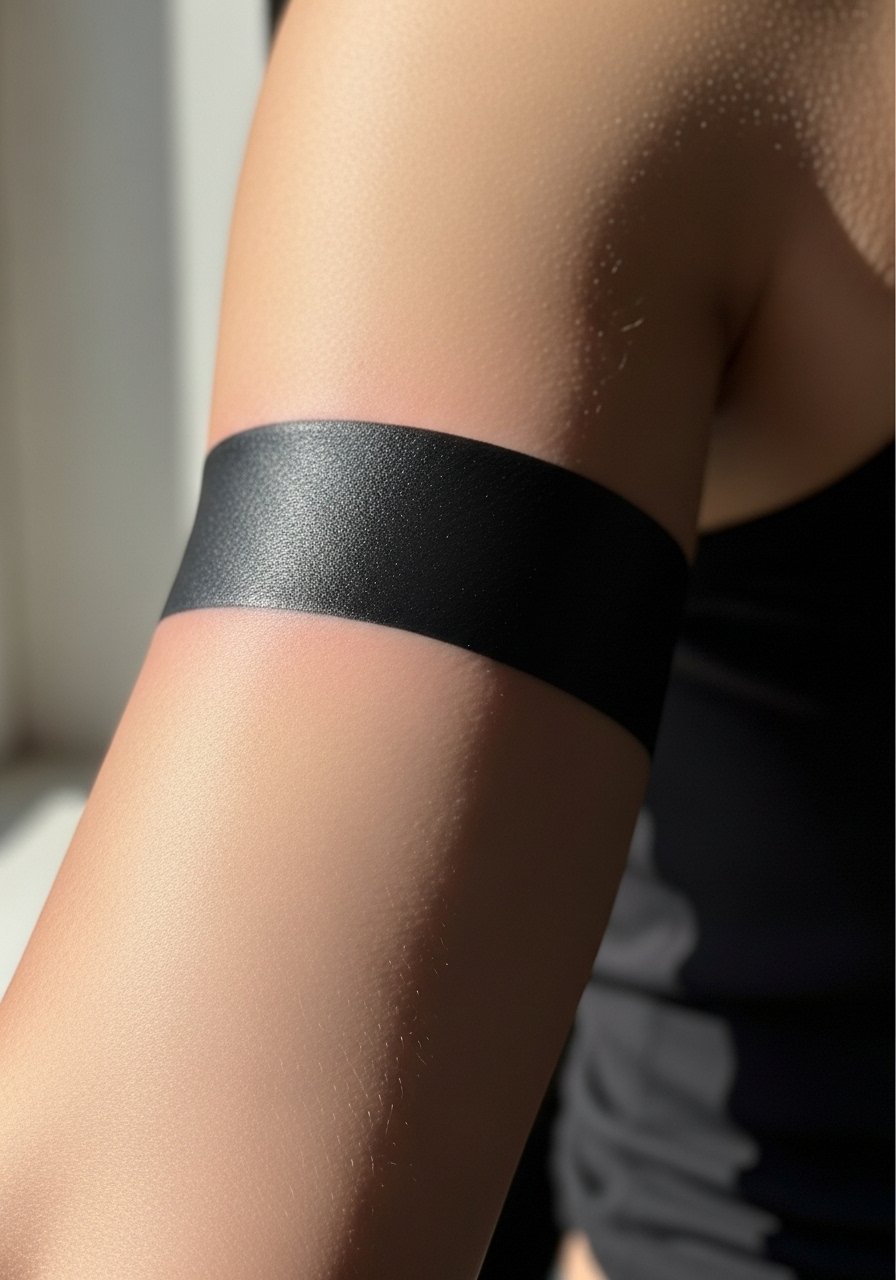
Most people pick a solid black band for a low-fuss first tattoo, but sizing matters more than you think. Go for a width that matches your arm proportions so the saturation holds without risking blowout from overworking a tiny channel. Artists split on aftercare for saturated blackwork. One camp prefers protective film or Saniderm in the first 24 to 48 hours. The other camp favors dry healing to avoid trapped moisture. Be explicit with the shop about their preference and bring a sleeveless muscle tee to the session so the bicep stays accessible.
4. Mandala Armband

There is something about mandala repeats that reads hypnotic on curved surfaces when scaled properly. My advice is to size the central motifs so they have breathing room, then use stipple shading to avoid heavy saturation that can merge over time. The inner bicep placement increases pain and scab risk, so expect two to three sessions for full saturation and touch-up. Pair this with a muscle tank top for the reveal or session wear so the artist can rotate the arm without tugging fabric.
5. Wave Band Tattoo
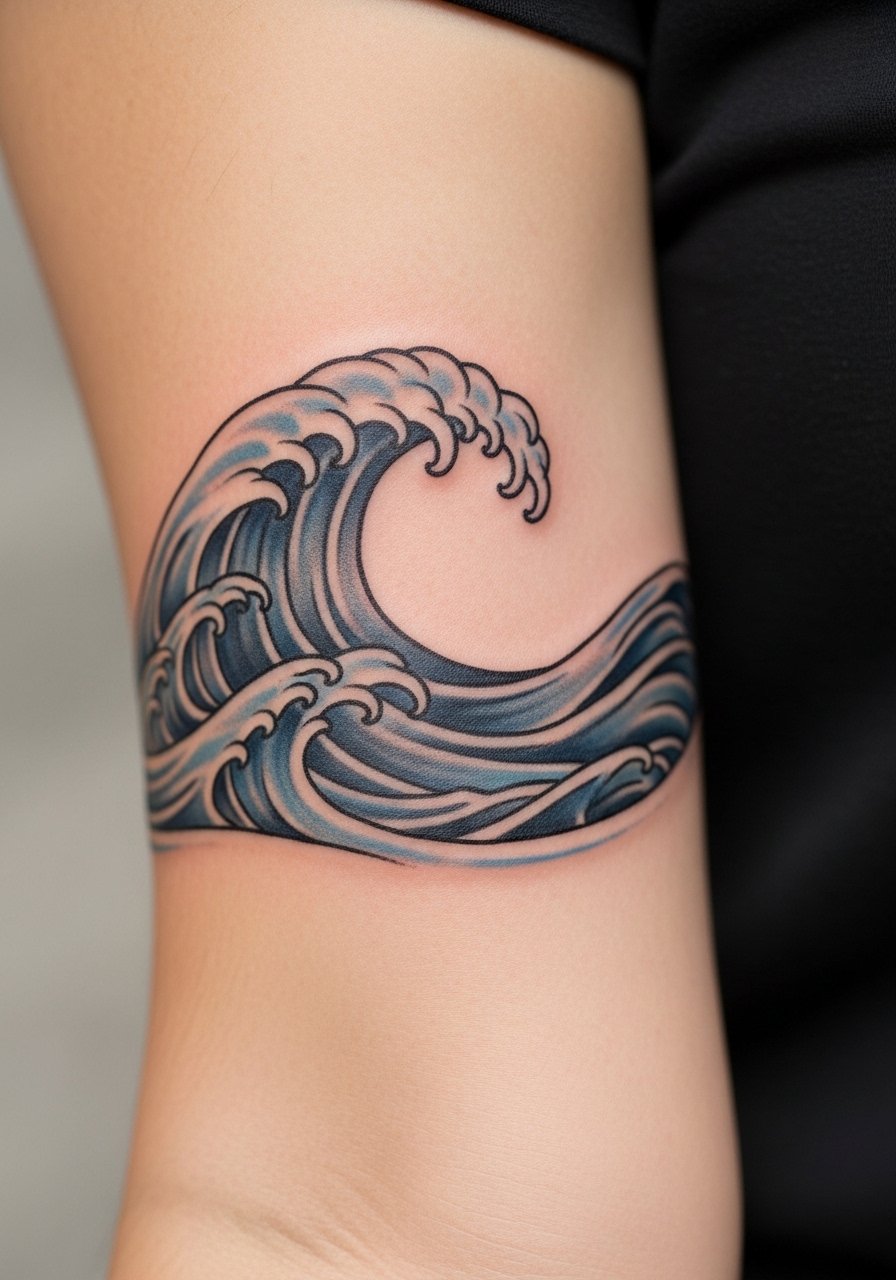
Most wave bands look best when the motion reads with the arm's curve. Ask your artist to orient the crest so it follows the forearm from elbow toward wrist. A common regret is making the waves too delicate; they need solid linework or saturated shading to survive sun and friction. For showing off, rolled sleeve button-downs in white or gray echo nautical tones. Try a linen short sleeve button up to frame the design without covering it.
6. Dotwork Eternity Band

Fine dotwork reads delicate on the wrist but is where the fine-line debate shows up. One camp warns that tiny stippling fades into a soft gray within two years on high-friction spots. The other camp says controlled spacing and deeper point placement keeps dotwork readable much longer. Tell your artist you want slightly larger dots and more space between rows if you want slower aging. Wrist pieces rub against watches and cuffs, so pair this with a thin gold cuff bracelet on the opposite wrist to avoid crowding.
Pre-Session Essentials
The first six designs above include wrist, forearm, and bicep placements that heal at different rates, so a short kit makes the session and first week easier.
- Hustle Butter Deluxe. Many people prefer its non-greasy texture over petroleum balms for humid climates, which helps saturated blackwork like solid bands breathe while healing.
- Indie tattoo balm. Lighter absorption helps on forearm pieces that sweat in summer, reducing uneven scabbing on wave and feather bands.
- Unscented shea balm. Works well on darker skin where white-casting lotions can change how black ink photographs.
- Tea tree salve. A gentler antiseptic some people use sparingly if a friction zone shows persistent irritation during the first week.
- Saniderm protective film. Useful for short stretches after forearm and wrist sessions if your artist supports film rather than a wet ointment.
7. Arrowhead Stack Band
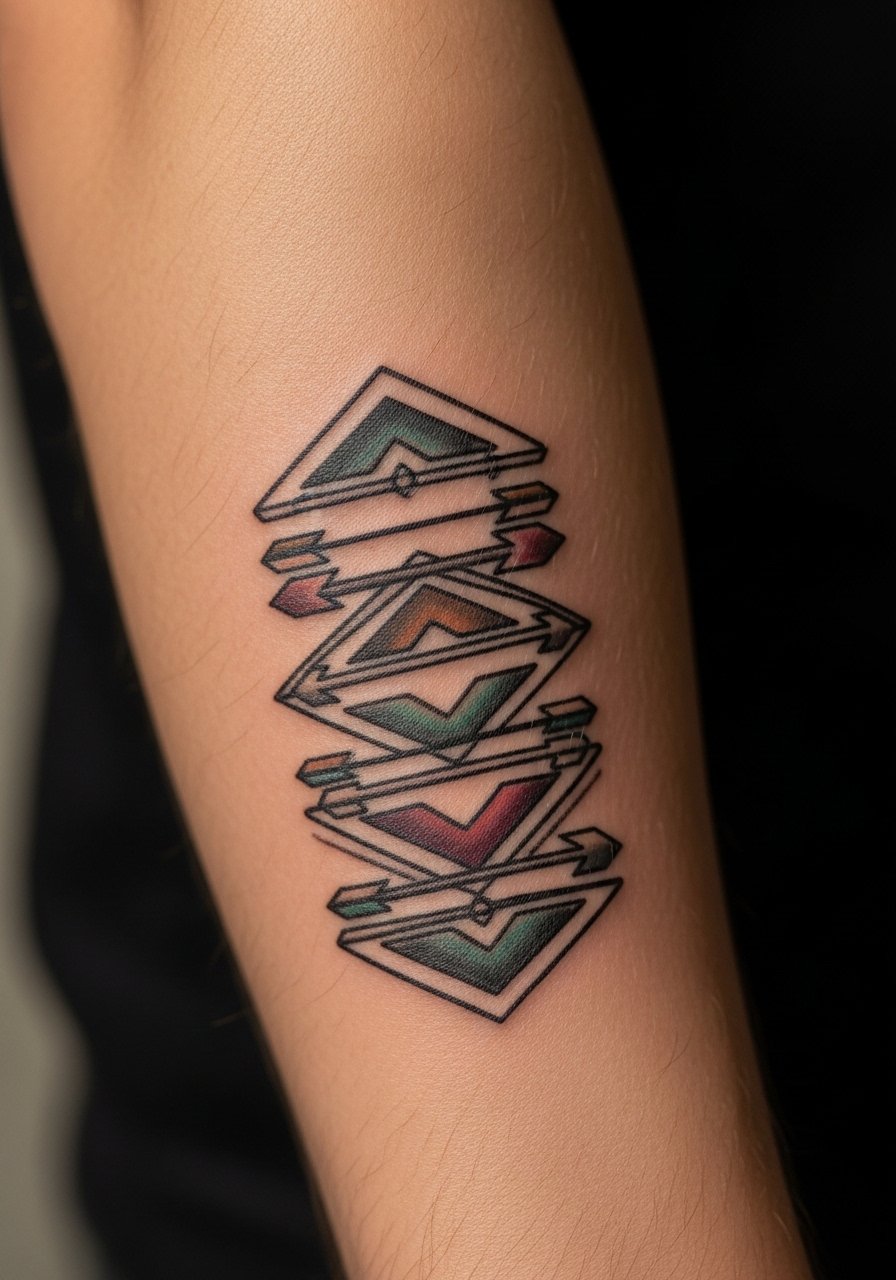
The stacked arrow motif gives a clean linear read that works for motivation-oriented designs. When you ask for this, specify whether you want alternating negative space between arrows or solid fills. Too many tiny arrowheads close together will blur when the arm flexes. Expect a single session for a small wrist-to-forearm stack and a touch-up at year two for color accents. Show-off pairing calls for rolled sleeves, so bring a roll up sleeve shirt to the reveal photos.
8. Skull and Band Hybrid
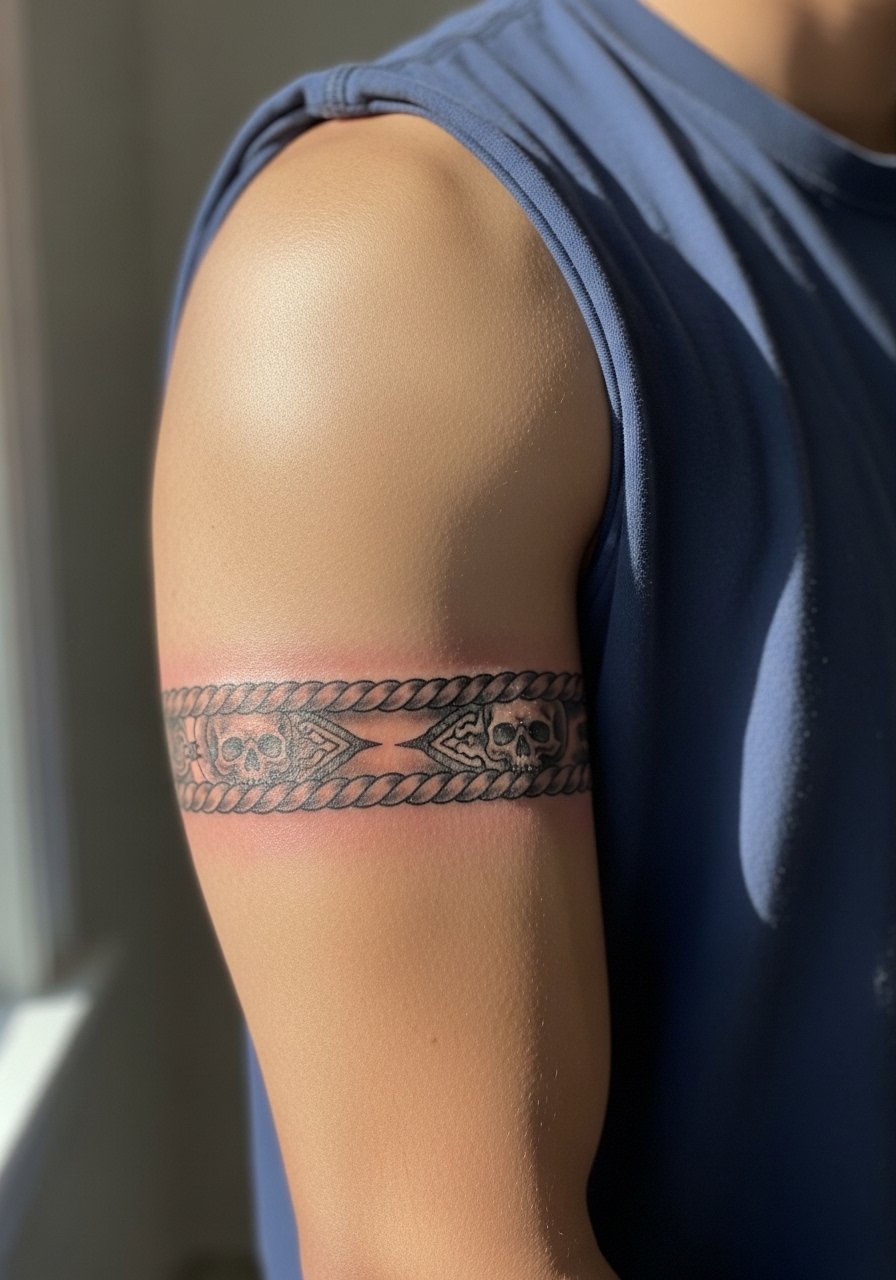
This hybrid reads edgy without committing the entire arm to heavy imagery. Tell your artist to keep skull elements small and spaced so they do not merge into the rope texture over time. The bicep hides distortion better than the inner arm if your body changes. Pain is moderate and sessions often split into linework then color or shading. For session wear pick a sleeveless hoodie you can lift off easily without smearing fresh ink.
9. Feather Armband

Fair warning, the inner forearm near the bone can surprise first-timers with tenderness. Feather bands work well here when they flow lengthwise with the arm and use feathered shading instead of tight line bundles. A common mistake is over-detailing individual barbs; keep the main shaft clear and ask for wider feather strokes for longevity. For the session wear, a push up sleeve henley or sleeveless tee makes access simple and keeps cuffs from rubbing.
10. Rope Band with Anchors
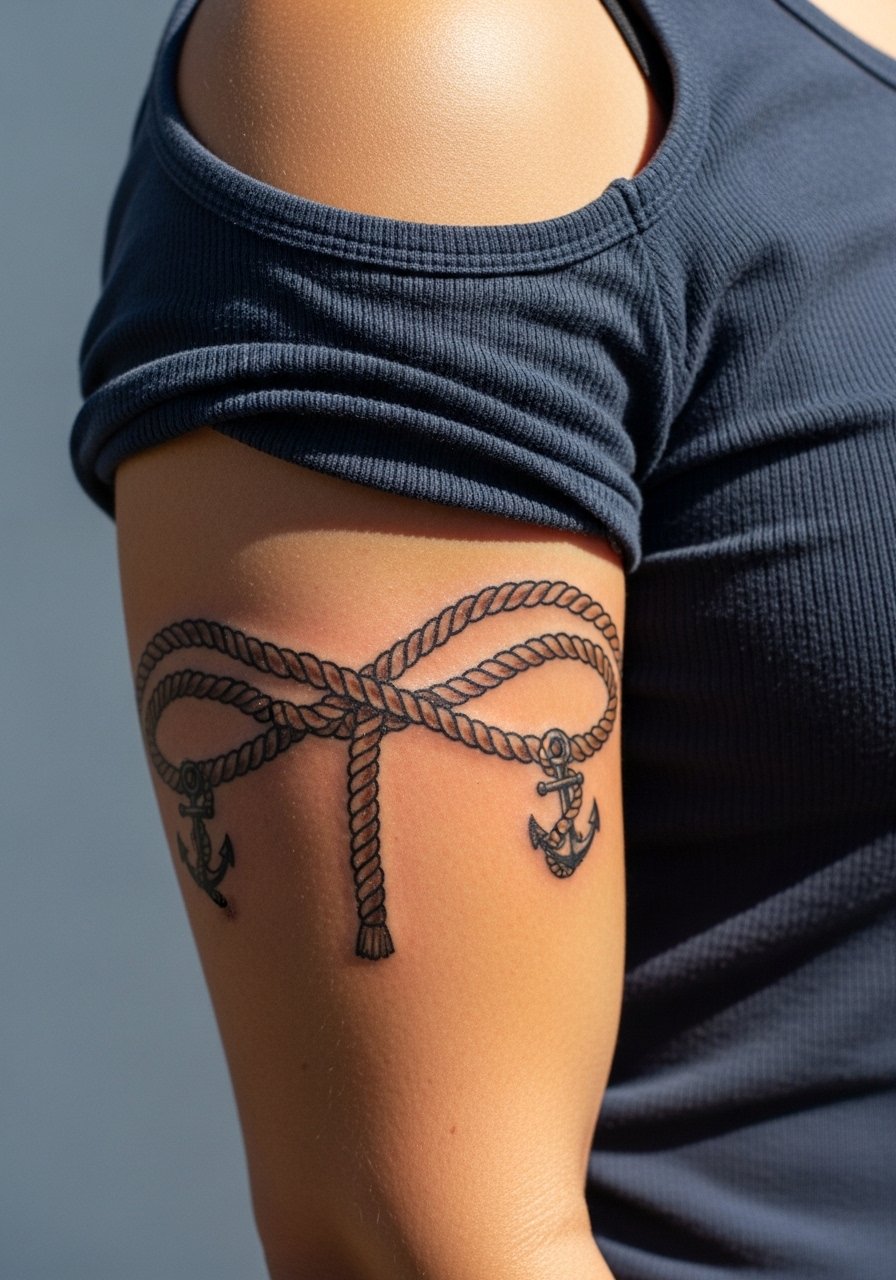
Rope and anchor designs benefit from bold outlines that read at a distance and resist early fading. Ask for negative-space highlights in the rope strands to keep the texture readable without extra saturation. Bicep placement keeps the rope shape consistent as long as the band is sized for muscle contours. For a show-off look pair this with a leather arm cuff bracelet on the opposite arm to lean into the sailor aesthetic.
11. Geometric Triangle Bands

Geometric stacks are minimalist but fall prey to the "too small" mistake. Triangles need width so the points do not bleed into one another as the skin ages. If you want a modern clean look ask for negative space between rows and a bold outline where shapes meet. Expect a single session for thin stacks and a touch-up at year three depending on sun exposure. Session wear for forearm pieces is easy with a linen short sleeve button up you can roll.
12. White Ink Band
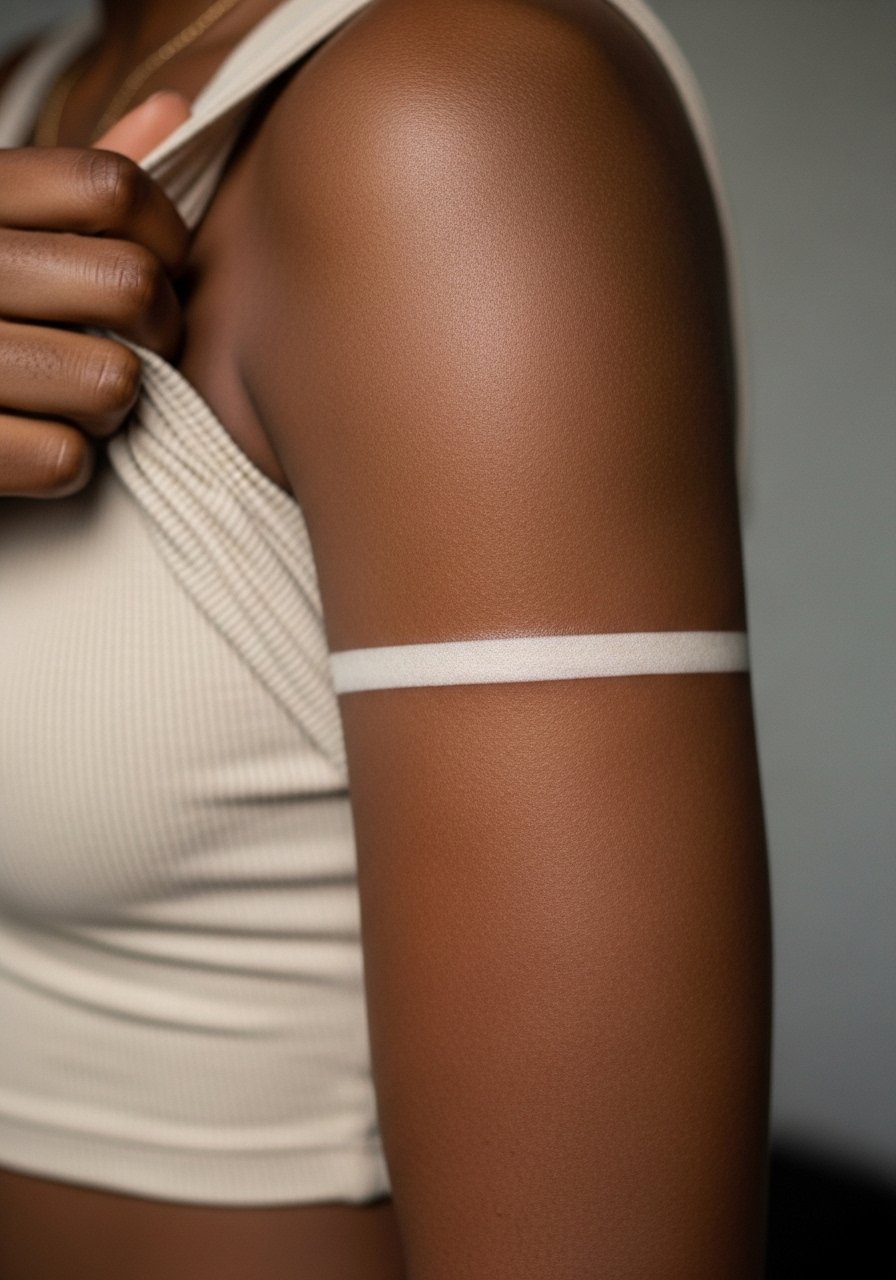
White ink divides artists into two camps. One side says white is ideal for discreet, work-friendly pieces and can look like a subtle sheen on tanned skin. The other warns white fades faster and often needs yearly touch-ups to keep the glow. If you lean white, ask for a slightly thicker line and plan on touch-ups. For session wear choose a fitted black tank top men style so the contrast and placement are easy to judge under salon lights.
13. Stacked Thin Bands as Sleeve Starter

Using thin bands as a sleeve foundation is a smart move for future customization. When you start this way, tell your artist you plan to add patches between bands later so they can space elements to accept future fills. The mistake is placing bands too close together with no planning, which limits later options. For session day wear pull on an open flannel shirt you can slide aside and still get a good photo after the stencil is applied.
14. Bicep Negative-Space Muscle Band
Personal observation tells me negative-space bands can actually enhance muscle definition, especially if the pattern is curved to the bicep peak. During consultation request a mockup with your arm tensed so you can see the illusion. The big error is asking for a perfectly straight band across a round muscle. For the appointment wear a sleeveless athletic shirt that allows the artist to view the muscle both relaxed and flexed.
15. Elbow Wrap Geometric Band

Fair warning, elbow wraps are painful compared with the forearm because of the bone and thin tissue. Artists also debate whether fine line works here because stretch and frequent movement can blur tight lines quickly. Request bolder spacing and avoid ultra-fine textures. Expect two sessions if shading wraps the joint. For session wear choose an elbow length sleeve shirt you can roll without tugging the fresh work.
16. Greek Key Armband

The Greek key is a classic repeat that reads beautifully when each element gets breathing room. Tell your artist you want clean corners and a stabilizing band on either edge so the pattern does not appear to break up over time. This is a low-pain forearm piece with minimal touch-up needs if you avoid tiny inner details. Show it off with rolled sleeves or a linen short sleeve button up for a subtle contrast.
17. Micro Chain Link Band
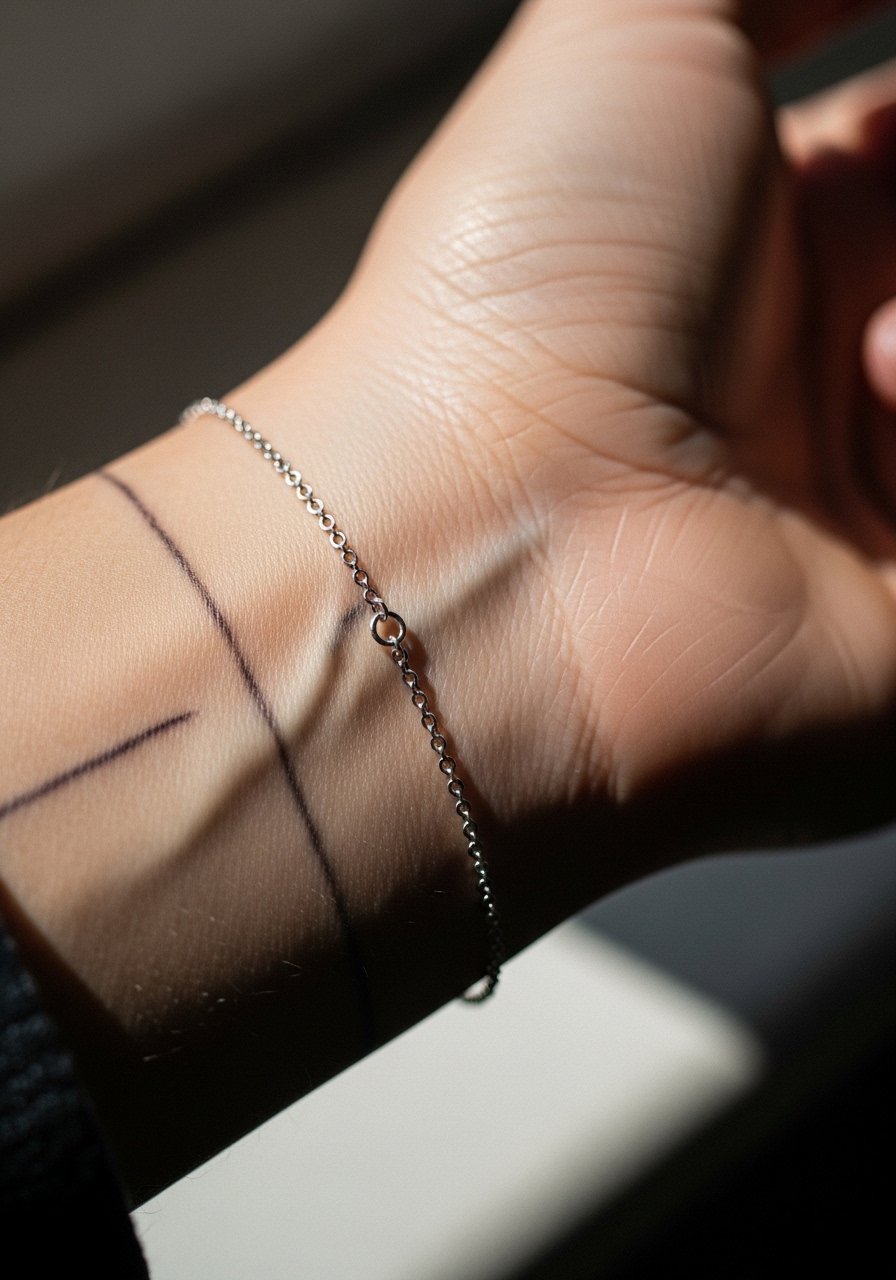
Tiny chain links look great but face the same friction issue as dotwork. Ask the artist to scale links slightly larger than you think you need and to use bold linework for outer contours. The wrist sees constant washing and contact with watches, so consider planning touch-ups at year two. For showing off pair this with a wrist cuff minimalist on the opposite arm to balance without rubbing the new ink.
18. Botanical Vine Armband

Botanical armbands age well when the leaves are simplified rather than crowded with tiny veins. In consultation ask for a composition that follows the arm's flow and leaves negative space between clusters for longevity. Inner-forearm vines will feel more tender during the session, so expect moderate discomfort. For session wear lean on a roll up sleeve shirt so the artist can work without fabric interference and you can photograph the stencil.
19. Rotated Forearm Band for Watch Hiding

This practical angle solves a common pain point for professionals who need to hide a watch in formal situations. Ask your artist to measure the band placement while wearing your watch in the position you want hidden so the band sits under the cuff. The risk is misplacement if you only use a flat mockup. On session day wear a henley long sleeve shirt you can push up to simulate daily use while the stencil is checked.
20. Chevron Stacked Band
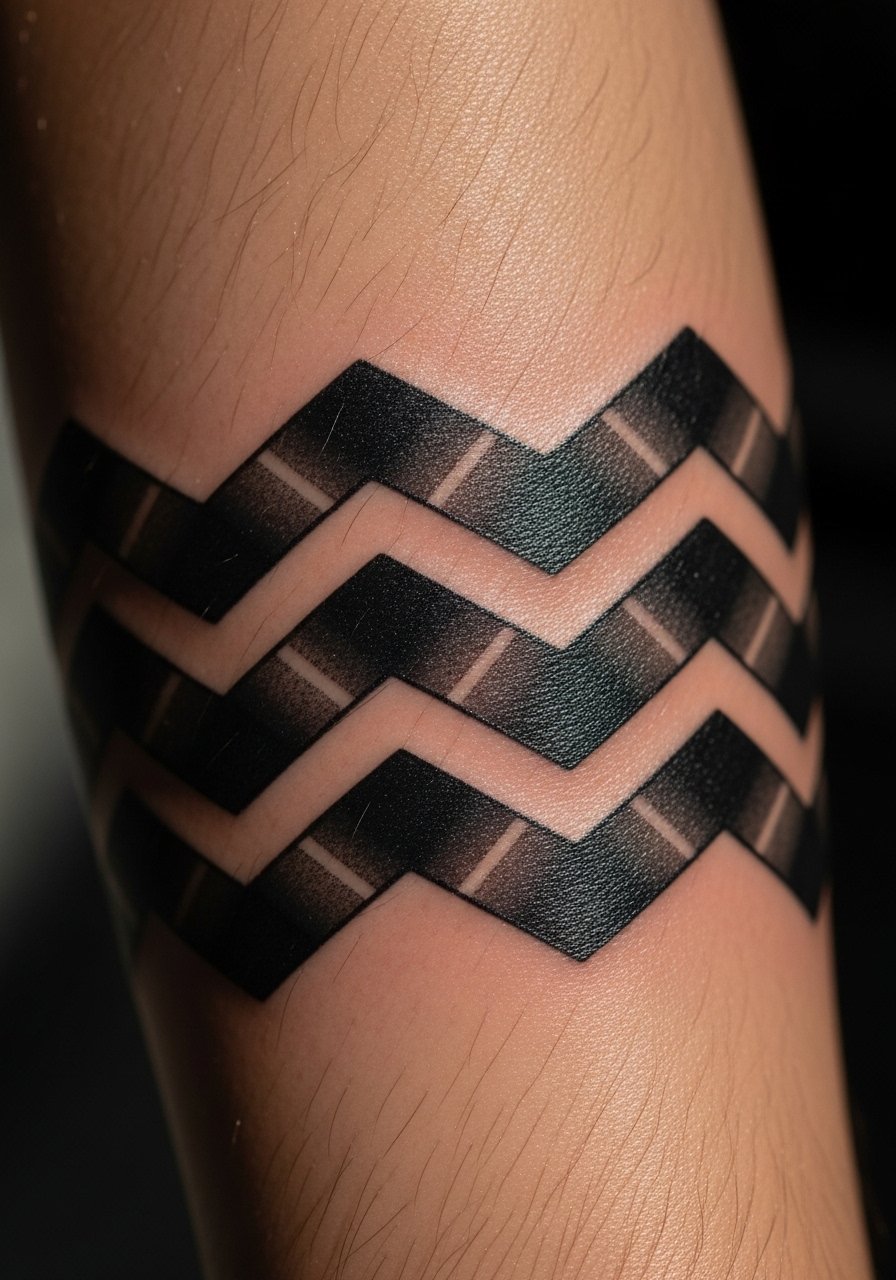
Chevron stacks create movement that looks modern yet rooted in classic forms. The biggest mistake is stacking chevrons too finely; give each peak at least a few millimeters of separation for future clarity. This is a low- to moderate-pain area depending on proximity to the wrist. If you want a slightly harder edge ask for a bold outline to protect the geometry from blurring. Session wear is simple, but bring a linen short sleeve button up or a shirt you can roll.
21. Armband Sleeve Starter

Using bands as a patchwork base sets up a structured sleeve over time and avoids the "can't add here" trap. Tell your artist you want deliberate gaps left for filler pieces and note how patches will layer across years. The smart approach is alternating widths and textures so future work snaps into place. Expect this plan to take several sessions spread across months as you layer custom patches. For the session bring an open flannel shirt that shows the band placement well for photos and portfolio shots.
Frequently Asked Questions
Q: Will a thin armband warp if I gain muscle or weight?
A: It depends on placement and sizing. Bands on the outer bicep handle muscle gain much better than tight wraps on the mid-bicep. Ask your artist to size the band wider and preview the wrap while your arm is flexed so you can see how it will distort with changes.
Q: My skin is dark and I want a black armband that photographs well. What should I request?
A: Ask for heavier outlines or negative-space patterns to create contrast, and avoid purely fine-line fills. Some artists suggest a thin white highlight within the black for photos, but that changes maintenance. Also consider styling with a minimalist leather watch on the opposite wrist to frame the band in pictures.
Q: How painful is an inner-forearm feather band compared with a forearm outer band?
A: The inner forearm is typically more sensitive, especially near the bone. Feather work there can feel tender for a longer stretch in the session. Numbing cream is an option many beginners prefer, though there is debate among artists about its effect on linework, so ask the shop what they allow.
Q: Are fine-line dotwork bands worth it if I want them to last?
A: Fine dotwork looks great at first but can soften faster in high-friction or sun-exposed spots like the wrist. If longevity matters, request slightly larger dots and more spacing, and plan on a touch-up at year two to keep the pattern crisp.
Q: What should I wear to a bicep band session to make the artist's life easier?
A: Choose clothing that gives full access without stretching the area. A sleeveless athletic shirt or tank top you can remove easily is ideal. That way the artist can rotate your arm without fabric tugging the fresh lines.
Q: How soon should I book a guest spot if I want a Celtic or custom mandala band at a convention?
A: From what I've gathered, popular guest spots fill weeks to months in advance, so book early and confirm deposits. If an artist cancels, Booksy or convention pages often list backups, so have a second option ready.
Q: Is Saniderm recommended for armbands or is dry healing better?
A: There are two camps. Some people swear by Saniderm for the first 24 to 48 hours because it protects against friction on forearms and wrists. Others prefer dry healing to let scabs form naturally. Ask your artist which approach they support and follow their instructions for the specific band you get.
