
Sitting in the chair with the stencil across your upper back is where most decisions either click or feel off. The width reads different under studio lights and the way the shoulder blades move changes how linework settles. Small adjustments in placement, spacing, and shirt choices during the session make the difference between a crisp fine line upper back tattoo at year five and a blurred memory that needs touch-ups. The first idea below shows a clean, central option to consider.
1. Central Spine Minimal Mandala

This central mandala reads like a tidy focal point for the upper back. I recommend slightly increasing the negative space between concentric rings so stipple shading does not merge as the piece heals. Tell your artist you want the outer rings spaced like a ringed target, not tight lace, and ask to preview a stencil in different sizes on your spine. Pain sits around a five out of ten for most people because you are over bone, and a single session usually runs under two hours. A common mistake is asking for dense detail that looks incredible fresh but blurs into a smudge by year three. For showing it off, pair this with an open-back midi dress or a racerback tank so the symmetry reads without fabric crowding.
2. Paired Wings Over Shoulder Blades

The wing motif plays well with the anatomy of the shoulder blades. In consultation, ask the artist to follow the natural curve of your scapula rather than forcing a mirror-perfect pair. One camp says tiny feathers should be extremely fine to keep them airy. The other camp prefers slightly bolder quills for longevity. Say which side you favor and why, and expect two hours if you want feather detail. This placement flexes with wardrobe, so wear a racerback tank for the session and consider an open-back knit top for showing it off. The most common mistake is placing them too low where they disappear under straps.
3. Crescent Moon Bouquet at the Nape

A crescent cradling botanicals reads delicate but holds up if the lines are slightly separated. Ask for micro spacing and stipple shading rather than dense hatchwork to prevent merging over time. Expect a session under 90 minutes and mild discomfort because you are close to the spine and neck muscles. One real mistake is asking for hairlike stems that are too close together. For evenings, pair the design with a thin chain pendant necklace that sits above the curve so the jewelry frames the tattoo without covering it.
4. Horizontal Mountain Range Across the Upper Back

This low-contrast mountain line reads modern and holds because it relies on single strokes that are spaced intentionally. During consultation, bring references that show the exact silhouette you want and ask the artist to scale it to your shoulder width. Pain tends to be moderate when the needle crosses the shoulder blade edges, and the session usually fits into an hour. A typical error is shrinking the range too small so peaks blur together. For the session, wear a loose button-down shirt you can pull aside to give clean access and keep the skin relaxed.
5. Delicate Script Name Along the Upper Back Curve

Script on the upper back can look intimate and spare. Specify exact font weight and ask for a stencil in the size you intend because tiny, cursive loops can thicken as they heal. Expect light to moderate pain and a quick session under 45 minutes. A mistake is picking a dense calligraphy style that loses counters over time. If the text matters, request the artist place the stencil and photograph it from a distance so you see how it reads under clothing. Show-off pairing works well with an open-back dress for evenings or a simple wide-neck tee for casual looks.
6. Fine Line Floral Yoke Across the Upper Back

A yoke of flowers frames the upper back and flatters collarbones. Ask for negative space between petals and leaves so the design keeps definition after a couple of years. Pain is variable since the design crosses softer muscle and spots over bone. Sessions can run one to two hours depending on detail. Artists split on whether ultra-fine petal veins hold up. One camp favors slightly heavier main stems. The other argues for keeping everything hairline thin. Request dot work instead of solid shading to minimize saturation that could merge. For showing off, pair this with a halter top or open-back midi dress to keep the floral band visible.
Studio Day Picks
The upper back pieces above range from central spine work to horizontal yokes, and a few need different prep than shoulder-only tattoos.
-
Stencil transfer paper kit. Helps your artist preview exact spacing on the upper back before a needle touches the skin, particularly useful for scripts and mandalas.
-
Topical numbing cream. Applied under dressing for 30 to 45 minutes eases the sting on tight spots near the spine without compromising linework.
-
Thin protective film roll. Useful after sessions to shield delicate upper back linework from friction from straps and backpacks during the first two days.
-
Fragrance-free gentle body wash. Cleanses the area during showers without stripping moisture from fine line work.
-
Aquaphor healing ointment. A thin layer during the first days locks in moisture for fine lines without heavy clogging.
7. Mirror Floral Clusters Along Each Trap

These mirror clusters accent natural muscle shapes and move with your shoulders. Ask for mirrored scaling rather than identical copies to avoid a mechanical look. Pain is low to moderate because you are over muscle, and each cluster usually takes 30 to 50 minutes. A common mistake is requesting too many tiny buds. Keep clusters airy and expect touch-ups around year three if you favor ultra-thin stems. For the appointment, wear a loose tank top so straps do not rub against fresh ink.
8. Constellation Arc Across the Upper Back

Tiny dots and straight connectors form a readable constellation if spacing is generous. Ask your artist to increase dot size slightly so they remain distinct in two and five years. Sessions are quick and low on pain. A mistake is packing multiple tiny stars too close, which causes the dots to merge. For evenings, an open-back knit top or a low-backed dress keeps the arc visible without straps interrupting the flow.
9. Single-Stem Rose Along the Right Scapula

A vertical rose follows the curve of the scapula and flatters movement. In consultation, ask for petal separation and stipple in the shadows rather than heavy fill so the bloom holds definition. Pain spikes briefly when needles cross bone edges and the session is likely under 90 minutes. A common error is making petals too detailed in a small size. Wear a thin-strap top for the session so the artist can work without fabric tugging.
10. Geometric Yoke With Negative Space Filigree
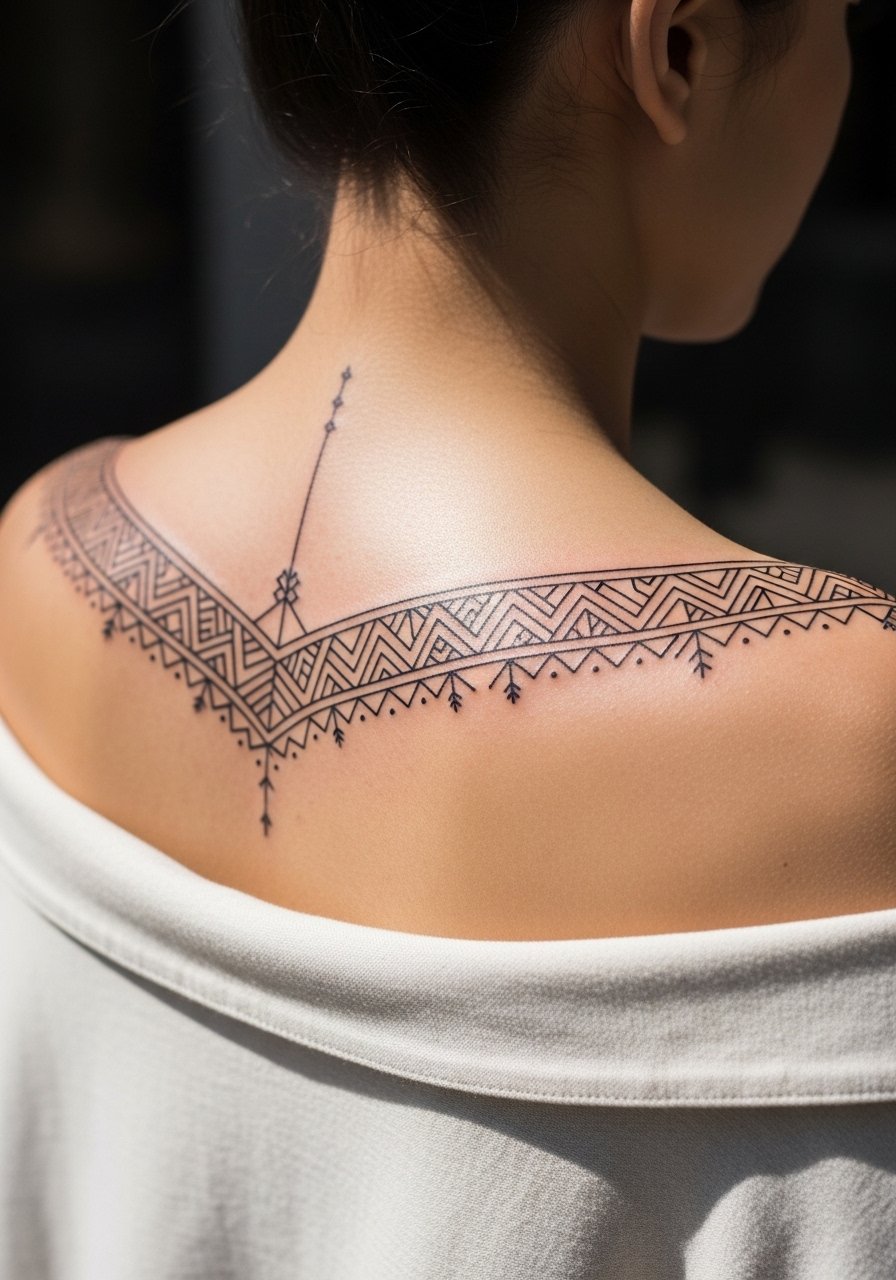
Geometric yokes need breathing room between elements so the pattern does not gray together. Tell your artist you prefer open nodes and stipple shadowing instead of solid fills. This work sits at moderate pain when crossing bone. Sessions can run one to two hours. A mistake is crowding triangles and dots too tightly. For styling, an off-shoulder blouse or a cropped backless top keeps the geometry readable in photos.
11. Tiny Birds Taking Flight Across the Upper Back

A small flock reads lively because the spacing suggests movement. Request varied wing positions rather than identical repeats so the pattern looks organic. Pain is minimal and a session can be under 45 minutes. A common mistake is packing birds too close which makes them look like a smear from a distance. Pair this with a wide-neck tee that reveals the upper flow without straps obstructing the view.
12. Micro-Realism Moon With Stipple Halo

Micro-realism on the upper back benefits from micro spacing and stipple shading rather than continuous grey. Ask for a reference of healed micro moons so you see how stipple reads over time. Pain is moderate near the spine and sessions can take up to two hours for precise dot work. One controversy is whether stipple holds on natural creases. Some artists say it softens; others say careful dot density keeps it crisp. For sessions, a sports bra you can pull down slightly keeps the area accessible and comfortable.
13. Thin Arrow Cluster Pointing Down the Spine

A vertical arrow cluster makes a clean spine accent when spacing allows each shaft to breathe. During the consult, ask for slightly bolder shafts rather than hairline arrows so they stay legible after a few years. Pain is noticeable when the needle travels directly over the spine and the session runs around an hour. A common mistake is cramming too many arrows together. For showing it off, try a backless evening top that highlights the vertical motion.
14. Lace Band Under the Top of the Back

A lace band creates the illusion of garment embroidery. Request open negative spaces and stippled shadows to keep the lace airy. Pain is low to moderate and the session can be under 90 minutes. One real mistake is over-detailing the lace so that small loops fill in as they age. For showing it off, wear a thin-strap dress or a strapless top that imitates the band without covering it.
15. Linear Skyline Across the Shoulder Line
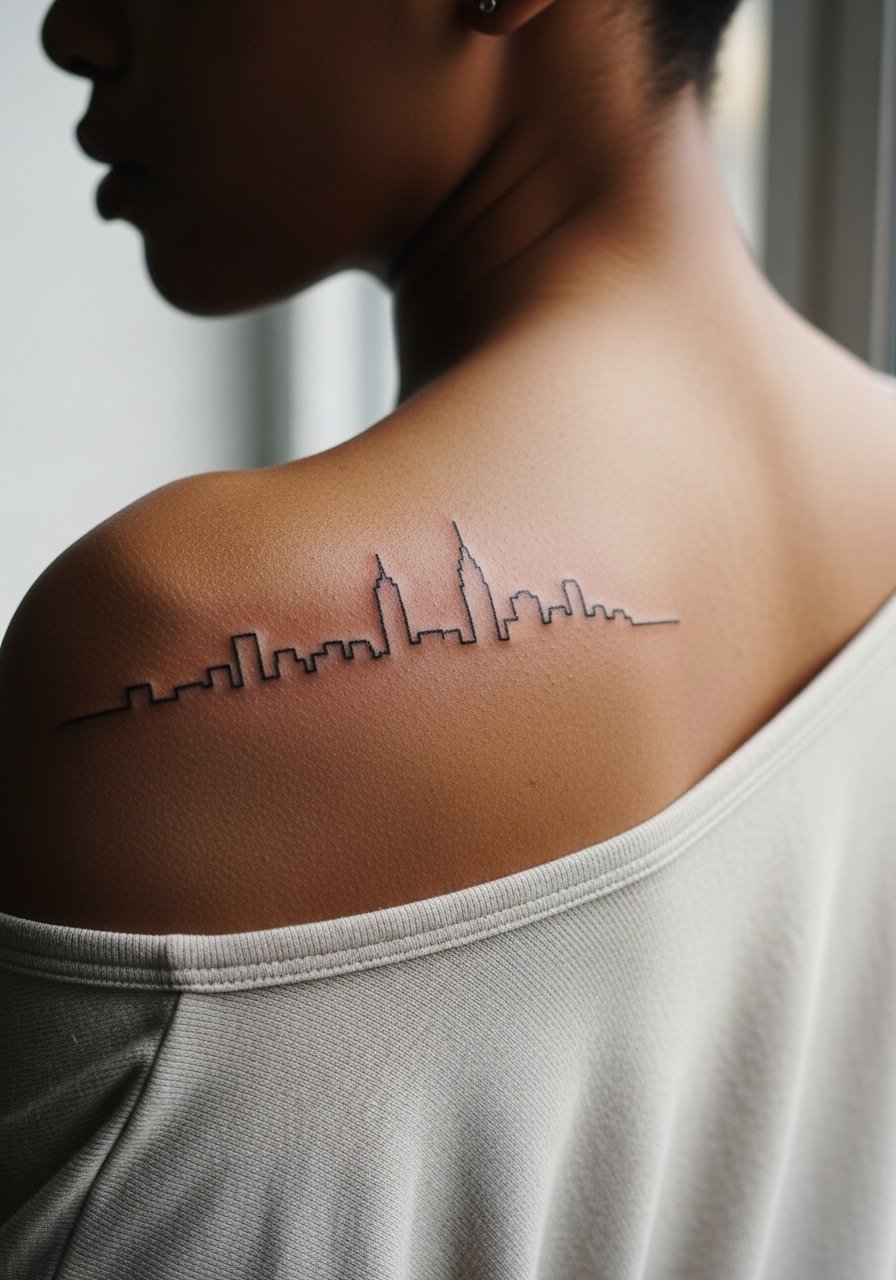
A skyline reads like a subtle statement when it follows the shoulder line. Ask for simplified rooftops and avoid tiny windows that disappear over time. The session is low on pain and usually quick. A mistake is including too many tiny architectural details. For casual wear, pair it with a wide-neck tee or a shirt worn off one shoulder so the skyline remains visible.
16. Botanical Crescent That Wraps the Upper Back

This crescent wraps the back and flatters the shoulder curve. Demand spacing between floral clusters and ask for dot shading rather than heavy fills so the crescent keeps contrast. Pain sits at moderate and the session may be around 90 minutes. Artists debate whether continuous crescents should be done in a single pass. One group says single pass yields smoother flow. The other advocates for layered dots for longevity. Request a healed reference on similar skin tones to guide your choice. For evenings, match it with an open-back knit top.
17. Minimal Compass Nestled by the Neckline
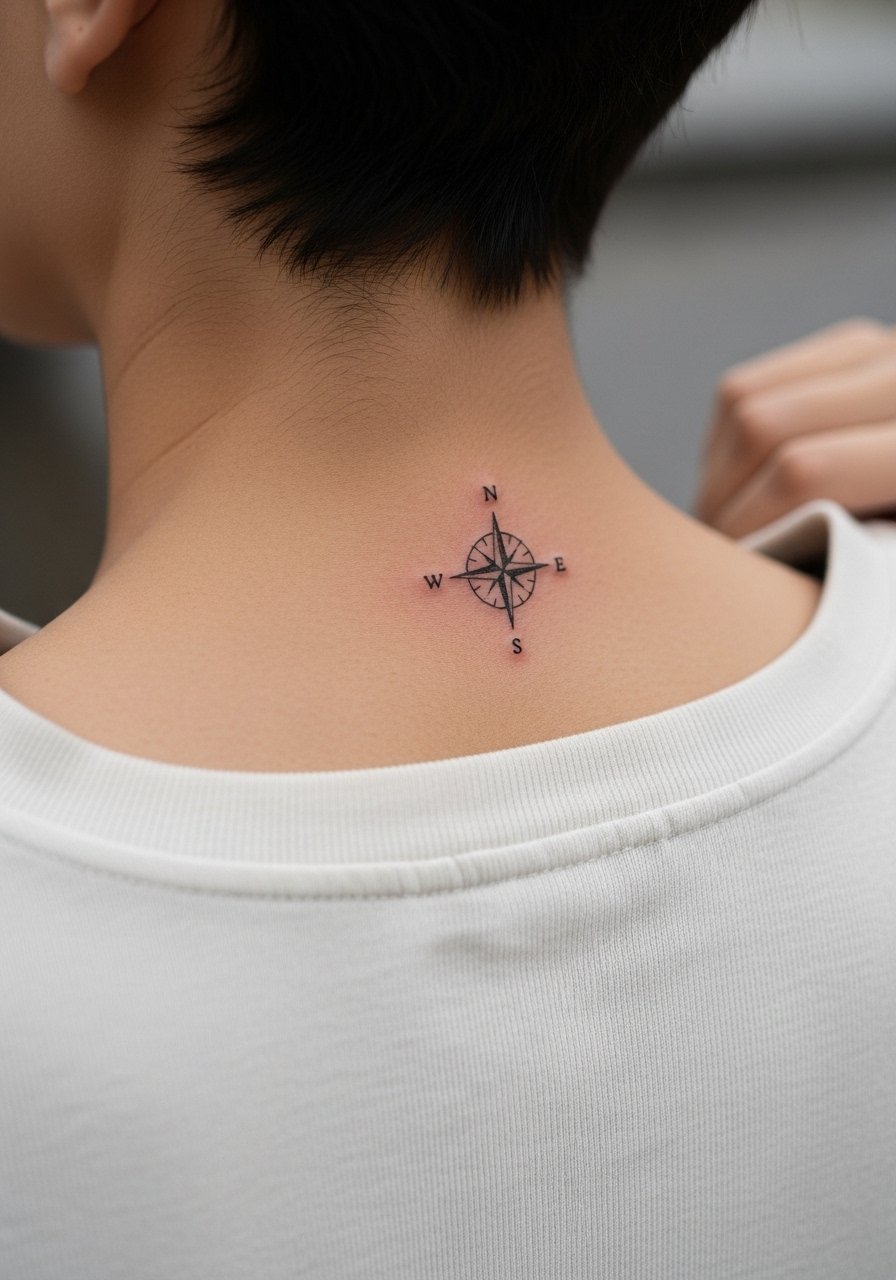
A small compass anchored close to the neckline benefits from clear negative space and slightly reinforced cardinal points so it reads from a short distance. Sessions are quick and discomfort is mild. A common error is shrinking directional markers so they blur. For showcasing, a thin chain pendant necklace sits just above without competing with the compass. Also think about whether you want asymmetry versus perfect centering.
18. Abstract Line Patch With Negative Space

An abstract patch plays to modern minimalists when spacing is generous and line weights vary slightly. In consultation, ask the artist to paint a temporary marker version on your back to preview movement with your shoulders. Pain is moderate and sessions can go one to two hours. A mistake is overcomplicating the patch with too many intersecting lines. For the session wear a loose button-down shirt that you can shift aside without pulling.
19. Tiny Coordinates Under the Nape

Textual coordinates need exact sizing and clear type choice to avoid becoming illegible. Provide the exact numbers you want and request a stencil in the size you intend so you know how legible it will be after a year. Pain is low and the session is brief. A mistake is choosing a decorative font that loses counters. For showing it off, keep a wide-neck tee or an open-back top handy.
20. Thin Celtic Knot Band Across the Upper Back

Celtic knots depend on clean, continuous linework. Request slightly thicker main strands so overlaps remain distinct as the skin settles. Pain is moderate near bony areas and the session may take up to two hours for precise joins. A real mistake is asking for tiny knotwork that fills in. For showing it off, a halter top or a strapless dress keeps the band unobstructed.
21. Single Fine Line Wave Cresting Across the Upper Back

A simple wave uses one confident stroke to read clearly even years out. Tell your artist you want a single confident pass with a small pause at the crest so it reads like motion. Pain is low and sessions are typically brief. The common mistake is over-layering shading which defeats the minimalist intent. Pair this with a wide-neck tee or an open-back dress when you want the curve visible.
Frequently Asked Questions
Q: Will a fine line upper back tattoo blur faster than thicker work on the same area?
A: Fine line tends to rely on narrower channels of ink so it can soften more quickly than saturated work. That said, placement, spacing, and your skin type matter most. If you want longevity, ask for slightly increased negative space and modest line weight during consultation.
Q: How should I dress for an upper back session to make access and healing easier?
A: Wear something that you can easily pull aside without exposing more than needed. A loose button-down or a tank top works well during the session. For post-session comfort, choose soft fabrics and avoid tight straps that press into fresh ink.
Q: Are touch-ups for upper back fine line tattoos common and when are they typically needed?
A: Touch-ups are common around year two to four depending on sun exposure and how dense the original lines were. Expect lighter touch-ups for airy designs and deeper work for more saturated features. Discuss a realistic touch-up timeline with your artist before booking.
Q: Does skin tone affect how fine line upper back tattoos heal and appear?
A: Yes. Line contrast and dot work read differently across skin tones. Ask to see healed examples on skin tones similar to yours and request color or density adjustments so the work reads clearly after healing.
Q: Can I combine fine line upper back work with larger back pieces later?
A: You can, but planning helps. Fine line elements do not always merge cleanly with heavy black or color. If you foresee future expansion, tell your artist so they can place elements and space lines with integration in mind.
Q: Where should I look to find artists who specialize in fine line upper back tattoos?
A: Search local directories, scan convention guest lists, and look for portfolios tagged with fine line and spacing terms. Also try hashtag searches and shop websites. Seeing healed photos on an artist's feed is one of the best indicators of how their fine line work will age.
