
The stencil sat down the spine like a ladder of inked leaves, the client breathing slow while the artist checked symmetry under the studio light. Pain, visibility, and how the piece will look after two sun-soaked summers are the questions that come up in that ten-minute pause. Nail those three before the first pass and the rest of the session becomes about rhythm and line instead of damage control.
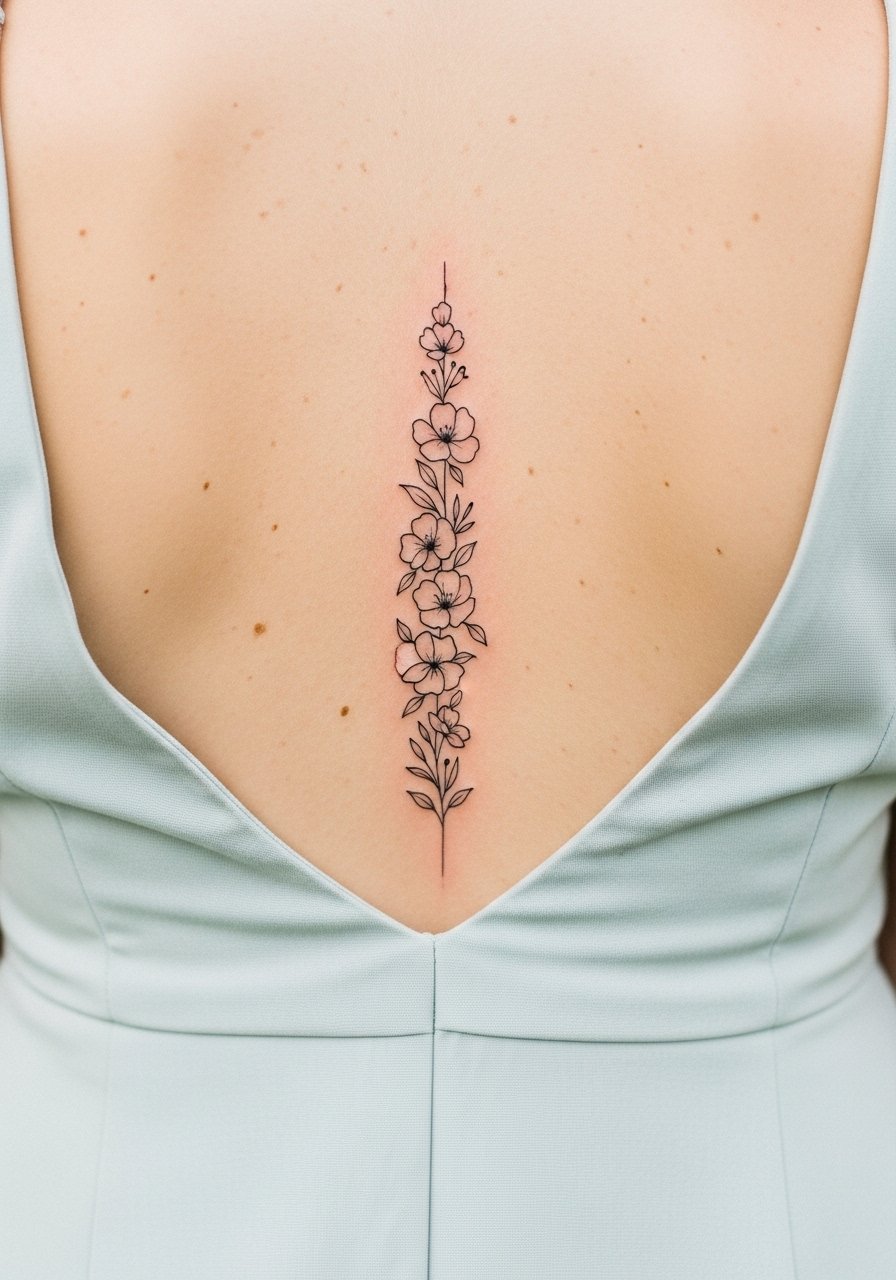
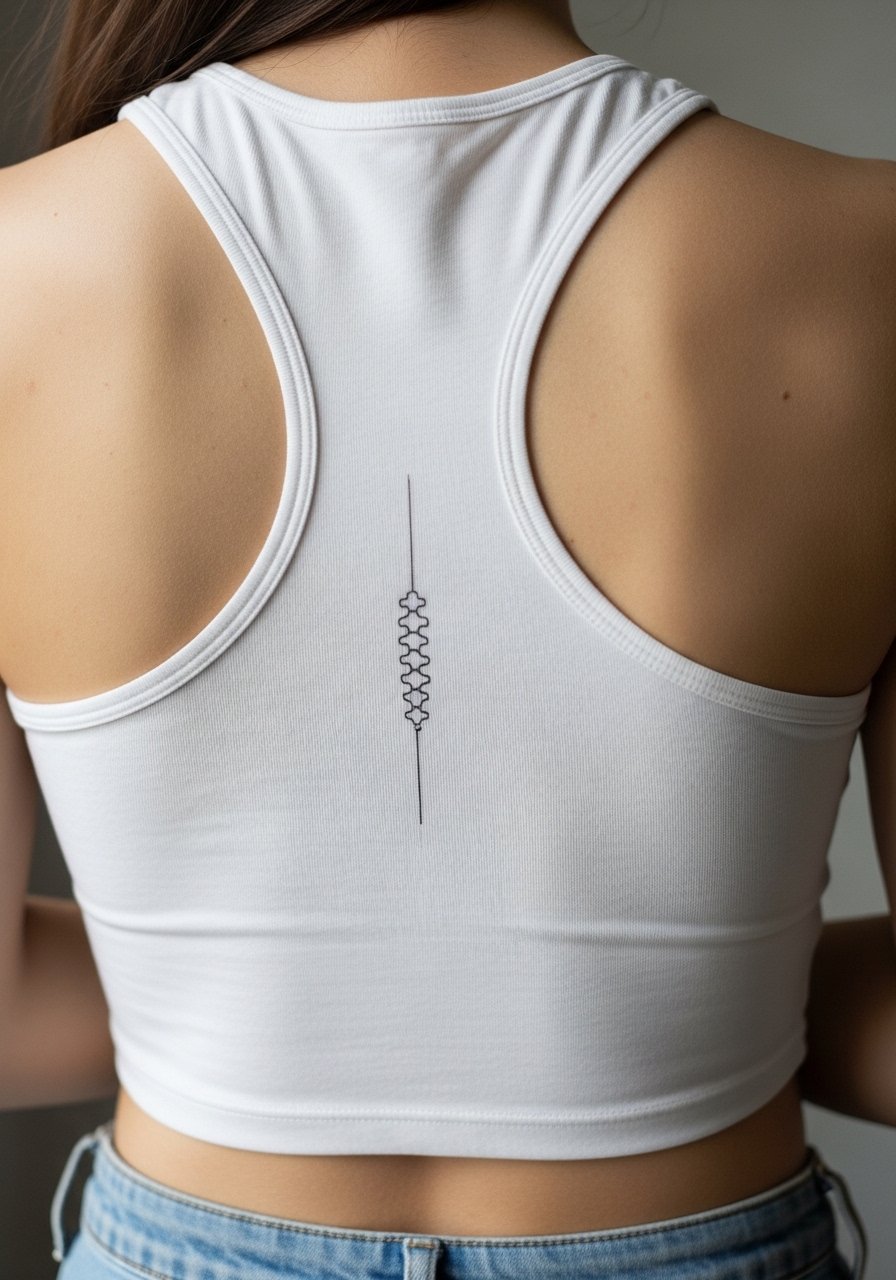
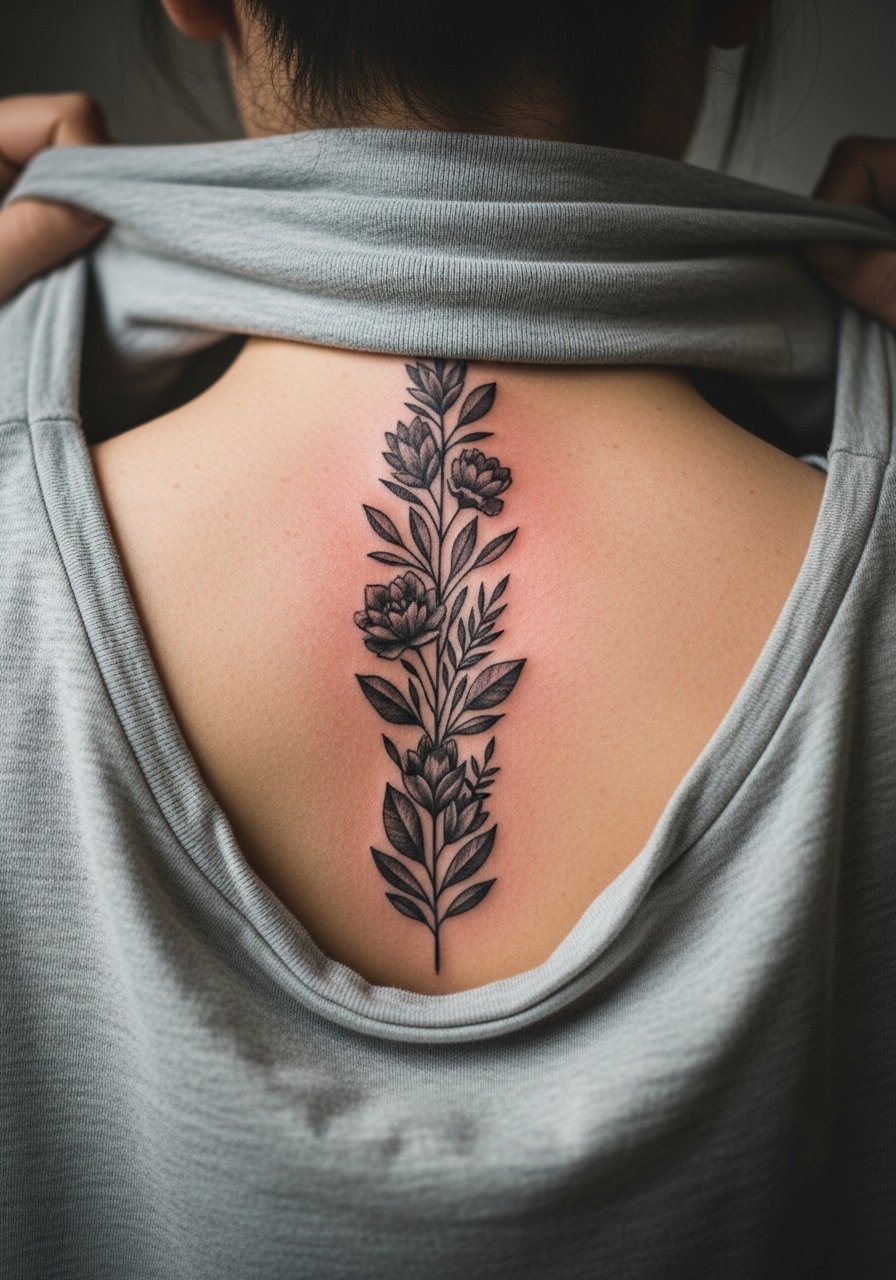
1. Fine Line Floral Column on Lower Spine
I've seen this one on clients who want something delicate that still reads under clothing. Ask for slightly increased spacing between petals so the stipple shading has room to age. Fair warning, lower spine skin gets movement from sitting and bending so tiny filigree can blur faster than you expect. Pain is moderate and the session usually runs one to two hours depending on coverage. For the studio day wear a low-back dress or a cropped tank top you can pull aside to expose only the tattoo zone. A common mistake is asking for micro detail that needs a touch-up by year three, so scale up line weight slightly at consultation.
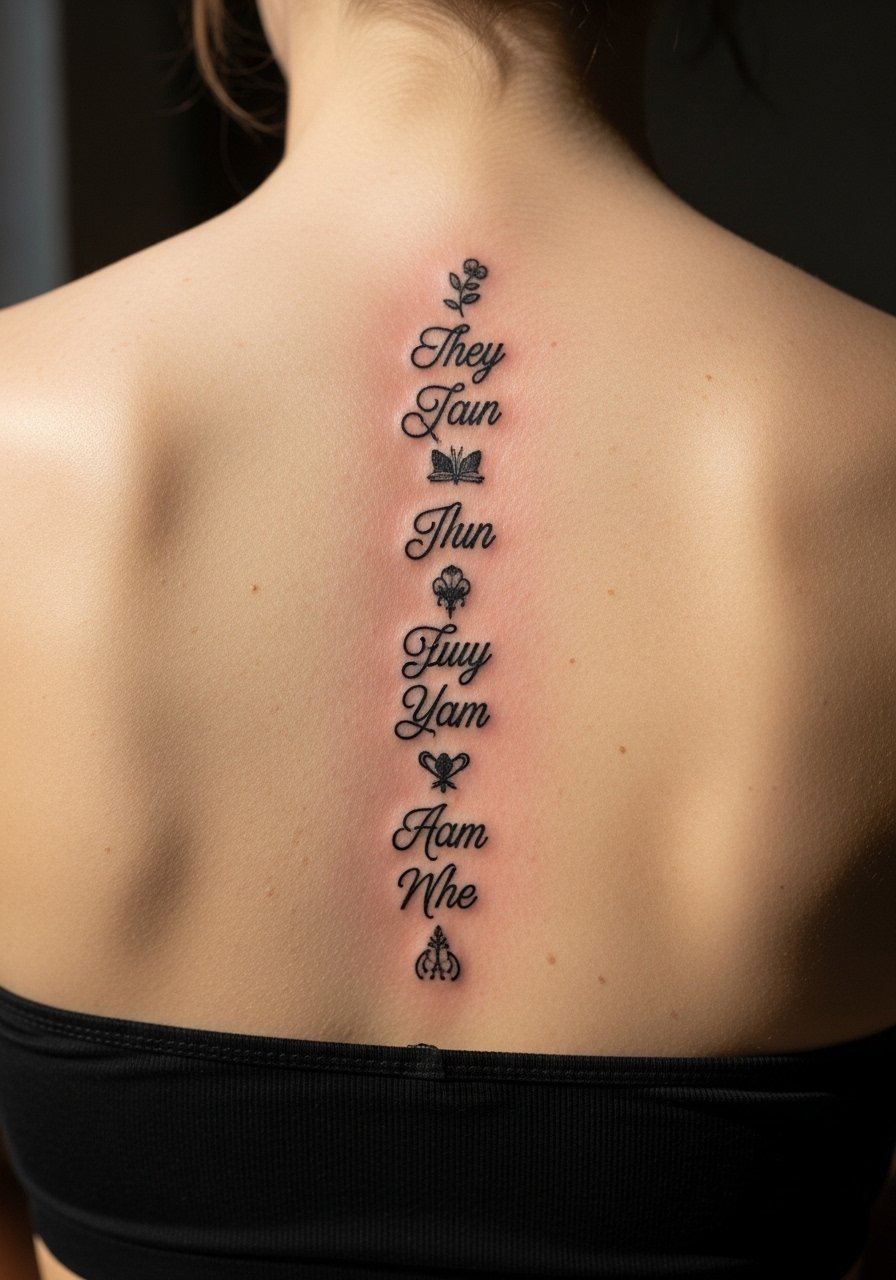
2. Vertical Script Down the Spine in Script Serif
Personal observation: vertical script has a confident look but it needs exact kerning. Tell your artist the exact font weight and provide the phrase set in that size on your spine to preview the flow. Expect a sharper sting near the vertebrae where bone sits close to skin. Sessions are quick for short phrases but longer quotes take time, over two hours if the line length increases. This ages predictably if letters are not crammed together. Pair with an open-back halter top for showing it off. If the lettering has cultural or religious content consider a subtle variation rather than a direct replication to avoid appropriation.

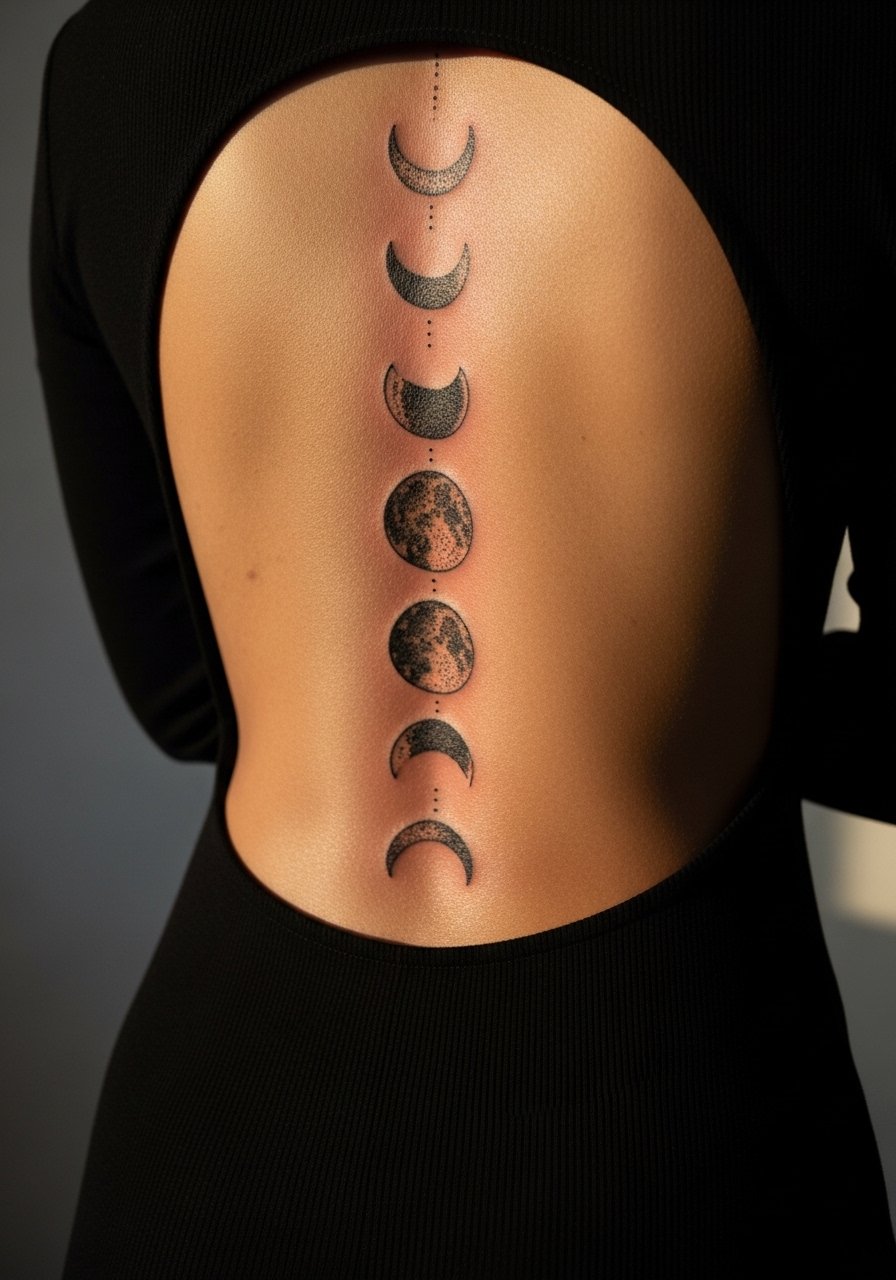
3. Moon-Phase Dot Work Cascade Along the Spine
Fair warning about dot work near the spine. The repetitive motion and shallow dots can either sing or soft-focus into a gray wash over years. Ask for stipple shading with slightly larger dots near areas that get friction from waistbands. The session feels like steady tapping and can run from ninety minutes to three hours depending on density. Expect touch-ups at year four for fine stipple. This pairing looks lovely with an open-back midi dress when you want the phases to be visible at night. The common mistake is crowding too many small moons on a short spinal run.
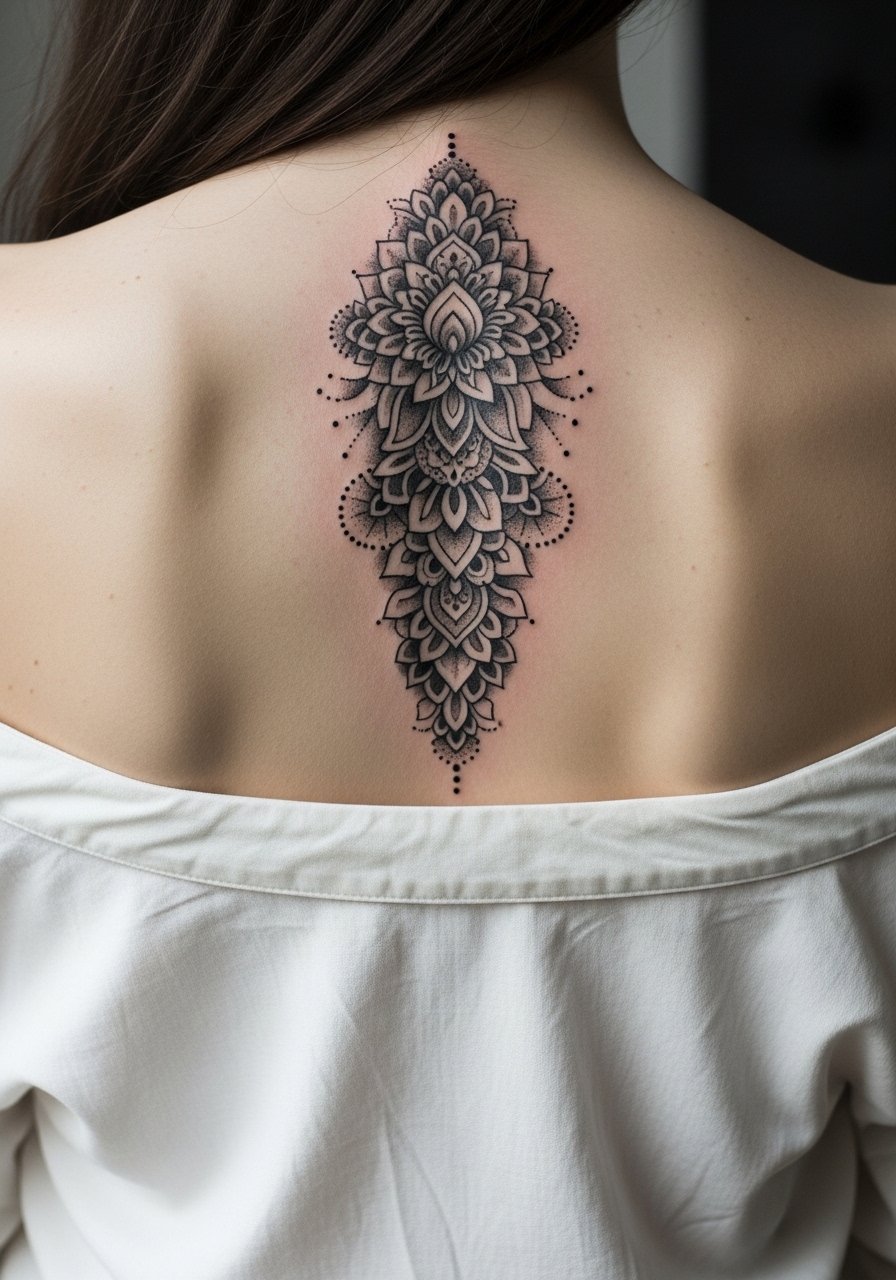
4. Ornamental Mandala Spine Runner with Stipple Shading
When you sit down with your artist for this one, bring photos that show how mandala elements align on a vertical axis. The risk is placing dense motifs directly over vertebrae where skin flex makes tight geometry merge. Pain steps up over bony segments but most clients handle it with breaks. Plan for two sessions if you want highly detailed stipple. Long term, spacing is what preserves the pattern. For careers where back exposure is rare this is a discreet statement, but if you plan to show it, an open-back blouse frames the negative space well. Artists split on sizing for the chest-to-lower-back bridge. One camp favors small, precise repeats. The other argues more breathing room keeps detail readable for years. Ask where your artist stands.
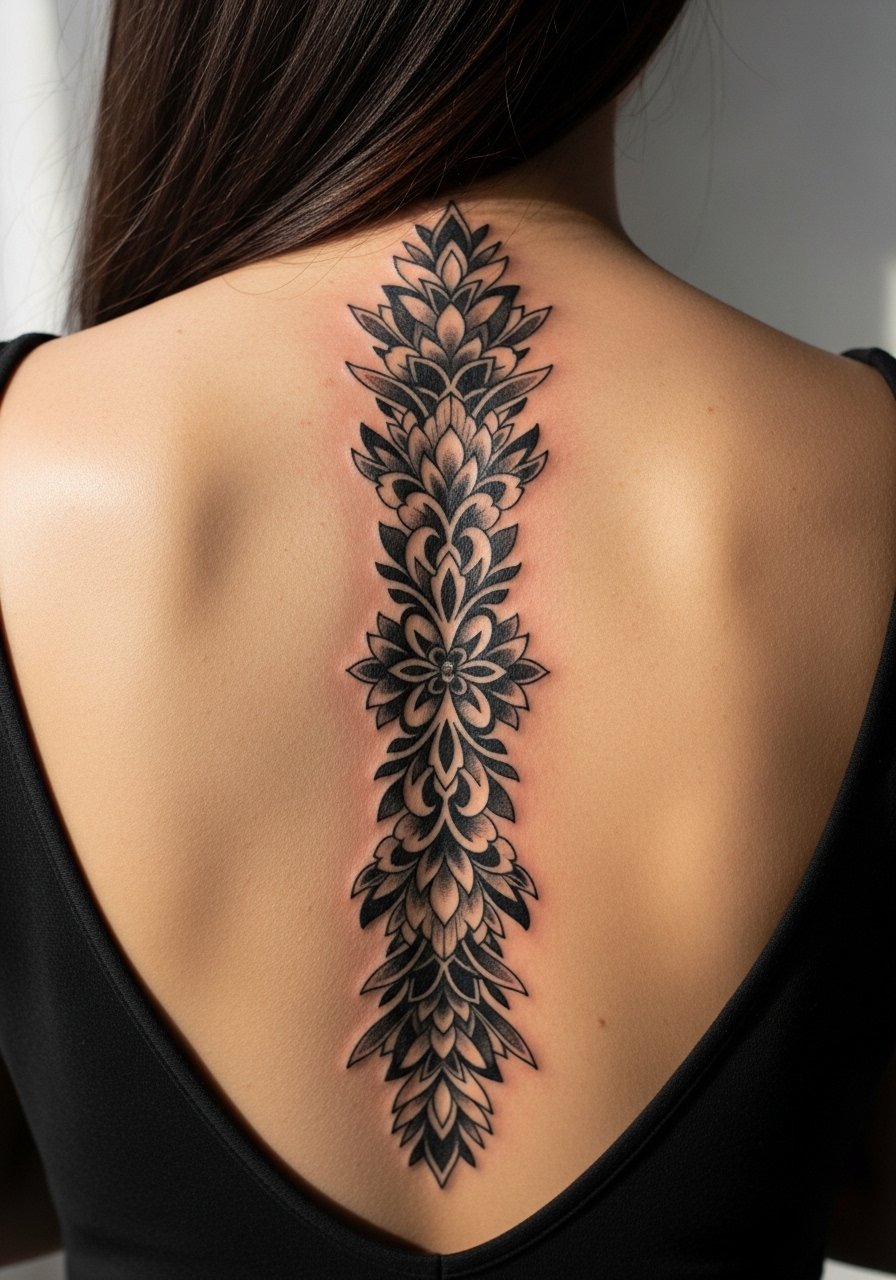
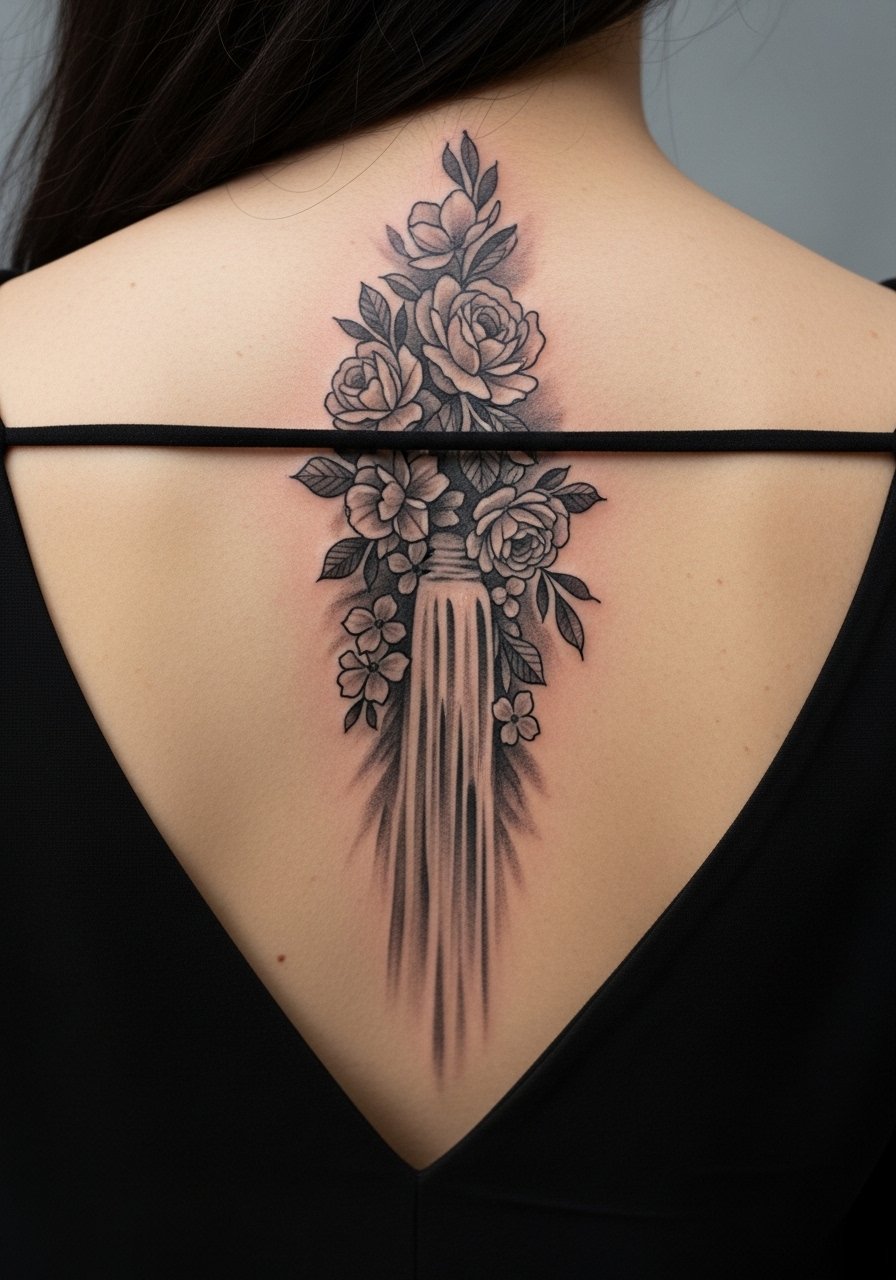
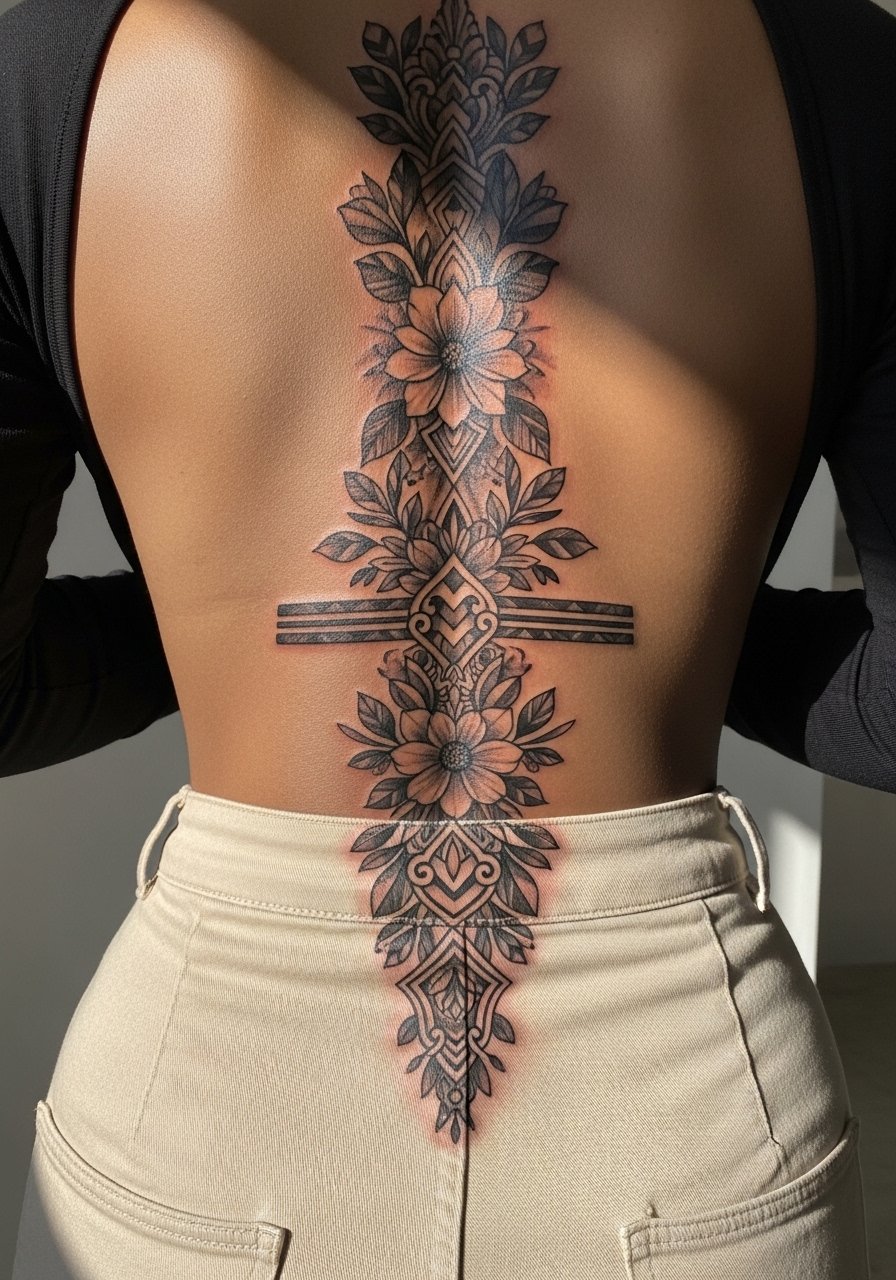
5. Bold Blackwork Column with Negative-Space Florals
The visual impact lead fits this one. Bold linework and saturated black fills hold up far better on the spine than ultra-fine lines. If you want longevity choose saturation over micro detail and ask for clean negative-space breaks to keep the florals readable. Sessions are longer and feel more intense around bone, so expect a higher pain threshold. Touch-ups are usually later and less frequent than for fine line work. For showing it off pair with a backless dress or high-slit styles that let the silhouette show. A common mistake is requesting blackwork too small, which can become a muddy patch after a few years.
Pack Smart
Those upper and lower spine pieces above demand different prep than forearm work, so a few targeted items smooth the session and the first week.
-
Stencil transfer paper kit. Lets you preview vertical placement on your skin before the first pass, which matters for long spinal designs.
-
Topical numbing cream. Applied per instructions eases the edge when vertebrae and ribs make the session intense.
-
Thin protective film roll. Useful for lower-back pieces that rub against waistbands during the first days of healing.
-
Fragrance-free gentle body wash. Cleanses the healing area without irritating delicate linework or stipple shading.
-
Aquaphor healing ointment. Thin layers in the first three days keep moisture in without suffocating densely packed blackwork.
6. Minimalist Single-Line Spine Curve
Visual impact lead: a single clean line that follows the vertebrae can read modern and minimal. The trick is steady linework and consistent depth. The session is short for this kind of work, often under an hour, but it shows any wobble immediately. Aging can be forgiving if the artist spaces the ink with a tad more depth than typical fine line. Pain focuses on spots where the needle crosses bony landmarks. For showing it off try a racerback tank that keeps the spine visible without full exposure. Avoid asking for hairline single strokes over long runs. They may soften into faint lines over a few years.
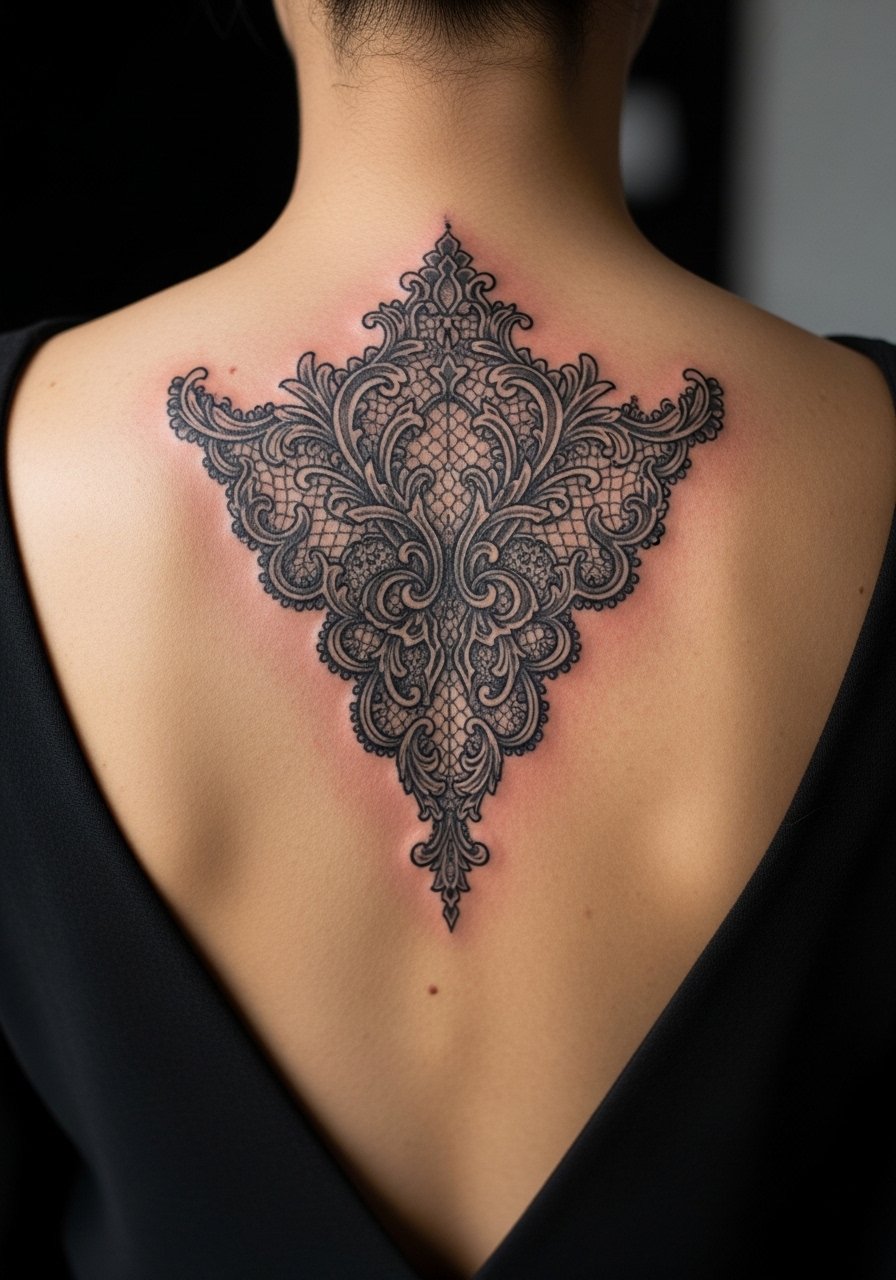
7. Gothic Lace Spine Lacework with Negative Space
Mistake lead: the biggest mistake with lacework is asking for lace at a size that the skin cannot support. Lace needs breathing room and designated negative spaces so the pattern does not collapse. Expect a longer session with patience around sensitive points. This style pairs well with evening wear, especially an open-back gown for occasions where the pattern becomes part of the outfit. Pain peaks over the lower thoracic vertebrae for most people. If you work in conservative environments think about how often you will show this area before committing.
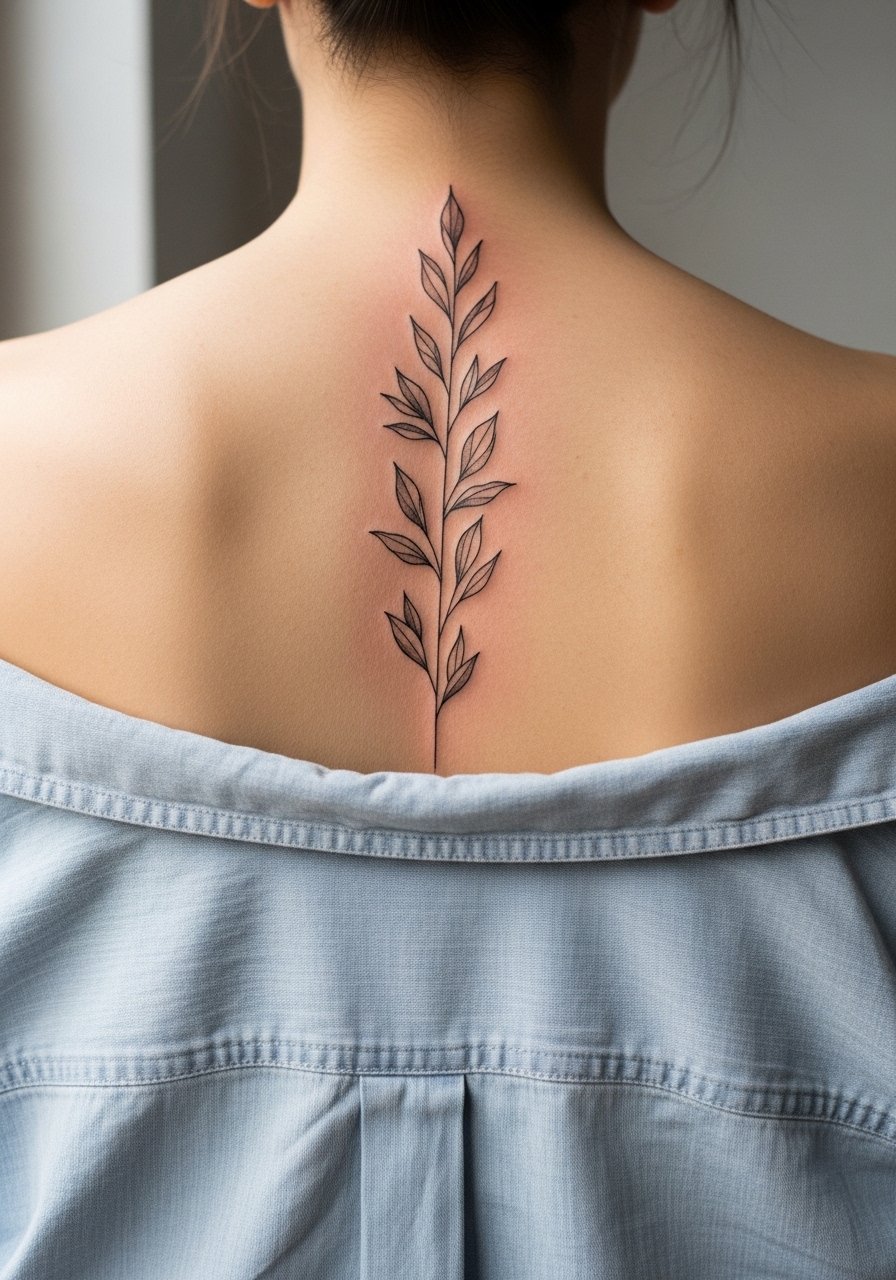
8. Botanical Vine Weave Up the Spine
Aging and healing lead: botanical vines with alternating leaf sizes tend to age well because the variety disguises minor spreading. Ask for slightly bolder leaf outlines near areas prone to friction. Sessions are moderate and often broken into an initial outline and a shading pass. Touch-ups at year three are common for finer veins. For the appointment wear a loose button-down shirt you can pull aside so the artist has clear access. The look transitions from intimate to statement depending on how much negative space you keep.
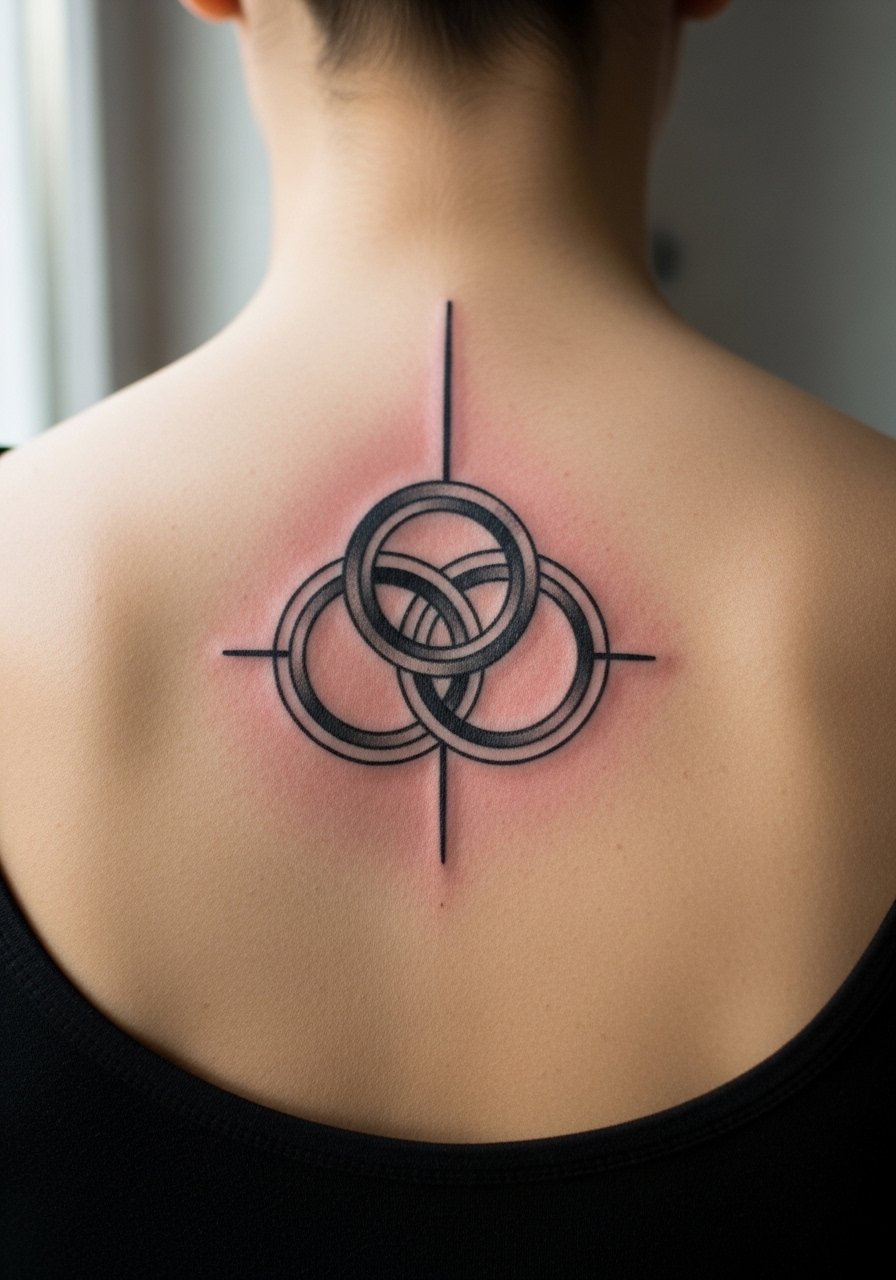
9. Geometric Spine with Interlocking Rings
Consultation lead: when you sit with your artist for geometric spinal work bring printed overlays showing the rings aligned to your vertebrae. The symmetry matters more here than in freeform florals. Pain is more noticeable when the needle crosses bone intersections. Sessions require precision and can take multiple passes. Overly tight geometry is the common error since the pattern needs breathing room to avoid merging. Pair this design with a backless top for nights out. If tribal motifs influence the design, include a note about respectful adaptation rather than literal copying.
10. Micro-Realism Botanical Column
Personal observation lead: micro-realism on the spine can read like a photograph if scaled correctly. Tell your artist you want contrast preserved between shadowed buds and mid-tones so the piece still reads at a distance. This is a longer session with delicate shading work that can last multiple sittings. Expect a touch-up around year three to keep the tiny highlights crisp. For the session wear something that exposes just the mid-back like a wide-neck tee you can shift aside. The common mistake is asking for too many tiny elements on a narrow vertical strip.
11. Script Frieze with Small Icons Between Words
Styling lead: this reads like a story down your back when spaced well. Include small icons to mark pauses but tell your artist the exact spacing to avoid crowding. The session often alternates between single-line text and tiny blackwork icons which makes the sting variable along the run. Healed, the icon details soften slightly so expect minor touch-up work by year three. Pair with a strapless bra or a bandeau under certain tops to keep the chest area unobstructed during healing. Avoid long runs of script without visual breaks.
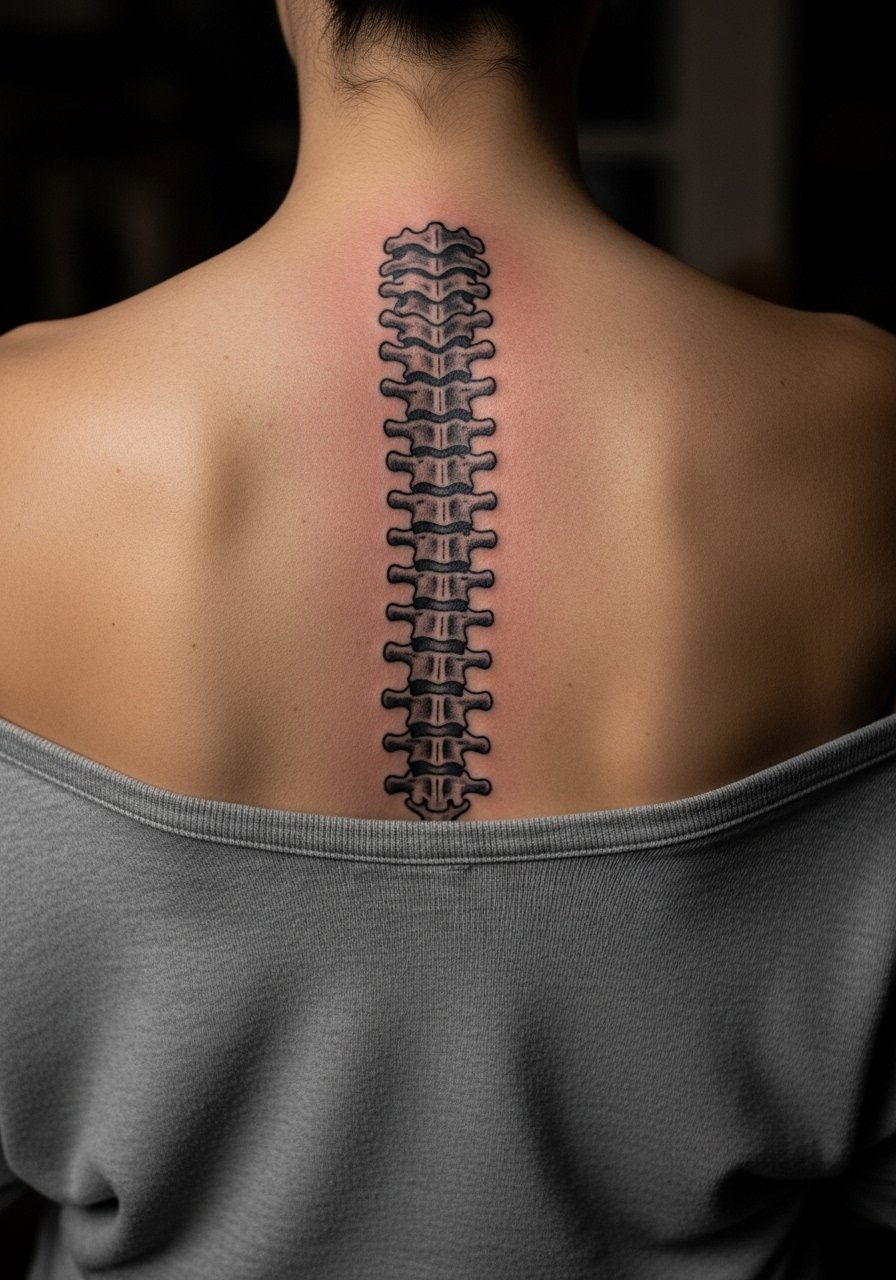
12. Anatomical Spine Illustration with Soft Shading
Pain warning lead: anatomical pieces over the actual vertebrae feel sharper because they sit over bone. The session leans longer if you want high micro-detail in vertebral shading. Healed, highly detailed anatomical lines can lose some crispness so plan for a touch-up if you want long-term clarity. Many pick this design for personal meaning rather than fashion. If you do, discuss exact placement so that the vertebral landmarks line up with your body. For professions where visible back art matters make wardrobe considerations beforehand.
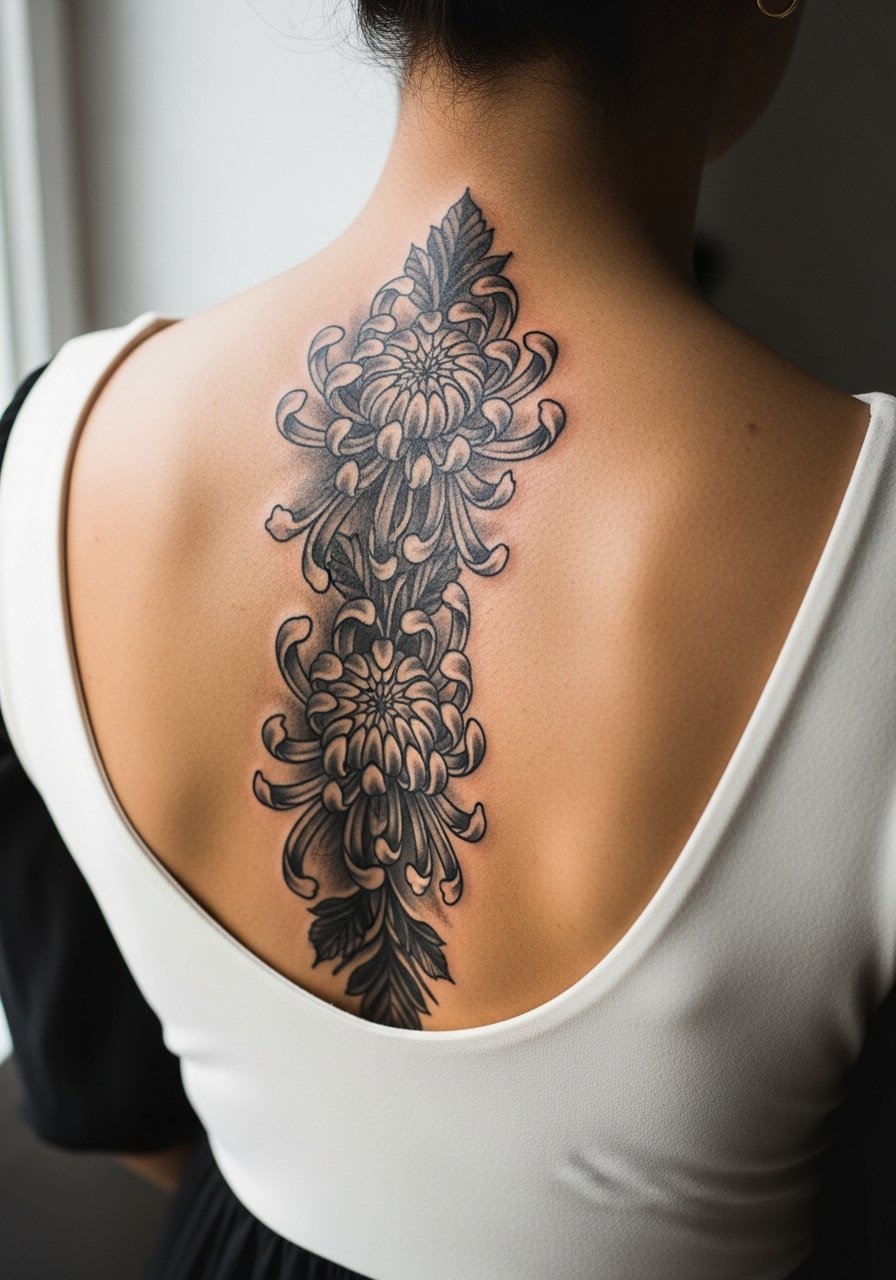
13. Cascading Chrysanthemum Column with Whip Shading
Mistake lead: chrysanthemum petals with too-tight whip shading can merge into a gray block after a couple years. Ask for varied shading techniques and slightly larger petal gaps near high-friction zones. Sessions are medium to long depending on petal count. This design pairs beautifully with a scoop-back dress that keeps the column visible. Common errors include over-detailing at the base where waistbands sit. If you plan frequent swimsuit use, factor in extra sun protection to preserve contrast.
14. Minimal Geometric Dots Progression
Visual impact lead: a vertical progression of dots that grow in size moving down the spine is deceptively simple and forgiving. Tell your artist the exact diameter progression you want so the rhythm reads intentional. Sessions are surprisingly quick and the pain varies with vertebral prominence. Dot spacing helps longevity. If you plan to show it, a halter dress frames the negative space. The common mistake is inconsistent dot sizing, which ruins the intended flow.

15. Waterfall Floral with Soft Grey Wash
Aging lead: soft grey wash near the spine reads like a watercolor without color when done with proper depth. The key is balanced saturation so the wash does not spread into a muddy field. Sessions involve layered shading that can stretch over multiple visits. For showing it off choose an open-back blouse that lets the faded edges breathe with clothing. Expect a touch-up at year three to restore subtle gradients. The common mistake is asking for wash so faint it disappears at six months.
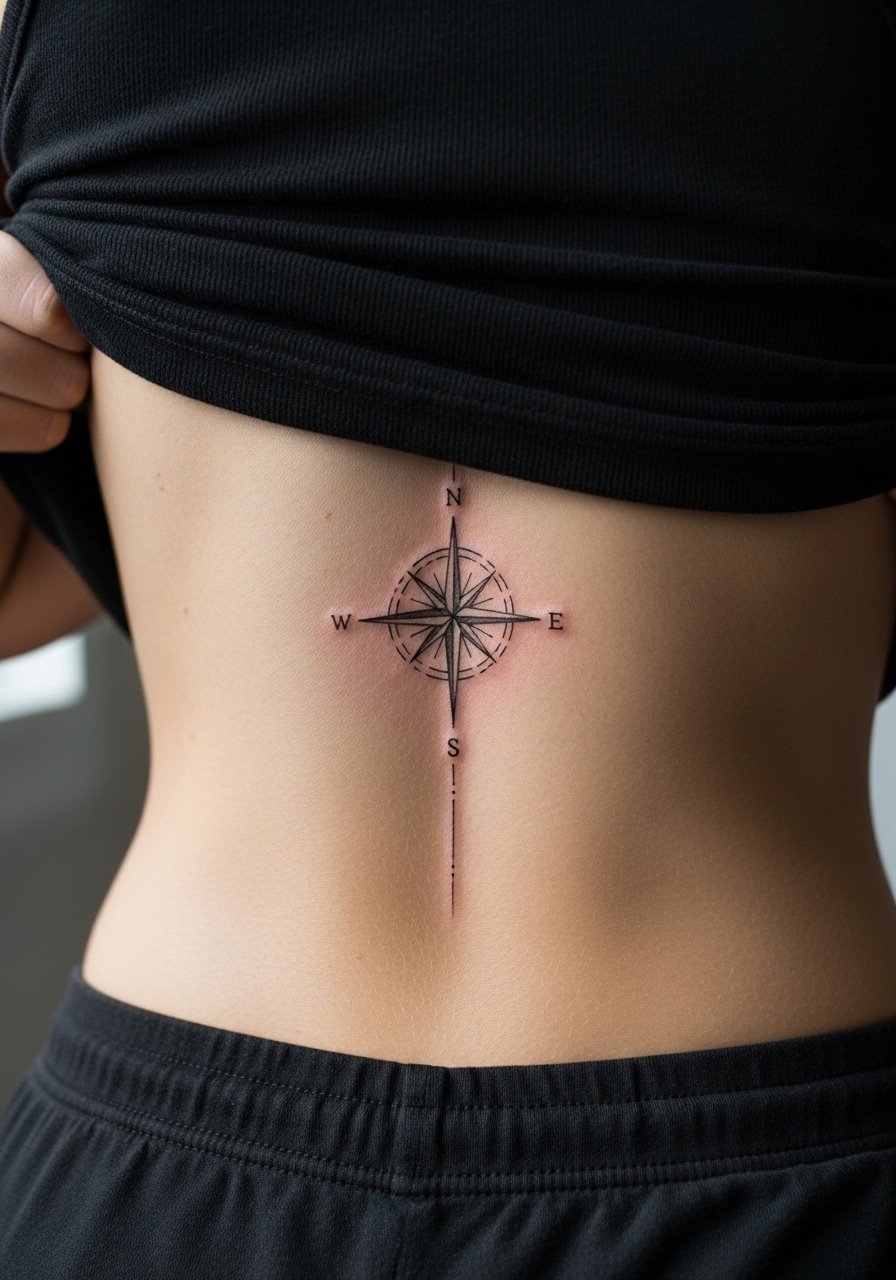
16. Vertical Compass with Fine Line Rays
Consultation lead: compasses need a true center line aligned to your spine. Bring photos of your back standing naturally so the artist can plan the axis. Sessions are moderate and involve precise linework for the rays. Long term the fine rays may need a light touch-up at year three depending on sun exposure. For the session wear a loose tank top you can pull aside, and for showing it off loose shirts with low backs work well. A common error is off-center placement that becomes obvious once healed.
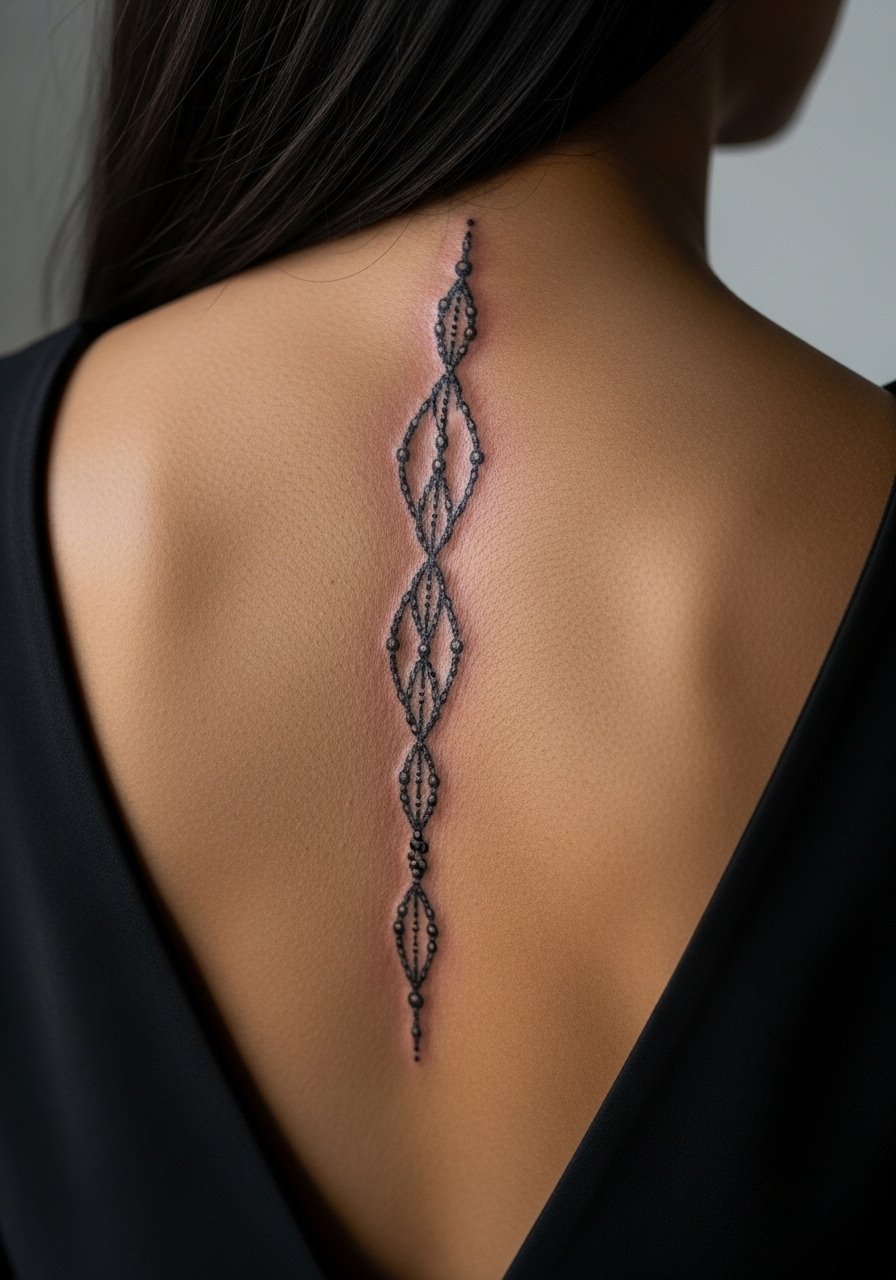
17. Threaded Chain Spine with Tiny Beads
Styling lead: chain motifs running down the spine look like jewelry and pair well with clothing that exposes the central back. Ask for bead spacing to be slightly larger than imagined so the beads do not blur together. Sessions are relatively brief but the sting increases over bony points. For showing the piece, try an open-back dress or a thin chain pendant necklace that sits just above the topmost bead to create framing. If you work in an industry with conservative dress codes consider how often you will reveal the piece.
18. Abstract Brushstroke Spine with Sparse Linework
Personal observation lead: abstract brushstrokes centered on the spine read like a signature and age more gracefully because they rely on negative space. Tell the artist how much texture you want and which areas may absorb more ink from movement. Session time varies with complexity and can be completed in one sitting if the strokes are broad. Expect minor softening at year five depending on exposure. For the session wear a zip-up hoodie you can open to allow access without full undressing. The common mistake is asking for too many narrow strokes.
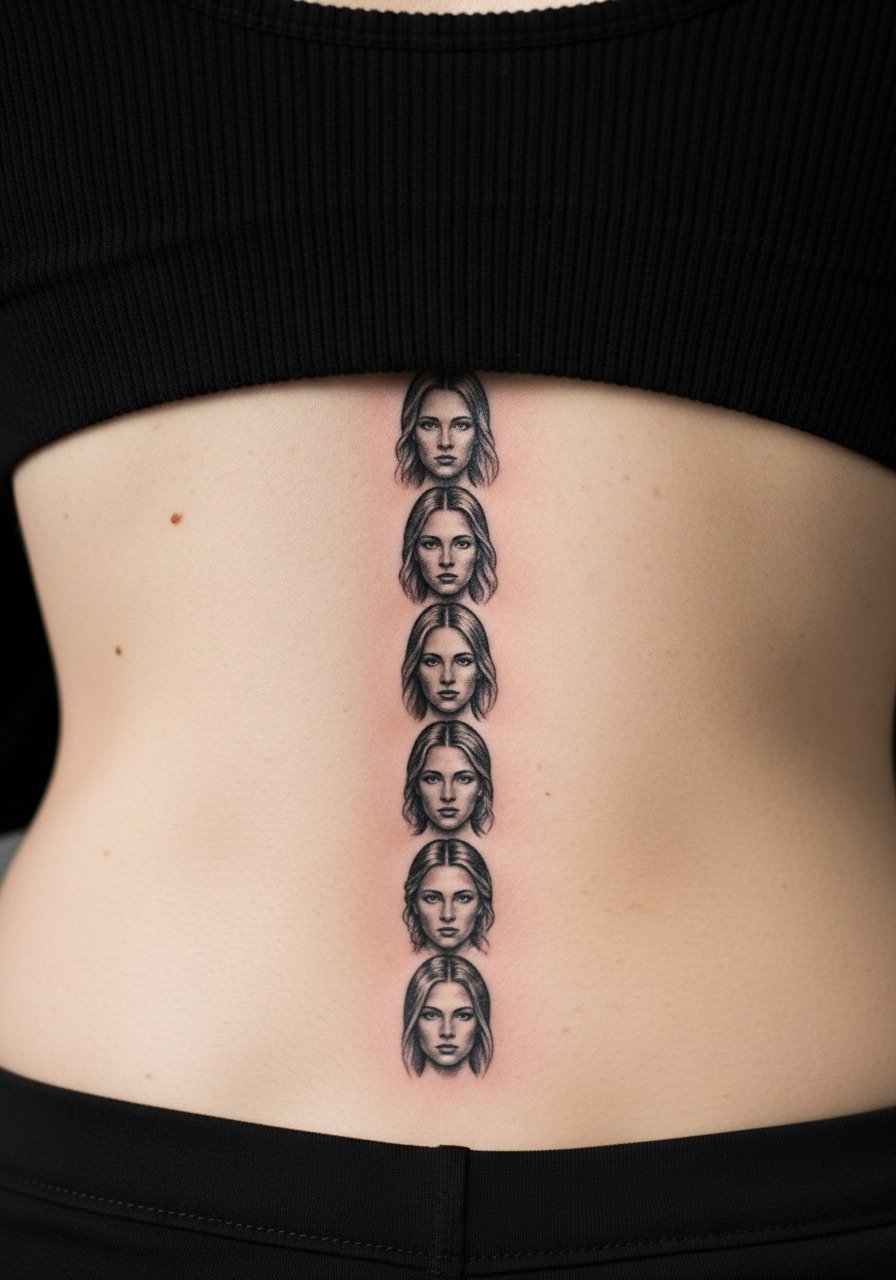
19. Tiny Portraits Stacked Subtly Along the Spine
Controversy lead: artists debate micro-portraits along the spine. One camp argues they can be rendered cleanly with proper contrast and touch-ups. The other camp warns that portrait detail fades and smudges on long vertical runs. The truth depends on scale and the artist's photorealism experience. Sessions are lengthy and likely staged across appointments. For showing, a backless top keeps attention focused without crowding. A realistic expectation is a touch-up at year two to maintain facial detail.
20. Botanical Spine with Accent Geometric Bands
Mistake lead: combining florals with bands can create a competing focal point if sizes are not balanced. Tell your artist which element you want to dominate and plan band widths accordingly. Sessions alternate between organic shading and crisp band edges, which affects sensation and time. Healed, the bands stay bold while the botanical shading softens a bit, so expect a small touch-up at year three. For the session choose a top like a loose drawstring linen pant outfit for comfort and movement, and a shirt you can shift aside. The common error is mismatched scale between bands and blooms.
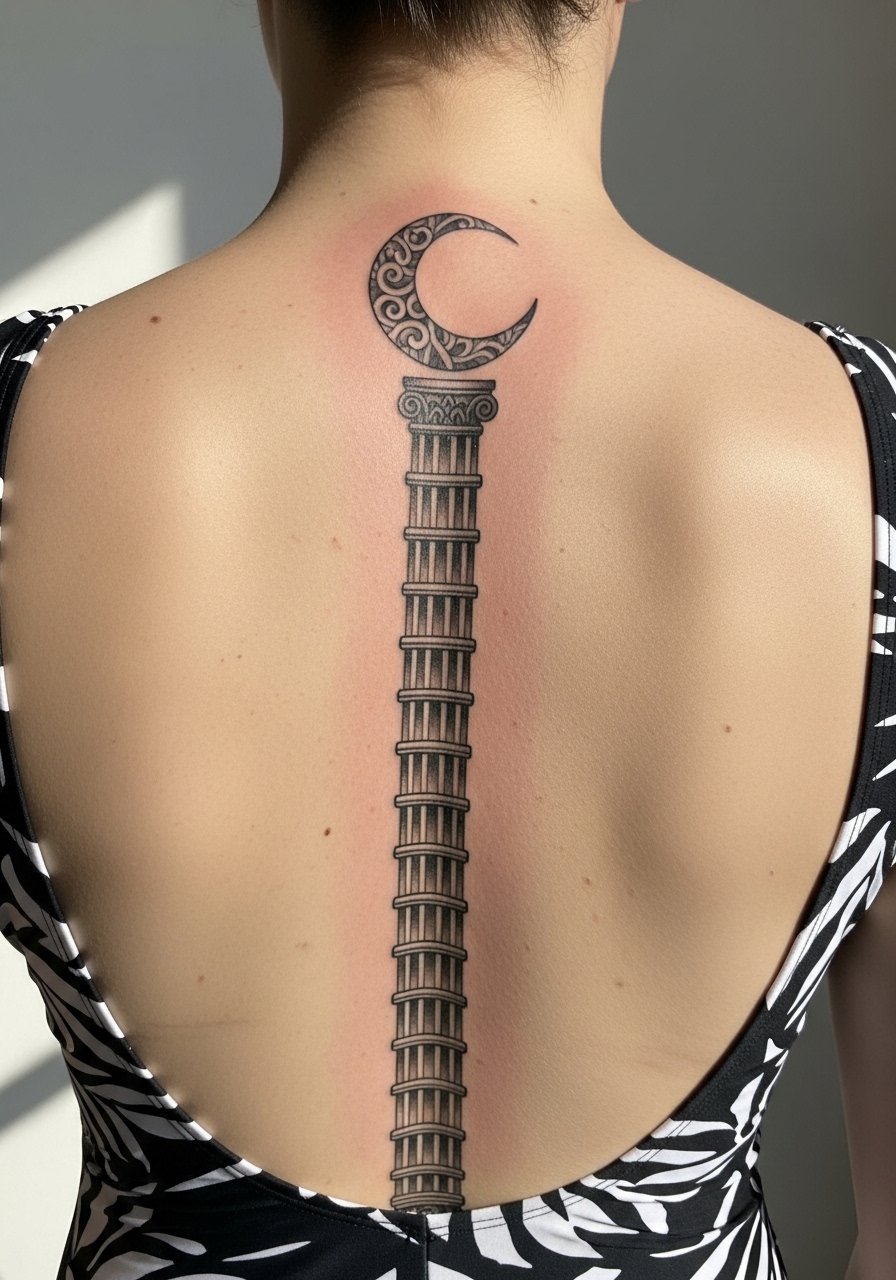
21. Crescent Moon Ladder Running From Nape to Lower Back
Decision-pressure lead: sitting in the chair with the stencil down is when most people decide if the vertical crescent spacing suits their back curve. The ladder of moons needs even vertical spacing to follow natural spinal curvature. Sessions can be completed in one to two hours and the pain rises as the needle crosses high points of the vertebrae. For showing this off pair with an open-back swimsuit or halter dresses. Expect light softening after a few years and plan a touch-up if you want the crescents to remain crisp.
Frequently Asked Questions
Q: Will fine line spine tattoos blur faster than bold blackwork on the same area?
A: From what I've seen, fine line tends to soften sooner because small spacing and hairline strokes are more likely to spread with skin movement and sun exposure. Bold blackwork creates durable contrast that often needs fewer touch-ups. If you love fine line, ask the artist to slightly increase line weight and spacing so the piece holds detail longer.
Q: How painful is getting a tattoo directly over the vertebrae compared to lower back soft tissue?
A: Pain is higher when the needle crosses bony landmarks because there is less cushioning. Softer tissue areas along the lower back give a more even sensation. Everyone tolerates pain differently, and sessions can be broken up, so plan breaks and talk to your artist about pacing.
Q: What should I wear on the day of a full-spine session to keep the artist's access simple?
A: Wear clothing you can shift aside without fully undressing. Good options include a loose button-down shirt or a zip-up hoodie you can open. For lower spine work a low-back dress or crop top helps expose only the necessary strip without extra discomfort.
Q: Do vertical spine pieces interfere with common clothing waistbands during healing?
A: They can. Waistbands that sit across the lower spine create friction during the first week. Choose loose waisted bottoms for the initial healing phase and avoid tight belts. If the design sits where elastic rubs, mention that to your artist so they can advise on placement.
Q: Are there cultural concerns with certain spine designs like mandalas or tribal bands?
A: Yes. Some motifs originate from spiritual or indigenous traditions. Many people opt for respectful variations rather than literal replicas. Discuss provenance with your artist and consider subtle adaptations that honor origin without direct appropriation.
Q: How often should I realistically expect touch-ups for detailed spine work?
A: It depends on style and exposure. Fine line and micro-realism may need light touch-ups around year two to four. Bold blackwork and geometric pieces often go longer before needing refresh. Factors like sun exposure, friction, and skin type affect timing, so plan for a realistic touch-up window rather than a firm date.
