
Fine line kiss marks have been all over saved boards lately, and what looks delicate on a phone can read very different on real skin. The small choices you make now about scale, placement, and spacing decide if the tattoo still looks crisp in two years. Below are realistic kiss mark ideas with notes on how they heal, what to ask your artist, and how to dress the piece so it gets the attention you want.
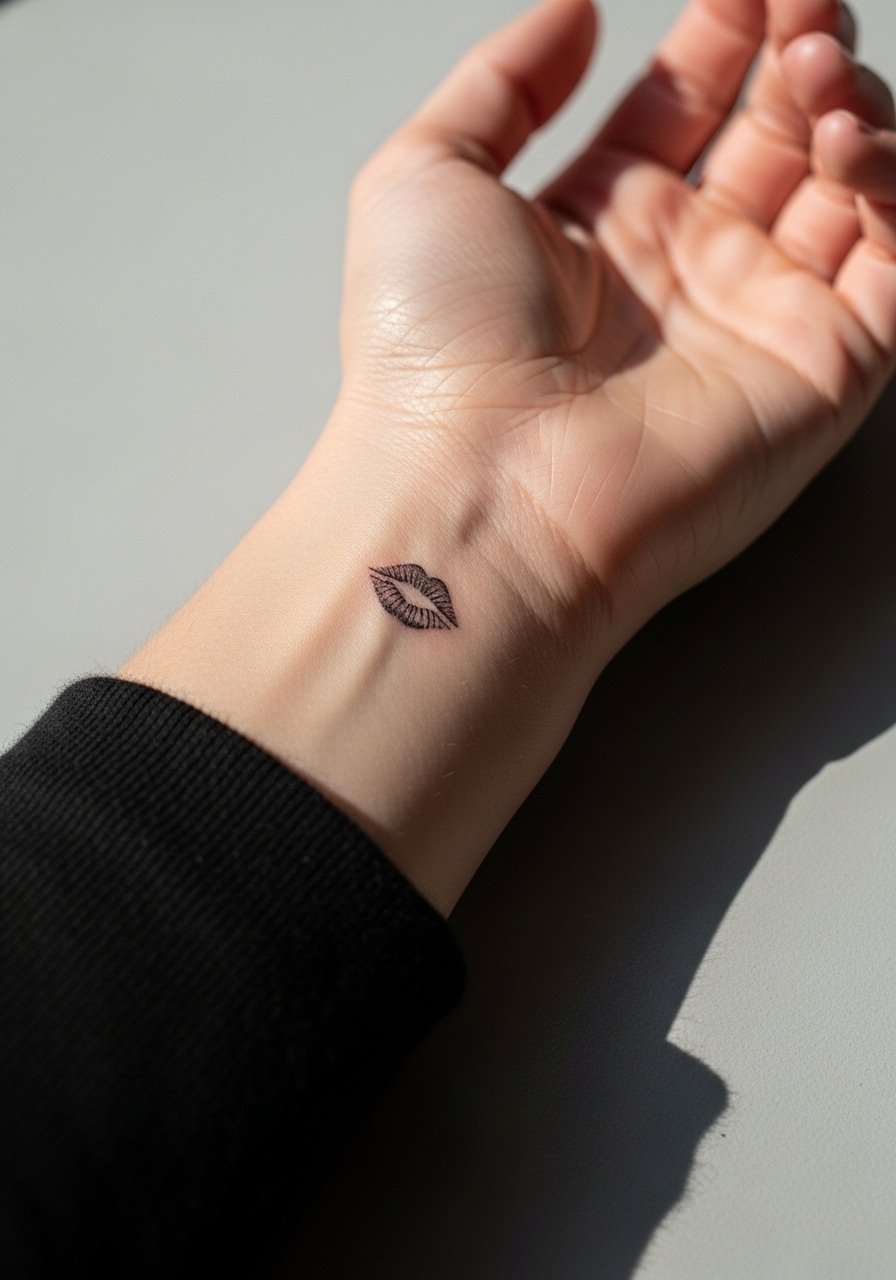
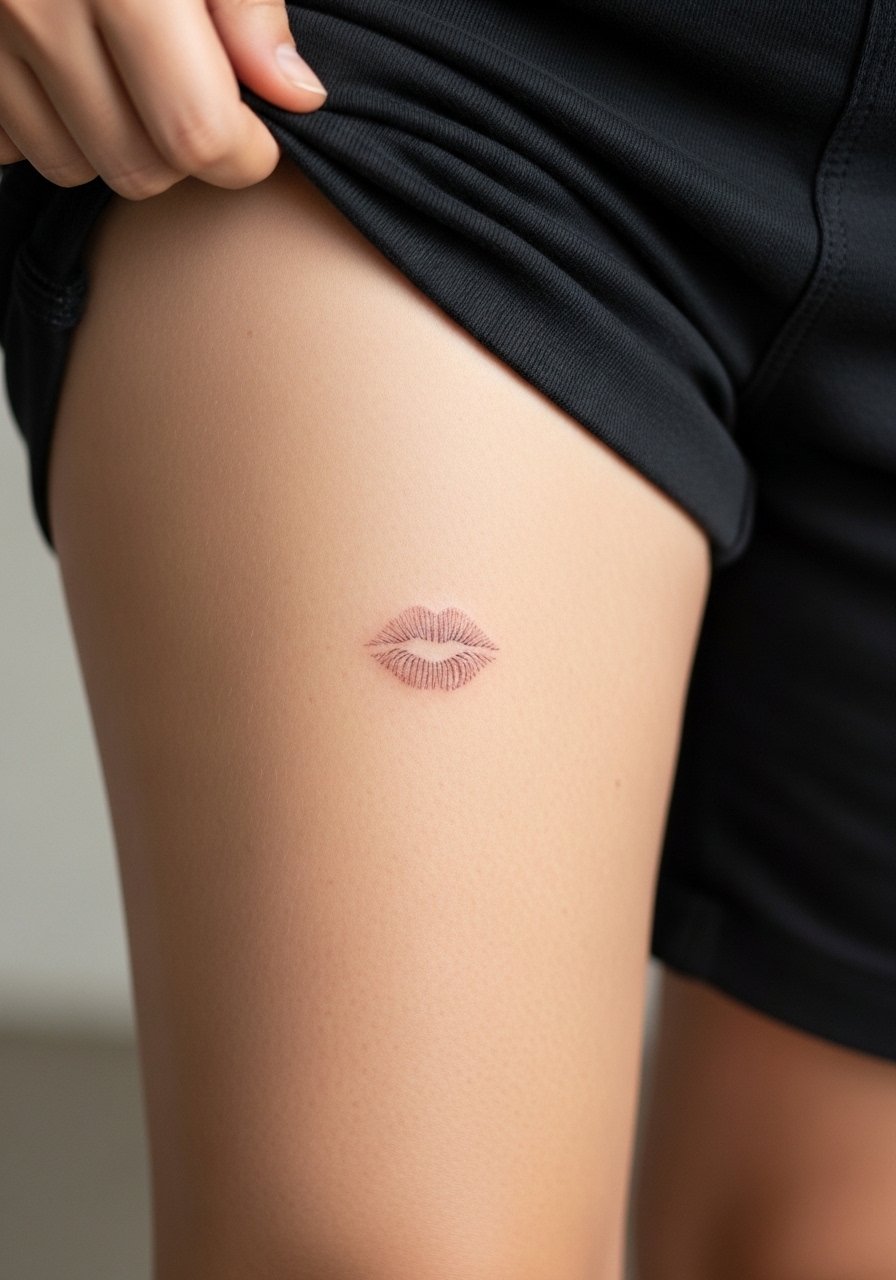
1. Tiny Fine-Line Kiss on the Inner Wrist
I've seen tiny wrist kiss marks hold up best when they're scaled to the wrist's movement and given a slightly bolder contour than online references. Fair warning, wrists are exposed to sun and friction so expect touch-up at year three to five. In consultation, ask the artist to preserve small gaps in the lip print and to avoid razor-thin single strokes that can blur. Session time is short, about 20 to 40 minutes, and pain is low to medium. For showing it off, pair with a thin chain bracelet or a minimalist watch, both keep attention on the mark without crowding the wrist.
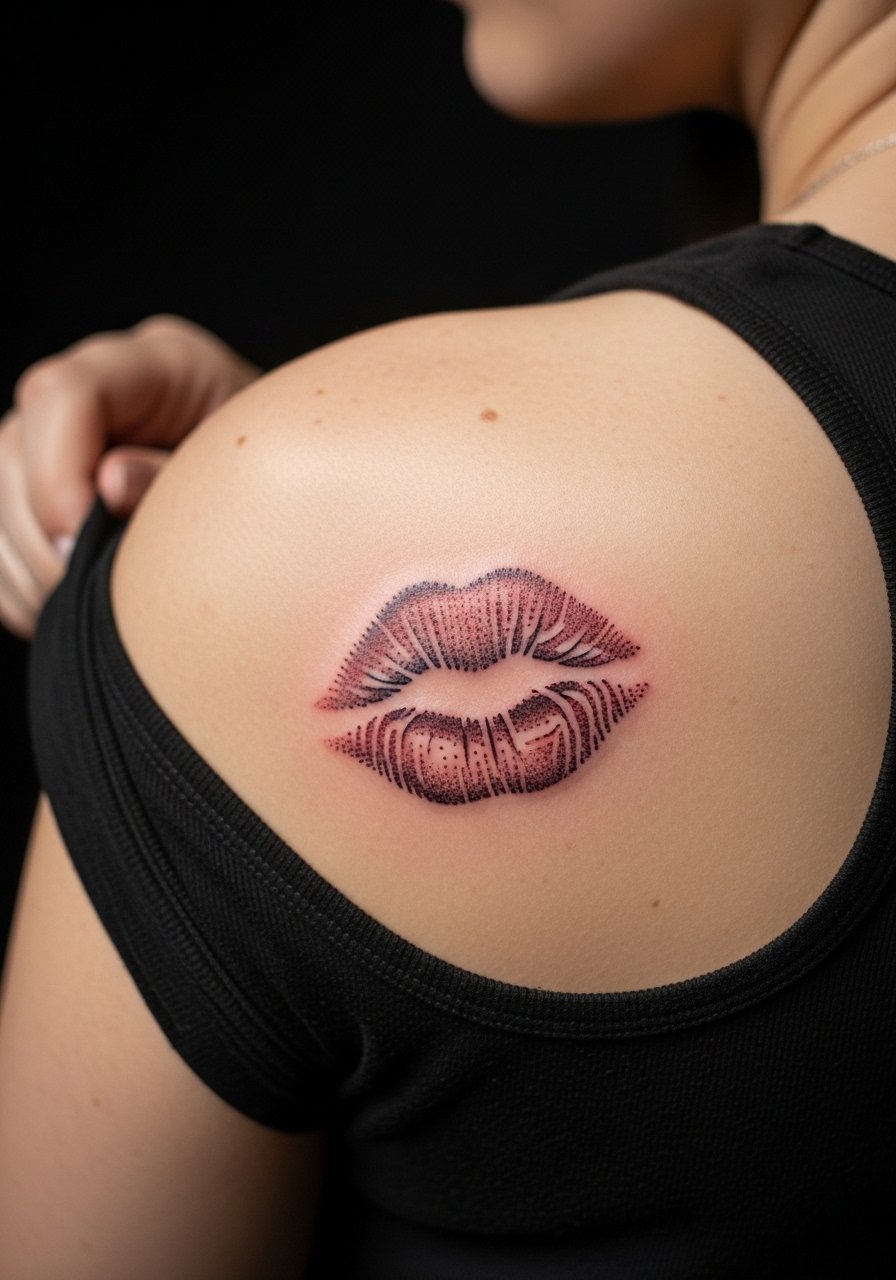
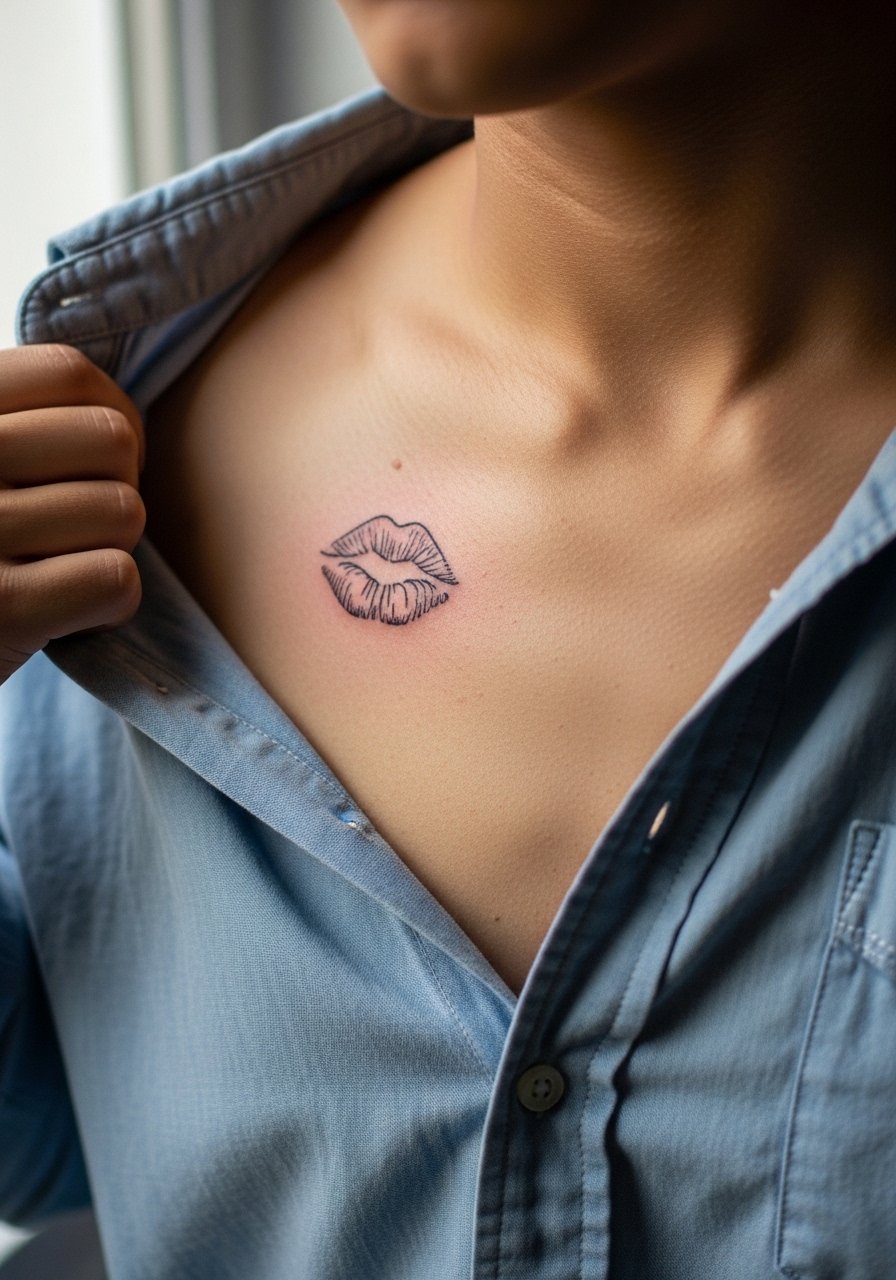
2. Micro-Realism Kiss Near the Collarbone
There is a lot to love about a micro-realism kiss near the collarbone because the slight curvature of bone gives the print depth. Most clients want color that reads like lipstick rather than a flat red so specify saturation and a tiny highlight during consultation. The area heals well with low blowout risk if the artist uses shallow layering and avoids overcrowding the white highlight. It is visible in cropped tops so plan wardrobe around it. For evenings try an open-back midi dress or for casual wear a racerback tank to frame the piece. Session time is usually 45 to 90 minutes.

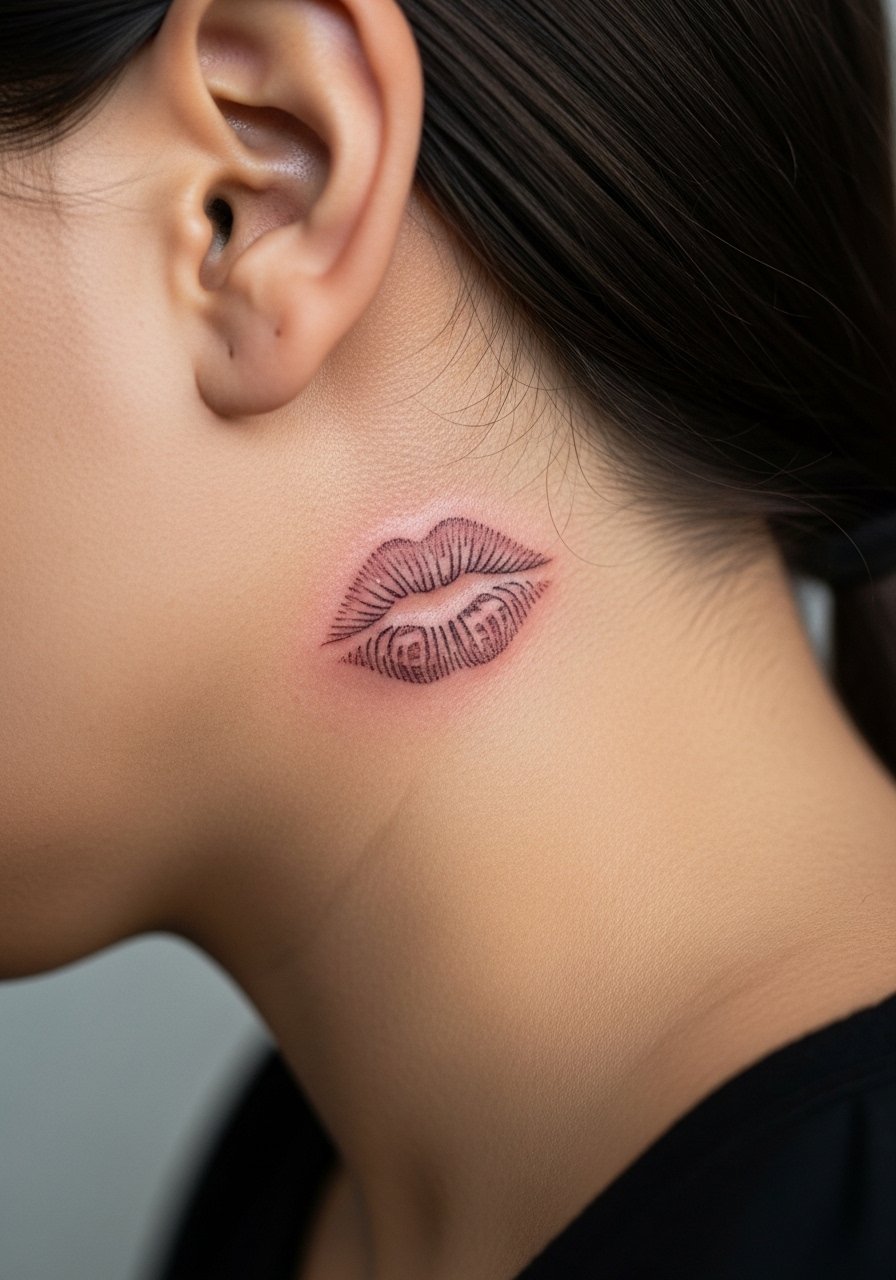
3. Subtle Kiss Behind the Ear, Below the Hairline
Styling lead, short and direct: this tucked kiss reads like a secret in photographs and works best when done as a tiny, single-color imprint on the skin just below the hairline. The area needs careful stencil placement because it sits on an uneven curve. Expect a brief session under 30 minutes and spot-specific sensitivity that varies by person. For professional considerations, remember a behind-the-ear mark can be hidden by hair or shown with updos depending on your work environment. Ask for a test transfer so you can see placement before any needle touches skin.
4. Minimal Outline Kiss at the Ankle
Visual impact lead, straightforward: a tiny outline kiss at the ankle sits well with sandals and cropped trousers because it reads like a delicate charm. The ankle moves a lot, so the artist should space the linework a touch wider than on the forearm to avoid crowding. Session time is short but the skin there is thin and can sting; expect a 3 to 5 pain level on most scales. For showing it off pair with strappy sandals or roll-up jeans so the tattoo gets visible negative space around it. Typical touch-up timelines are around year two to three for small outlines.

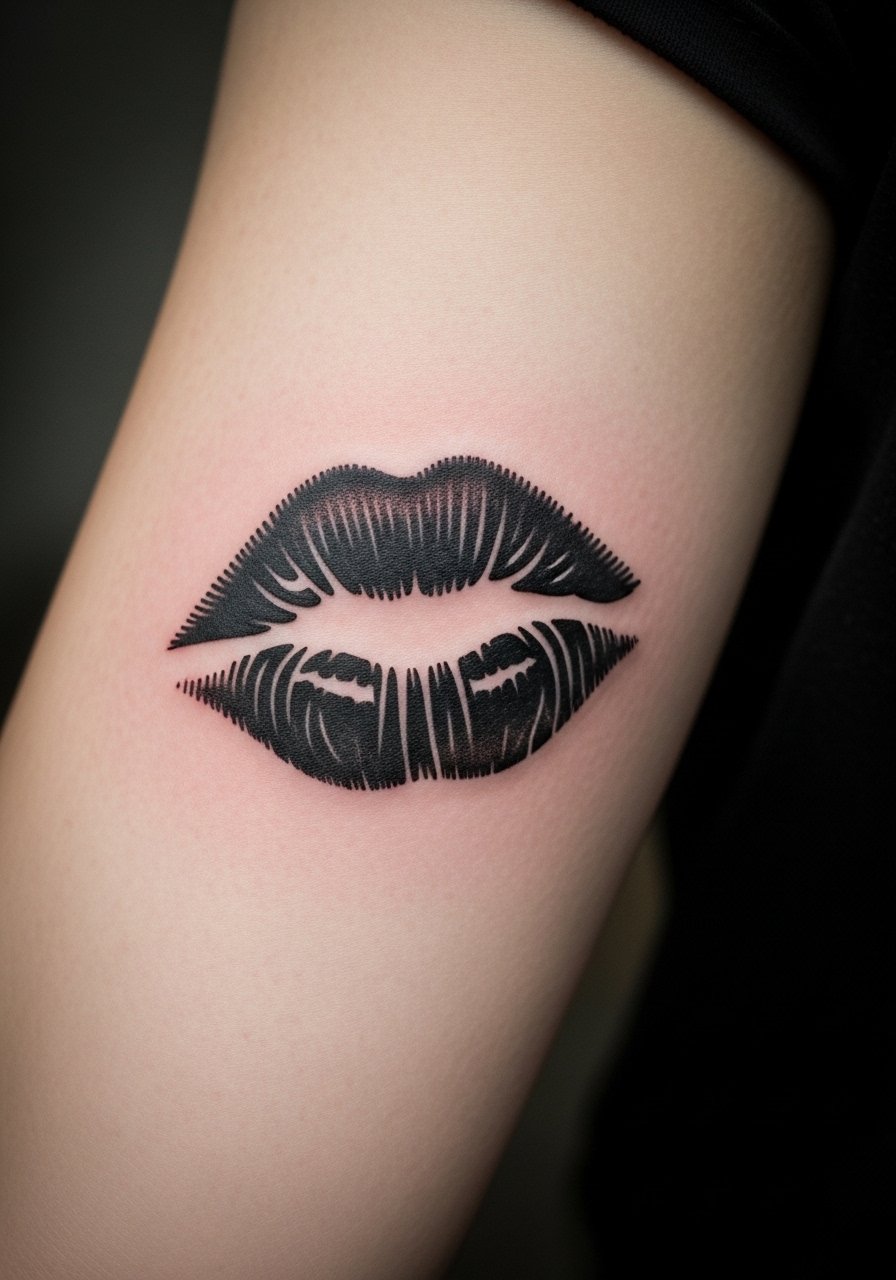
5. Bold Blackwork Kiss on the Outer Forearm
Visual impact lead again but with contrast: a bold blackwork kiss brings a graphic, legible silhouette that reads from across a room. This option is better for people who want low-maintenance pieces because heavy saturation tends to age cleaner than micro hairlines. The biggest mistake is asking for tiny detail inside a saturated field. Tell your artist you want a solid silhouette with one point of fade at the edge rather than a packed smudge. Pair it with rolled-up sleeves and a loose button-down shirt so the forearm displays without competing elements. Session time is usually 60 minutes and pain is manageable.
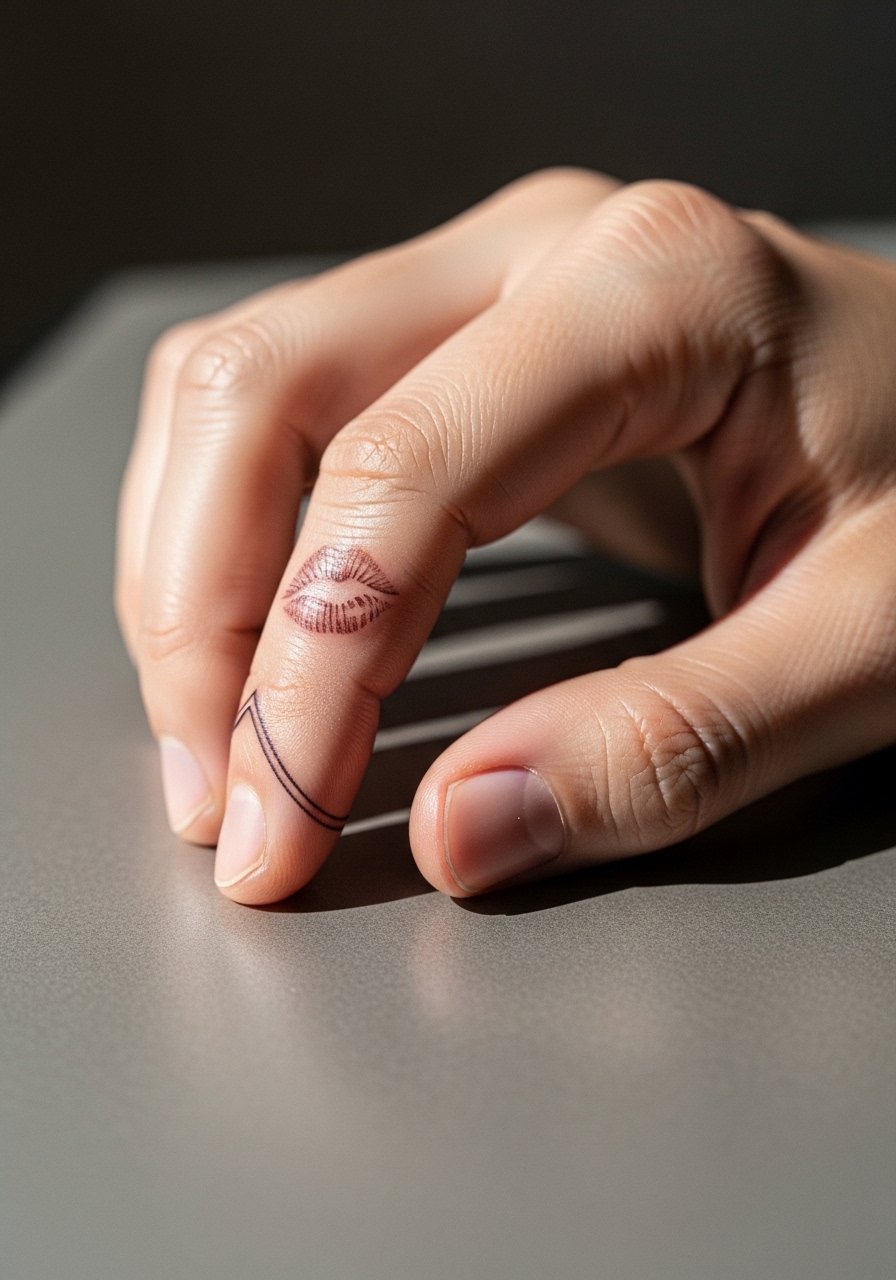
6. Tiny Kiss on the Ring Finger
Consultation lead, candid: ring finger tattoos need the most specific conversation because skin there sheds and receives a lot of friction. Many people expect finger ink to last as long as an arm piece and then feel surprised when lines soften. Ask your artist about line spacing and plan for periodic touch-ups. The session is short but can be painful and healing depends on hand use. For a discrete look, consider pairing the finger mark with a thin band or a delicate stacking ring so the tattoo feels integrated with daily jewelry. Hand tattoos still affect hiring in some industries so think about your career path before committing.

Studio Day Picks
The wrist and finger pieces above heal differently from larger work and a few small items smooth out the session and the first week.
- Stencil transfer paper kit. Lets you preview exact placement on wrists and collarbones before the artist inks, especially helpful for the tiny and micro-realism pieces in ideas 1 through 6.
- Topical numbing cream. Applied according to directions takes the edge off finger and ankle sensitivity without obscuring linework.
- Thin protective film roll. Useful for ring finger and wrist marks where friction and hand washing threaten the early healing window.
- Fragrance-free gentle body wash. Gentle cleansing helps prevent irritation on exposed forearm and collarbone pieces.
- Aquaphor healing ointment. A thin layer during the first days keeps small linework hydrated without over-saturating the tiny needle channels.
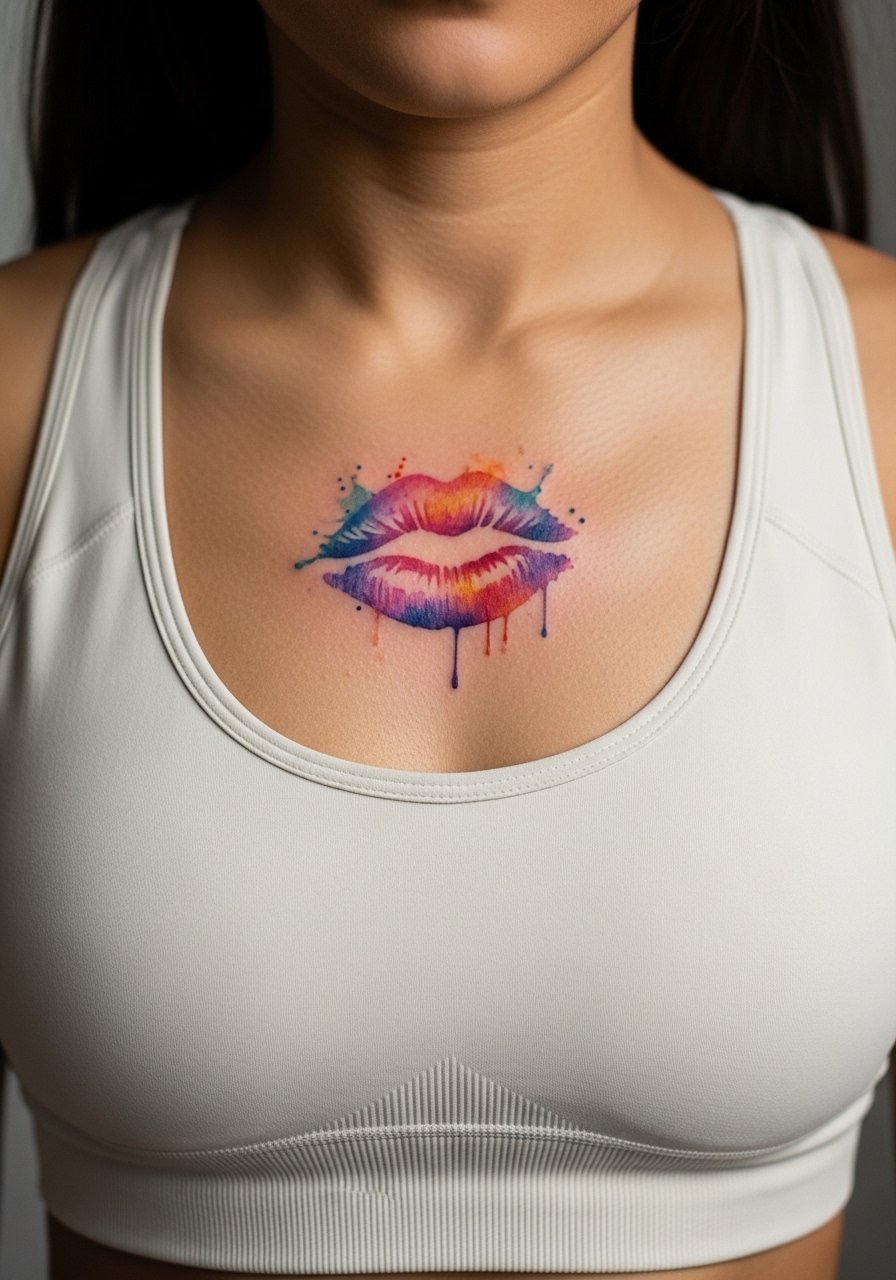
7. Watercolor Smudge Kiss on the Sternum
Aging and healing lead: watercolor smudges over the sternum can look soft and ethereal when healed, but they require a different approach than a punchy micro-realism piece. The sternum shifts with breathing and body position so ask for looser edges and less dense saturation to avoid the patchy bruise look. Session time is moderate and pain is higher on the sternum than on limbs. For the appointment wear a fitted sports bra or bandeau so the artist can access the area without you being uncomfortable. Sternum pieces need an artist experienced with torso movement because placement errors show up as distortion when you move.
8. Side-Rib Realistic Kiss with Smudge
Controversy lead, explicit: fine line on the ribs splits artists into two camps. One group says the stretch and shallow dermis blur lines within two years. The other group argues that with proper depth and spacing the lines settle clean. My take is to discuss which camp your artist practices before booking. For this placement ask for slightly larger scale and spaced contours so the design has room to breathe as the skin moves. Pain is higher on the ribs and sessions are often split into two appointments. Session wear should be a cropped top lifted slightly to expose only the rib area.

9. Shoulder Blade Color Kiss with Stipple Shading
Personal observation lead: the shoulder blade is forgiving because the skin is flat and not constantly rubbed. A color kiss with subtle stipple shading keeps the print soft at the edges and avoids dense packing that can age into a patch over time. Tell the artist you want a light dot-work gradient from the lip edge outward to suggest texture without heavy saturation. Session time is moderate and pain is low to medium. For showing it off choose an open-back dress or a tank top pulled aside so the shoulder blade becomes a focal point in evening photographs.
10. Hidden Kiss Behind the Hairline for Subtle Show-Off
Styling lead, short: a kiss placed just under the hairline or low on the neckline works like a hidden charm that becomes visible with an updo. Placement must be described in the consultation exactly as "on the skin below the hairline" so the artist avoids misplacement on the ear. The session is quick and sensitivity is low. If you want it visible in photos, bring hair clips and consider a set of bobby pins to style hair away from the area during events. This placement gives the option to hide it for work and show it for nights out.

11. Upper Thigh Hip Kiss for Private Placement
Pain warning lead: the upper thigh and hip take ink well but require session wear that gives the artist access without making you cold. These placements are intimate and often chosen for pieces meant to stay personal. Expect a moderate pain level and plan a longer session if you want color or layered texture. For the appointment choose high-cut shorts or a swimsuit bottom so the area is exposed only where needed. Keep in mind healing can be hindered by tight waistbands, so avoid restrictive clothing in the first two weeks.

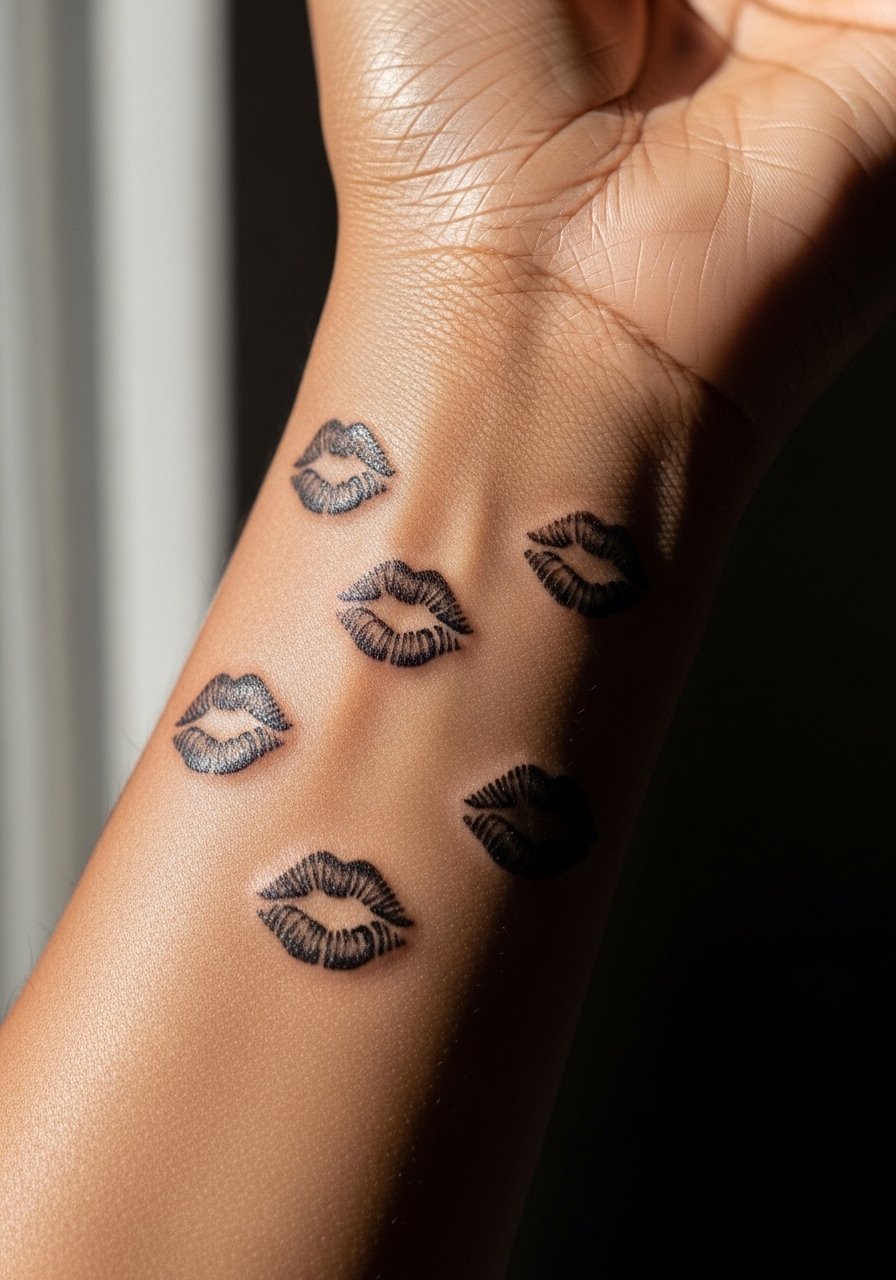
12. Repeated Tiny Kisses as an Ankle Band
Mistake lead: repeating tiny kiss marks around the ankle looks charming but the most common error is making each print too small and identical. Variation in scale and slight rotation makes the band feel hand-placed. The ankle is a friction zone so space the marks and keep outlines a touch bolder than the teeniest lines. Session time depends on count but plan for thirty to ninety minutes. This design does not need heavy color to read. For footwear consider sandals or loafers that leave the ankle exposed but protected while healing.

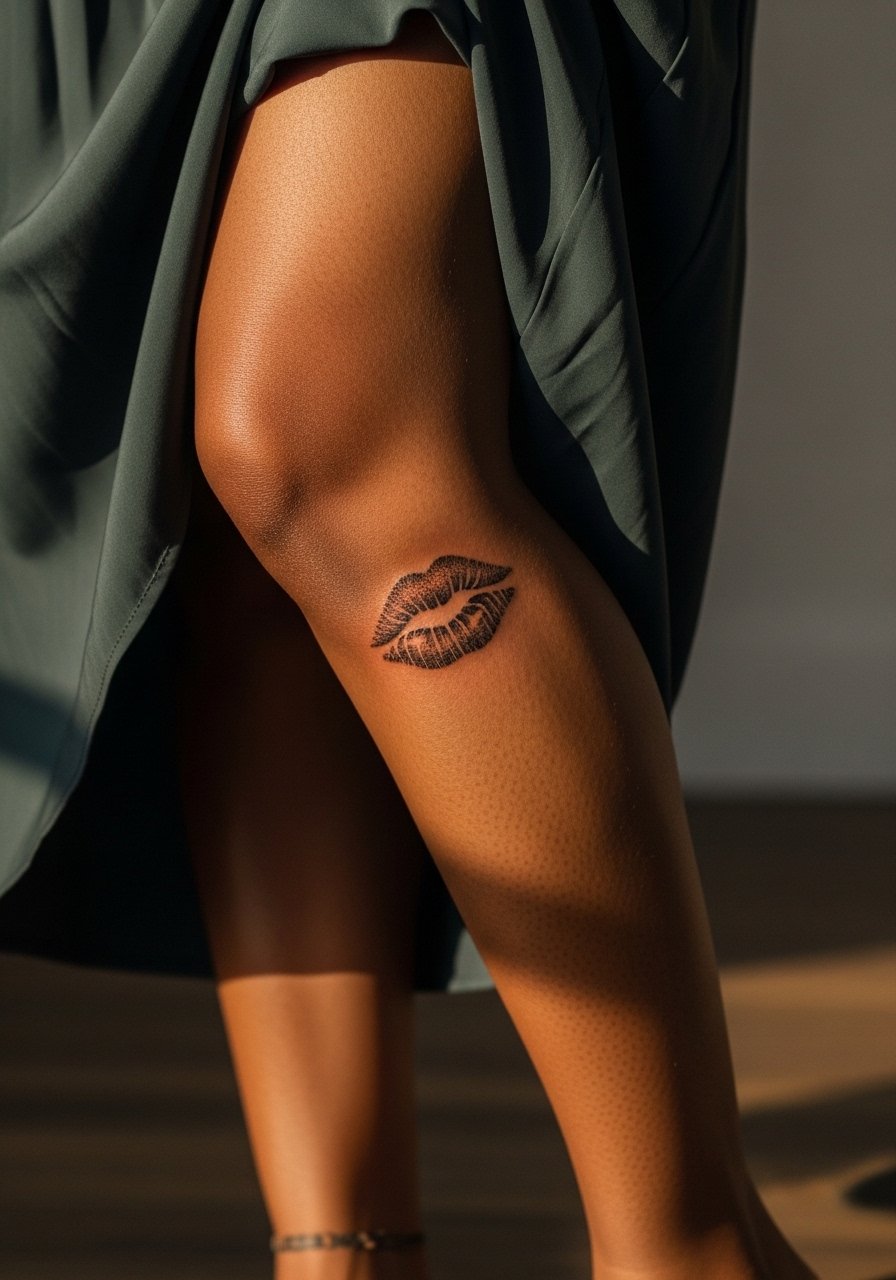
13. Calf Kiss with Stipple and Soft Shadow
Consultation lead: a calf kiss lets you scale up the detail without risking blowout because the skin is thicker. Ask for stipple shading and a soft shadow to create subtle depth that reads like a pressed print. Sessions here are comfortable and healing is straightforward. For pairing, a mid-length skirt or cropped trousers work well. Try an A-line midi skirt to keep the tattoo visible in movement while avoiding constant rubbing from pant seams. Expect touch-ups less often than finger or wrist work.
14. Inner Bicep Micro Kiss for a Private Reveal
Aging lead: inner bicep pieces heal well if the linework is not overly tight. The skin under the arm stretches with motion and dense detail can blur over time. If you like small, keep the print slightly larger than you think to compensate for settling. Session time is short and pain varies because of nerve presence. Wear a loose tank top or sleeveless shirt for easy access during the appointment. Artists with experience on softer inner-arm skin will know spacing tricks to help the piece age cleaner.

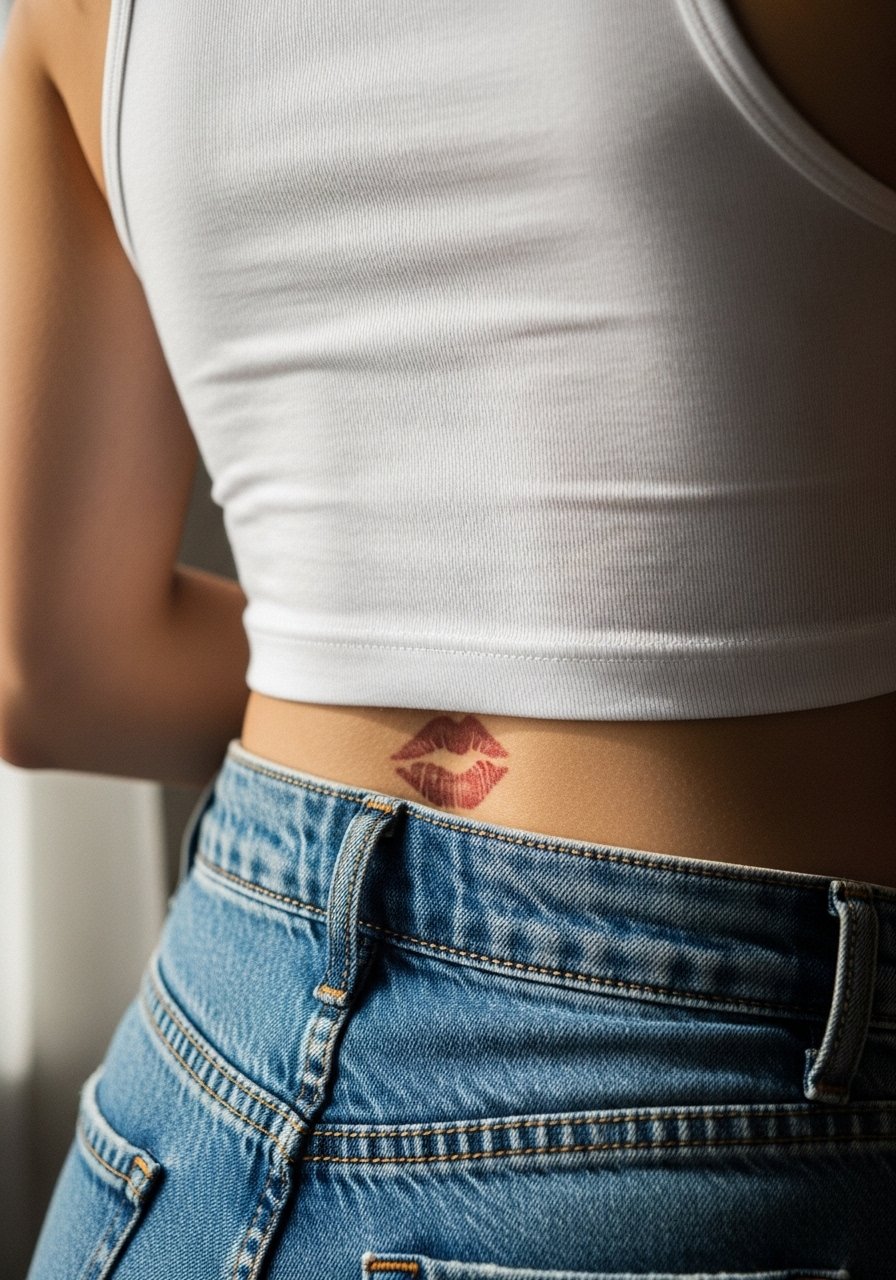
15. Lower Back Kiss with Subtle Highlights
Styling lead, succinct: lower back pieces look deliberate when paired with low-rise jeans or a cropped tee that reveals only a hint. The lower back takes saturation well so you can ask for a frail highlight without risking patchiness. Session time and pain are moderate. For the session wear a tank top and high-waisted pants you can shift slightly so the artist has access while you stay covered. A cropped tee makes it easy to expose the exact zone cleanly during inking.
16. Clavicle-Spanning Lip Print as a Matching Pair Piece
Personal observation lead: a full lip print that spans the clavicle works well for couples or mirrored matches because the chest gives enough canvas to keep details legible. If you plan a matching set, bring both references and agree on scale beforehand so each piece aligns with body contours. Session time varies by complexity and color. For showing the tattoo pair, open-collar shirts or v-neck tops frame the print without covering it. Try a thin chain pendant necklace to sit just above the design for balanced composition.

17. Knuckle Kiss Mark That Wraps Slightly
Mistake lead: knuckle and proximal finger tattoos often fail when people ask for too much detail in too small a space. A tiny simplified kiss mark that wraps slightly onto the side of the finger reads cleaner over time. Pain is higher and healing is finicky because of hand use. For styling, pair the mark with thin bands or a delicate stacking ring so the hand looks styled rather than tattoo-heavy. Be prepared to schedule touch-ups more frequently for hand placement.
18. Popliteal Area Kiss Behind the Knee for an Unexpected Spot
Pain warning lead: the crease behind the knee can be sensitive and tricky because skin shifts when you bend. That movement can create distortion if the design is too tight. For this placement request a looser impression with less dense fill so the tattoo keeps shape when you sit and stand. Session time can be longer than expected because the artist needs to position the leg for comfort. Wear loose shorts you can shift so the area is exposed only where necessary.
19. Wrist Wrap of Small Kiss Prints
Styling lead: a wrist wrap of small kiss prints reads like a charm bracelet and pairs well with stacked bracelets or a minimalist watch. The risk is crowding the wrist with too many tiny marks which then lose separation. Ask for slight size variance and spacing so each print maintains its identity. Session time depends on count but plan for at least 45 minutes. Try pairing the design with a minimalist watch or thin leather bands that frame without covering the tatt.
20. Subtle Outline Kiss on Upper Chest Near Shoulder
Aging lead: an outline kiss near the shoulder reads understated and ages well if kept slightly bolder than a sketch line. The shoulder sees sun exposure so discuss UV protection practices with your artist. Session is brief and pain is low. For the appointment wear a loose button-down you can pull aside so the artist has access. This placement benefits from breathable clothing during healing and from occasional styling with open-neck shirts to let the design breathe.
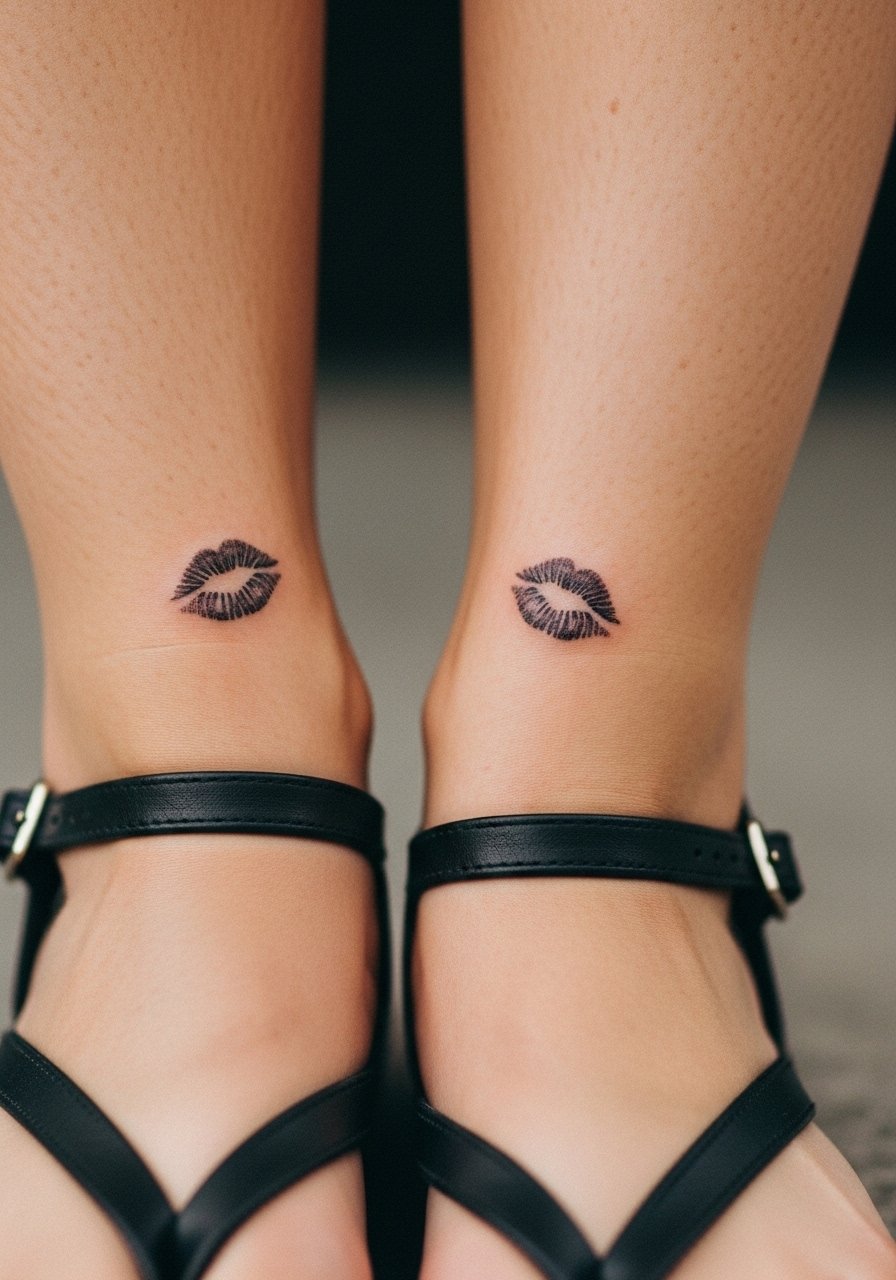
21. Matching Anklet Kisses on Both Inner Ankles
Consultation lead: matching anklet kiss marks on both inner ankles make a subtle pair for partners or for mirrored composition. The inner ankle sees less abrasion than the outer ankle but still needs attention to shoe friction during healing. Specify mirror placement in the consultation and ask for a transfer so both sides align symmetrically. For showing them off choose low shoes or sandals and consider a simple anklet chain in photos to echo the tattoo placement.
Frequently Asked Questions
Q: Will a realistic kiss mark on my finger fade faster than one on my forearm?
A: Yes, finger skin renews more and sees more friction so expect faster fading on fingers than on forearms. In my experience finger marks often need touch-ups every one to three years while forearm work can go longer without intervention. Ask your artist about line spacing and be prepared for maintenance if you want the finger piece to stay crisp.
Q: Are micro-realism kiss marks on the ribs worth the pain and risk of blurring?
A: It depends on your priorities. Ribs give a great canvas for detail but that same movement can blur ultra-fine lines over time. If longevity is important ask for slightly larger scale and spaced contouring. Some artists prefer to avoid ultra-thin work on ribs while others adapt depth and spacing; talk this through in consultation before booking.
Q: How should I dress for a shoulder blade or back-of-neck appointment?
A: For shoulder blade wear a tank top you can pull aside or an off-shoulder top that gives clean access. For behind-the-hairline or nape tattoos wear your hair up or bring clips so the artist can work without fabric getting in the way. A set of bobby pins is a small thing that makes sessions smoother if you want the area exposed for photos later.
Q: Can I get a hyper-realistic colored kiss that still looks good after five years?
A: Possibly, but color choice, saturation, and placement matter more than the initial photo. Heavier saturation tends to hold up better than diluted smudges, but dense color can age into a patch on high-movement zones. Expect that any colored micro-realism may need a color boost at year three to five depending on sun exposure and skin type.
Q: Are hand and neck kiss tattoos still a problem for jobs or formal work settings?
A: Some industries remain conservative about visible hand or neck tattoos. If your career could be affected consider placements you can conceal for interviews and work. Many people choose behind-the-ear or inner wrist locations that can be hidden by hair or sleeves when necessary.
Q: How do I find an artist experienced in lip-print micro-realism without naming anyone?
A: Use discovery pathways by searching genre tags and local directories. Look for hashtags like #microrealism and #lipprinttattoo combined with your city, check portfolios on shop websites, and ask in community threads for recommendation threads in regional groups. Schedule a consultation to discuss previous healed work and transfer technique before booking.
Q: Should I get a stencil preview for asymmetric placements like clavicle-spanning prints?
A: Yes, always ask for a stencil preview and request adjustments until the symmetry feels right on your body. Transfers reveal how a design lives with your bone structure and movement and avoid surprises when the needle starts.
