
Fine line stars are everywhere on feeds right now, but what survives the real world is a different story. Some of the prettiest wrist stars look great fresh and then soften in the first year if they sit over high-friction spots. This list walks through 17 star designs that consider placement, aging, and what to tell your artist so the piece still reads clean after a touch-up or two.
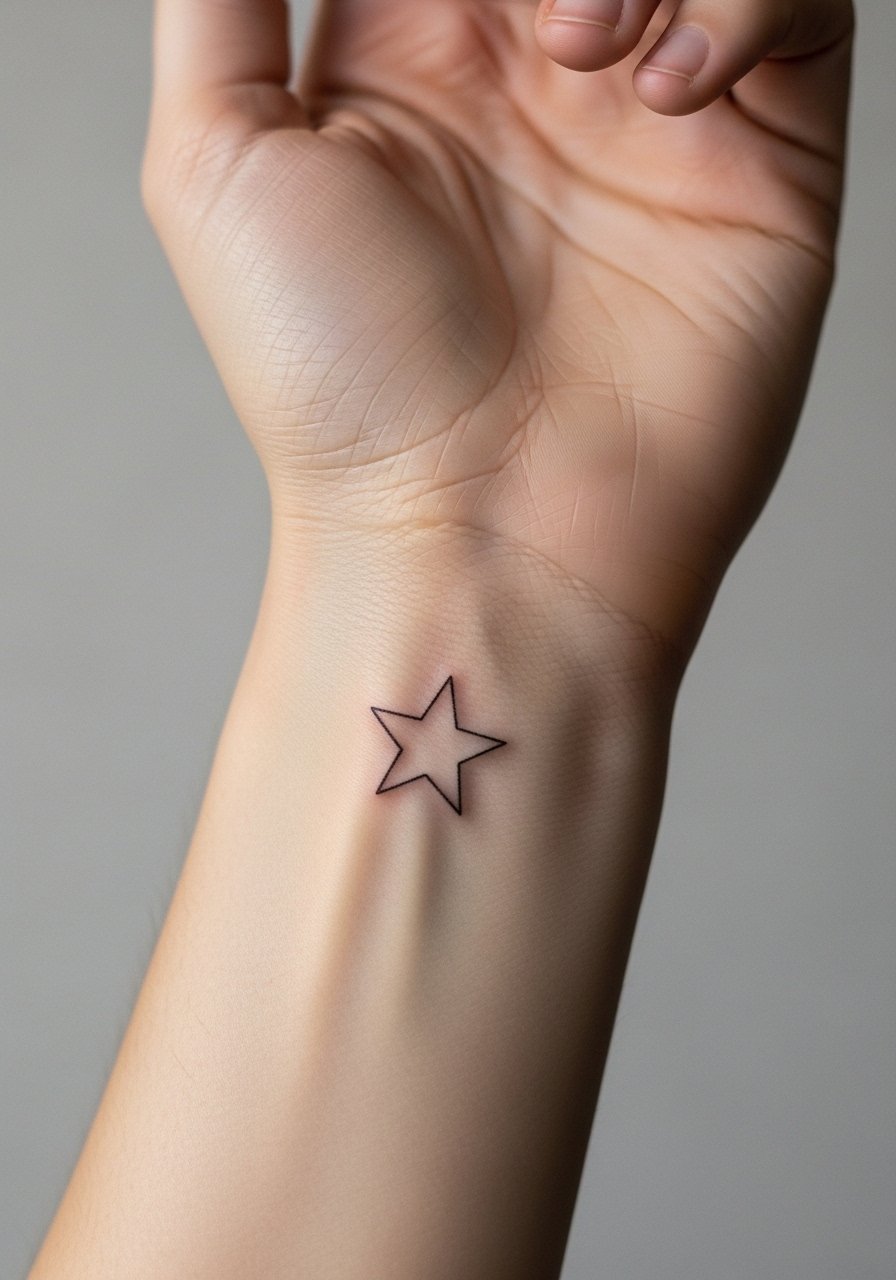
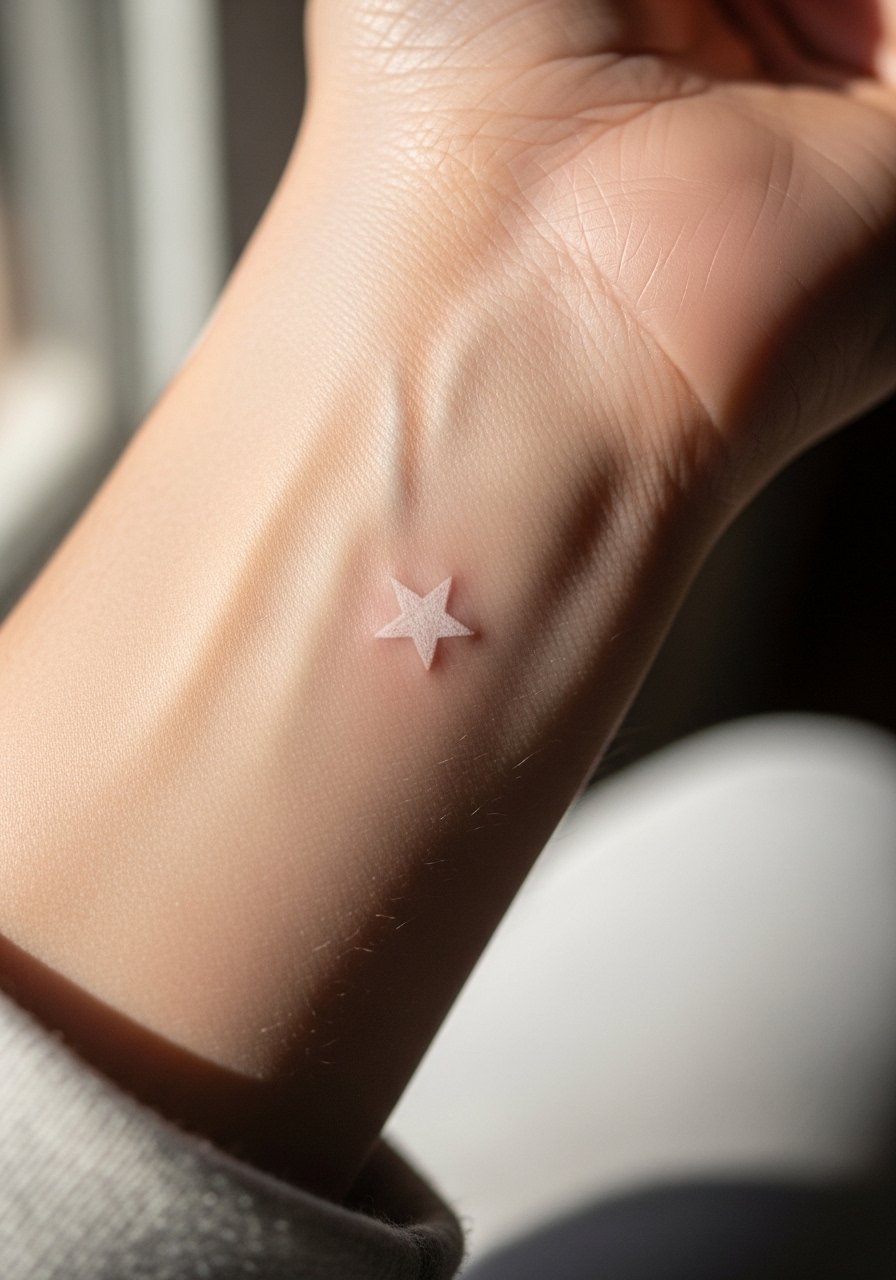
1. Single Fine Line Star on Inner Wrist

This is the classic starter piece for first wrist tattoos. I recommend asking the artist for slightly bolder linework than a single-needle ultra-fine line if you expect heavy rubbing from sleeves. Pain is mild to moderate because the inner wrist has softer tissue. The session is short, usually under 30 minutes, and the main mistake is making it too small. At six months fine lines can still look crisp but by year two some softening is common on high-motion wrists. For showing it off, a thin silver bangle stack frames the star without covering it, and wearing a loose sleeve the first week helps with healing thin silver bangle stack.
2. Constellation Outline of Three Stars on Outer Wrist
A three-star constellation reads like a small map without bold color. Ask your artist to space the stars so the gaps age as part of the design, not as separate faded dots. Outer wrist skin is moderately exposed so expect sun to lighten ink faster unless you take care. Common mistakes are crowded dots and inconsistent spacing, which makes the pattern blur at year two. Sessions take 30 to 45 minutes. This design pairs well with a wide leather cuff bracelet when you want to show it off wide leather cuff bracelet.
3. Geometric Dotwork Star Cluster on Wrist Bone

Dotwork creates texture that reads like jewelry on the wrist bone. Tell your artist you want stipple shading and clear negative spaces to avoid dense packing that blends over time. Expect higher pain on the wrist bone because the needle rides close to bone, and sessions usually run 45 to 75 minutes. The piece holds well when the dots have breathing room. A common fail is cramming too many tiny dots into a small area. For outfits, neutral linen shirts with an open cuff keep the wrist visible and let the dotwork act like a tactile accessory linen open cuff shirt.
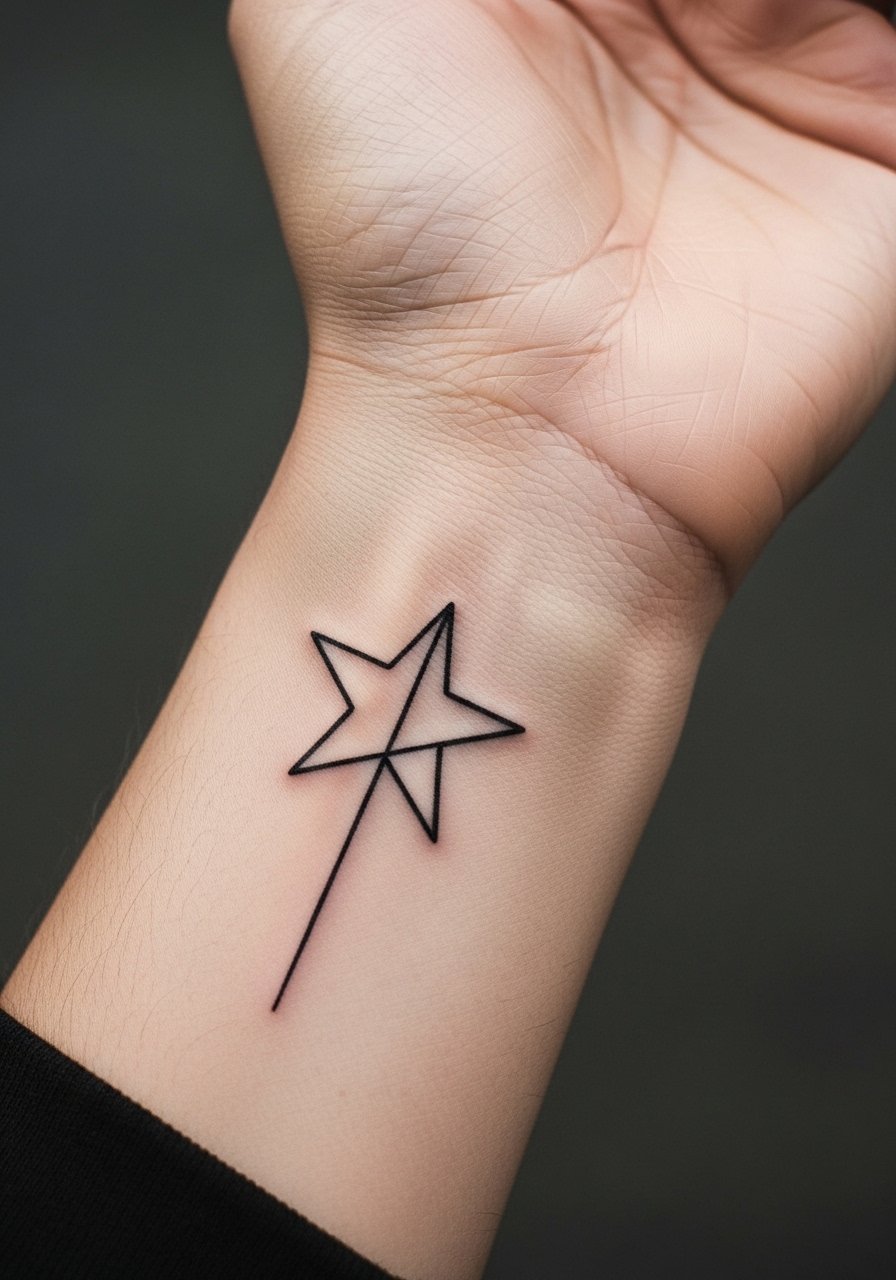
4. Minimalist Hollow Star Outline on Side Wrist
Side wrist placement suits people who want an easily concealed star by turning the hand. Ask for single-gauge linework and avoid the ultra-tiny size that blurs in a year. Pain is low to medium. The healing window is forgiving if you leave bracelets off for the first month. A typical mistake is asking for an open outline too small to maintain crispness. When you do show the tattoo, a stacked thin chain bracelet can sit beside it and give the design room to breathe thin chain bracelet stack.
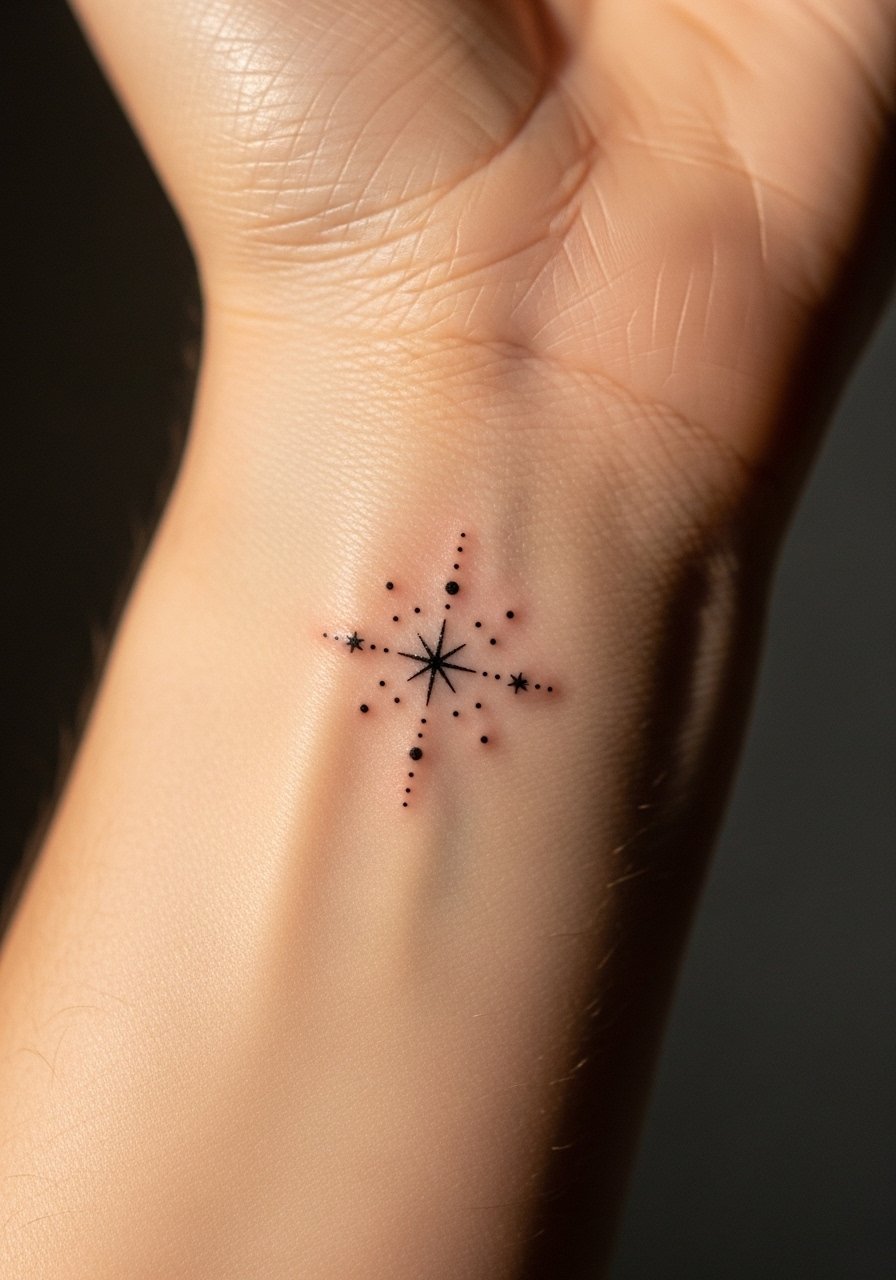
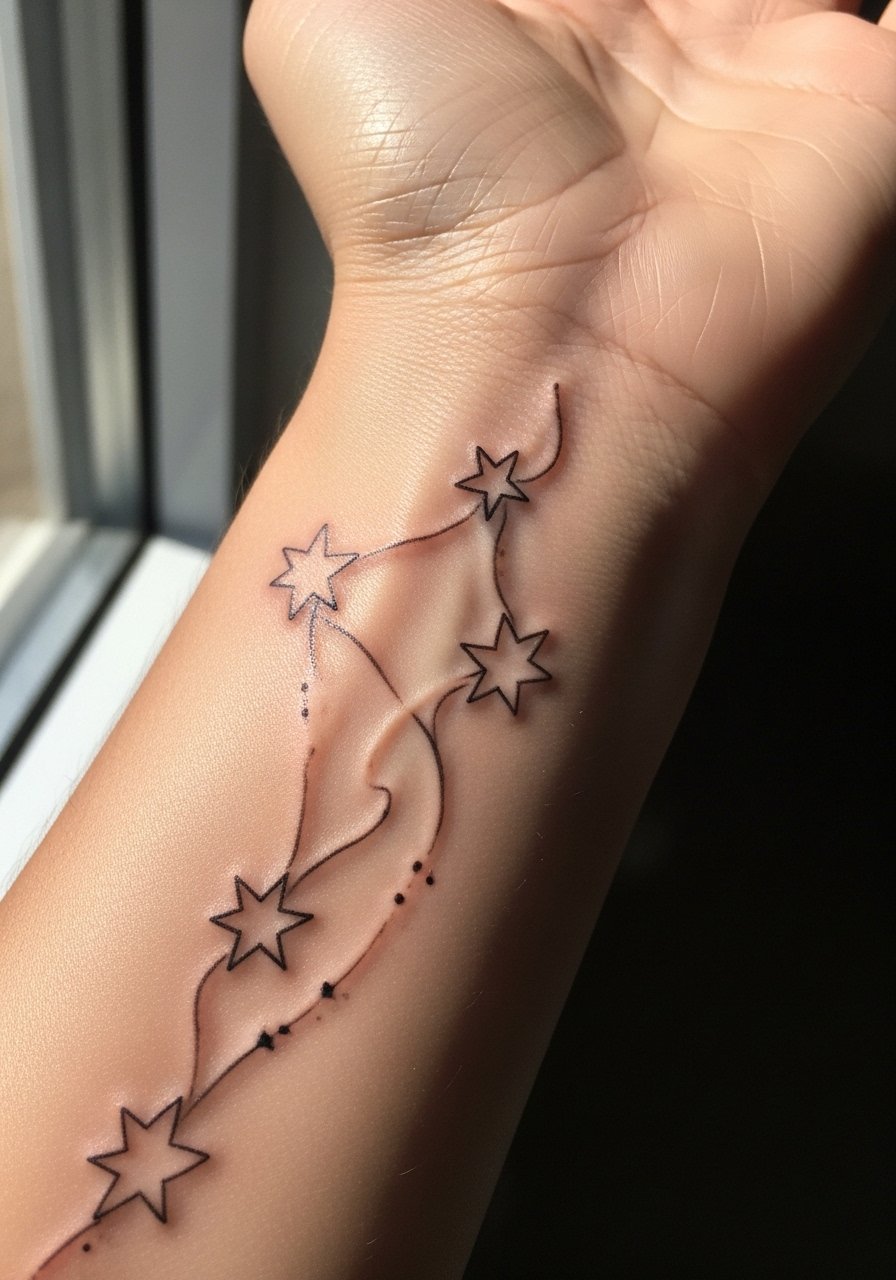
5. Shooting Star Trail with Fine Dots on Inner Wrist
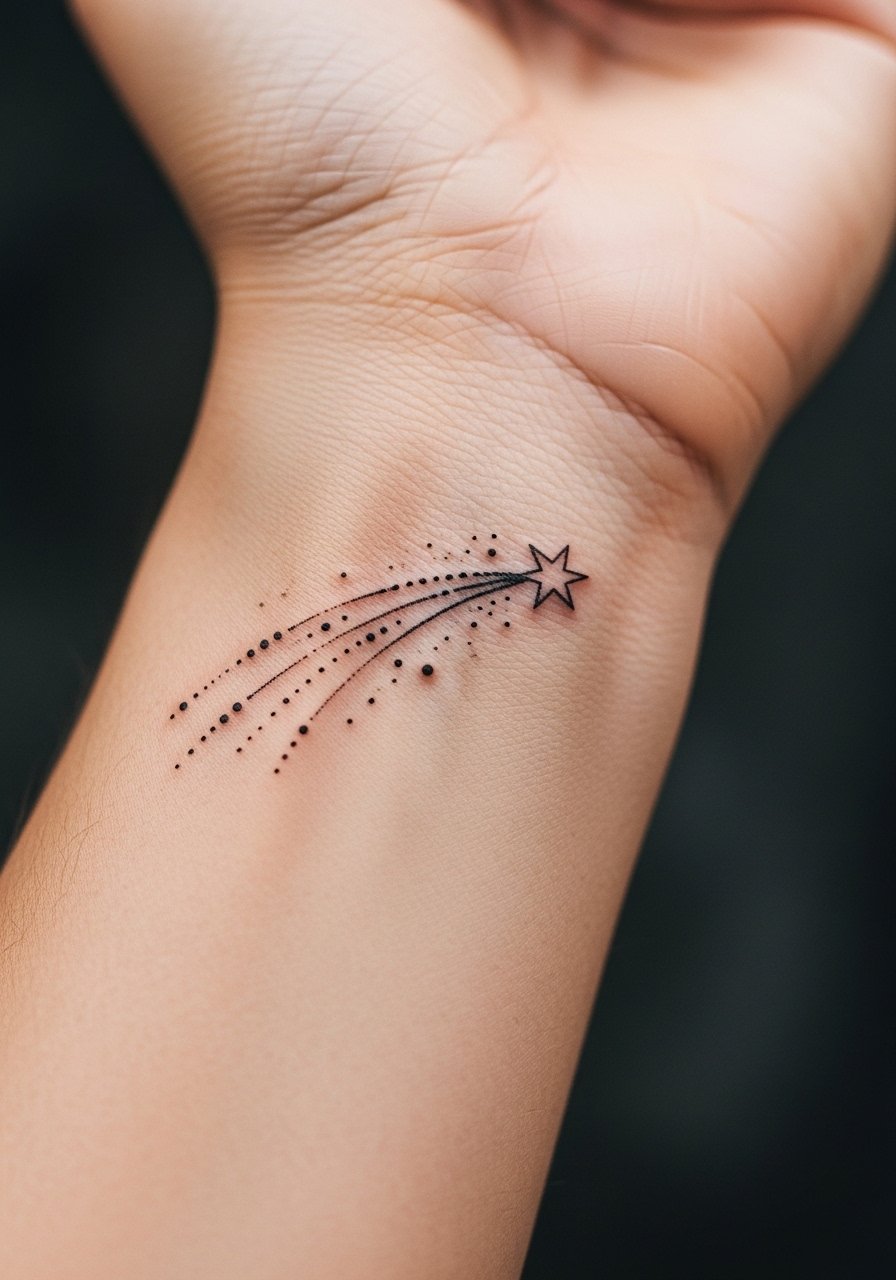
This design captures movement in a narrow space. Ask the artist to stagger dot sizes along the trail so the visual weight stays balanced as it ages. The inner wrist placement means the pieces see circulation and friction, so expect touch-ups at year two for fine dots. Sessions are typically under an hour. The usual mistake is a trail that is too dense, which leads to smudging after months. Pair it with a fitted olive tee for casual shows of the trail, and consider wearing a short-sleeve button shirt on session day for easy access olive fitted tee.
6. Blackwork Solid Star with Negative Space on Wrist
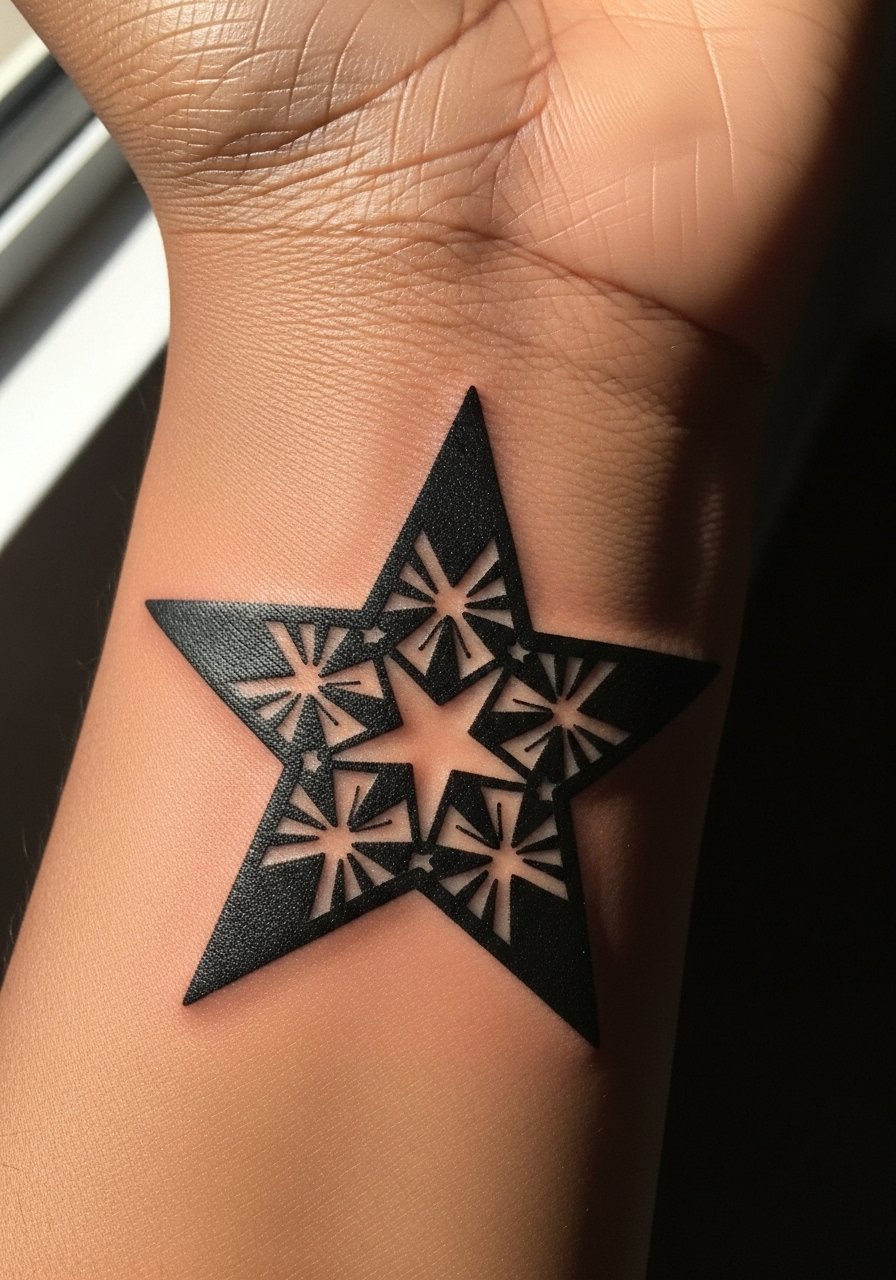
Blackwork reads boldly on all skin tones and resists visible fading compared with color work. For negative space accents, instruct the artist where you want skin showing through so the design keeps its shape as saturation settles. Pain on the central wrist is moderate. This one-session piece ages well if the fill is saturated and consistent. A common mistake is patchy fill from a rushed session which shows up once healed. Expect a heavier visual at year one but solid contrast should remain longer than watercolor.
Before You Book
The wrist pieces above live in a high-motion zone, and a few targeted tools make the session and the first week easier.
- Tattoo Goo Indie Balm. Thinner than thicker ointments, so it tucks into tiny wrist pieces without feeling greasy and reduces clogging on small linework.
- Ink Fixx Spray. Dries with a matte finish which helps wrist photos and avoids the shine water-based aftercare sometimes leaves during the first days.
- Australian Bush Aftercare Lotion. Lightweight lotion many people use in hot months to avoid heavy, sweaty greasiness while still keeping linework moisturized.
- Fragrance Free Gentle Body Wash. Cleans the wrist gently during showers without stripping ink or irritating peeling skin.
- Aquaphor Healing Ointment. Thin layer for the first two to three days helps retain moisture for fine line settling without excessive film.
7. Micro Star with Celestial Dots on Pulse Point
Pulse point stars are tiny and deliberate. Tell your artist you want stacking capacity so future stars can be added on the same axis without crowding. Pain is low but feel varies with how close the design sits to veins. Sessions are quick, often under 20 minutes. A mistake is starting with a cluster that leaves no room for future additions. After healing you can layer a thin chain pendant above the area for a light, complementary look thin chain pendant necklace.
8. Neo-Traditional Starburst with Rays on Outer Wrist
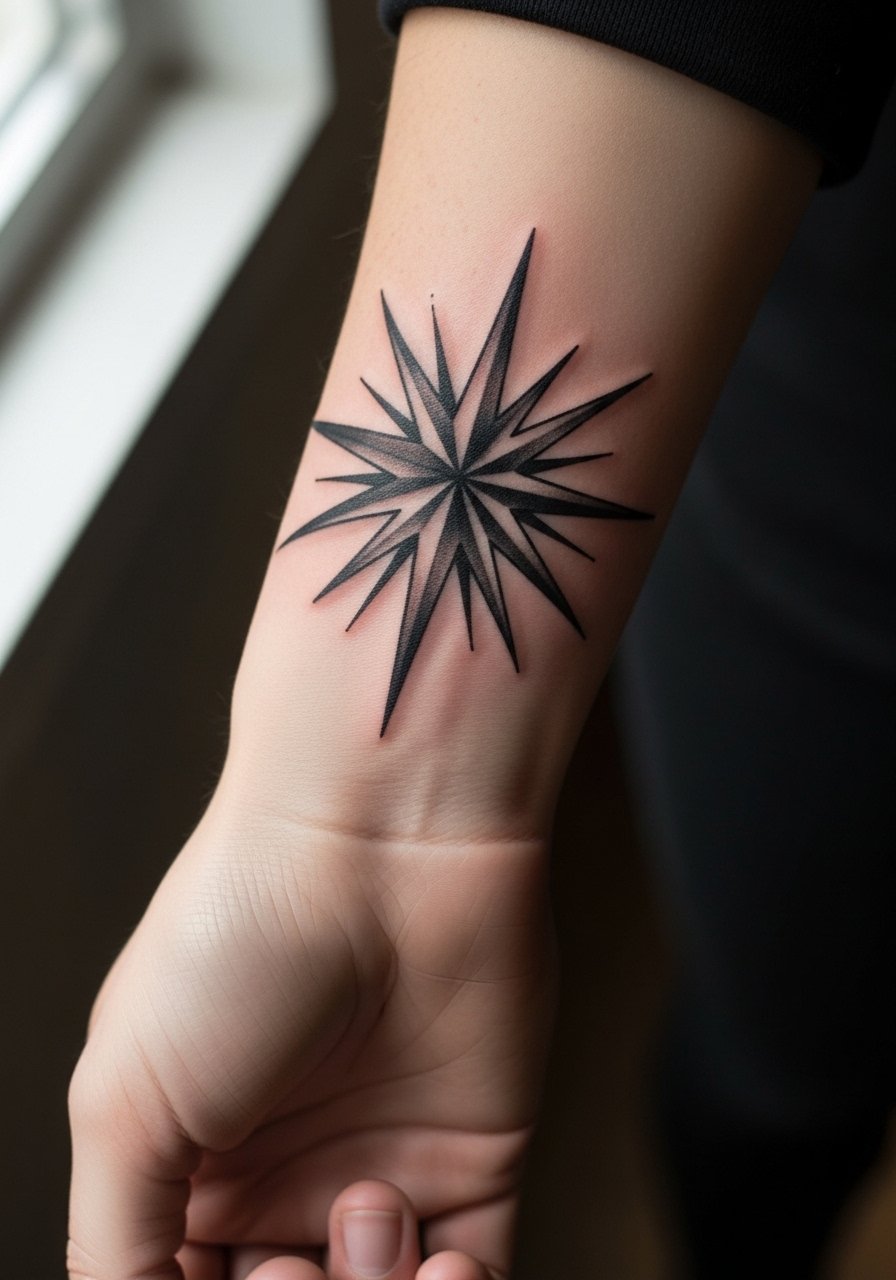
Neo-traditional starbursts give vintage character without relying on color. Ask for bold outlines and controlled shading so the rays do not feather into each other as the piece settles. Outer wrist placement handles shading well but watch for sun exposure which can soften midtones. Sessions may run to 90 minutes depending on detail. The main error is over-detailing the rays in a small area which blurs later. This style keeps a strong silhouette even after several years.
9. Watercolor Star Splash on Wrist Top
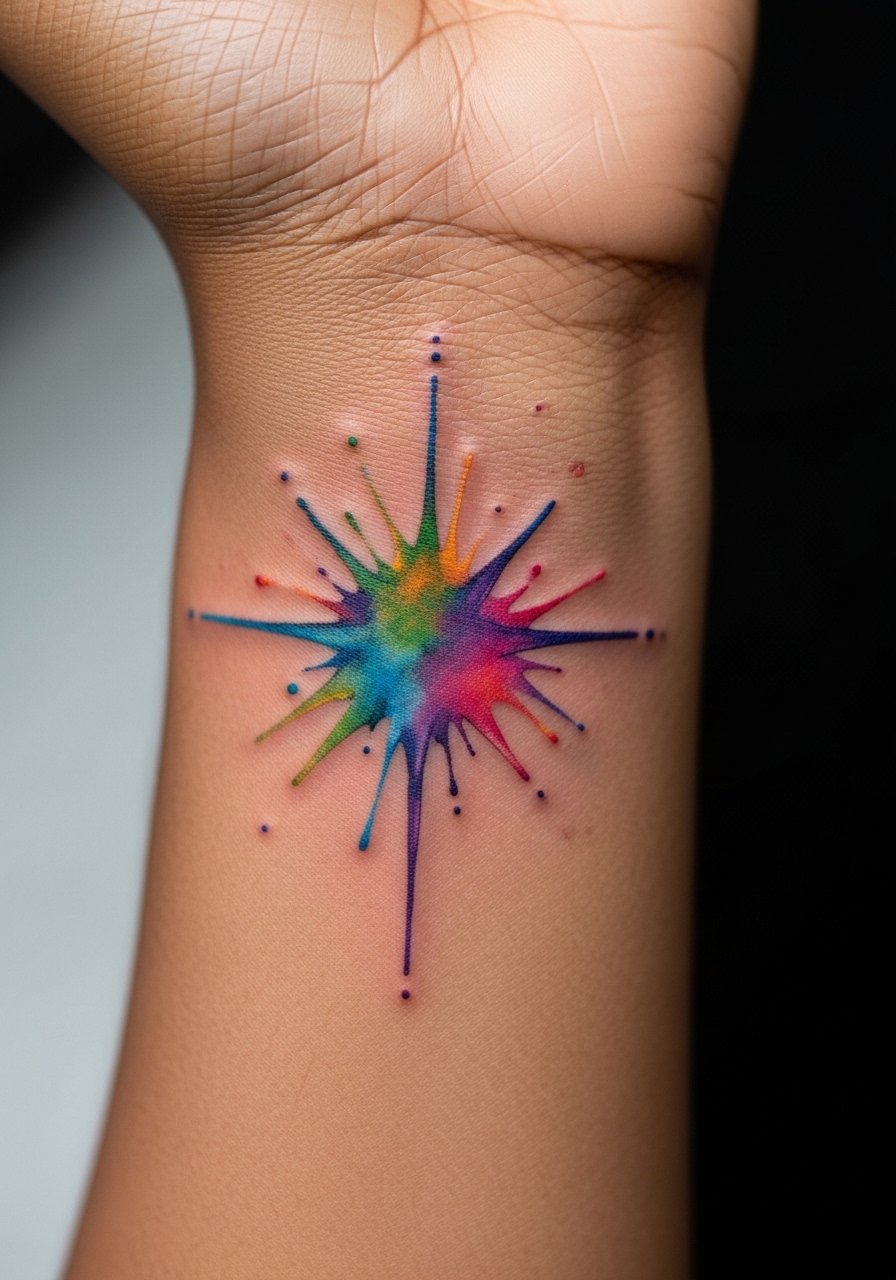
Watercolor gives a painterly pop on the wrist top but it fades faster in sweaty or sun-exposed spots. If you want color, have the artist design stronger black anchors within the splash so the composition retains shape when pigments soften. Pain is low. Expect touch-ups more often than for blackwork, especially with blues and greens. The common regret is choosing pastel fills with no anchor lines because they can wash out in a season of heavy sun or gym time.
10. Ornamental Mandala Star Transitioning to Inner Forearm
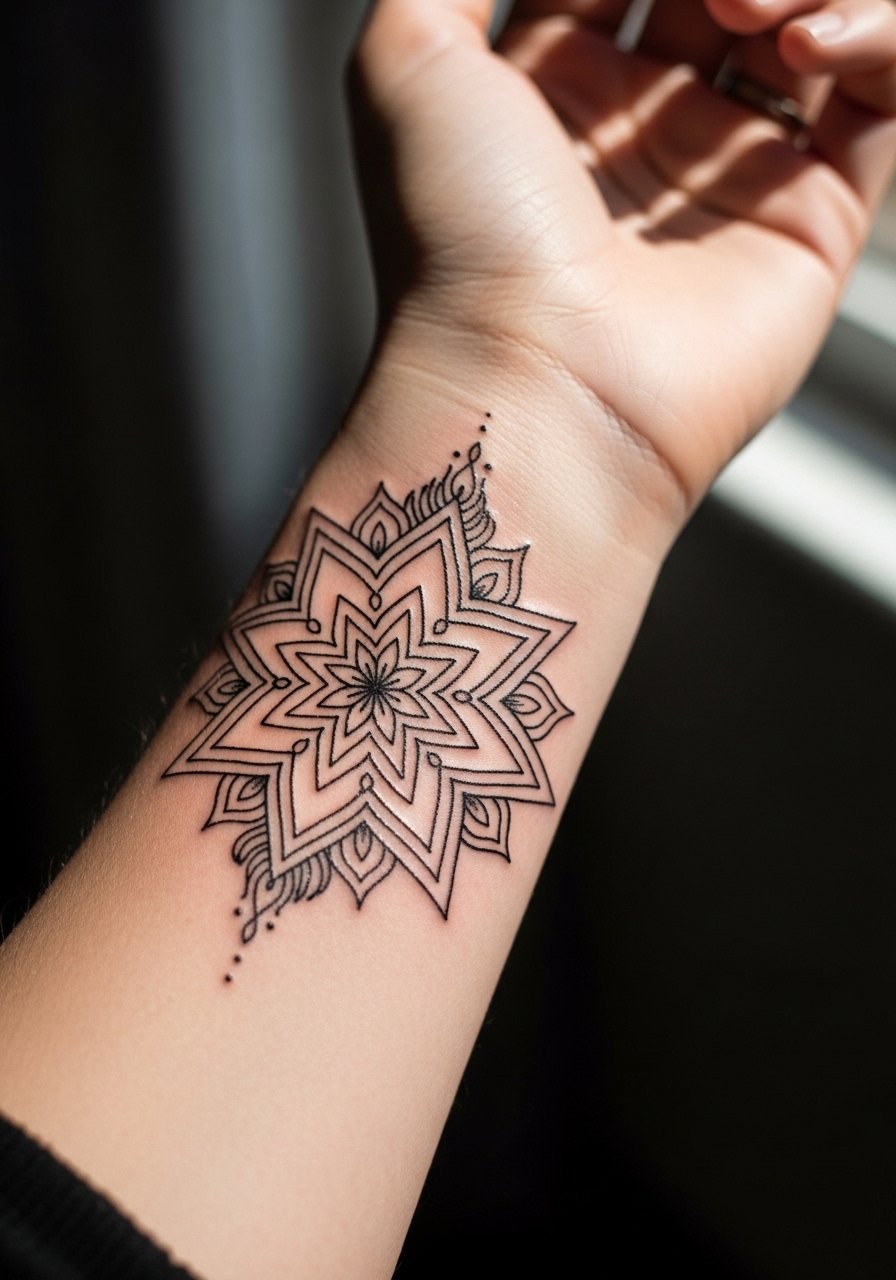
Extending a mandala into the forearm solves the "tiny wrist looks cramped" issue. Tell the artist you want spacing to increase as the design moves away from the wrist so lines do not merge with age. This is a longer session or multiple sessions depending on size. Pain is moderate on the wrist and milder higher on the forearm. A misstep is compressing too much detail near the wrist. For casual shows, a fitted olive tee rolled once keeps the transition visible and complements the circular geometry olive fitted tee.
11. Ignorant Style Single Line Star on Side Wrist
The ignorant line look feels hand-drawn and honest. Ask for one continuous stroke and a mockup on skin so you can confirm the rhythm before the needle hits. Pain is low to moderate. The main mistake is expecting perfect symmetry from a style that is supposed to read rough. Over-refining the original sketch erases the character, so pick the version that feels human.
12. Traditional Anchor-Star Combo on Wrist Bone
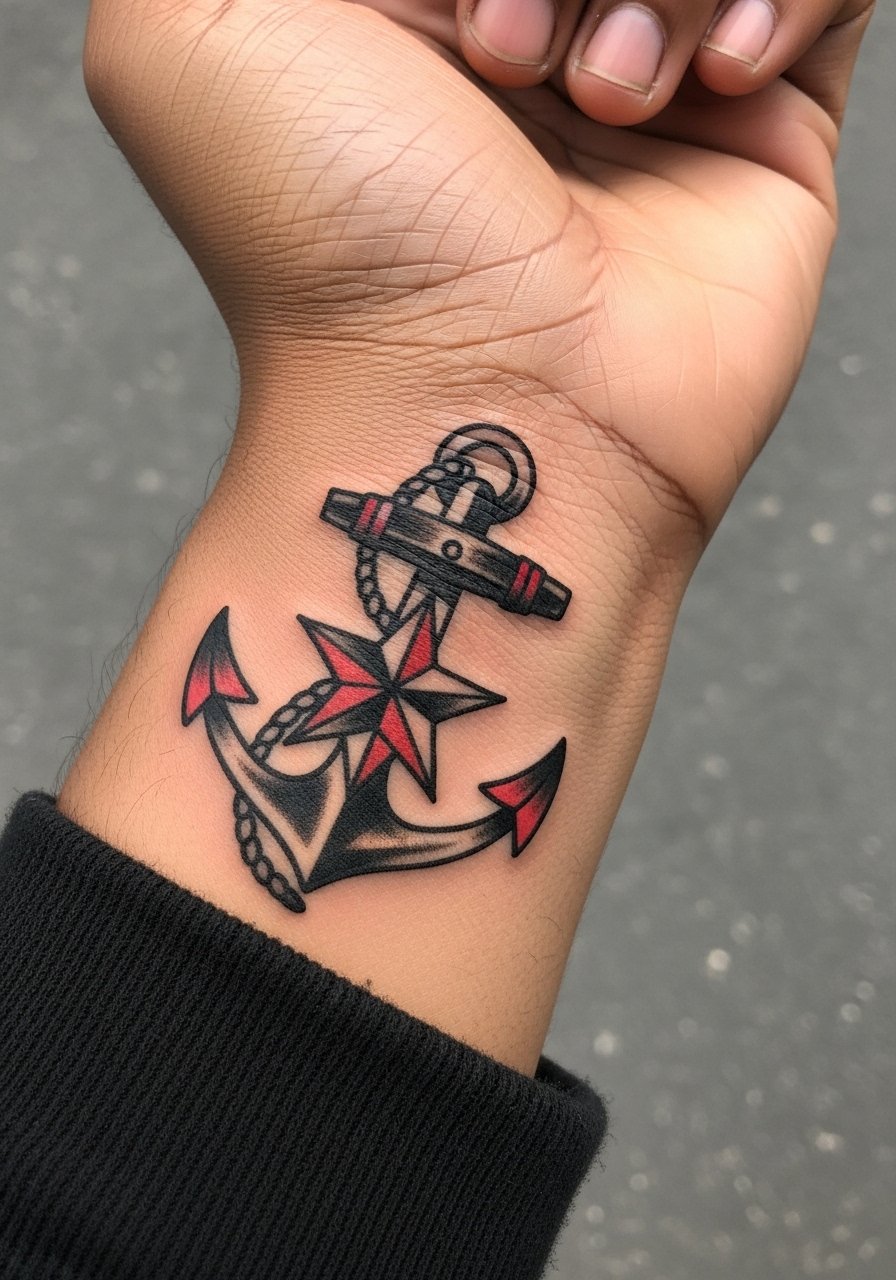
Classic sailor motifs age well because of bold outlines and controlled saturation. Tell your artist to keep red accents minimal on wrists because red fades faster than black there. Wrist bone placement yields sharp contrast but higher pain. Sessions are usually under an hour. A frequent error is tiny lettering that becomes unreadable. For a rugged show-off look try a wide leather cuff once healed to mirror the nautical vibe wide leather cuff bracelet.
13. Watch-Tan Line Aligned Star

This clever placement uses the negative of a watch tan to anchor the design. When you bring references, show a photo of your wrist with a watch so the artist can place the star where it will read as part of your natural tan boundaries. Pain and healing match a typical inner wrist piece. The usual pitfall is shifting the design off the line which makes it look misaligned once you wear a watch. Aftercare is the same as other inner wrist work but plan your watch choices after healing.
14. Negative Space Stars Using Wrist Veins as Constellation Lines
Using negative space can make stars pop without heavy ink. Ask for a stencil preview so the artist can map veins and advise where negative space will remain readable as swelling and settling occur. Pain is similar to other wrist work. A typical mistake is assuming veins will remain in the same visible place as skin tones and hydration change. Discuss long-term visibility with the artist before committing.
15. Stacking Protocol: Add Stars Yearly Without Regret
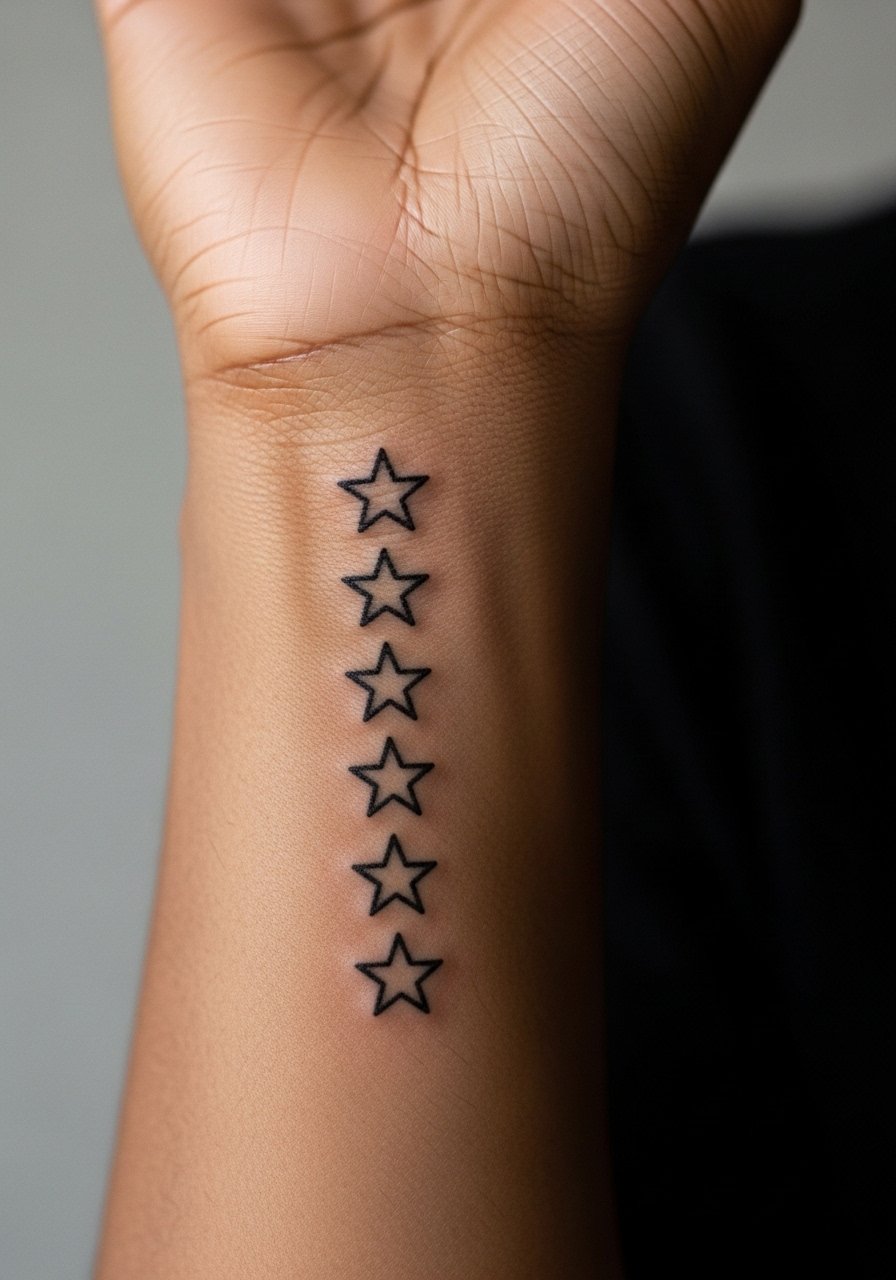
Think of stacking as choreography. Start with an axis or arc and leave consistent distances for future additions. Tell the artist you plan to add one small star each year so they can mark anchors during the first session. Pain per addition is low. The common mistake is random placement, which leads to overcrowding. When showing off a stacked series, a thin chain bracelet sits above the cluster and balances the composition thin chain bracelet stack.
16. White Ink Star for Dark Skin Pop
White ink can be striking on darker skin when used as a highlight rather than a full-piece fill. Ask the artist to combine white with a thin black outline so the star keeps edge definition as the white fades. Expect more frequent touch-ups and color shift over time, and be realistic about UV sensitivity. Pain and session time are similar to comparable small wrist pieces. For sweater season consider a cream cable sweater to contrast the bright highlight cream cable sweater.
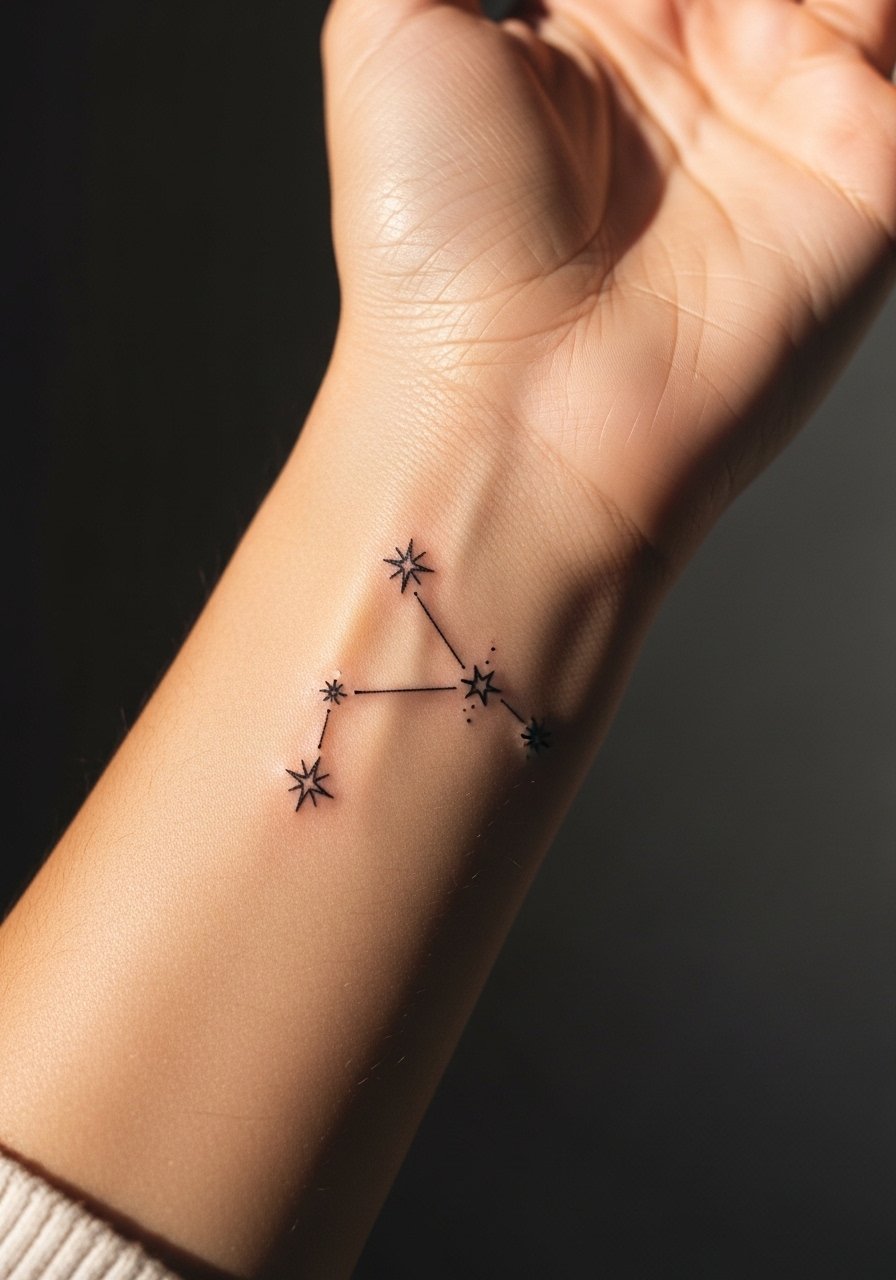
17. Micro Constellation for Zodiac Personalization
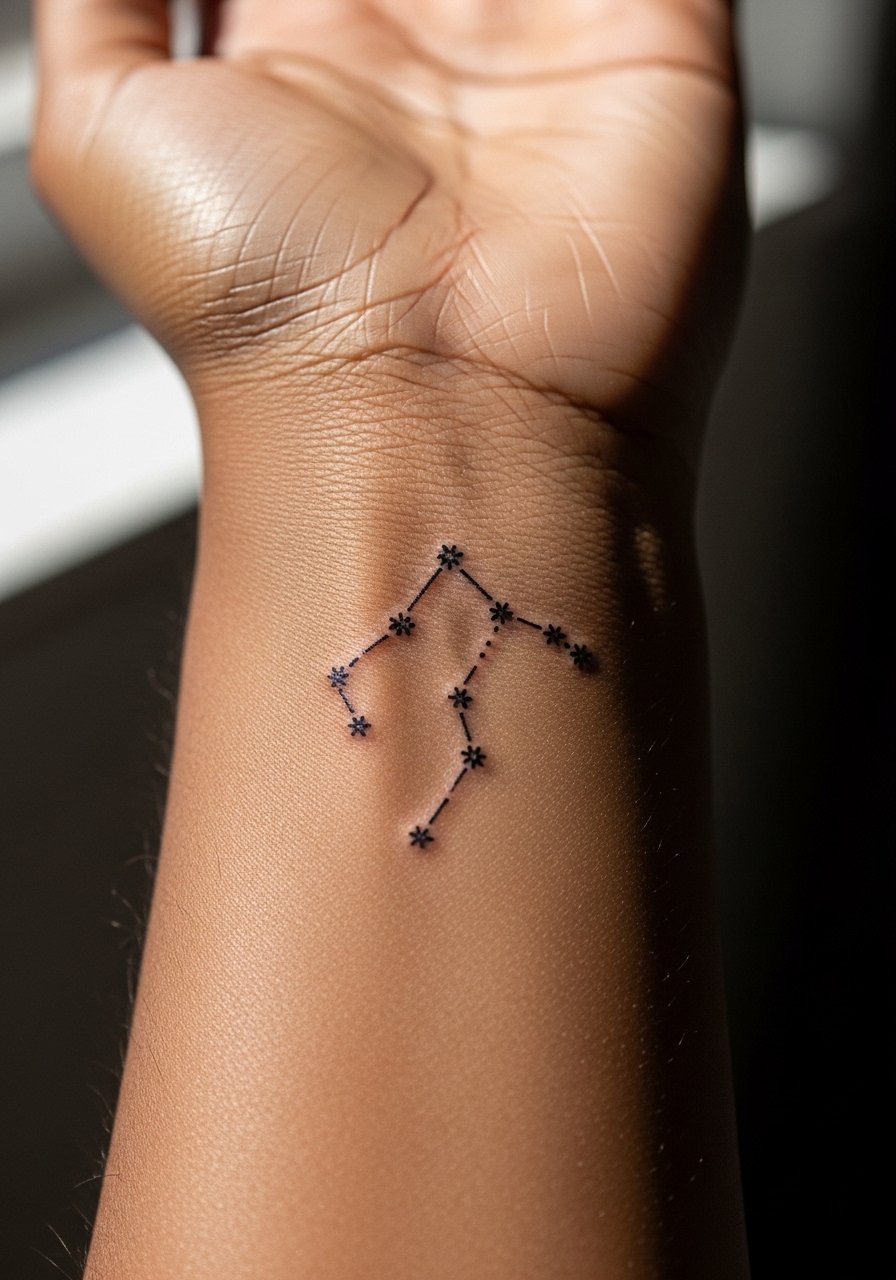
A zodiac constellation lets you carry a personal map without bold color. Provide the exact star map or glyph during consultation so spacing is accurate and the pattern will still read after settling. Keep the cluster slightly larger than tiny pinpricks so the points remain distinct at two years. Sessions are compact, but expect a touch-up at one to two years for tight micro placements. The frequent error is asking for dots so tiny they merge after heeling. Planning spacing avoids that.
Frequently Asked Questions
Q: Do fine line wrist stars actually fade faster than bold ones, and what should I ask my artist?
A: Fine line pieces on wrists do tend to blur sooner if they sit over friction zones. Two camps disagree on this. One group says bold linework outlives fine lines by a large margin. The other group says with correct needle depth and spacing fine line can settle well. Practical step, ask the artist to show healed portfolio pieces from wrists and to explain their touch-up policy so you know what to expect.
Q: Is Saniderm recommended for wrist tattoos or is dry healing better?
A: Artists and collectors split into Saniderm and dry healing camps. The Saniderm group values moist, protected healing and less picking. The dry healing group worries about trapped bacteria on flex areas like the wrist. My experience is to follow the artist's protocol and your own skin history. If you choose barrier film, monitor for excess moisture and follow removal instructions closely.
Q: How often will a watercolor wrist star need touch-ups compared with blackwork?
A: Watercolor styles on wrists typically need touch-ups sooner because pigment sits differently in top layers and sweats and sun accelerate fading. Blackwork and saturated fills usually hold longer. Expect watercolor to need attention at one to three years depending on exposure and care.
Q: Can I wear bracelets while the tattoo is settling and when is it safe to resume stacking?
A: Avoid bracelets that rub directly on fresh ink for at least four weeks. Once peeling finishes and the skin is smooth you can reintroduce jewelry slowly. If you plan to stack multiple stars, space additions by at least six months so the area can fully heal and the artist can evaluate how the skin settled.
Q: What is the best way to plan yearly stacking so the wrist does not look overcrowded?
A: Start with a clear axis and ask the artist to mark future anchor points during the first session. Use consistent spacing and keep a visual rhythm so each new star complements what is already there. For a wearable finish consider a thin chain above the cluster to frame the run.
