
Fine line tattoos are everywhere on mood boards right now, and they look incredible fresh. The catch is that the ones that still read crisp after a few years are often the ones built with spacing and contrast in mind. For Donnie Darko fans that means choosing the right line weight for wrists, adding bold anchors to small pieces, and picking placements that survive life changes. Below are 27 Donnie Darko tattoo designs that balance tribute with real-world wear so your reference photo still looks good after a few showers and a handful of touch-ups.
1. Frank the Bunny Mask Outline on Inner Forearm
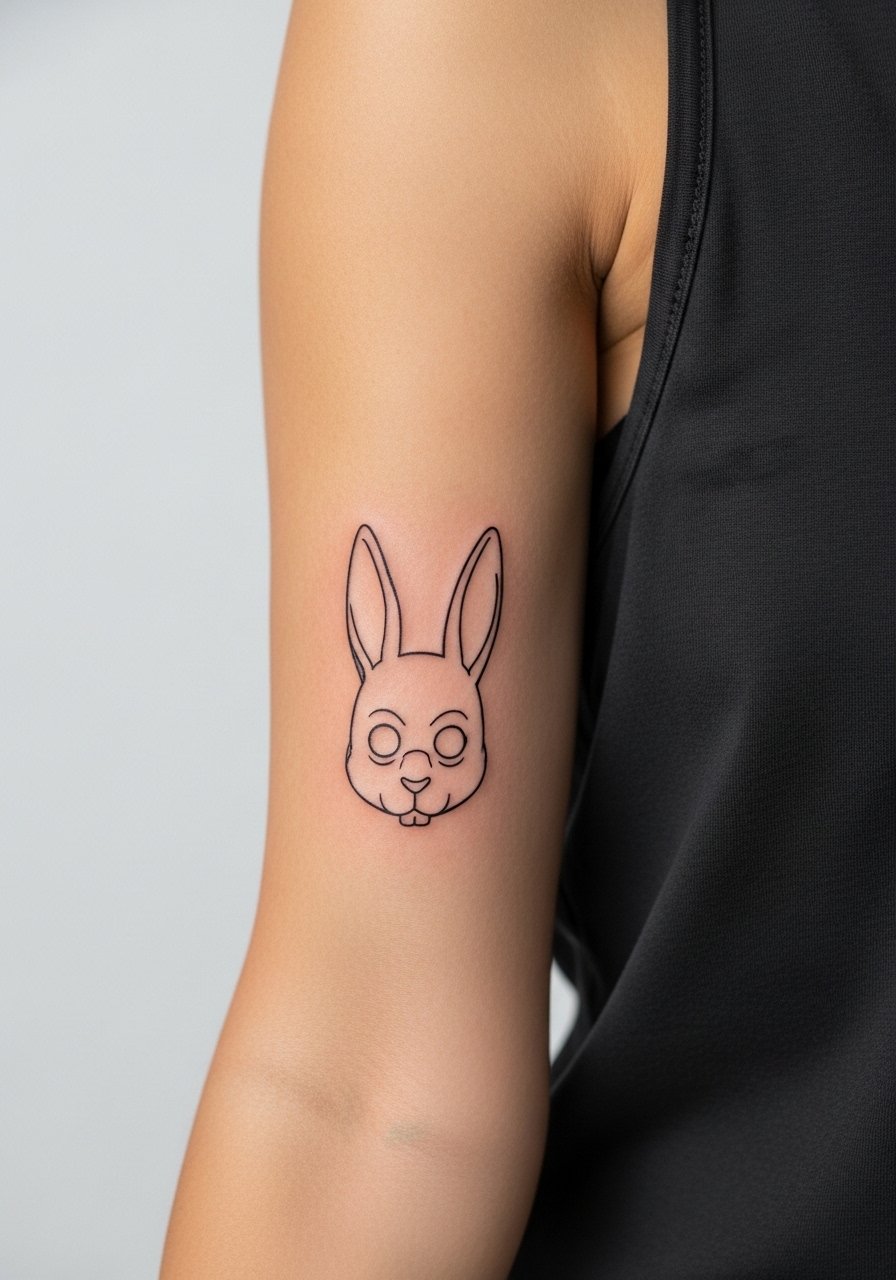
Most people who get a tiny Frank mask here want a subtler nod to the movie. Fair warning, wrists and hands are notorious for fine-line fade, so ask for a slightly heavier outline and minimal interior detail to keep the silhouette readable at year two. During consultation, request a stencil test on your forearm in the exact spot you plan to place it to preview scale. Pain is moderate, and session time is short. For the appointment wear a loose fit tank top men so the artist has clear access without pinching fabric around the arm.
2. Full Frank Bunny with Glowing Eyes on Outer Calf
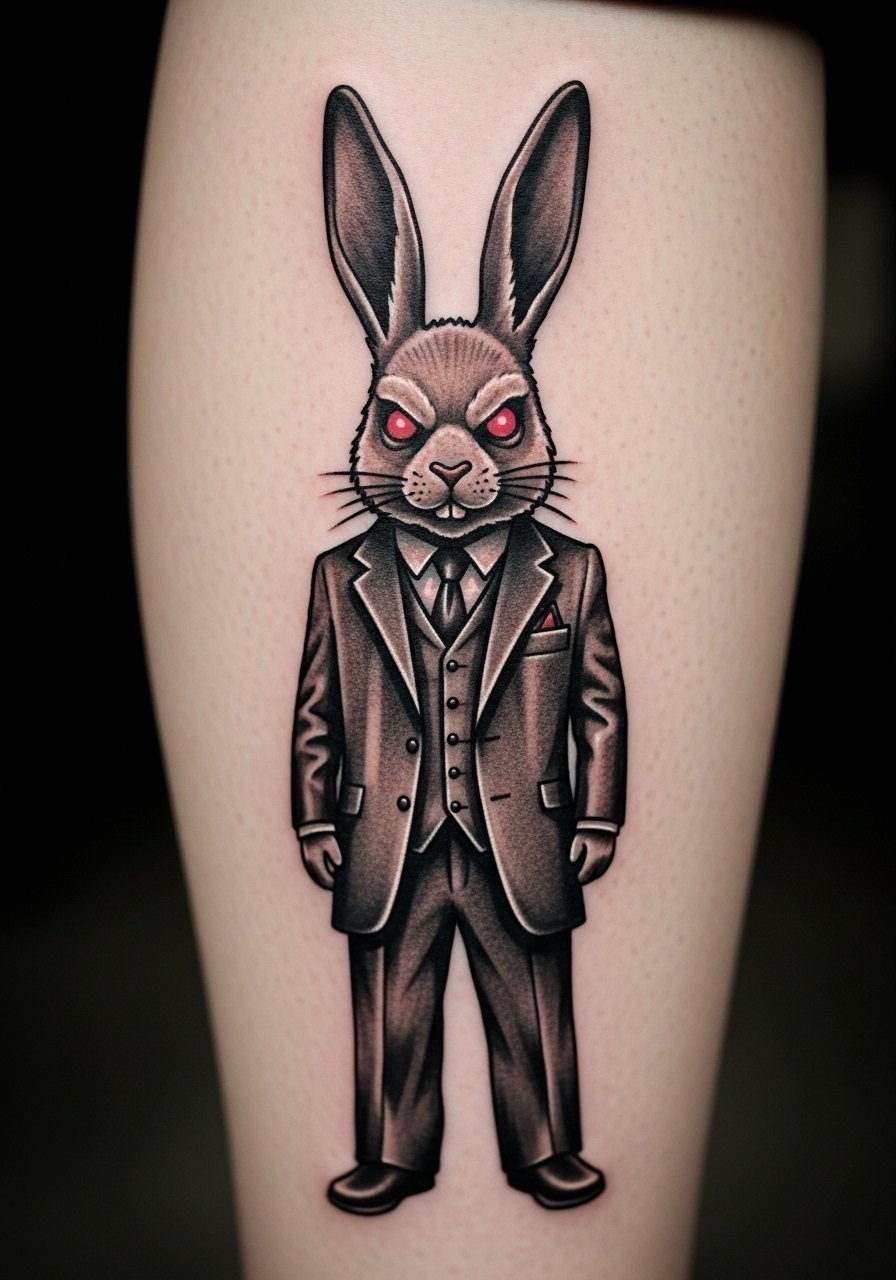
Ive seen full Frank pieces on calves hold saturation well because the skin there does not flex as much. This version uses heavy blackwork for the mask and a sparse red pop for the eyes so the contrast reads in photos and in person. The calf tolerates multiple sessions, so plan two appointments for linework first then saturation. Session pain is low to moderate and healing benefits from loose shorts. Show-off pairing is simple: roll up slim jogger pants rolled cuff and wear low-top sneakers to let the portrait peek out on summer days.
3. Jet Engine Falling from Sky on Shoulder
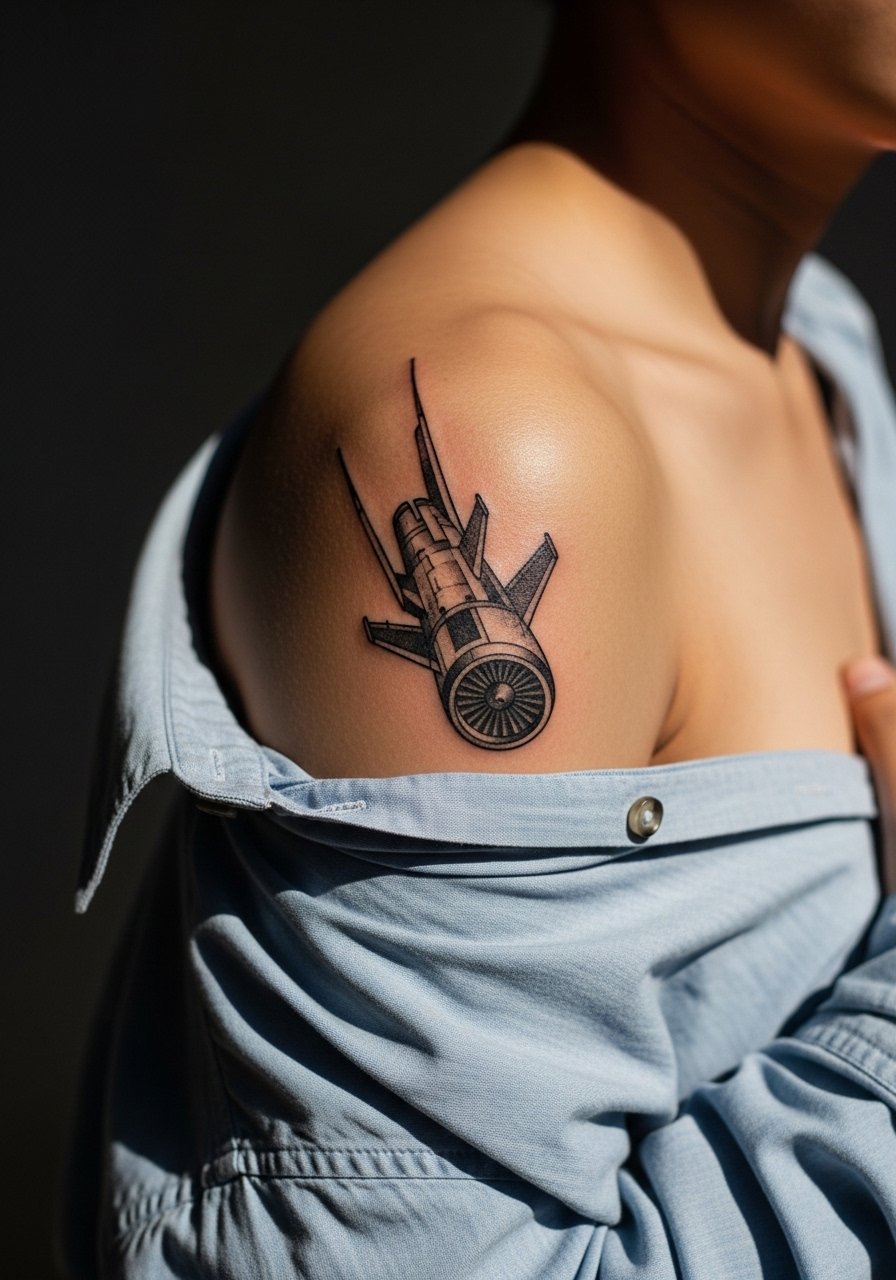
The shoulder is forgiving for mid-sized surreal pieces like a falling jet engine. Most people regret placing this on areas that flex because the engine lines and subtle shading blur with stretch. For this placement ask your artist for denser black fills and slightly simplified contrails to preserve clarity at year three. Pain is low and session time is typically one to two hours. For the studio wear, pull on a button up linen shirt you can slide off the shoulder without forcing the artist to work around sleeves.
4. Donnie in Therapy Pose Silhouette on Collarbone
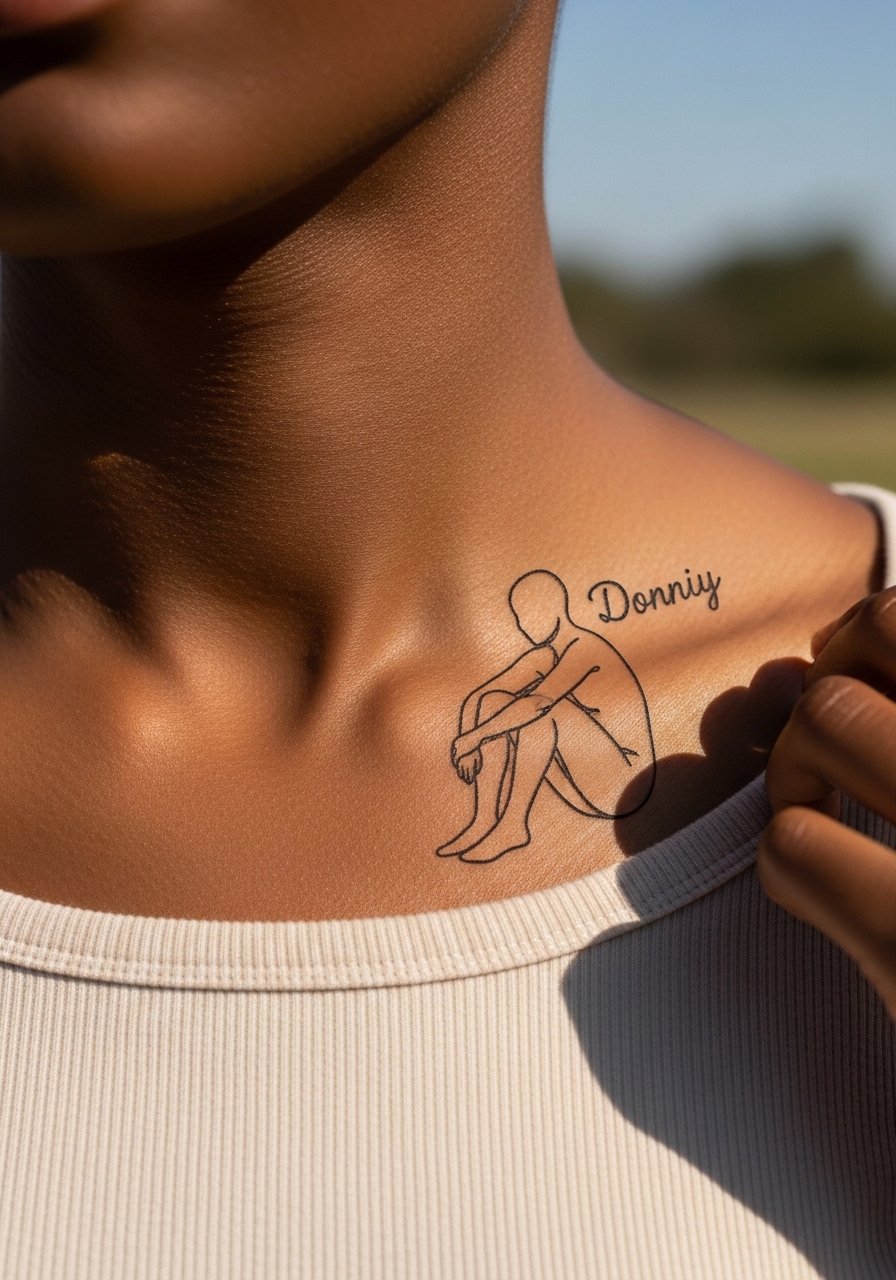
Collarbone pieces read intimate and paper-thin details show immediately. Fine line silhouettes work here when sized correctly, but dense micro detail will blur with movement. Expect higher pain because the bone is close to the surface. Tell your artist you want a single-session, clean silhouette with negative-space highlights rather than shaded gradients. For showing it off later, pair with a strapless tube top and a dainty chain necklace so the silhouette remains the focal point.
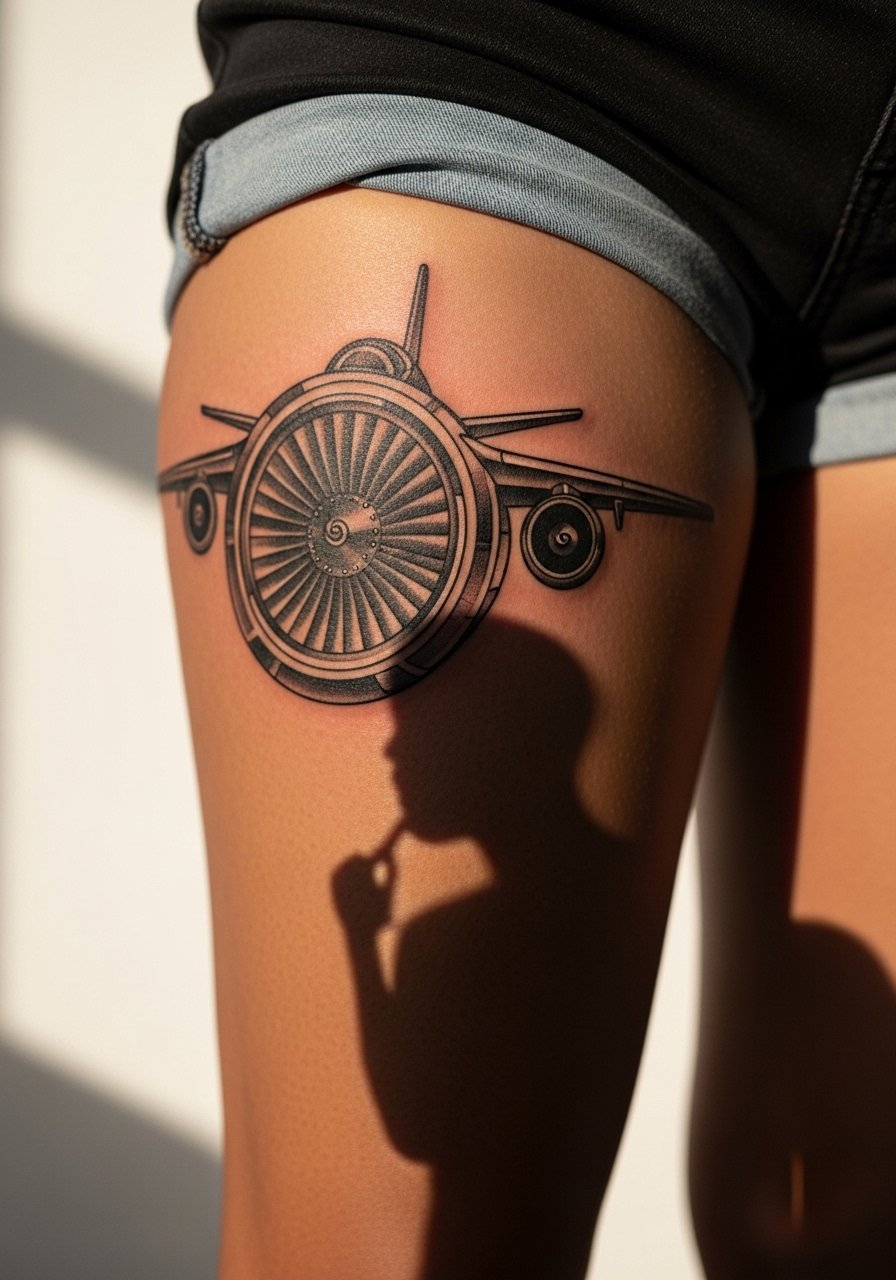
5. Time Portal Swirl with Bunny Ears on Thigh Outer
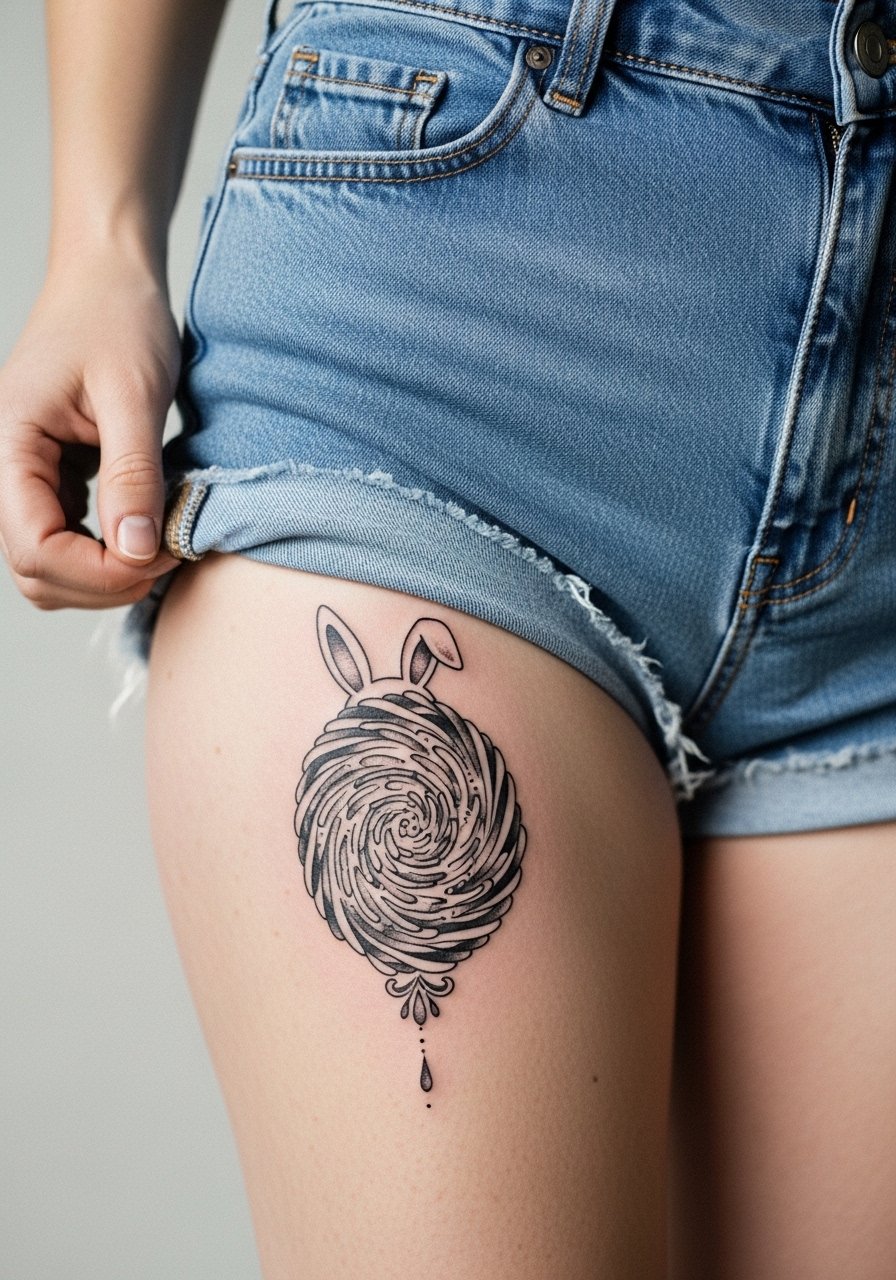
Thigh placements let you scale surreal portals large enough that dot work and stipple shading breathe. The main risk is stretch from weight change or pregnancy, which can warp circular designs. To avoid distortion pick the outer thigh and add structural gears or bands that maintain the circle shape as skin shifts. Sessions run longer, and you will need two visits for complex shading. For session comfort wear high waisted denim shorts so the artist can roll fabric without tight seams hitting the tattoo zone.
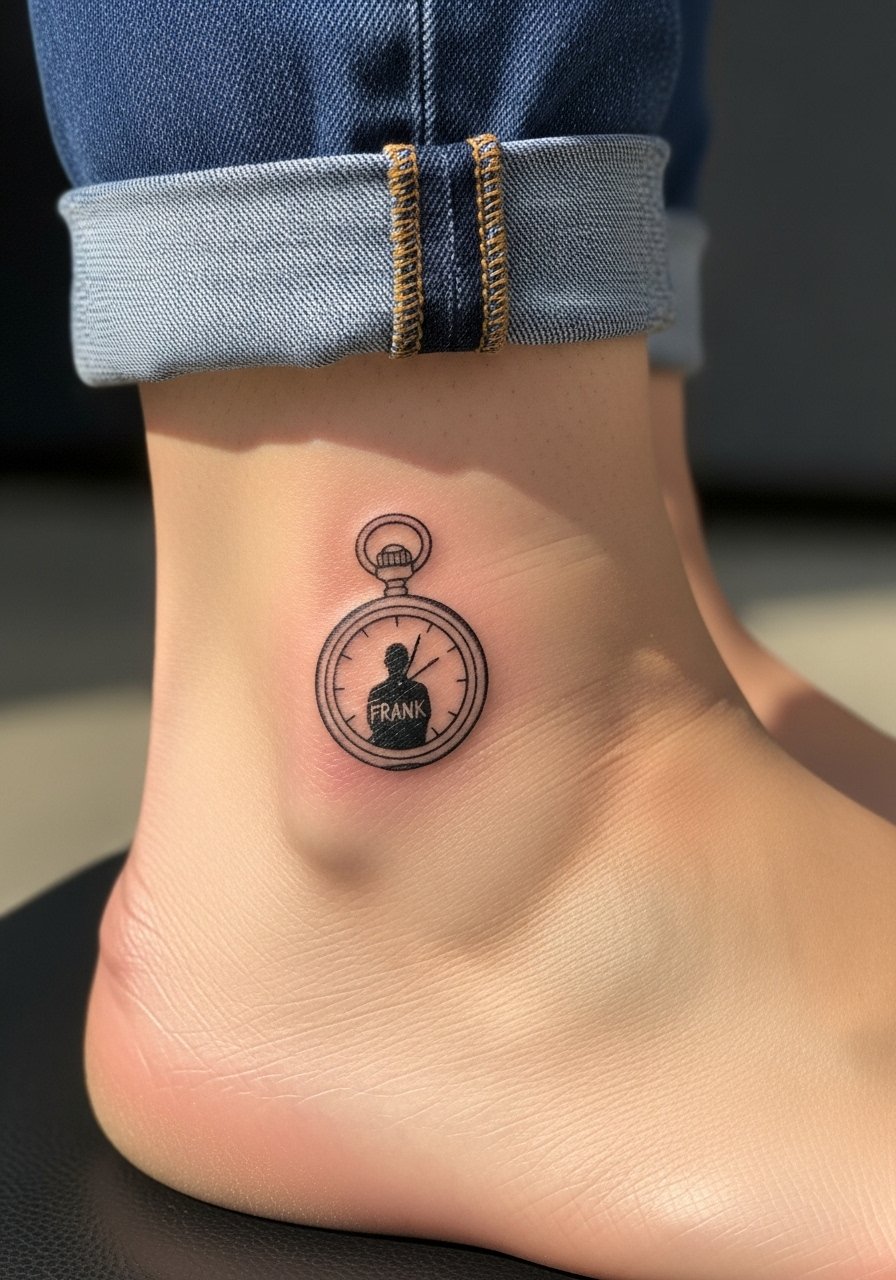
6. Frank Mask with Tangent Universe Text at Ankle
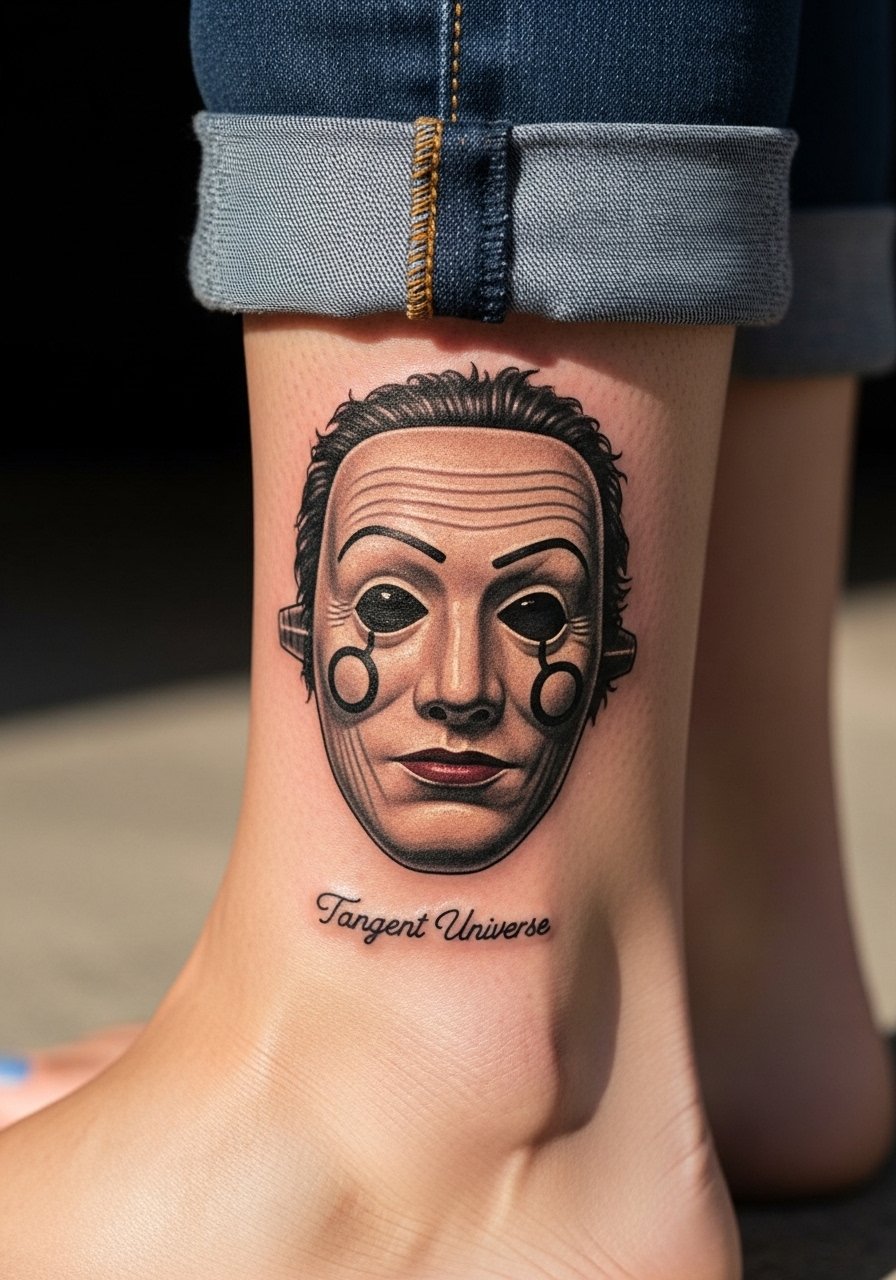
Ankle pieces are small and symbolic, but they live in a friction zone with shoes and socks. Micro-realism masks here need bold surrounding outlines to avoid the "smudge" effect after heavy wear. Ask for slightly larger lettering and a subtle negative-space border. Session time is short and pain is moderate. For showing off choose low-profile footwear and cuffed pants for visibility. If you plan to wear the tattoo often, a thin leather wrap bracelet on the opposite wrist can balance minor accessories.
Pack Smart
The first handful of ankle and thigh designs above see a lot of rubbing and wardrobe stress, so a few targeted prep items make the session and first week easier.
-
Tea tree salve alternative balm. Breathable and less greasy, a good option for calf and thigh work that needs moisture without trapping sweat during summer heals.
-
H2Ocean saline spray. Useful for cleaning detailed blackwork that sits near friction zones like ankles and wrists without leaving residue.
-
Rice bran oil balm. Absorbs quickly and avoids white cast on darker skin tones, which helps portraits and gray washes pop in photos.
-
Indie soy-based moisturizer. Lightweight option for thigh portals that may expand or contract after weight changes.
-
Hustle Butter Deluxe. Thinner than petroleum creams and preferred by many for breathable moisture on shaded blackwork on forearms.
7. Donnie on Bike Under Jet Engine, Upper Arm Sleeve Starter
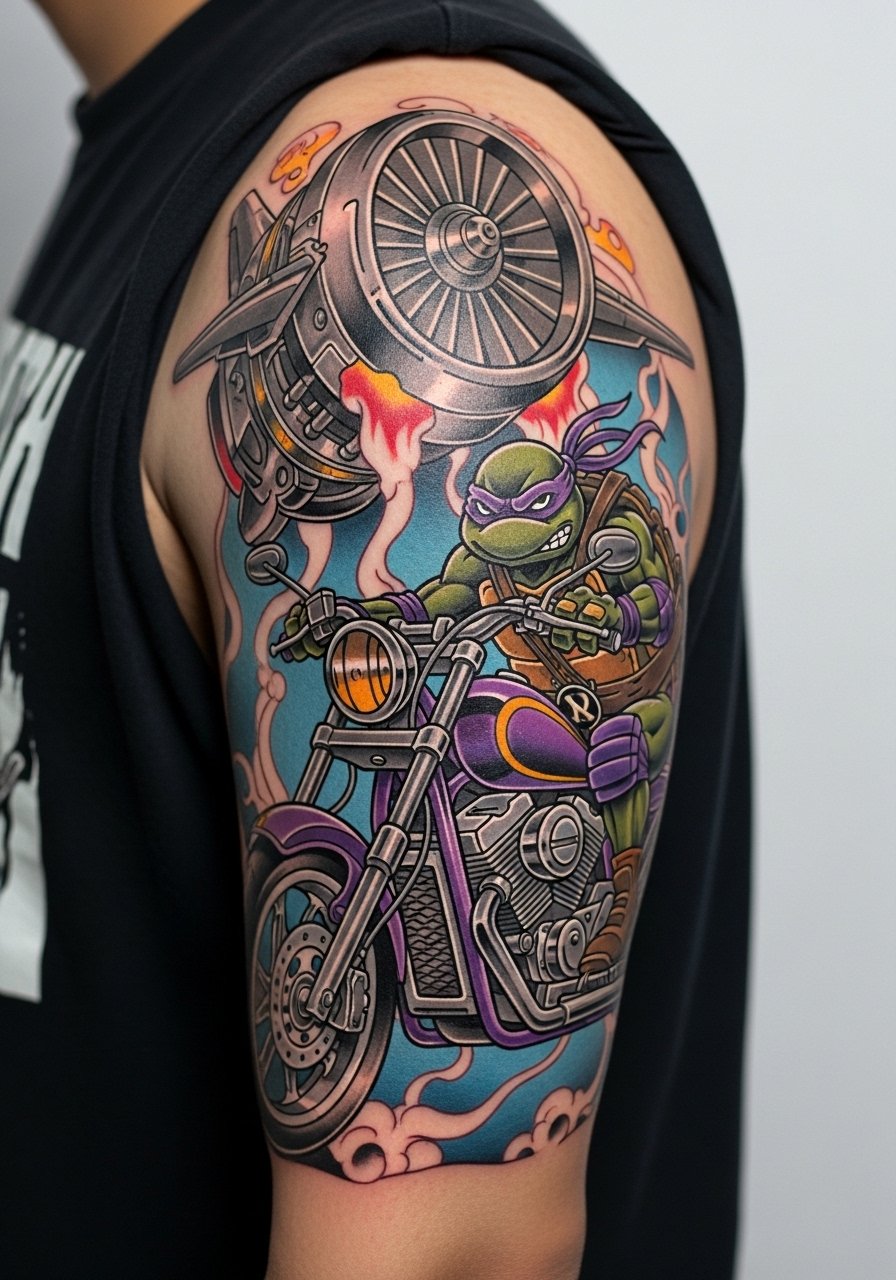
This scene reads cinematic at sleeve scale and looks great as a sleeve starter. The upper arm is forgiving for color blends and heavy shading, so vibrant blues will hold better than pale grays. Expect multiple sessions and moderate pain. A common mistake is crowding the composition with too many tiny elements. Tell your artist you want clear focal points and room for future sleeve elements. For session day wear a sleeveless hoodie or a loose tank so the artist can access the whole upper arm without tugging fabric.
8. Minimalist Eye in Bunny Mask on Finger
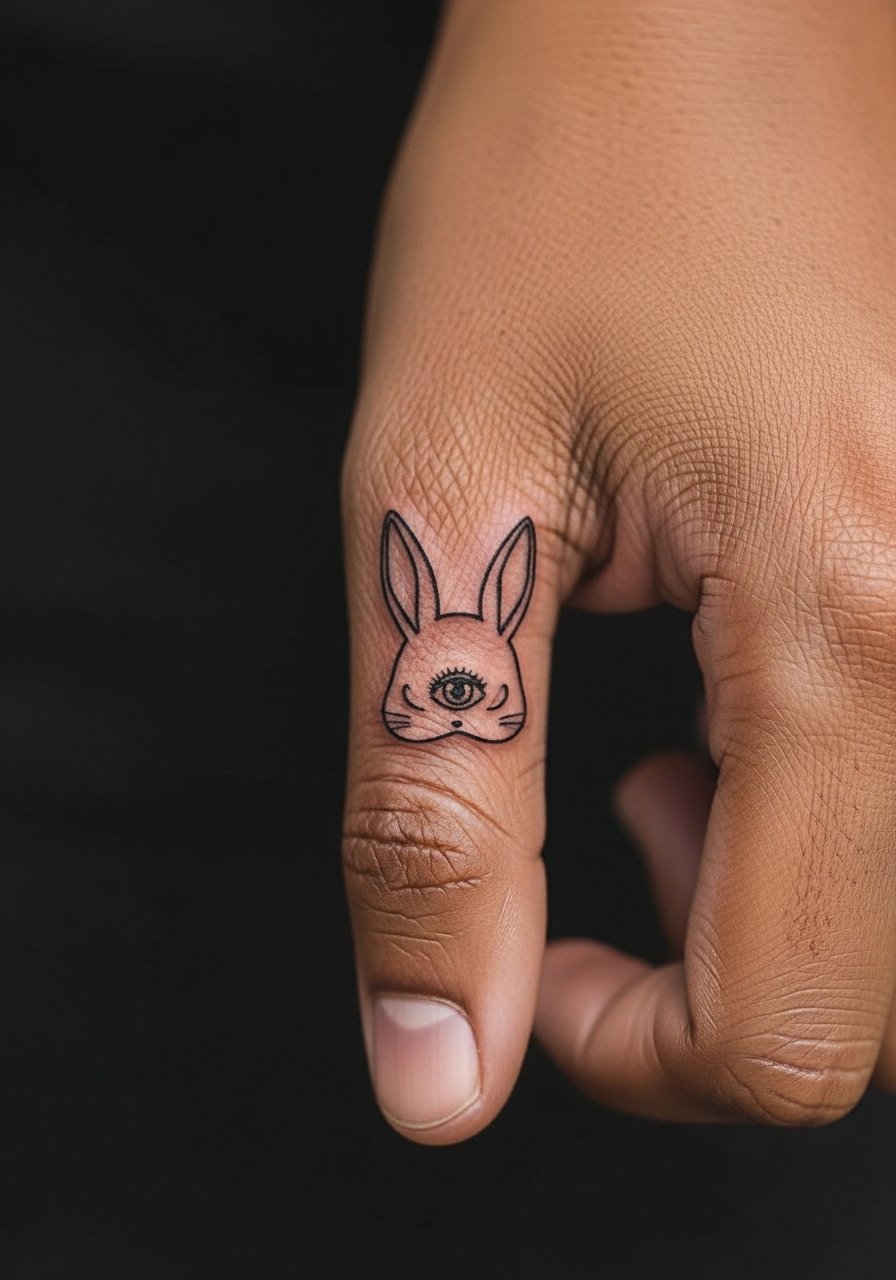
Finger tattoos are conversation starters but they are also notorious for early fading. A tiny eye inside the mask reads well only if you accept that touch-ups are likely within one to two years. The real mistake is insisting on ultra-fine hairlines without a solid anchor. For this placement, choose a simplified eye and a heavier surrounding outline. Pain here is sharp and quick. Keep expectations realistic about longevity and avoid placing critical detail on the center of the finger where washing and friction are constant.
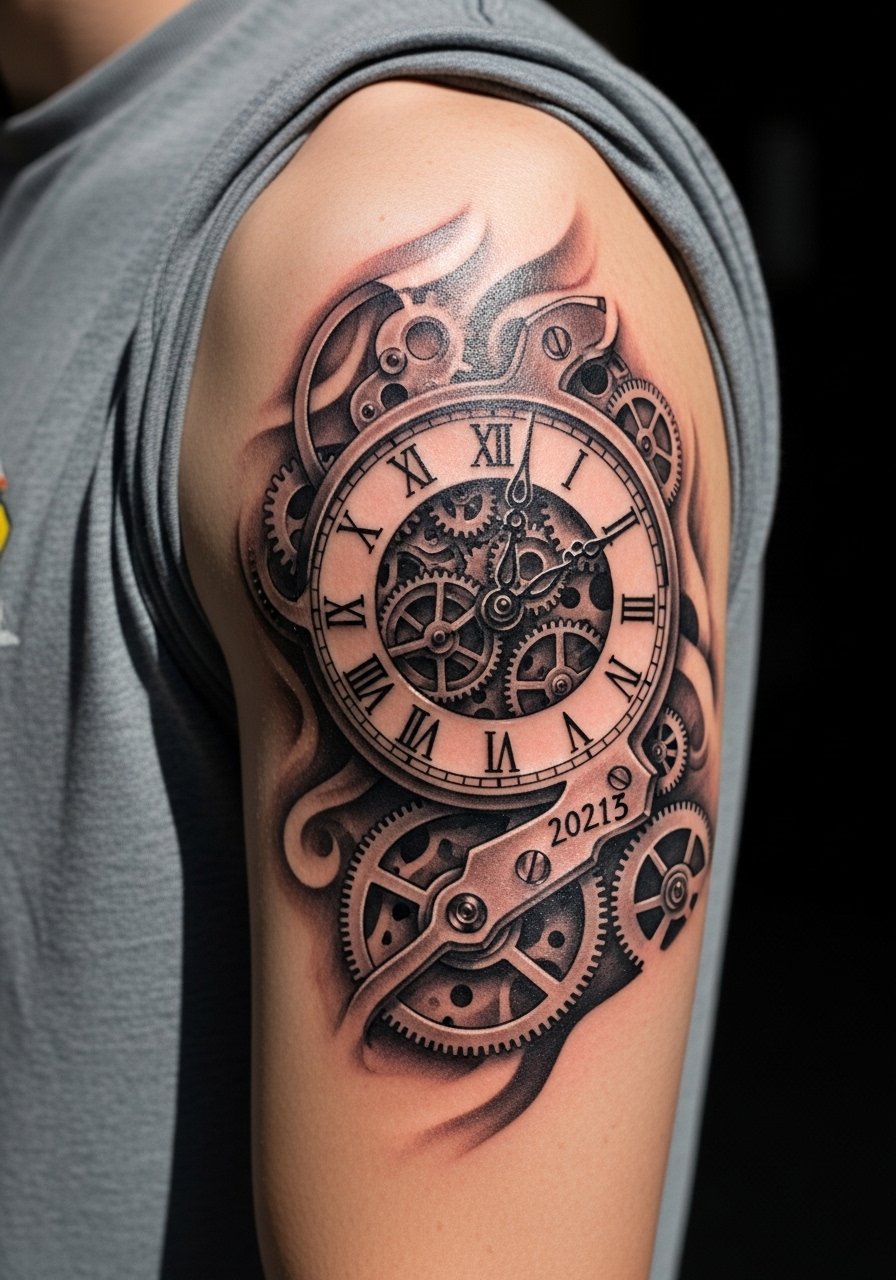
9. Skeletal Bunny with Clock Gears on Forearm
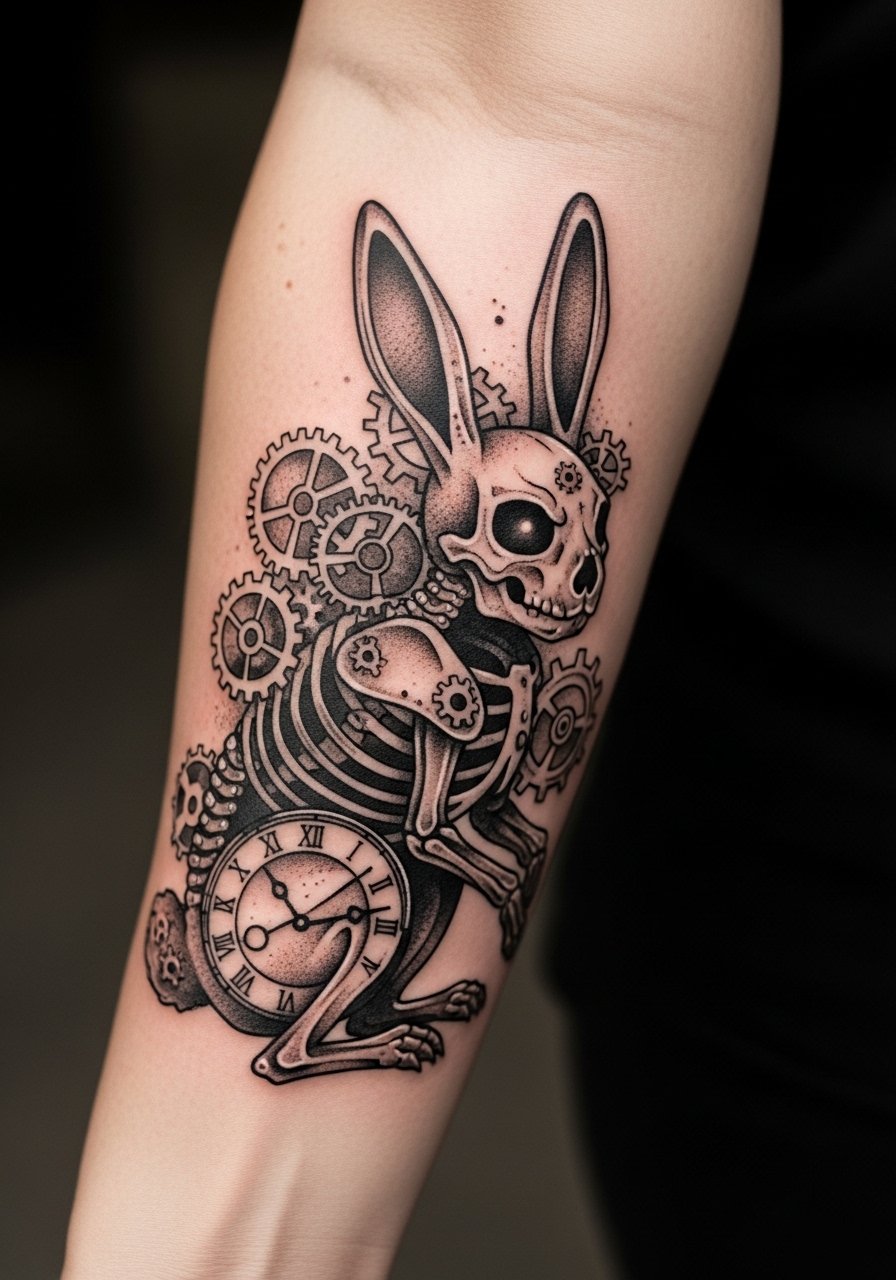
Forearms are a sweet spot for blackwork because they tolerate dense shading and still heal with clear saturation. This skeletal bunny with gears blends horror and time themes in a way that reads well at five inches. The usual error is too many tiny gear teeth packed into a small area. Tell your artist to simplify teeth and use negative space to separate components. Pain is moderate. For showing off, roll the sleeve of a charcoal henley shirt to frame the design without competing visuals.
10. Film Quote Script on Inner Bicep
Script on the inner bicep sits nicely in a pocket of skin that does not flex with every movement. Keep lettering size larger than you think so serifs and small counters do not fill in over time. A common mistake is choosing a thin, ornate script for a high-motion area. This location has moderate pain during the session. For comfort wear a loose tank top or button-down that you can slide without disturbing the stencil.
11. Primary Universe vs Tangent Universe Mandala on Shoulder Blade
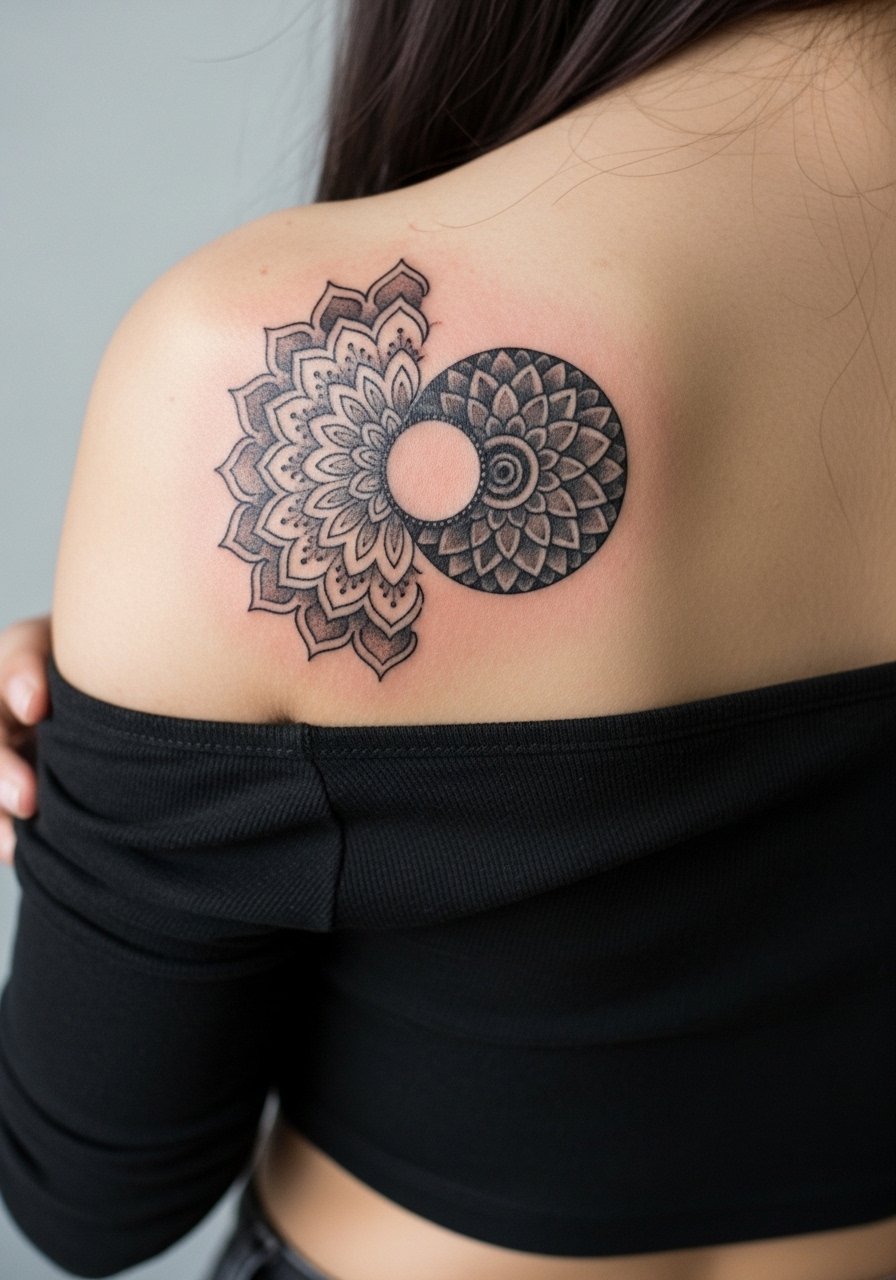
Shoulder blades give enough flat surface for a mandala that plays on the film's metaphysics. The design works best with clear radial spacing so lines do not merge as the piece ages. One overlooked detail is how clothing straps can rub the edge during the first week. Expect two sessions for linework and shading. For showing off, pair the piece with an off shoulder crop top so the shapes read cleanly against the skin.
12. Frank Bunny Half-Face Portrait on Upper Arm
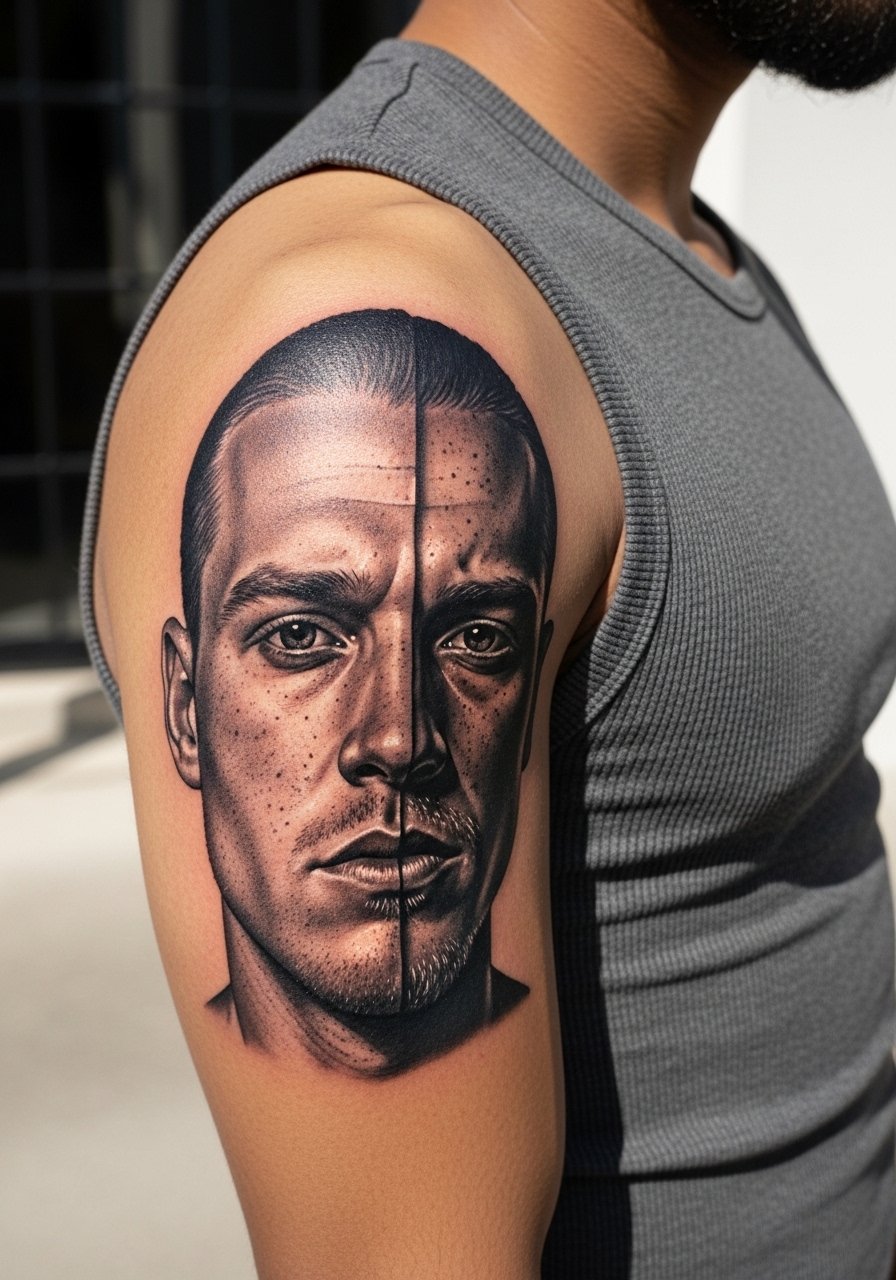
Half-face portraits need strong contrast to keep an ominous presence as the skin ages. The upper arm is excellent for micro-realism because it offers a forgiving canvas and lower blowout risk than the forearm. A common mistake is overworking tiny facial details that blur into gray at year two. Ask for bold key contours and lighter texture work for hair and mask surfaces. Session time is longer and pain is moderate. For showing off try a fitted muscle tee black and an open jacket to let the portrait sit against a simple backdrop.
13. Jet Engine with Frank Shadow on Outer Thigh
Outer thigh pieces allow larger compositions and preserve detail because the skin there shifts less from daily motion. That said, tight circular motifs can still distort if weight fluctuates. The fix is designing strong anchors like a vertical contrail or gear band. Sessions are comfortable and can be split across days. For showing off, thigh-high socks and high waisted denim shorts make the motif feel editorial and seasonal.
14. Curved Spine Time Portal for Motion
A spine placement uses the body's natural curve to make portals feel like they move when you walk. The downside is pain and the need for an artist experienced with spinal canvases. One camp says fine line never holds there because skin stretch blurs lines. The other camp says with correct depth and spacing it can settle well. Ask the artist where they stand and request a wider spacing plan if you lean toward longevity. For the session wear a wide-neck shirt pulled aside that lets the artist expose only the spine area.
15. Micro Finger Jet Engine as Ring Alternative

Micro finger tattoos can be playful and discreet, acting like a permanent ring. The real downside is frequent touch-ups. Oils, hand washing, and friction make inks disappear faster. If you choose this, ask for a simplified silhouette with thicker anchor lines and accept a touch-up at year one. Pain is focused and brief. Keep in mind rings and bracelets will draw attention away from the fingers, which may be what you want or not depending on your aesthetic.
16. Black and Gray Frank Adapted for Dark Skin with White Highlights
Dark skin requires a different approach to keep gray washes looking crisp. Ask for stronger linework and white highlight planning that the artist will add only if it photographs well on your tone. A common misstep is trying to translate the same gray gradient used on pale skin without increasing contrast. The result can photograph muddy. Tell your artist you want photos of healed results on similar skin tones so you can set expectations. This version reads best with bold contours and selective highlights rather than soft mid-tone blends.
17. Minimalist Jet Engine on Wrist
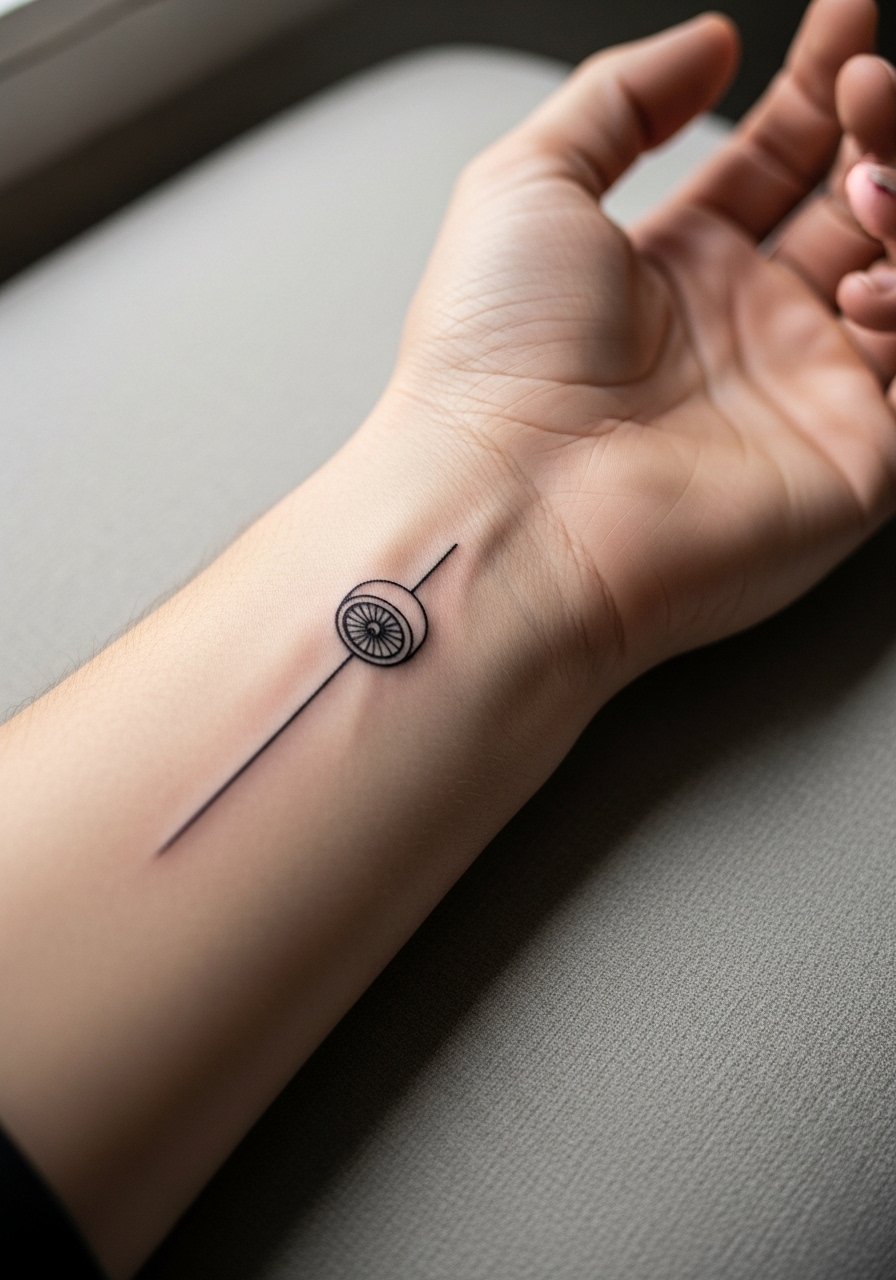
Wrist placements are visible and vulnerable to fast fade. Fine-line jets here must be slightly enlarged with a crisp outer contour. The controversy over fine line vs bold line is loud in forums. One camp accepts subtle fading as character. The other argues small fine-line wrist tattoos often vanish within a year. If longevity matters opt for a thicker outline and plan a touch-up at year one. For session wear choose a sleeveless tee and remove all jewelry so the artist has an unobstructed area.
18. Donnie Darko Portal as Collarbone Script Wrap

A collarbone wrap that includes script can be elegant if the lettering is spaced to account for skin movement. The primary mistake is tiny script that collapses into a thin smudge. Ask for larger, simpler script and a portal that uses negative space. Pain is higher near the bone. For showing off this placement choose a dainty chain necklace that sits above the script without overlapping the design.
19. Donnie Darko Clock Gears with Personal Birthdate Integration
Personalizing the jet engine motif with birthdate gears gives the time travel narrative an autobiographical twist. Upper arm placement is forgiving for these custom elements. The common error is cramming small numerals into busy gear areas. To avoid legibility loss, have the artist place the date on a clear gear face or as a band across the design. Sessions can be split between linework and shading. For the session wear a loose button-down shirt so the artist can slide the sleeve without tugging.
20. Donnie in Therapy Pose on Ribcage
Ribcage placements are painful and prone to movement-related blurring. The rib offers dramatic negative space but it demands spacing and patient sessions. Artists argue fine line here either holds or blurs depending on needle depth and client healing. If you choose ribs, size the silhouette larger and avoid tiny interior details. Expect high pain ratings and plan a single longer session with breaks. Bring a cropped athletic top you can lift for access without exposing the whole torso.
21. Micro-Realism Frank Eye on Neck Side
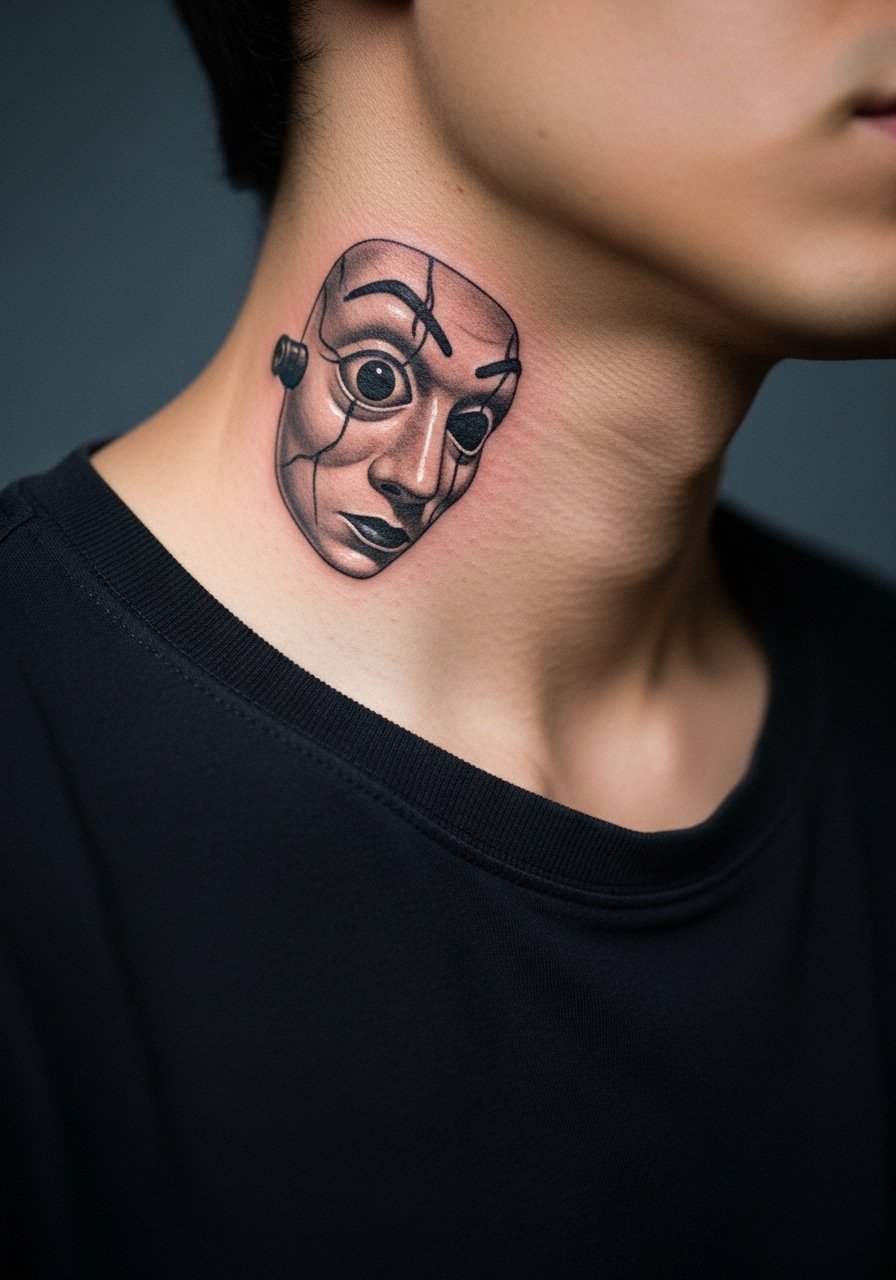
Neck pieces are visible and can affect first impressions professionally. Micro-realism on the side neck needs higher contrast and a clear border to avoid spreading. Ask the artist about how healed photos look on necks similar to yours. Pain is high and touch-ups are more common. For session wear choose a wide-neck shirt you can adjust so the artist works on the small area without exposing more than necessary.
22. Donnie Darko Mandala as Sternum Accent
Sternum pieces can be stunning but are sensitive and need careful aftercare. A common mistake is going too dense visually in a high-motion area, which leads to merging lines. Opt for more spacing and bolder anchor points within the mandala. Pain can be intense. For the session wear a fitted sports bra so the artist has access but you remain comfortable.
23. Donnie Darko Pocket Watch with Tiny Frank on Ankle
Ankle jewelry-style pieces age by contact with footwear. A pocket watch motif sits well when its outer rim has a slightly thicker outline to resist fade. Tiny internal details like spokes and a small Frank should be simplified. Expect touch-ups within one to two years if you wear low shoes daily. For the session roll your jeans and wear no socks so the artist can work on a clean surface.
24. Donnie Darko Sleeve Anchor: Blackwork Crossroads

For someone planning a larger Darko sleeve, blackwork anchors help future pieces blend without competing. The mistake I see is starting with micro-realism that does not leave room for anchors, which makes later integration messy. Choose a bold silhouette for the inner forearm to frame subsequent scenes. Pain is moderate and sessions depend on size. Roll your sleeve up and wear a charcoal henley shirt so the artist has unobstructed access.
25. Donnie Darko Memorial Frank on Calf with Date Ribbon
Some fans adapt Frank as a memorial motif with a small ribbon and date. Calf portraits handle this well and photograph cleanly. Keep the ribbon text large enough to avoid illegible numerals when healed. The usual error is tight script on a curved portion of the calf. For session comfort wear loose athletic shorts so the artist can fully expose the area without pressure on the skin.
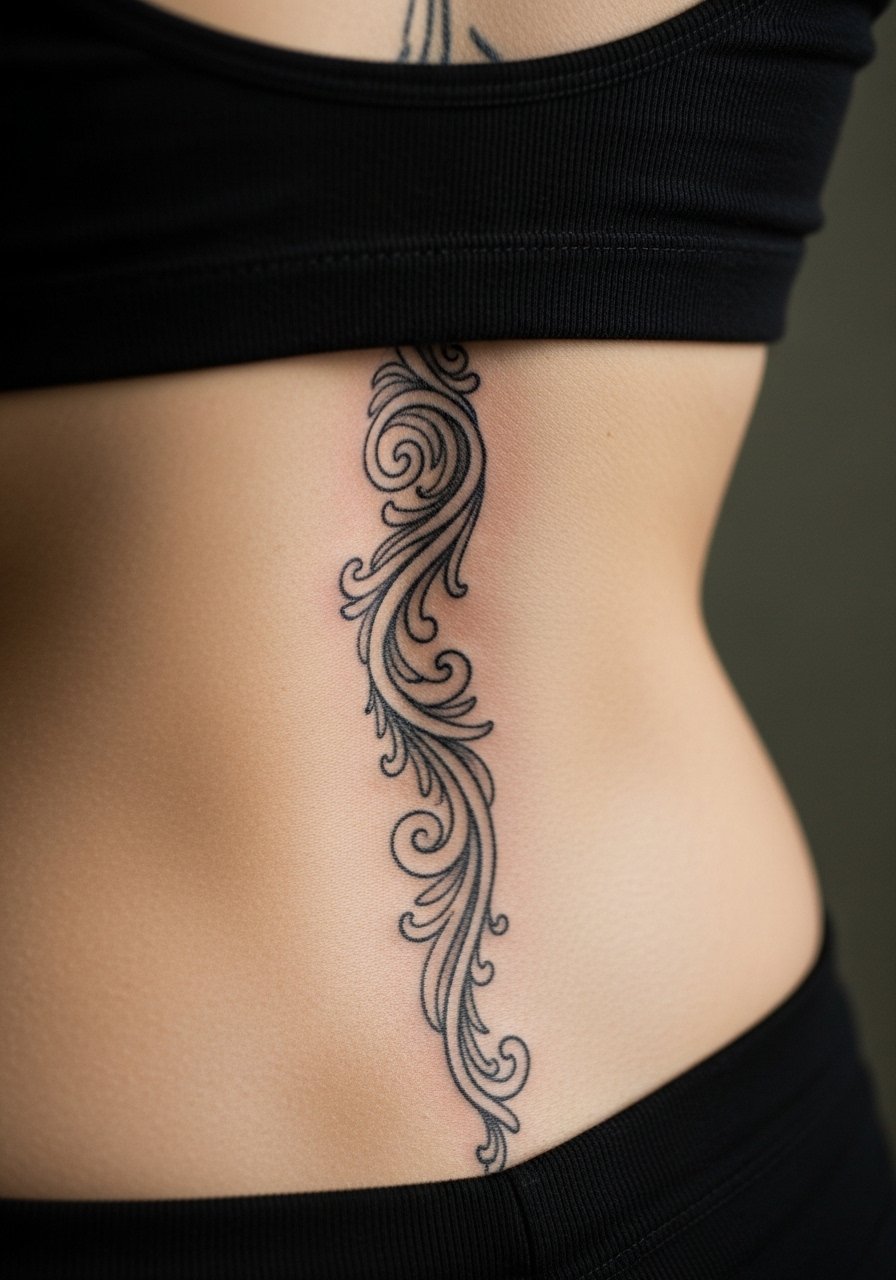
26. Donnie Darko Time Swirl on Lower Back
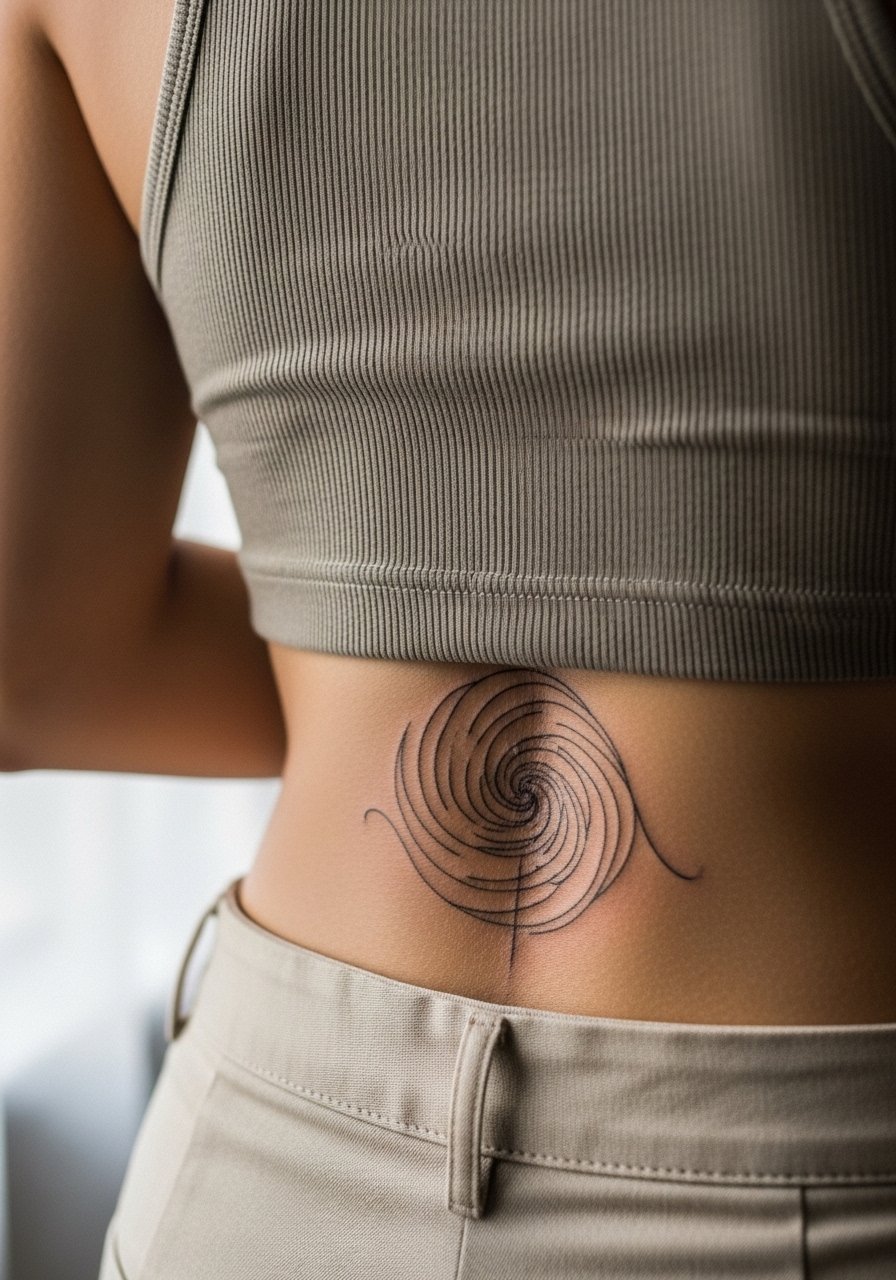
Lower back designs can be hidden or shown depending on wardrobe. The lower back moves less daily, which helps circular swirls stay balanced. Make sure the design sits above the pant line so it is not constantly rubbed by waistbands during the initial healing. Pain is moderate and touch-ups are typically minimal if spacing is correct. Wear a tank top with high waisted pants pulled slightly down for the session so the artist can work without tight waistbands.
27. Micro-Realism Frank Half-Face on Upper Chest Near Collarbone
Upper chest pieces look dramatic and can mimic portrait placements without being fully centered. The area near the collarbone is bony, so expect sharper pain. For longevity, ask for stronger contours and less reliance on soft mid-tones that can flatten on movement. If you are considering visibility in formal settings, note that shirts with a high collar will hide the piece easily. Wear a wide-neck shirt you can pull aside during the session so the artist accesses only the targeted zone.
Frequently Asked Questions
Q: Will a fine line Frank mask on my wrist fade quickly and what can I do to prevent it?
A: Fine line wrist tattoos often show early softening because wrists face constant sun and friction. Choose a slightly heavier outline and ask for limited interior detail. Expect a possible touch-up around year one to year two. During the first week follow your shop's cleaning routine and avoid abrasive wristbands while it heals.
Q: My jet engine on the thigh stretched after weight change. Which placements resist stretching the most?
A: Outer thigh and calf are more stable than inner thigh or ribcage when weight fluctuates. If you anticipate change, design with anchor elements such as bands or gear rims that maintain shape. A spine or upper arm placement also resists stretch better than areas with larger soft tissue shifts.
Q: How should I adapt a Frank portrait for darker skin tones so it photographs well?
A: On darker skin, request higher contrast linework, intentional negative space, and selective white highlight planning if your artist has healed photos to show. Ask for references of healed pieces on similar tones. Avoid relying solely on soft gray washes without bold anchors.
Q: There are arguments for Saniderm and for dry healing. Which camp should I pick for detailed blackwork?
A: Both camps make solid points. The Saniderm group says protective film keeps contaminants out and protects tight linework during the early window. The dry-heal group worries that trapped moisture on heavy shading can promote issues. Ask your artist what they prefer for dense blackwork and follow the exact aftercare they recommend for that shop.
Q: Can I wear normal clothes to a collarbone or sternum session, and what should I bring?
A: For collarbone choose a wide-neck or strapless option you can pull aside without exposing your whole chest. For sternum wear a fitted sports bra that reveals only the area being worked on. Bring loose layers to stay comfortable between passes and avoid tight straps that will rub the fresh work during the first 48 hours.
