
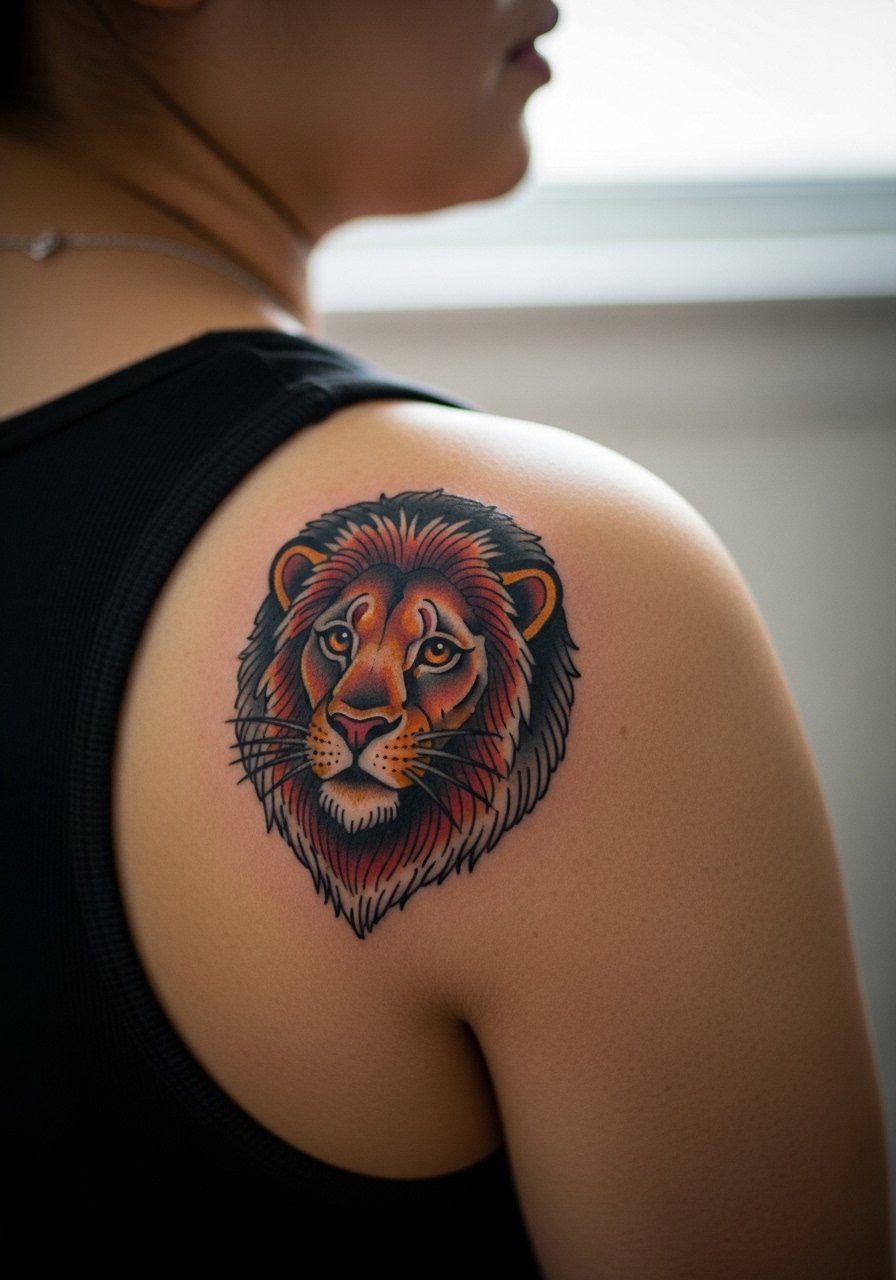
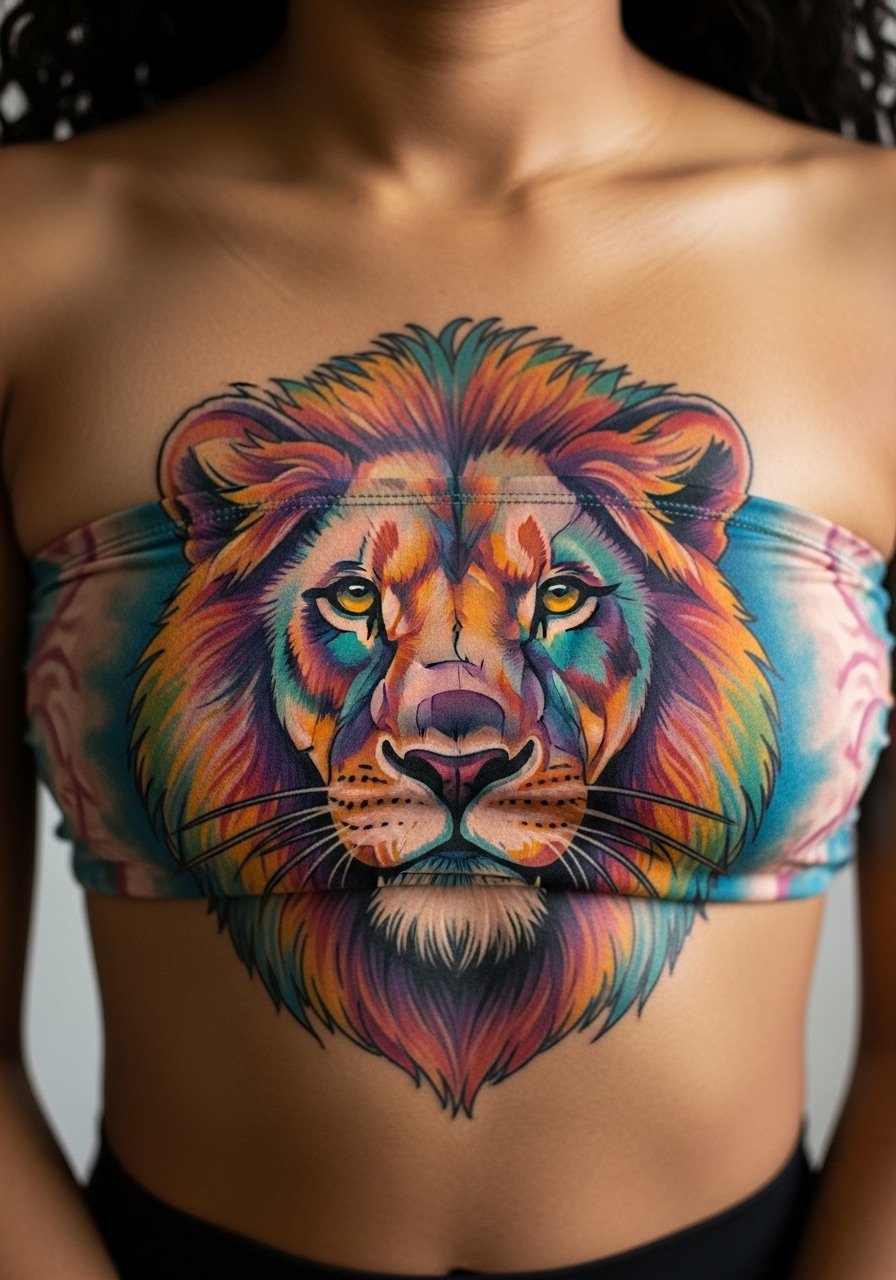
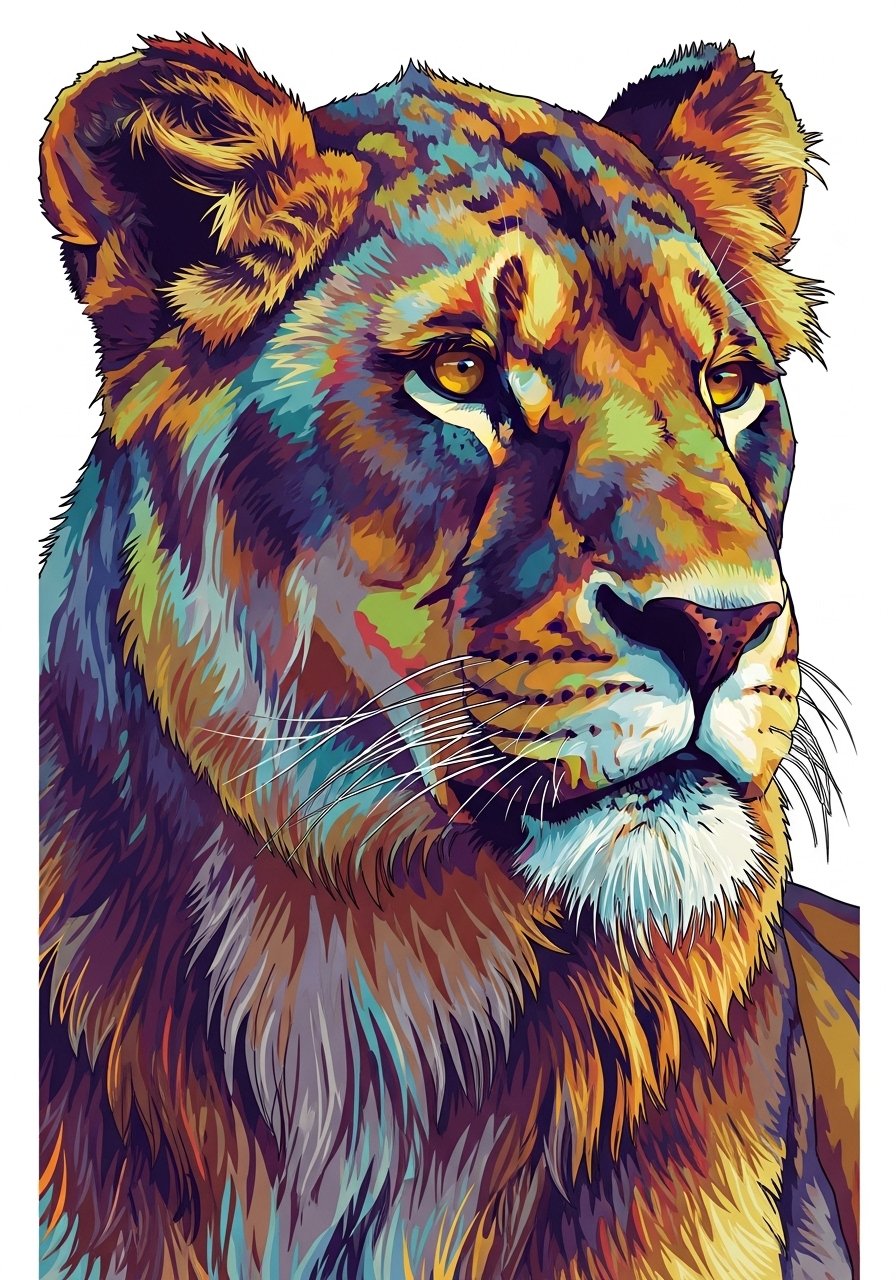
Fine line and saturated color trends look great in photos, but they bring a few realities to the chair: placement changes pain and healing, bright fills can soften faster than you expect, and small details can blur if you go too tiny. If you want a colorful female lion that reads powerful for years, pick placement, spacing, and saturation with those trade-offs in mind. The first set of ideas starts with compact placements that hold fine detail well.
1. Petite Colorful Female Lion on the Inner Forearm
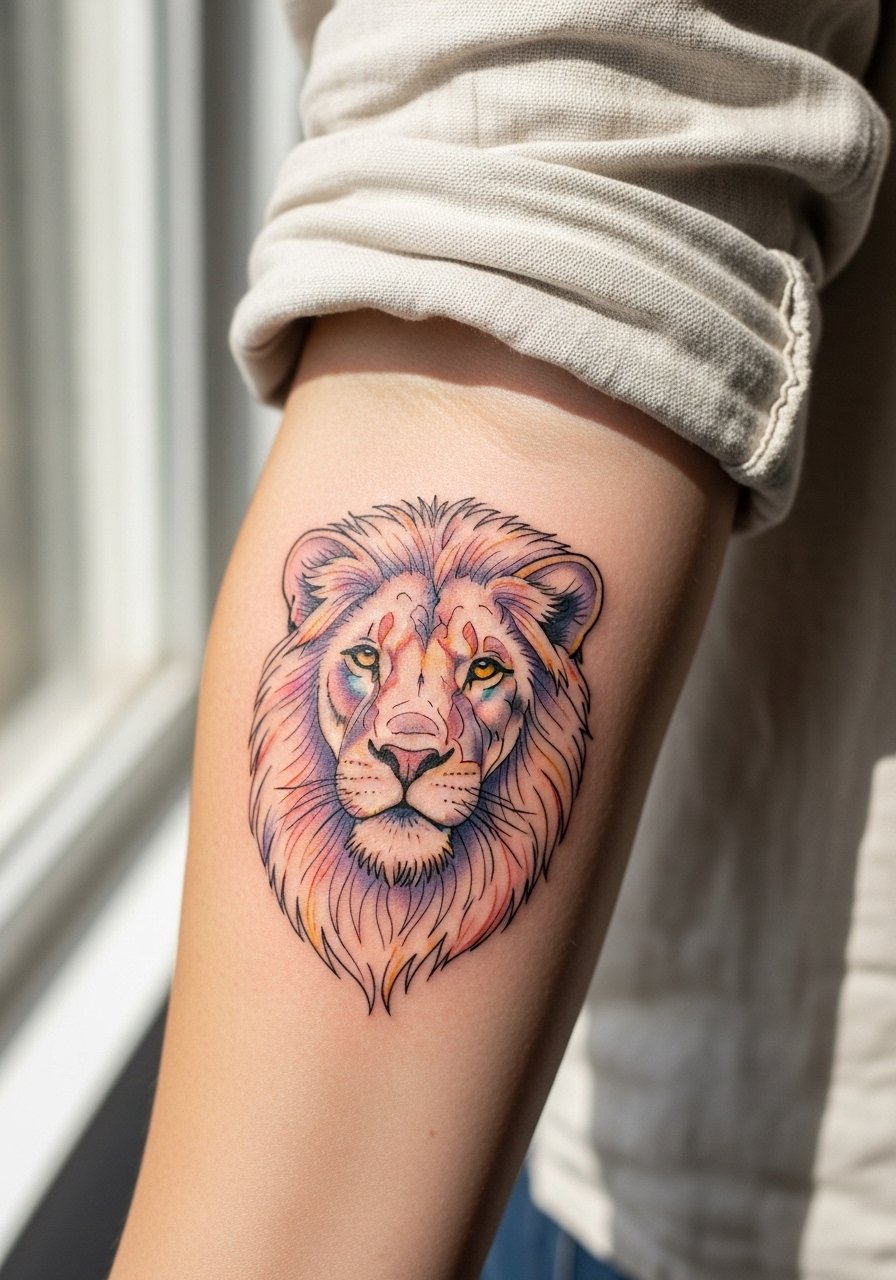
A small, detailed lioness face on the inner forearm reads intimate and strong. I recommend asking for slightly heavier linework around the eyes and whisker pads so the expression stays legible at year two. Fair warning, the inner forearm is forgiving on blowout but sun exposure will fade subtle pastels faster, so plan saturation with your artist. During consultation, bring close-up references and tell the artist you want the color packed with layered saturation, not a single wash. For the session wear, pull up a loose button-down shirt so the artist has full access without tugging at your sleeve.
2. Mid-Sized Watercolor Lioness on the Outer Bicep
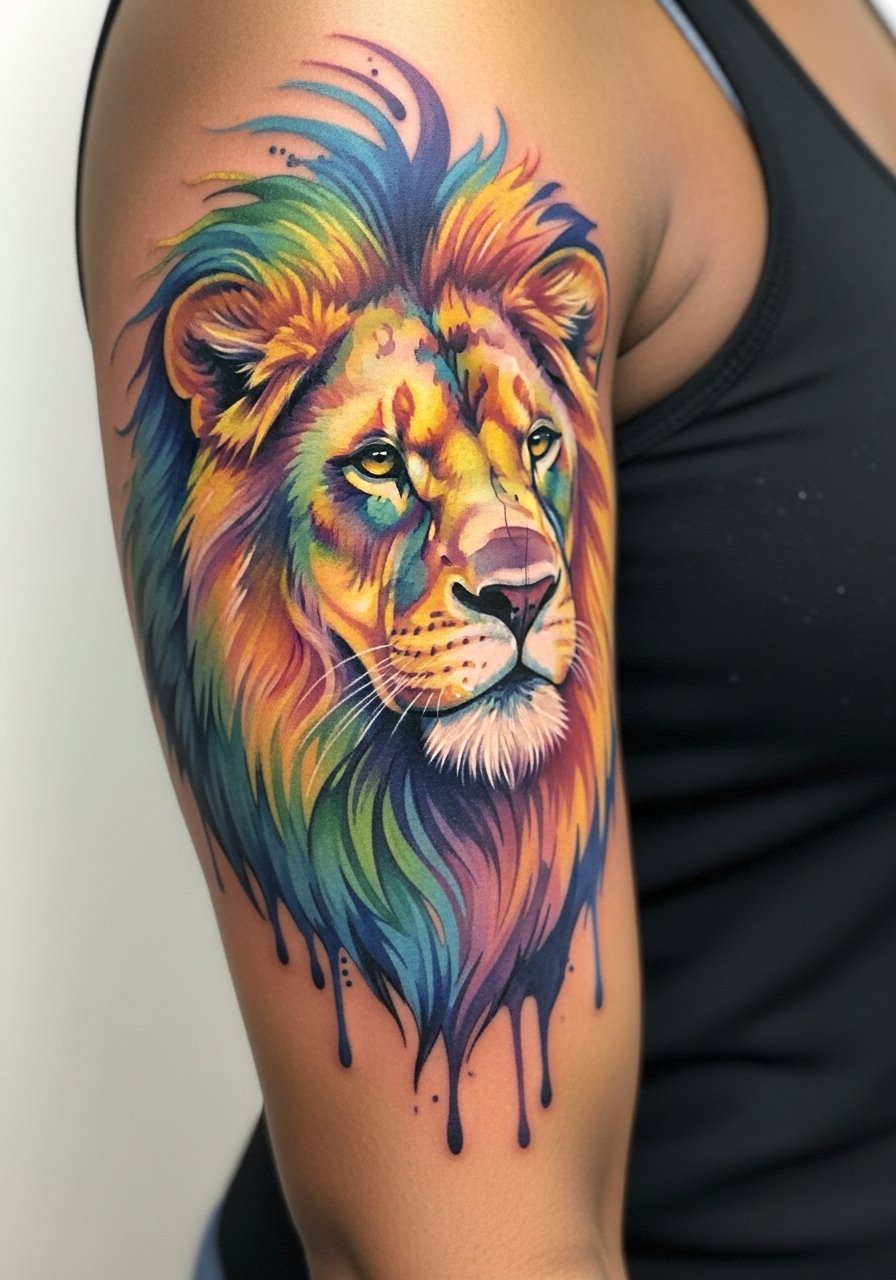
Watercolor fills give a painted feel but some artists split into two camps on longevity. One camp says watercolor fades like a soft pastel by year three, the other says careful saturation and edge control keeps it readable longer. Tell your artist you want soft edges with concentrated color anchors at the eyes and mane. Expect a medium pain level and a two to three hour session for a mid-sized piece. A common mistake is asking for washed-out pastels only. If you want the look to last, ask for selective saturation and a touch-up plan at year two.
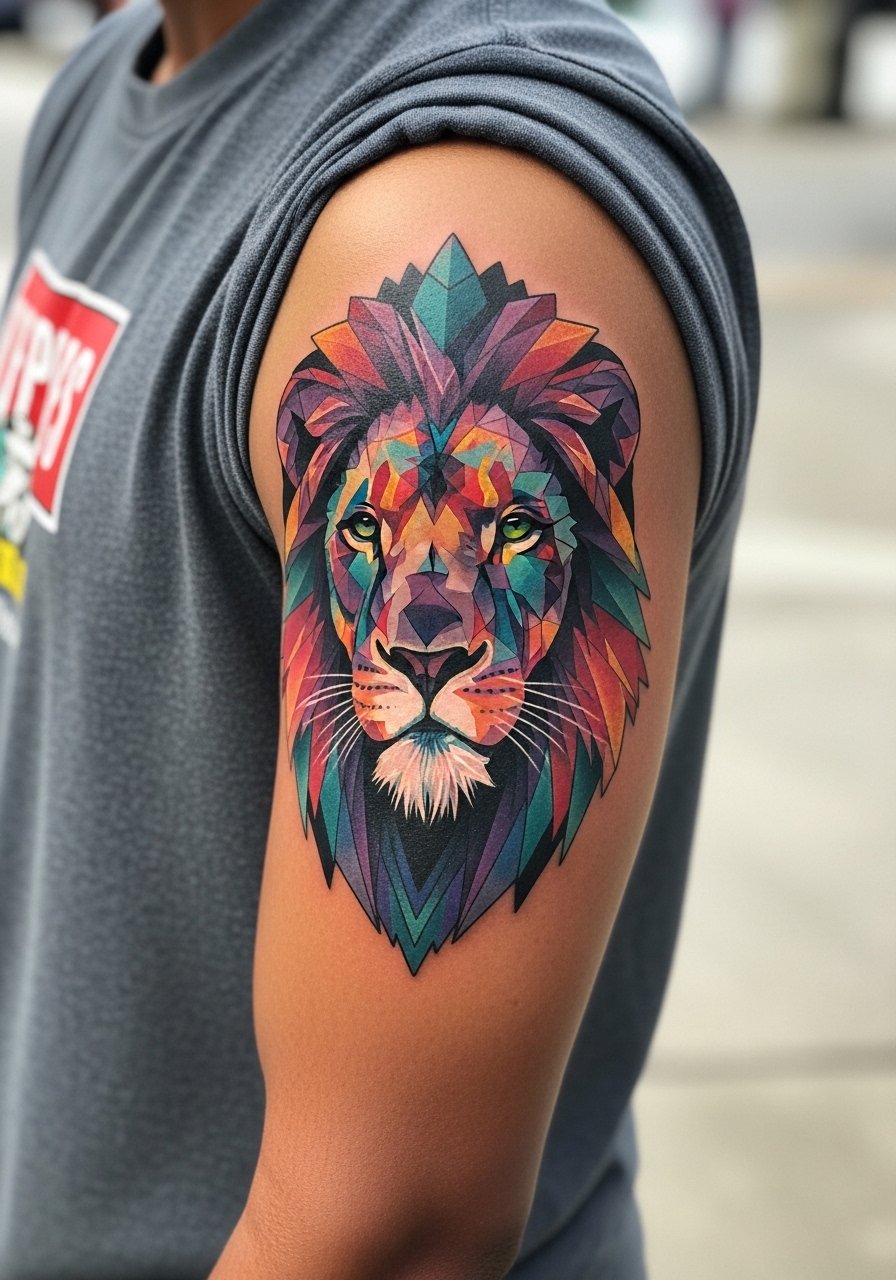
3. Geometric Mane with Rainbow Accents on the Upper Arm
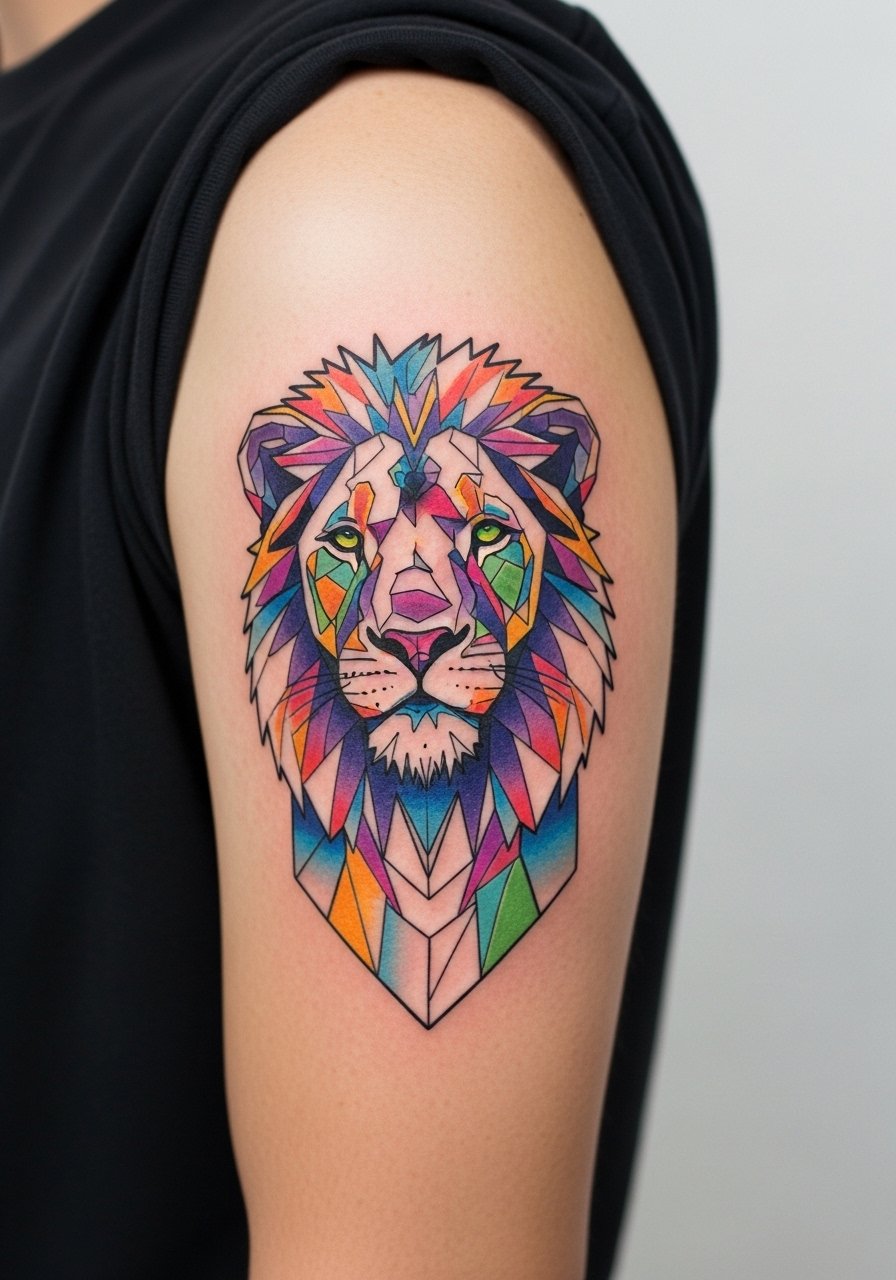
A geometric mane mixes crisp linework with bright color panels for modern contrast. The visual impact comes from clean linework around geometric shapes and saturated color in the negative spaces. Tell the artist to space lines to avoid dense crossings that age into a block. For session prep, wear a loose tank top so the artist can work without fabric interference. This placement is low to medium on pain and handles larger color patches well, but heavy color bleed into narrow shapes is a common mistake, so keep shapes at least a few millimeters apart.
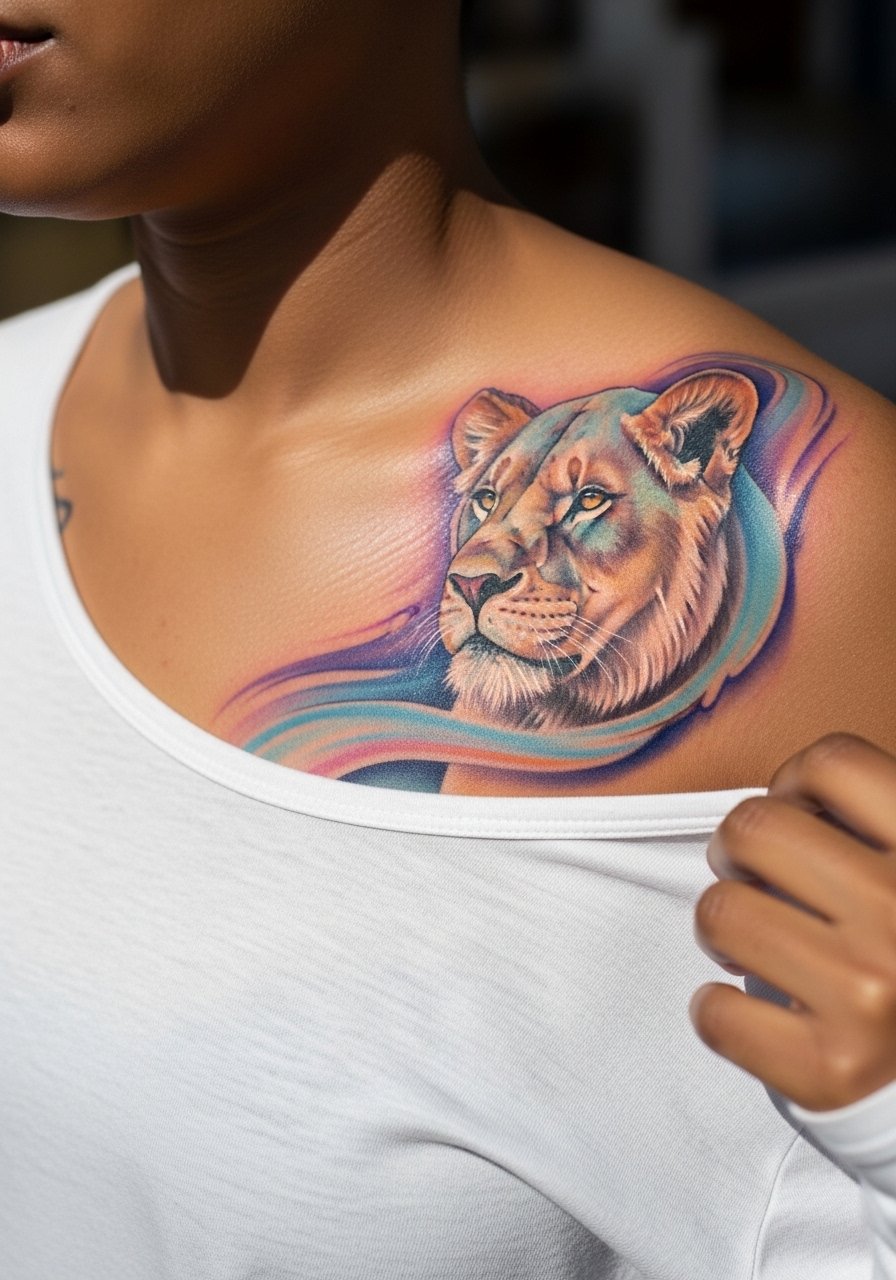
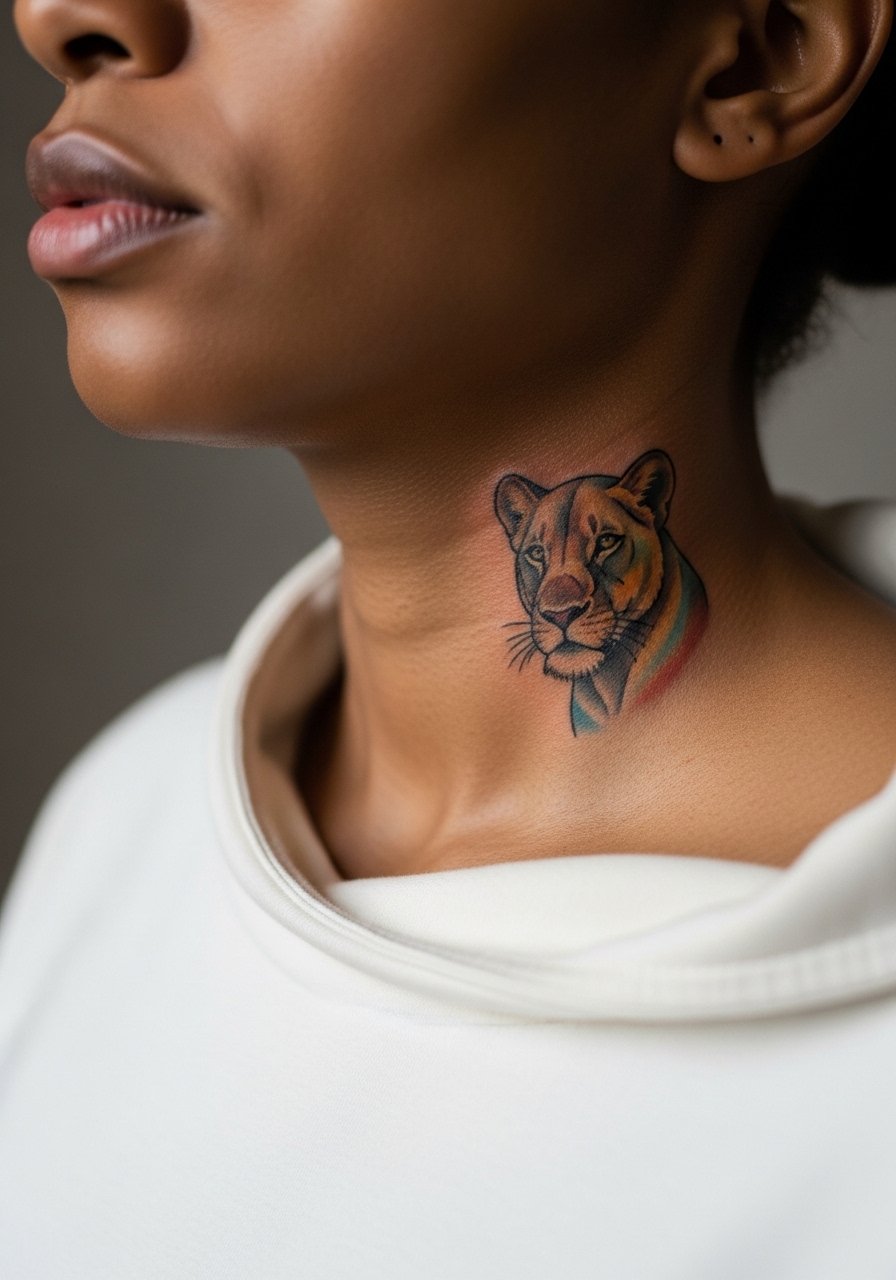
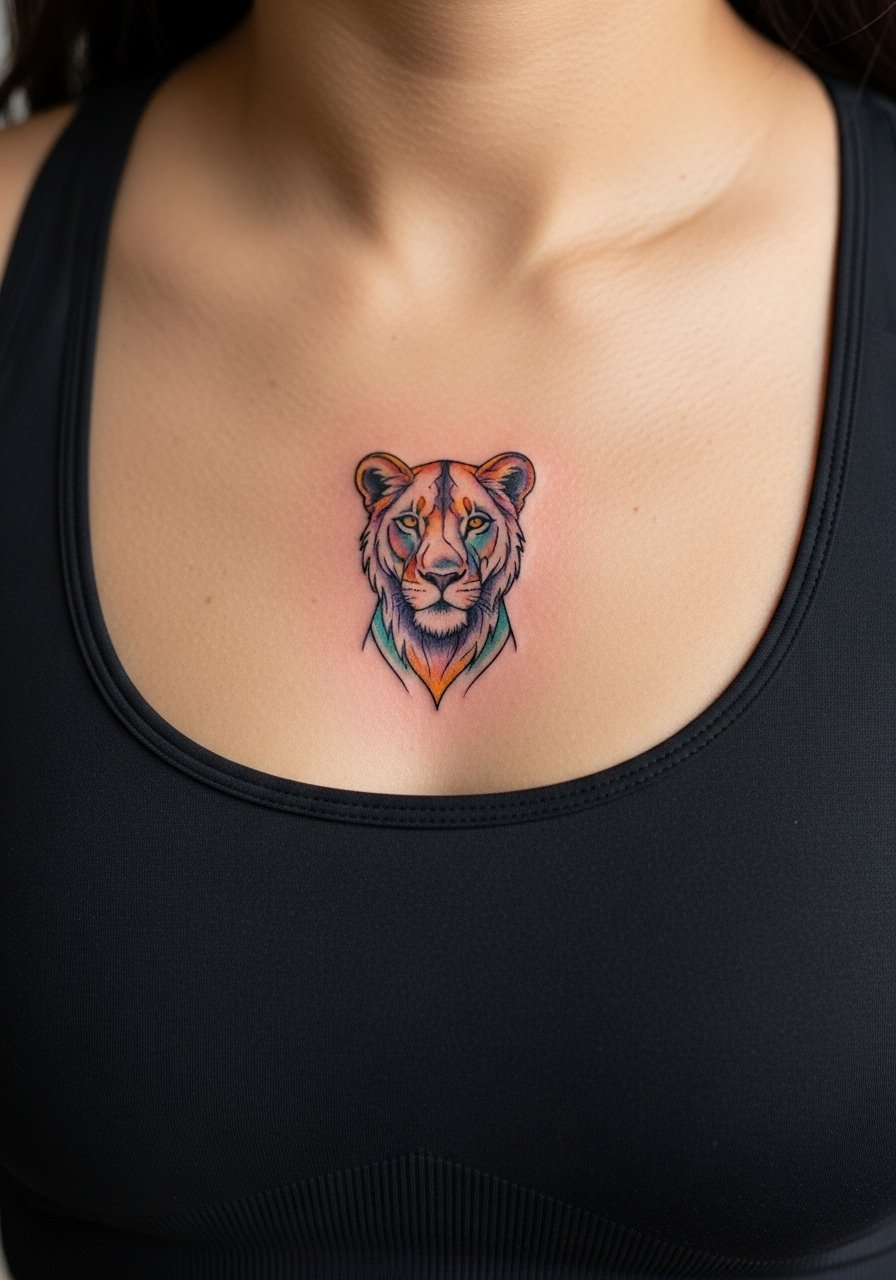
4. Feminine Lion Bust over the Collarbone
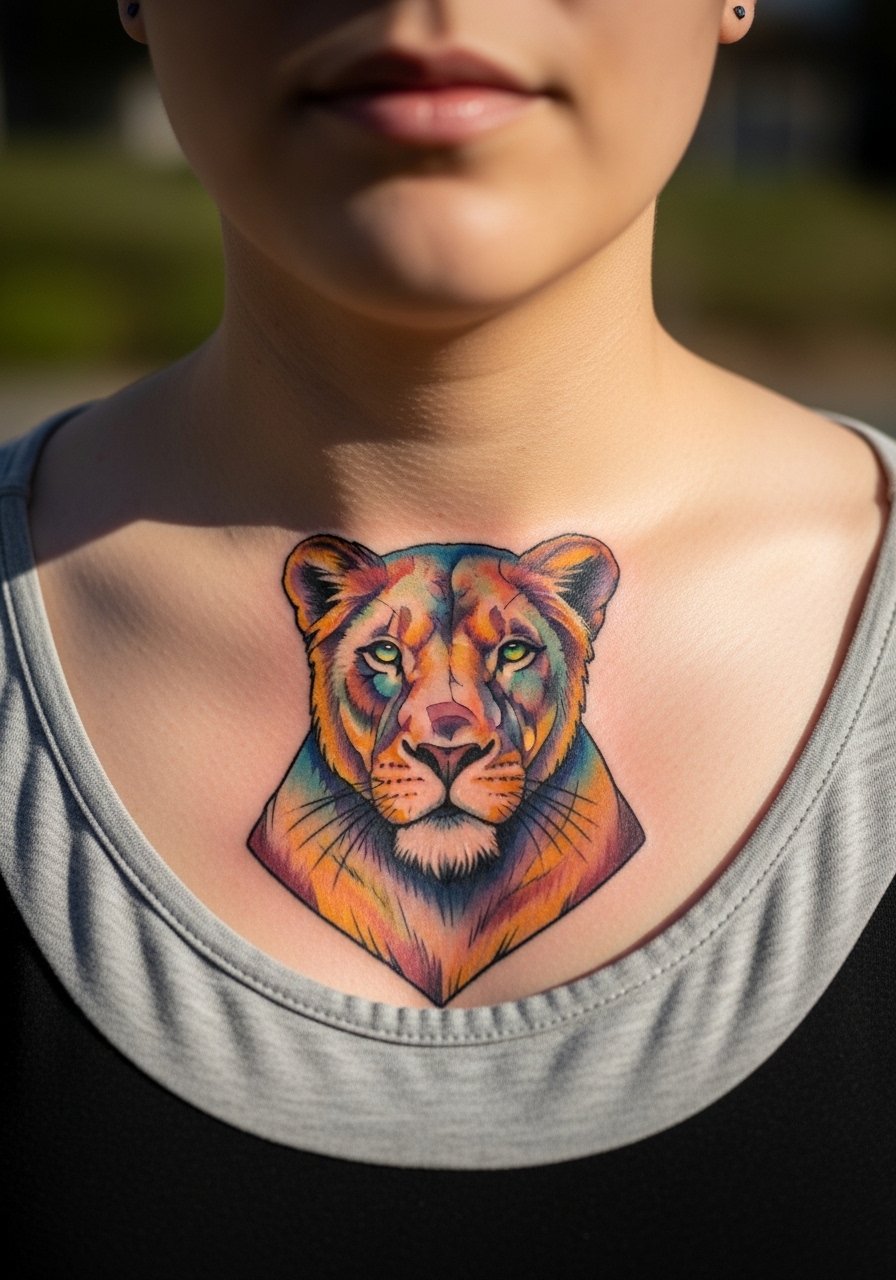
A collarbone lioness reads elegant and assertive when framed by jewelry or open necklines. The sternum and upper chest skin moves as you breathe so ask for slightly bolder linework along the jawline and mane. Pain here can be higher than on the arm, so plan for short breaks during the session. For showing off, a thin chain pendant necklace sits above the design without competing. A common error is over-detailing on the collarbone where the skin is mobile, which makes touch-ups more likely.
5. Small Finger Accent Lioness Head
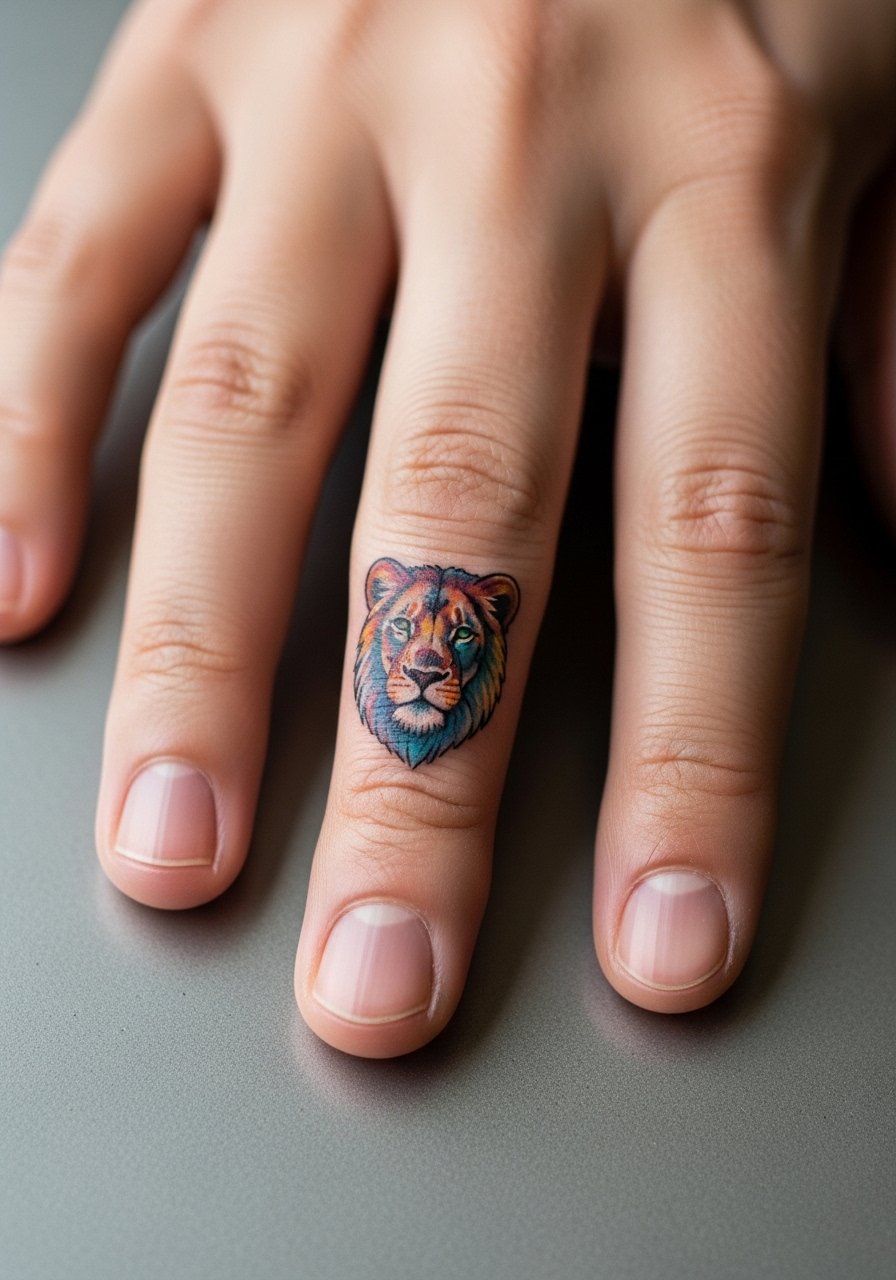
Finger tattoos are bold choices but they come with high friction and faster fading. For a female lion accent, keep the design compact with bold contours around the face so it survives daily wear. Tell your artist you accept a touch-up within the first year as standard for finger work. The session is quick and sharp in sensation. Avoid tiny hairline details inside the mane because they blur first. For the appointment wear comfortable, loose sleeves you can pull back easily so the hand is accessible.
6. Sleeve Patch Lioness with Floral Frame on the Outer Forearm
A patch-style lioness gives you a clear focal point without committing to a full sleeve. The outer forearm is lower pain and shows color well. Ask the artist for a floral frame that balances the lioness rather than crowding it. Most people make the mistake of packing too many tiny elements into a patch, which ages into a muddle. For session day wear a rolled sleeve linen shirt so the artist can access the area easily and you stay comfortable during longer color sessions.
Studio Day Picks
The small forearm, finger, and collarbone pieces above need different prep than full-arm color. These picks smooth the session and protect delicate color zones in the first week.
-
Stencil transfer sheets. Lets you preview placement and scale against the skin, which matters for tiny facial details in ideas 1 and 5.
-
Topical numbing cream. Applied before collarbone or forearm sessions to ease sharp spots without changing the artist's linework.
-
Thin protective film roll. Protects finger and forearm pieces from friction during the crucial first few days.
-
Fragrance-free gentle body wash. Cleanses healing color without stripping pigment for the small colorful areas above.
-
Aquaphor healing ointment. A thin layer helps keep delicate color zones moist during the initial healing window.
7. Sternum-Focused Regal Lioness with Saturated Palette
A sternum placement reads powerful and intimate but requires specialized experience. The skin there is thin and moves a lot, so one camp of artists avoids fine line on sternum while the other uses deeper, controlled packing to make it last. Name both camps when you consult and ask which approach your artist prefers. Expect a higher pain level and multiple short passes for saturated color. For the session wear a fitted sports bra so the artist can work without exposing other areas. People often try to cram too many tiny facial features into sternum pieces, which leads to early touch-ups.
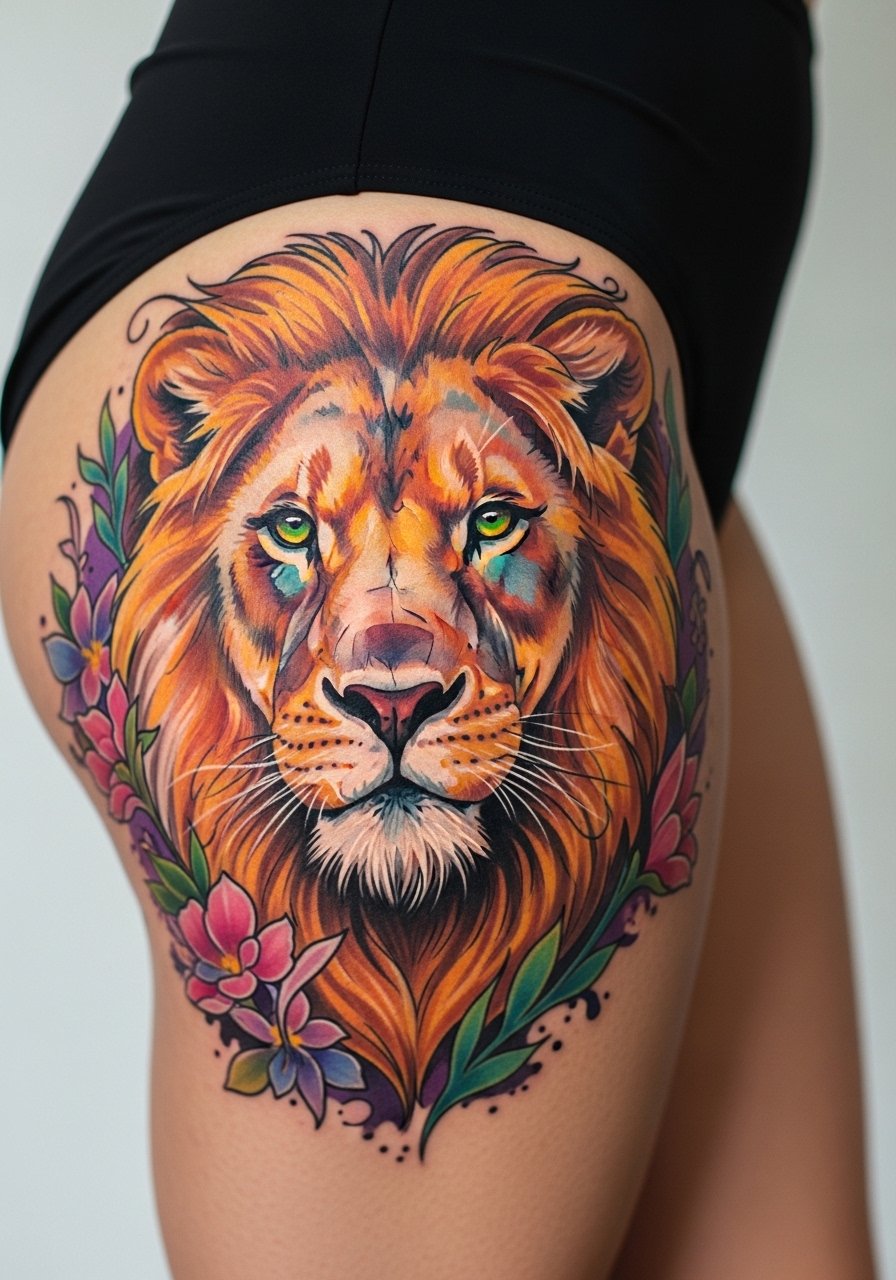
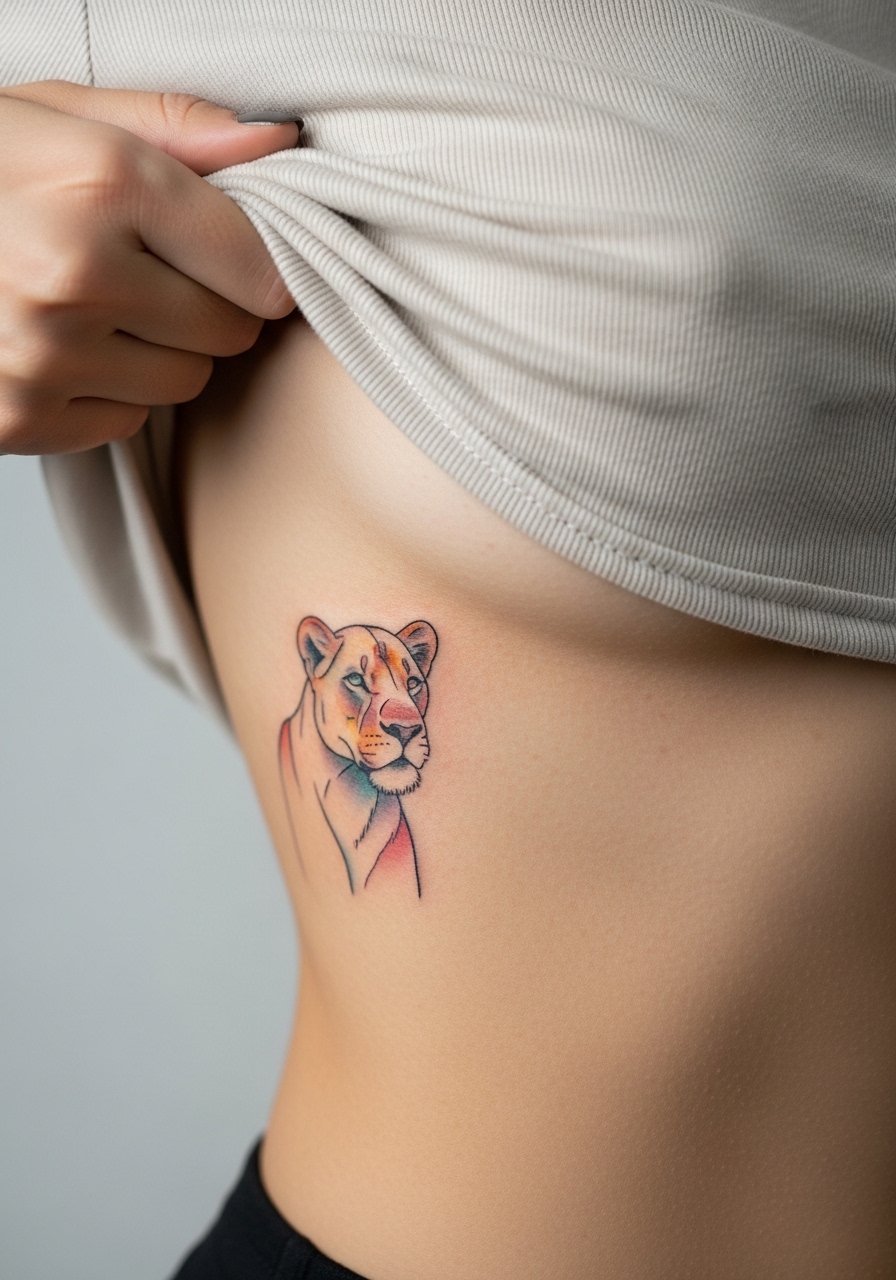
8. Abstract Color-Blocked Lioness on the Thigh
Thigh pieces let you go large and bold with confident color blocking. The extra real estate is forgiving for saturated fills and gives the artist room to separate color zones so they do not blend over time. Tell your artist to mark negative space corridors between colors to prevent merging. The session feels steady with moderate pain. For the appointment wear high-waisted shorts you can shift slightly to expose only the tattoo area without fuss. Avoid dense micro-detail in a color-blocked layout because it will lose clarity at distance.
9. Minimalist Linework Lioness at the Nape of the Neck

A nape tattoo reads quiet and controlled when paired with a confident outline and soft color. This area can be discreet or visible with certain hairstyles. Pain is low to medium and fading is moderate due to sun exposure on the neck. During consultation, specify how visible you want it with different hair lengths. For showing it off, a wide-neck shirt frames the piece without overexposure. A common mistake is asking for excessive tiny stipple shading close to the hairline, which can blur as the skin moves.
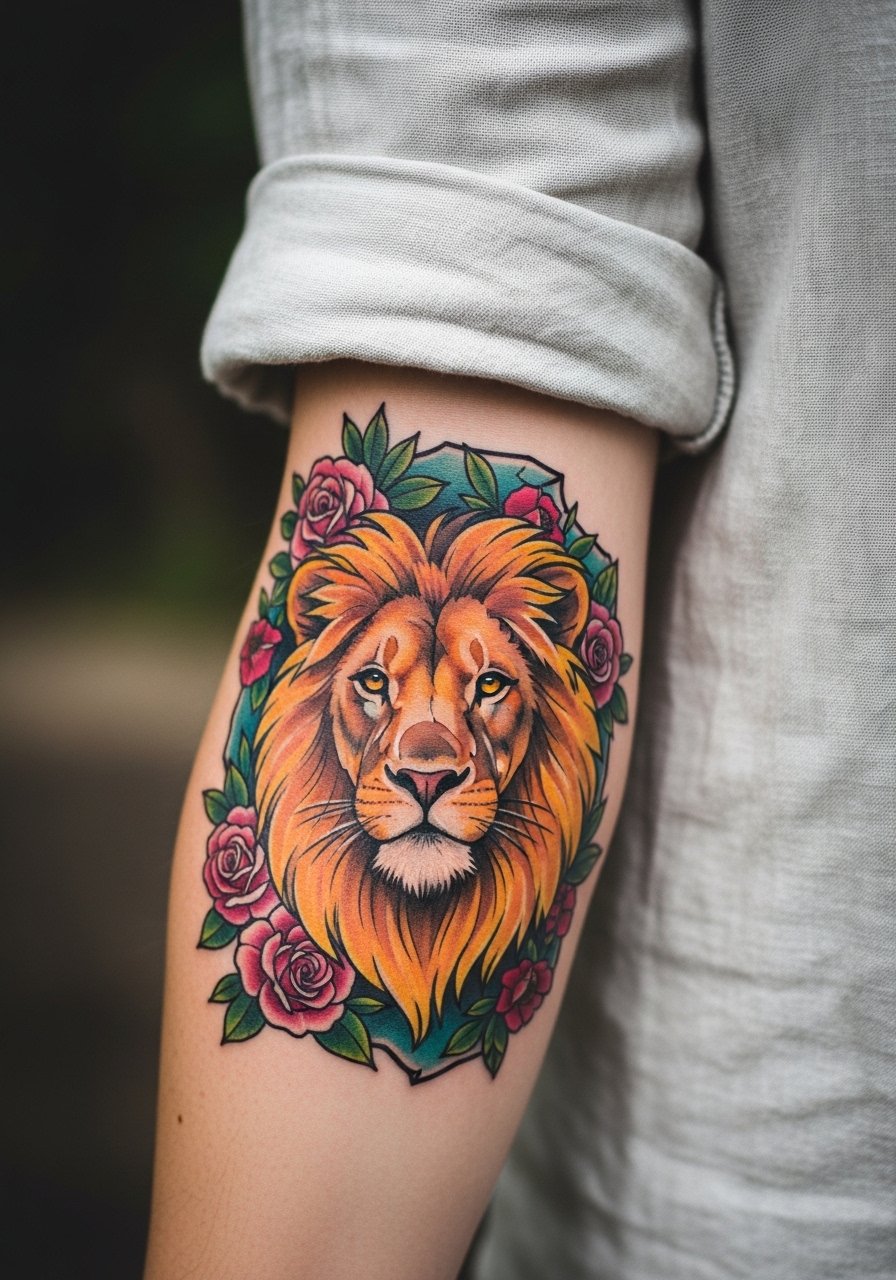
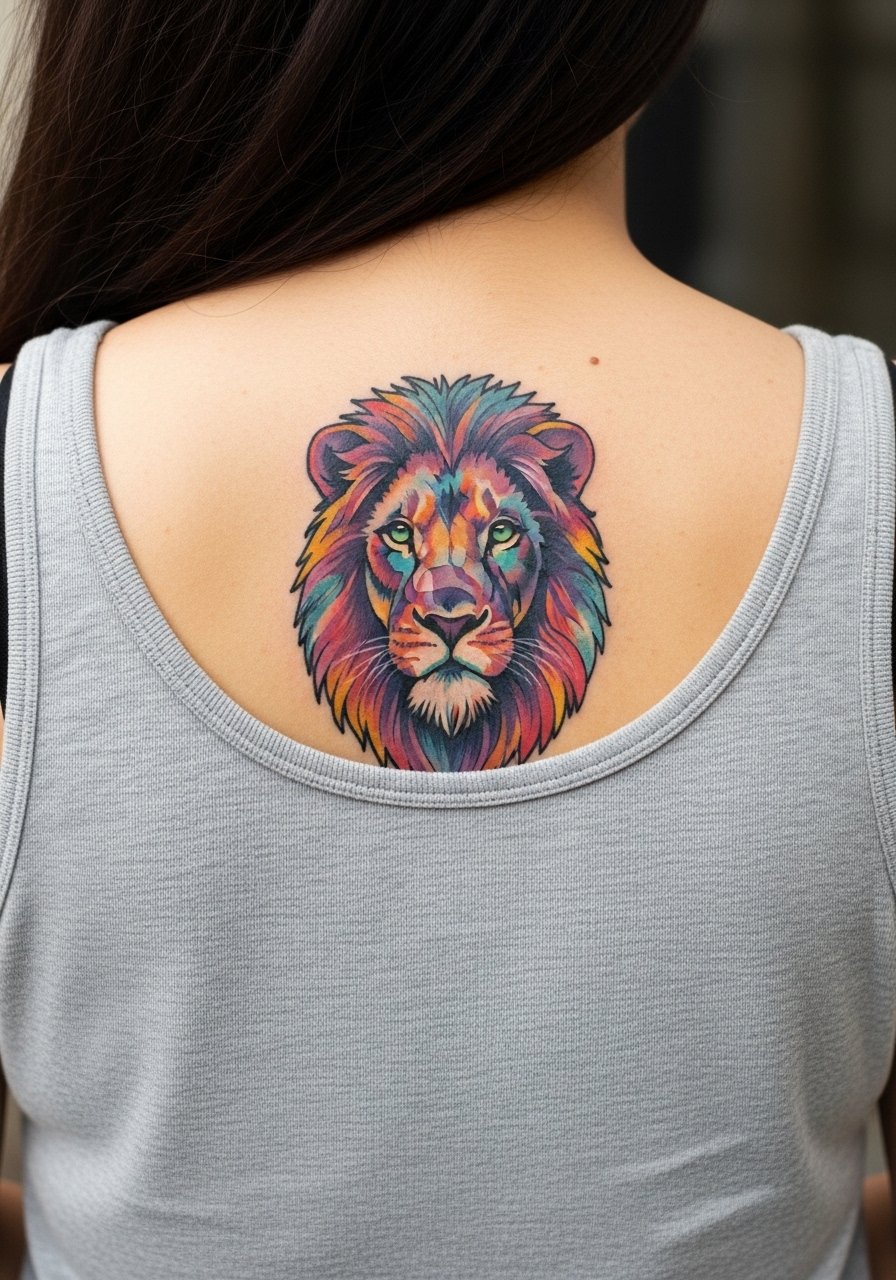
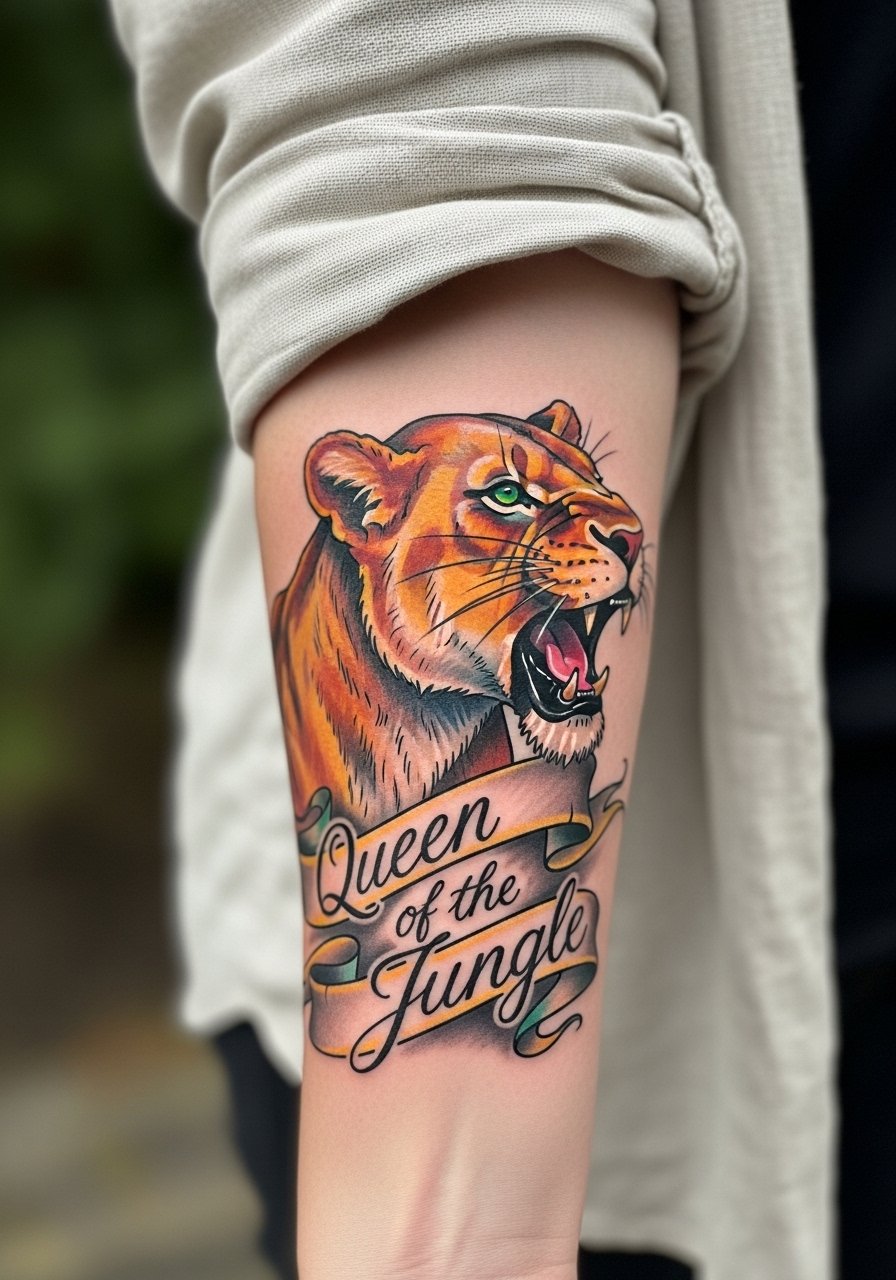
10. Bold Traditional-Influenced Lioness on the Shoulder Blade
Traditional linework with saturated fills gives a lioness a timeless, graphic feel that ages predictably. The shoulder blade accepts bold outlines and deep color well. Tell the artist you want clear black anchors with color packed behind them rather than washed gradients. Sessions are medium length and pain is moderate. Avoid asking for tiny filigree that crowd the bold silhouette because that detail is likely to fade. For the session wear a loose tank top you can pull aside so the artist has unobstructed access.
11. Geometric Half-Sleeve Lioness with Jewel Tones
A half-sleeve lets you blend geometry, portraiture, and saturated jewel tones for a dramatic effect. For longevity, ask the artist to space geometric intersections and anchor key facial features with heavier ink. The session can span multiple sittings and the outer arm is low on blowout risk. A mistake is overcomplicating negative space so the composition loses its focal lioness. For show-off styling, rolled sleeves or a short-sleeve tee keep the artwork visible while not competing with accessories.
12. Small Ankle Lioness with Tiny Color Halo
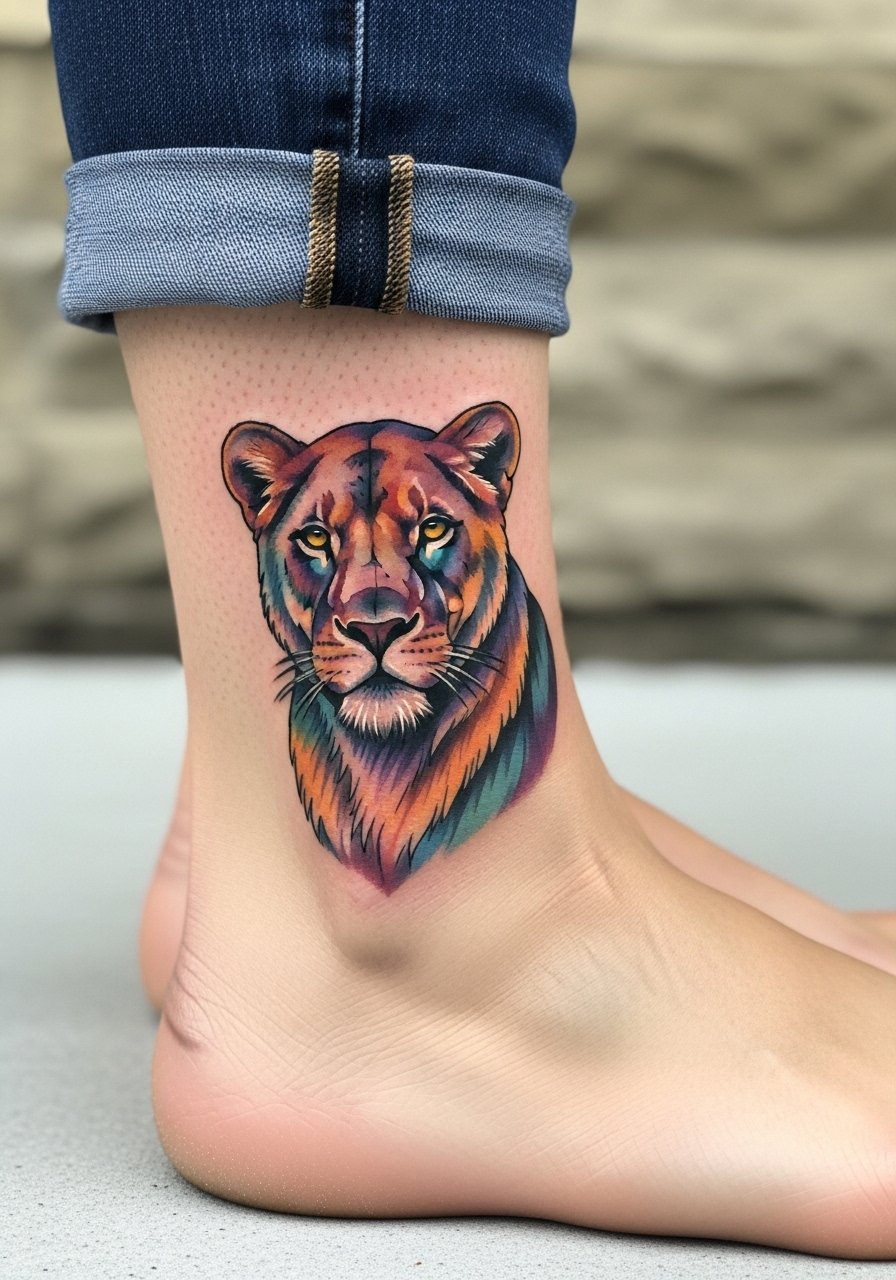
An ankle lioness reads delicate and intentional but faces heavy friction from shoes and socks. Keep the design bold in the central features and avoid fine hairline mane details. Expect faster fading and a likely touch-up at year one. The session is short but sharp in sensation. A common error is asking for pastel washes only on the ankle. If you want color to last, ask for medium saturation and a plan for touch-up. For the session wear pants you can easily roll up without rubbing the healing skin.
13. Floral Crown Lioness over the Ribcage
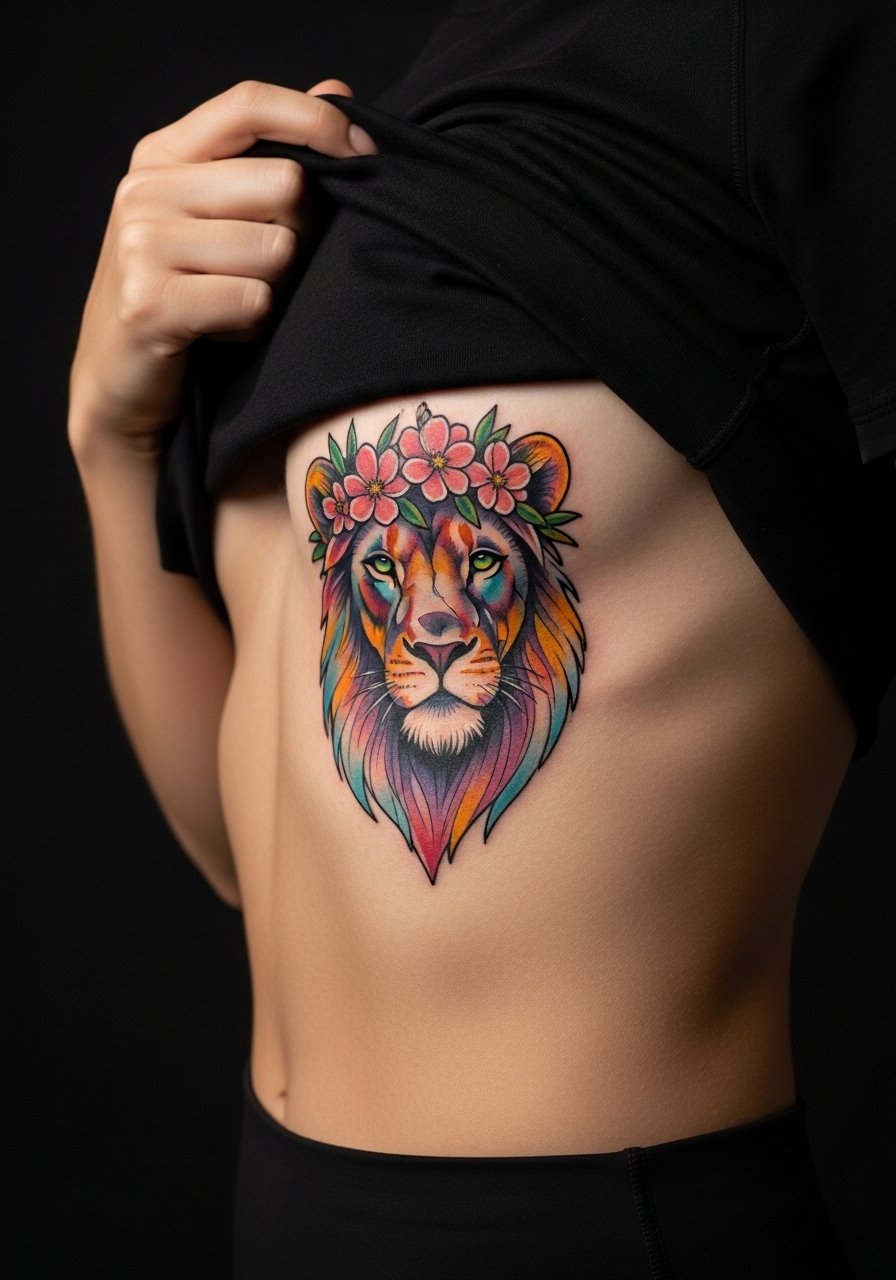
Ribcage pieces are dramatic but carry a controversy about fine detail longevity. One group of artists warns that ribs stretch and blur small lines within a couple of years. The other group says with proper spacing and deeper packing, detailed portraits settle well. Name both camps and ask your artist which method they use for rib work. Pain is higher and sessions often require breaks. For the appointment wear a cropped athletic top you can lift so the artist has access. People often try to sketch too many small facial textures on ribs and then need early touch-ups.
14. Collarbone-to-Shoulder Lioness with Soft Pastel Fade
A collarbone-to-shoulder piece travels with the contours of the clavicle and shoulder for a feminine silhouette. Pastel fades can look beautiful but they rely on strong initial saturation at anchor points to survive. Ask for concentrated pigment around the eyes and mane edges. Sessions can be split into anchors first then softer blends. For showing it off, pair with open-neck garments and a thin chain pendant necklace to draw the eye without overshadowing the art. Avoid asking for too faint a start because low saturation hides faster than you think.
15. Back-of-Thigh Regal Lioness with Botanical Accents
The back of the thigh gives plenty of space for large color fields and botanical framing. Because the area is less exposed to sun, colors tend to hold longer than on forearms or legs. Tell your artist you want clear color separation between mane and florals so the composition reads from a distance. The session is comfortable for most and pain is moderate. For the appointment wear a high-waisted swimsuit bottom or shorts you can adjust easily. A common mistake is crowding the mane with tiny leaves that lose definition.
16. Tiny Behind-the-Ear Lioness Accent
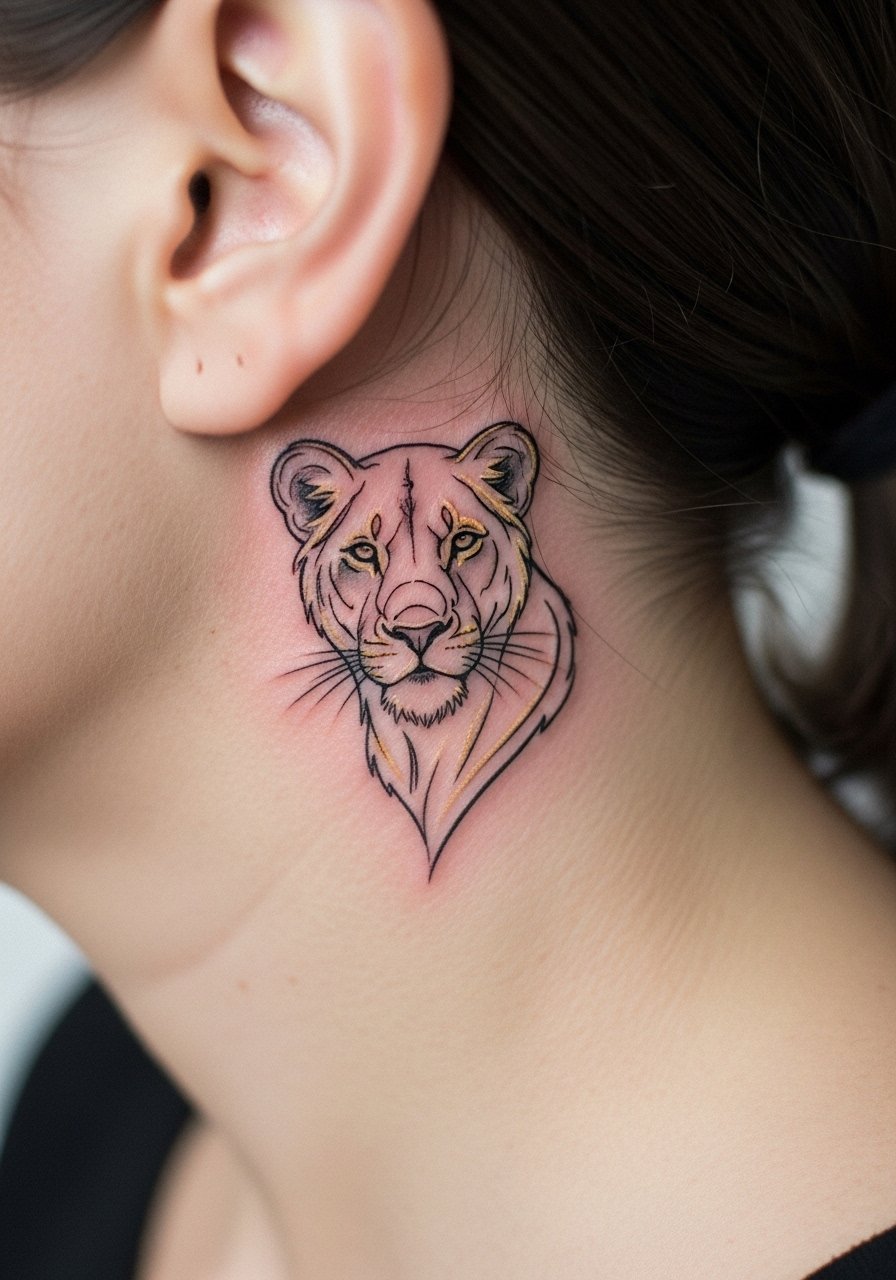
A tiny lioness behind the ear is discreet and playful but needs careful placement below the hairline on the neck. Keep the design minimal with color accents limited to a few points. The session is quick and mildly uncomfortable. Mention to your artist that you want the design placed below the hairline to avoid hair growth interfering with healing. For pro considerations, the area can be visible with certain hairstyles, so plan accordingly. Avoid texturing that relies on hairline shading because it can look patchy as hair grows.
17. Radiant Lioness on the Calf with Color Gradient
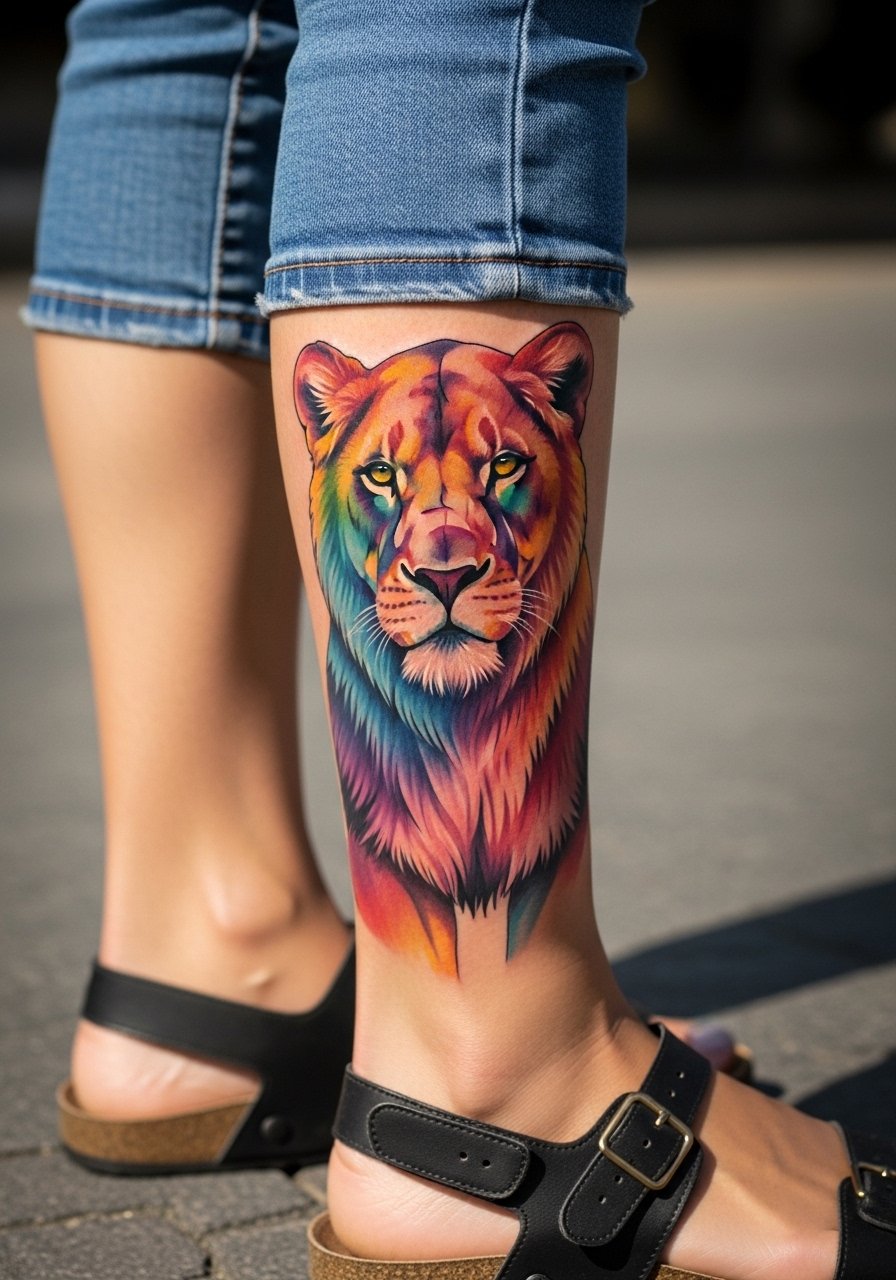
Calf work reads bold at a distance and handles gradients well because of the flat canvas. Ask the artist to anchor the portrait with clear dark outlines and to blend colors from the mane outward to avoid muddy transitions. The session feels steady and pain is manageable. For the session wear cropped jeans and sandals so the artist can access the calf without full leg exposure. A common mistake is overblending multiple colors without separators, which leads to dulling after healing.
18. Jawline Accent Lioness near the Ear
A jawline placement is edgy and visible when hair is tucked behind the ear. Keep the portrait compact and avoid long flowing mane details that interfere with jaw movement. Pain can be higher near the jaw due to thinner tissue. Tell the artist you want strong facial anchors and minimal feathering. For show-off styling, tuck hair back or wear a wide-neck top to frame the piece. Avoid asking for complex shading that relies on dense stippling because motion can make that blur.
19. Small Solar-Powered Lioness on the Wrist
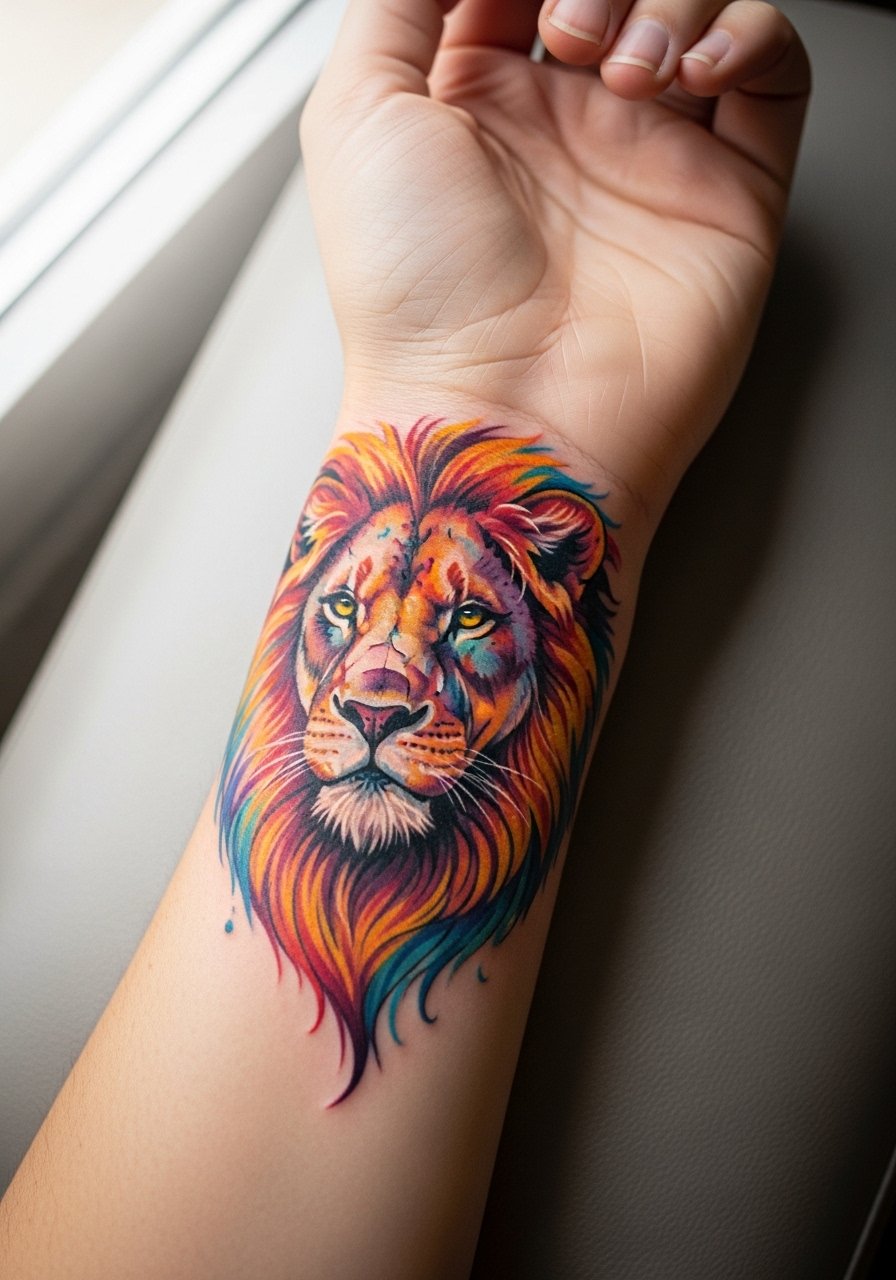
Wrist tattoos are great for visibility but face constant sun and friction. For a colorful lioness, anchor the portrait with darker contrasts so the shape reads even as pastels soften. The session is short with sharp sensation at bone-level spots. A frequent mistake is loading the wrist with tiny hairline details. For the appointment, wear short sleeves you can roll up easily and consider a minimalist watch when showing the piece that does not rub the healing skin.
20. Back Shoulder Blade Full-Face Lioness with Jewel Highlights
A centered shoulder blade portrait creates a symmetrical statement that works well with jewel-tone highlights. The area accepts heavy color and bold contrast, which helps the portrait endure. Sessions can be lengthy and may be split across days. During consultation request clear focal points like the eyes and nose packed with pigment. For the appointment wear a tank top to allow full upper back access. Avoid overloading the piece with micro texture around the mane because that detail competes with long-term saturation.
21. Minimalist Line Lioness on the Rib Edge
A minimalist rib edge piece reads subtle and strong but faces the same ribcage debate as other chest placements. One camp warns that thin lines blur with skin movement there, the other tailors spacing and depth to make slim portraits last. Discuss both approaches and ask for spacing that preserves negative space around the design. Pain is high and sessions are often short and intense. For the appointment wear a cropped top you can shift slightly. Small, intricate stipple on the ribs will likely need touch-ups, so plan accordingly.
22. Ankle Chain of Little Lionesses
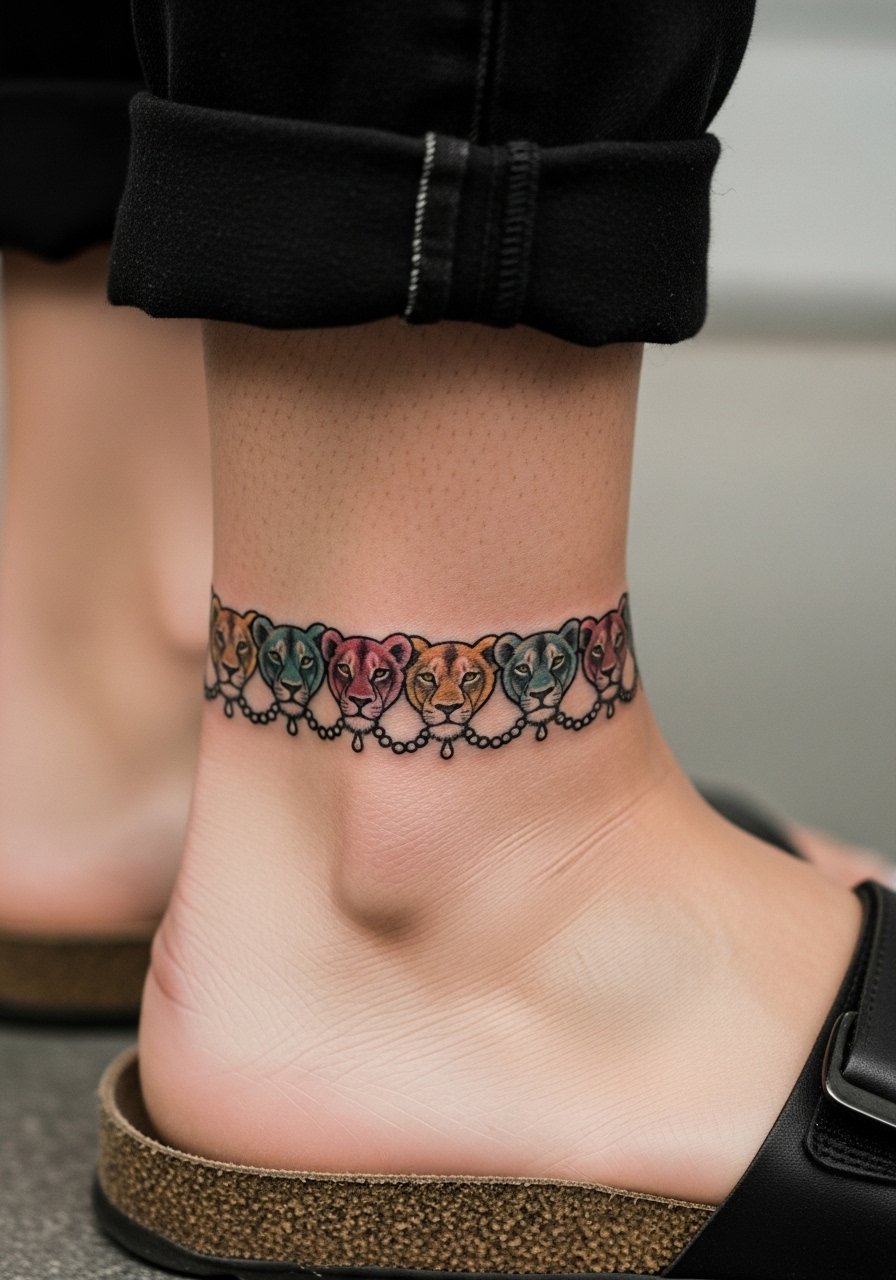
A chain of tiny lionesses around the ankle is playful and wearable. Because ankle skin sees a lot of shoe friction, keep each face bold and simplified. Tell the artist you prefer slightly thicker outlines for each mini portrait. Sessions are quick but may sting near bone. For showing it off pair with delicate anklets or wear sandals and choose sandals with thin straps that do not rub the tattoo while healing. Expect touch-ups sooner than for larger, less exposed work.
23. Majestic Lioness Across the Sternum and Upper Abdomen
A large sternum-to-abdomen piece is a commitment and requires an artist comfortable with torso anatomy. The movement of the area affects how small features age, so ask for strong anchors around the face and mane. Pain is significant and expect multiple sessions. For the appointment wear a fitted bandeau you can lower slightly so the artist works only on the target area. A common error is over-detailing in the center when breath movement will soften it, so plan for larger, readable forms and a later touch-up.
24. Pop-Color Lioness Behind the Knee

Behind-the-knee tattoos sit in a flexible area that moves a lot, which can blur fine detail. For a colorful lioness there, ask for bold, graphic shapes rather than tiny facial features. Sessions are uncomfortable because of constant movement in the area, so plan shorter sittings. For the session wear shorts you can move freely in and a lightweight fabric that does not press on the area afterward. Avoid layered tiny dots in that zone because they tend to coalesce as the skin flexes.
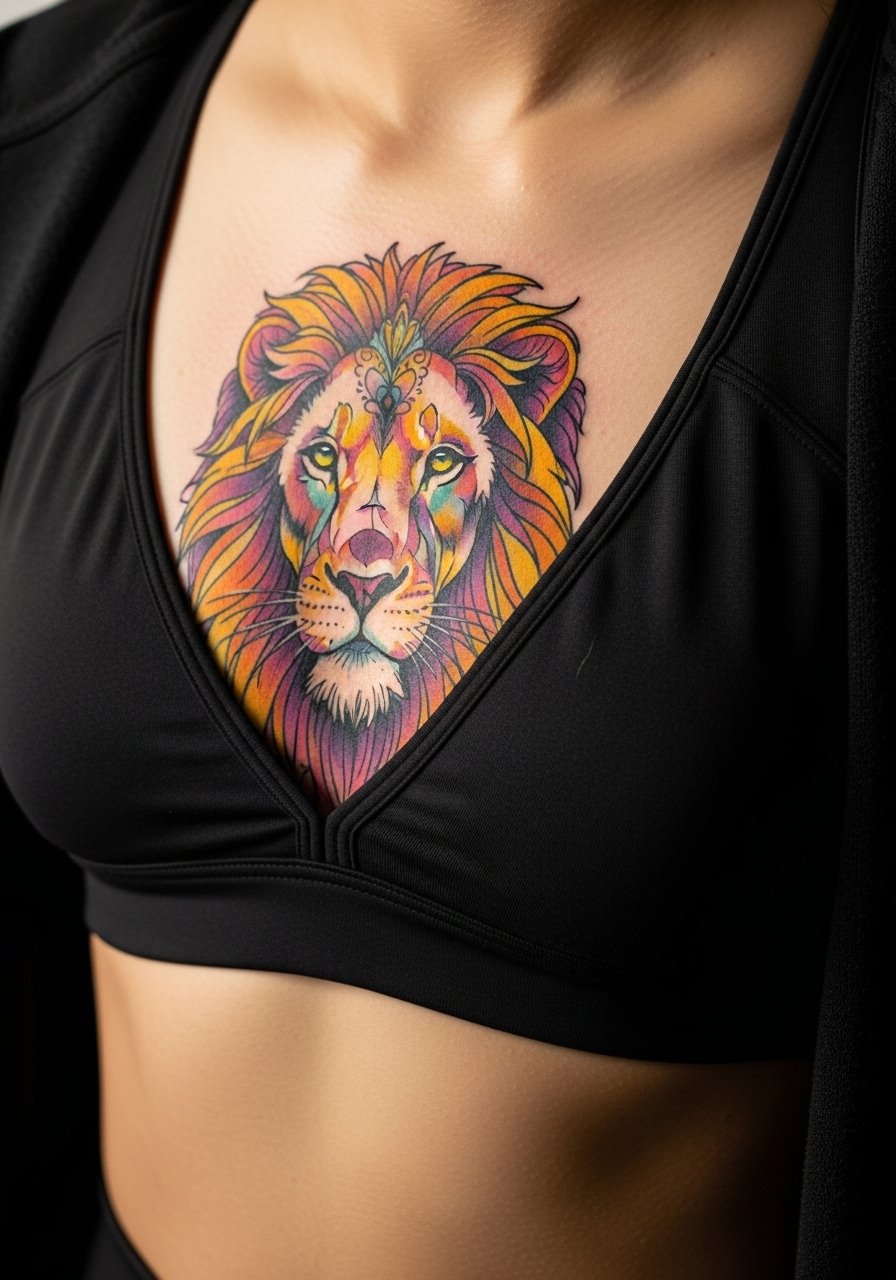
25. Chest-Centered Small Lioness Above a Heart Tattoo
A chest-centered small lioness positioned above the heart has emotional resonance and reads powerful when kept focused. The area can be sensitive so expect higher pain and briefer passes. Ask your artist to favor clear contour lines and anchored color points at the eyes. For the session wear a fitted sports bra so the artist has unobstructed access. A common mistake is trying to pack too many tones into a small chest piece which increases the chance of muddiness as it heals.
26. Forearm Wrap Lioness with Scripted Ribbon
A forearm wrap that pairs a lioness portrait with a scripted ribbon balances imagery and text when spaced correctly. If you include lettering, specify the exact text during the consultation and confirm the font size so it remains legible after healing. The forearm is forgiving for linework and color. For the session wear a loose button-down shirt you can move aside easily. A mistake is shrinking the ribbon script too small for the ribbon width, which makes it unreadable as it settles.
27. Thigh-to-Hip Dynamic Lioness with Motion Lines
A thigh-to-hip composition can convey motion with long color strokes and directional mane work. The hip curves require sketches that follow body flow so the portrait reads in motion and at rest. Sessions are lengthy and often split. For the appointment wear high-cut shorts you can shift slightly to expose just the working area. Avoid overcomplicated tiny textures on the hip because stretching and friction from clothing can soften them over time.
Frequently Asked Questions
Q: Will a colorful fine-line lioness blur faster on the ribs than on the forearm?
A: It depends on spacing, depth, and how the artist places negative space. Ribs move with breathing and can cause thin lines to merge sooner than on forearms. Ask your artist to space key lines and to use slightly bolder anchors around facial features if you want the portrait to hold as a fine-line piece on the ribs.
Q: How often should I expect touch-ups for saturated jewel-tone color in these lion designs?
A: From what I've seen, saturated jewel tones on low-friction areas like the thigh or shoulder often last longer before noticeable fading, three to five years is common for a refresh. High-friction spots like ankles, fingers, and wrists usually need touch-ups at year one or two. Plan touch-ups into the design timeline rather than treating them as surprises.
Q: Are watercolor-style lionesses a bad idea for darker skin tones?
A: Watercolor washes can work on darker skin with the right approach. Artists often pack stronger pigments at key points and use contrast rather than relying on pale pastels alone. Ask to see healed examples on similar skin tones and discuss which colors will read as intended. Contrast and saturation choices matter more than the label "watercolor."
Q: What should I wear to a session for a sternum or upper chest lioness appointment?
A: Wear a fitted sports bra or bandeau that you can lower slightly so only the target area is exposed. That preserves modesty and lets the artist work cleanly. If you plan to show the piece afterward, pair it with open-neck garments that frame the chest without rubbing the healing area.
Q: Can a small lioness finger tattoo look good long term or should I pick another placement?
A: Finger tattoos are visible and fade faster due to washing and friction. A small lioness can look great if simplified with bold contours. Expect touch-ups and accept that lines will soften. If longevity with minimal maintenance is the priority, choose a less exposed spot like the inner forearm or shoulder.
Q: How do I balance wanting pastel color with the need for saturation that lasts?
A: Ask your artist for a mix of pastel transitions and stronger color anchors. That means concentrated pigment at facial features or mane edges and softer blends elsewhere. It keeps the pastel vibe while giving the tattoo structural points that age better over time.
