
Bold black fills on the inner bicep read like a statement that ages well when the stencil, spacing, and needle depth are chosen with the placement in mind. The inner arm is forgiving for saturated blackwork, but it is also sensitive, prone to blowout, and more likely to need touch-ups if the design is too dense. Below are focused ideas you can show at your consultation to get it right.
1. Geometric Band Across the Inner Bicep

I recommend a wide geometric band when you want something that reads from across the room and still looks controlled after a few years. Tell your artist to leave small negative-space buffers between thick fills and the edge of the band so the saturation does not creep into a linear blur. Pain is moderate on the inner bicep. Expect a single two-hour session for a mid-width band, and a possible touch-up at year two if your skin shows early spreading. For the appointment, wear a loose tank top so the artist gets clean access and your sleeve can be rolled without pressure. A common mistake is making the band too thin. Thin bands on soft inner arm skin tend to lose crisp edges as the ink settles.
2. Solid Black Geometric Mandala Wedge

If you like bold blackwork with decorative detail, a mandala wedge that hugs the bicep curve gives strong graphic impact without being a full sleeve. During consultation, ask for stipple shading to transition from dense black to open negative space. That technique reduces the risk of heavy, blob-like patches as it heals. This placement feels tender near the armpit but numbing is usually unnecessary for medium-sized wedges. Session time often runs around two to three hours. A real mistake is packing the center too densely. Overfilled centers on the inner arm can turn into one dark spot after a year and need a careful touch-up. Pair this with rolled short sleeves to show it off. Try a short-sleeve linen shirt that frames the curve without cutting into the piece.
3. Negative-Space Skull Silhouette

I bring this up because a negative-space approach uses skin tone as part of the design. Ask the artist to map the negative areas precisely on your skin tone during the stencil stage. Pain is moderate to high near the armpit crease, and sessions run one to two hours depending on size. The controversy here is about scale. One camp says tight negative-space details are risky on the inner bicep because the skin is soft and can cause blurring. The other camp argues careful spacing and strong linework will preserve negative shapes for years. If you prefer low maintenance, keep the silhouette slightly larger than you think you need. Overworking small negative elements is the most common mistake.
4. Bold Script Block Lettering
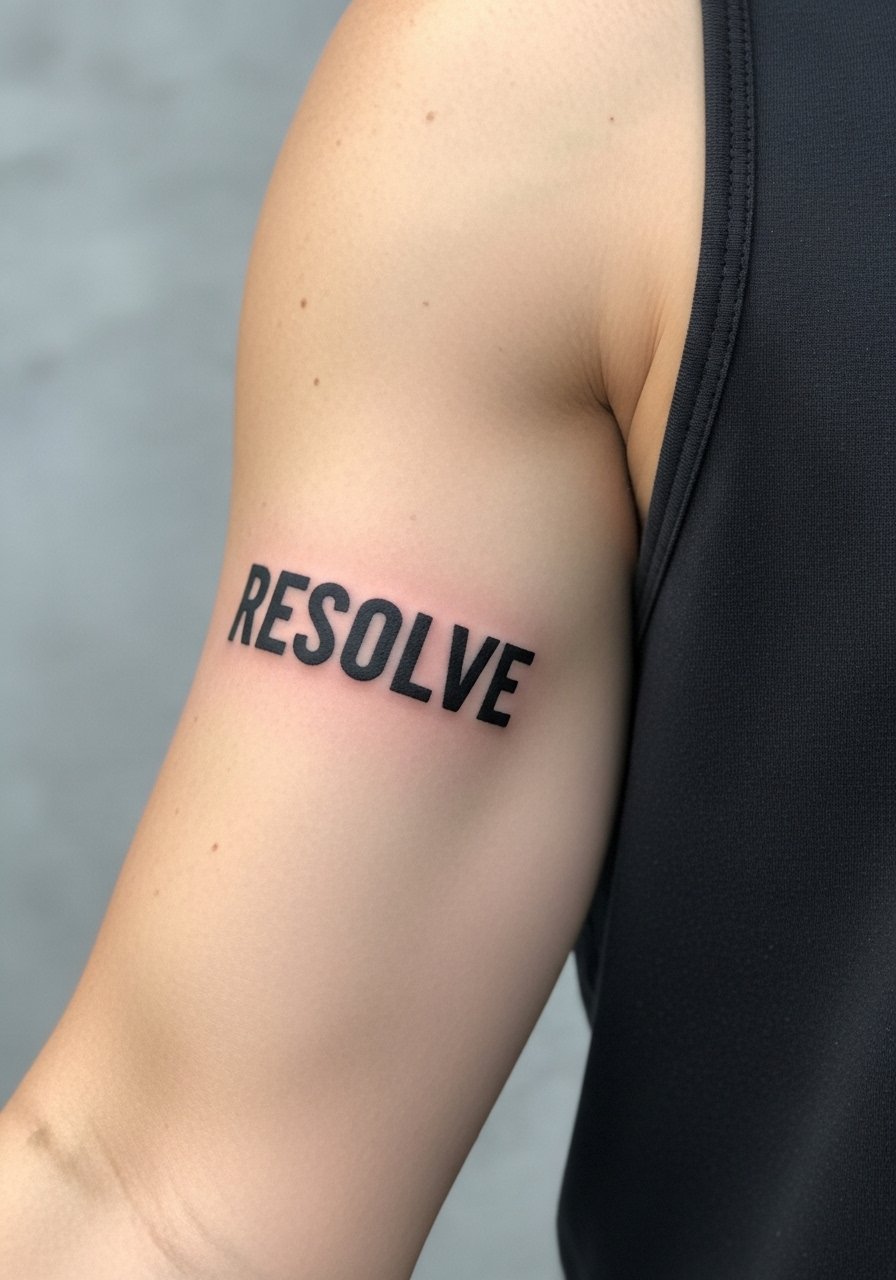
Block lettering in heavy black is unmistakable on the inner bicep. Pick letter spacing that accounts for the arm's curvature so letters do not squeeze together when your arm rests at your side. Tell your artist to show the stencil in both relaxed and flexed positions during the consult. Expect a sharp sting in the crease area but a fairly short session for medium text. A partner mistake is requesting ultra-tight kerning. Tight letters often join in the first two years, especially on softer skin. For showing it off, a racerback tank or rolled sleeve keeps the focus on the type.
5. Blackwork Floral Cluster with Stipple Shading

Florals in solid black avoid the fading problems color faces on inner arms. Ask for stipple shading to create texture without over-saturating the skin. That pattern also helps where the arm skin flexes. Pain is moderate and session time depends on coverage. A common error is asking for heavy black petals next to fine stems. Keep contrast intentional. Overly fine stems next to dense petals can disappear in the healing phase. For the session wear, throw on a loose button-down shirt you can pull aside to give the artist clean access without rubbing the fresh ink.
6. Miniaturized Mythic Creature in Solid Black
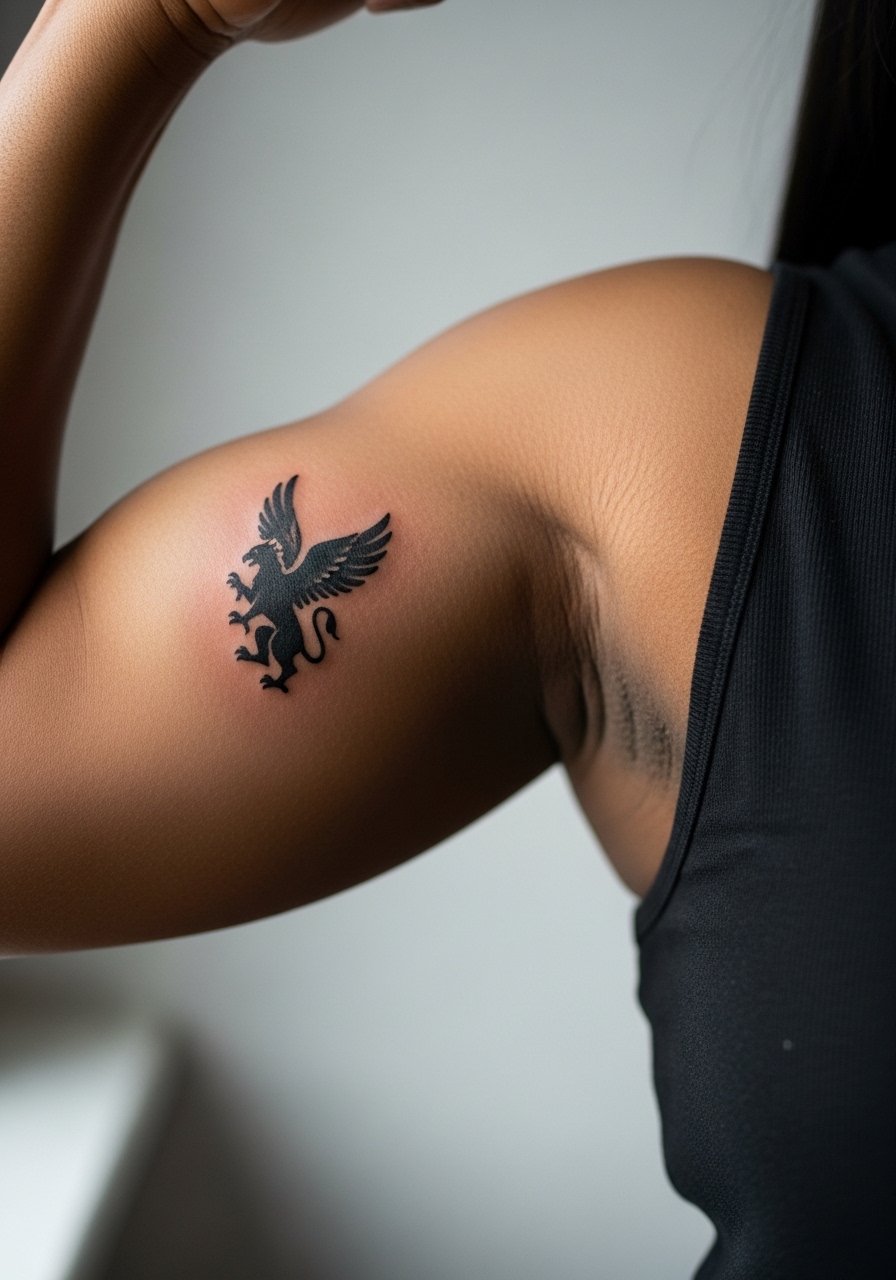
A compact mythic creature in saturated black works well if you want something symbolic but understated. Keep the silhouette bold so essential shapes survive settling. During consult, specify which features you want in negative space and which should be solid. Pain is short and sharp near the crease. Most of these hold up for years without color touch-ups. The biggest mistake is cramming too many tiny features into a small piece. Tiny details on the inner bicep often blur together over time. For a session, wear a sleeveless top so the artist can work without fabric pressure.
Studio Day Picks
The inner bicep pieces above need clean access and a few session-specific items that make the appointment and the first 72 hours easier.
-
Stencil transfer paper kit. Lets you preview exactly where negative-space elements will fall on your inner arm, which matters for curved lettering and silhouettes.
-
Topical numbing cream. Useful for tighter inner bicep work when you want the session to feel more manageable during the tender spots.
-
Thin protective film roll. Helps guard designs from friction against shirt sleeves during the first few days of healing.
-
Fragrance-free body wash. Gentle cleansers reduce irritation on fresh blackwork where heavy washing can disturb scabbing.
-
Aquaphor healing ointment. A thin layer supports initial moisture balance for saturated black fills without smothering the area.
7. Crescent Moon Cluster in Solid Black
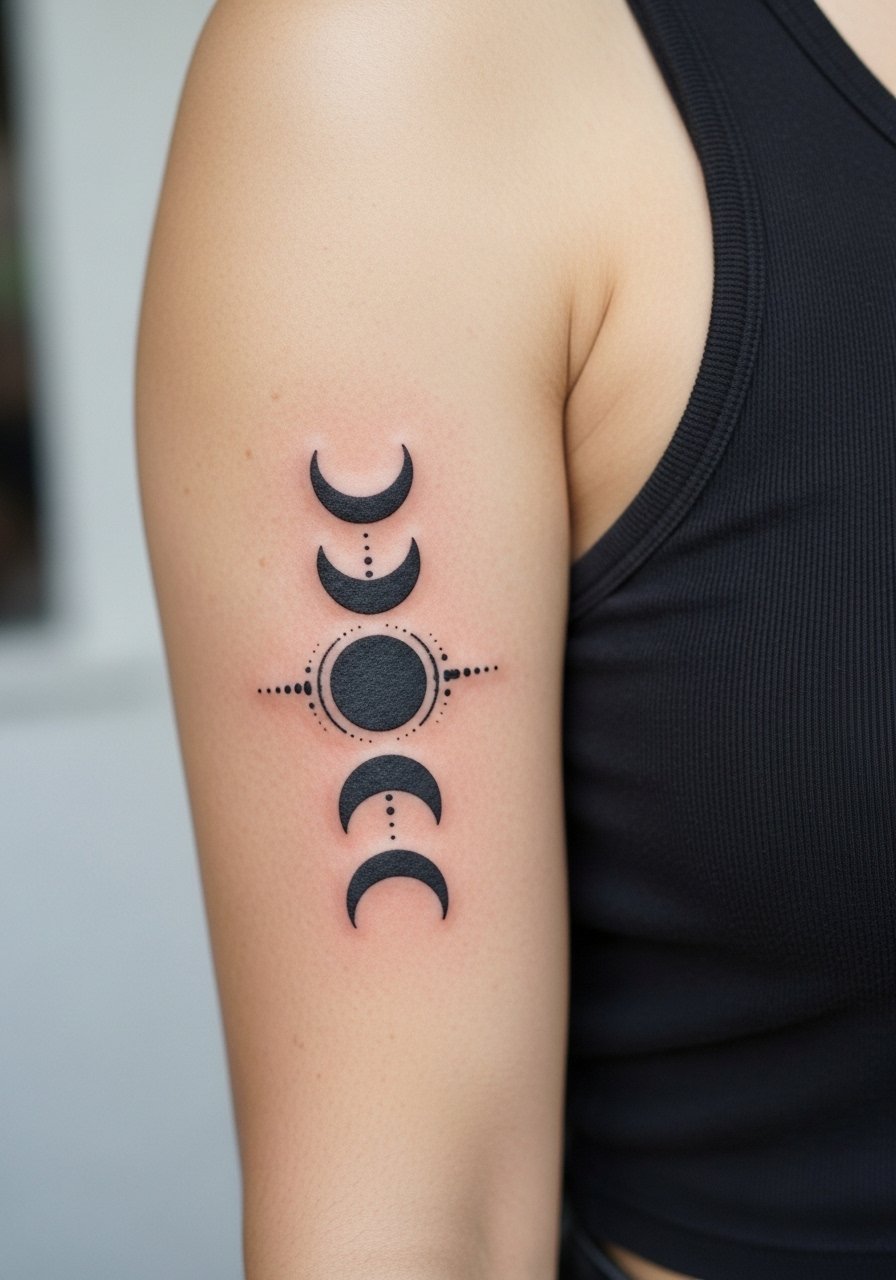
A line of small crescent moons in blackwork reads clean and architectural on the inner bicep. For longevity, space each crescent slightly wider than your instinct. The inner arm compresses while you move and the gaps need room to breathe. Sessions are quick and pain is usually moderate. People often ask for crescents too small. Tiny crescents risk losing definition within a year. If you want to show it off, wear a rolled short-sleeve tee to make the sequence visible without revealing the whole arm.
8. Blackwork Compass with Map Lines

A compass paired with thin map lines gives a travel-oriented blackwork piece. Ask your artist to use slightly bolder strokes for the compass cardinal points than for the connecting map lines. That approach keeps the focal point stable as finer lines soften. Pain varies with proximity to the armpit. Session time is usually two to three hours for a compact, detailed piece. The debate among artists here is clear. One camp warns that fine map lines will blur on inner arm skin and prefer fewer delicate lines. The other camp says with correct needle depth and spacing those lines can survive. If you want lines, ask to see healed examples on similar placements first. For showing it off, pair with a minimalist leather bracelet that draws the eye without covering the compass.
9. Blackwork Botanical Stem with Negative Veining

Botanical stems in heavy black give longevity compared with delicate colored florals. Ask for negative veining to be slightly wider than you imagine so the design keeps contrast after settling. Pain is on the lower side of moderate but gets sharper when the arm flexes. Sessions for a mid-length stem run one to two hours. The main mistake is requesting ultra-fine vein lines that disappear within the first 18 months. For session wear, choose a loose drawstring pant and a sleeveless top to stay comfortable and keep clothing from rubbing the fresh tattoo.
10. Solid Black Nordic Knotwork

Knotwork shines in saturated black because the high contrast keeps patterns readable as the skin ages. During consults, ask the artist to show how loops overlap when your arm is relaxed. Pain is moderate in the inner bicep region and sessions are typically two hours. A common error is making the pattern too intricate for the small area. Too many tight crossings can blur together. For a casual outfit that complements the motif, try a rolled sleeve flannel that frames the work without concealing the loops.
11. Bold Tribal Ribbon with Tapered Ends

A tapered ribbon that follows the inner arm curve gives a streamlined look while keeping the piece bold. Specify that edges remain slightly rounded rather than razor-thin. Rounded edges survive movement better. Expect moderate pain and a one to two hour session. A frequent mistake is insisting on razor sharp outer points that can feather as the ink settles. For the session, a stretchy sleeveless gym top lets you move comfortably and keeps fabric from pressing on the tattoo.
12. Heavy Black Animal Silhouette with Negative Eyeline

Solid animal silhouettes hold as long as the key features are exaggerated. Ask for the eye or facial lines to be slightly larger than you think. Tiny facial details on saturated black pieces tend to merge over time. Pain depends on proximity to the armpit crease. Sessions usually stay under three hours. People often cram recognizable fur texture into the silhouette and lose the clean shape later. If you plan to show it off, a casual rolled sleeve tee keeps attention on the silhouette without covering it up.
13. Scripted Phrase with Thick Black Wash

A bold script with a heavy black wash reads like a tattoo and not just type. Ask for slightly wider counters and thicker downstrokes so ligatures do not close up as the ink settles. Pain is moderate and sessions are short. The mistake is choosing thin, hairline script on the inner bicep. Hairlines that look delicate when fresh often need touch-ups or full rework. For showing off the phrase, a thin chain pendant sits above the script and keeps the chest area visually balanced.
14. Blackwork Dice and Geometric Numerals
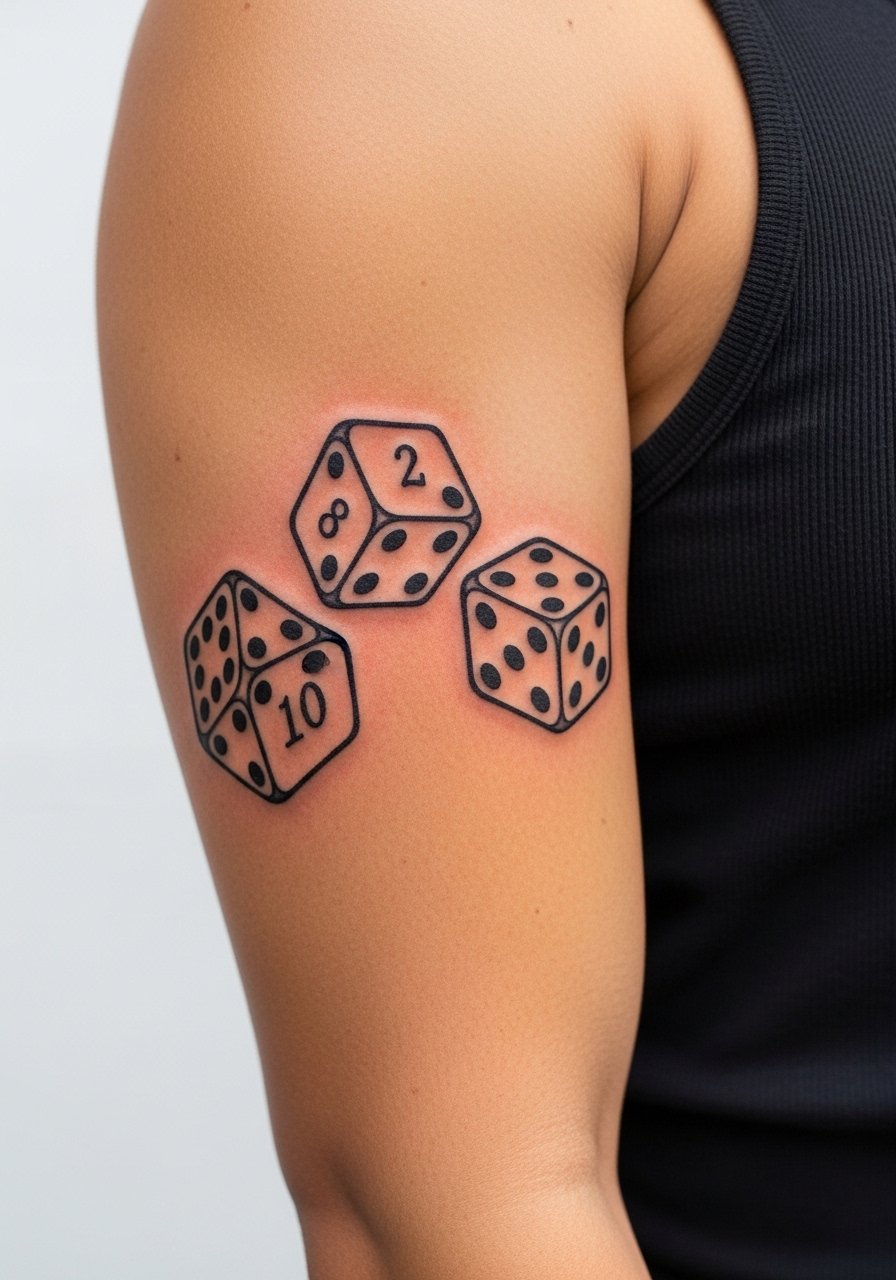
Dice and numerals in heavy black stay legible because the shapes stay distinct as the skin shifts. Tell your artist to slightly enlarge the numerals compared with a standard font. Small numeric details often blur first. Pain is manageable but sharp near the crease. A common error is packing too many tiny numbers into a compact composition. For session day comfort, wear a loose button-down shirt you can pull aside for the artist without rubbing the new ink.
15. Bold Abstract Block Shapes

Abstract blocks offer a modern take on inner bicep blackwork. Ask for clear negative margins and a deliberate hierarchy so the eye knows which block is primary. Pain is moderate and sessions vary with coverage. The error I see most is treating the inner bicep like canvas for tiny, competing shapes. When shapes compete, none remain distinct long term. For outfits, a rolled short-sleeve tee exposes the composition elegantly.
16. Thick Line Portrait Silhouette

Portrait silhouettes in bold black can suggest a likeness without fragile detail. Ask your artist to emphasize contour lines and minimize fine facial features. That approach protects the face from smudging. The inner bicep is tender near muscle attachments and sessions can be uncomfortable if long. A typical touch-up window is two to three years for high-contrast pieces. A common mistake is asking for facial detail at small scale. If you want to show the silhouette casually, pair it with a minimalist leather bracelet that keeps the wrist area congruent with the bold arm piece.
17. Interlocking Solid Chevron Stripes

Chevron stripes that interlock along the bicep curve make a clean, directional piece. Ask for slightly rounded internal corners so the design resists feathering at the joins. Pain is moderate and sessions are typically one to two hours. The main mistake is compressing too many chevrons into a small band. When chevrons are too tight, the negative angles soften into a muddied pattern after a year. For the appointment, a sleeveless tank keeps the area free and comfortable.
Frequently Asked Questions
Q: How much does inner bicep blackwork hurt compared with the outer arm?
A: Expect the inner bicep to be more sensitive than the outer arm. The skin is softer and closer to lymph nodes. Pain varies with your tolerance and how long the session runs, but many describe it as a sharper, more concentrated sensation when the needle hits near the crease. Shorter sessions or breaks help if you are worried about endurance.
Q: Will solid blackwork on the inner bicep need touch-ups sooner than other placements?
A: It depends on your skin and the artist's technique. Solid, saturated black tends to age better than fine detail on the inner arm, but blowout and some softening can still occur. Expect to check in around year two or three if you want the edges razor-sharp. Choosing slightly larger negative spaces and deliberate spacing reduces the need for frequent touch-ups.
Q: Are there specific clothing choices to avoid during the first week of healing for inner bicep tattoos?
A: Yes. Tight sleeves that rub the area increase scab disruption and irritation. During the first week wear loose sleeveless tops or button-downs you can slide aside. A soft, breathable fabric is best. The studio picks above also suggest a thin protective film or a loose sleeveless top so fabric does not stick to the healing tattoo.
Q: Do thin line inner bicep designs have a higher blowout risk than bold blackwork?
A: From what I've seen, thin line work on the inner bicep does carry a higher risk of blurring. The skin there moves more and the lines can spread. Bold blackwork tolerates movement better because the shapes are intended to read as blocks. If you prefer thin line, ask to see healed examples on inner biceps and plan for potential touch-ups.
Q: How should I choose between a custom inner bicep piece and a flash design?
A: A custom piece lets you adapt spacing to your anatomy and reduces common aging problems. Flash can work if it is scaled properly, but many flash designs are drawn for flat references and need adjustment for the inner arm curve. At consults I've seen clients benefit from combining flash elements with custom spacing to avoid future crowding.
