
Fine line eye motifs are plastered across feeds, but the pieces that still read clean in five years are usually the ones that respect spacing and movement on the body. Trends push tiny, dense detail in places that move a lot. Think about how the skin will shift when you reach, sleep, or shrug. These 17 designs focus on bold visual choices that consider placement, aging, and how to wear them so the eye remains legible long after the first week.
1. Fine Line All-Seeing Eye on Inner Forearm

I've seen this placed on forearms that roll into sleeves and still read clearly after three years when the artist left breathing room around the iris. Ask for slightly heavier outer linework and delicate stipple shading for the pupil so the piece keeps contrast as saturation fades. Avoid asking for ultra-small concentric details, because that is the common mistake that blurs into indistinct dots at year two. Pain is low to moderate and sessions are quick, often under an hour. For showing it off, roll a sleeve or go with a loose button-down shirt that frames the forearm without covering the whole piece.
2. Micro-Realism Eye with Single Tear on Upper Arm

This version looks very cinematic on the outer bicep because the roundness of the muscle gives the pupil depth. Tell your artist you want a tiny catchlight and a soft stipple wash rather than heavy shading. The mistake I see is asking for hyper-real texture without enough contrast, which flattens as it heals. The session feels like moderate pressure but short bursts, and a touch-up is common at year two for micro-realism. For session wear, throw on a racerback tank so the artist has clean access without the awkward tug of sleeve removal.
3. Bold Blackwork Eye Mandala at the Nape

A nape placement reads like jewelry because it sits at the hairline and collar junction. This heavy blackwork mandala uses saturated fills and negative-space petals to hold up through years of sun exposure. The common mistake is packing tiny lace details into the center, which can clog and look muddy after a few summers. Expect moderate pain from shoulder tension if you have knots there. Tell your artist you want bold intervals of solid black and wide negative-space rings to prevent blowout across the curved surface. This placement pairs well with short hair or updos that reveal the nape.
4. Geometric Eye with Dot Work on Outer Forearm

There is a clean, architectural feel to geometric eyes when the lines have space to breathe. In consultation, bring references that show exact line weight so the artist can plan spacing. The common aging error is going too dense with concentric geometry, which causes the inner lines to merge around year three. Ask for slightly thicker primary lines and stipple shading instead of solid fill in dense zones. Sessions are usually under two hours. For a subtle show-off, rolled sleeves help, or wear a linen short-sleeve shirt that frames the forearm without hiding it.
5. Watercolor Eye Burst on Shoulder Blade
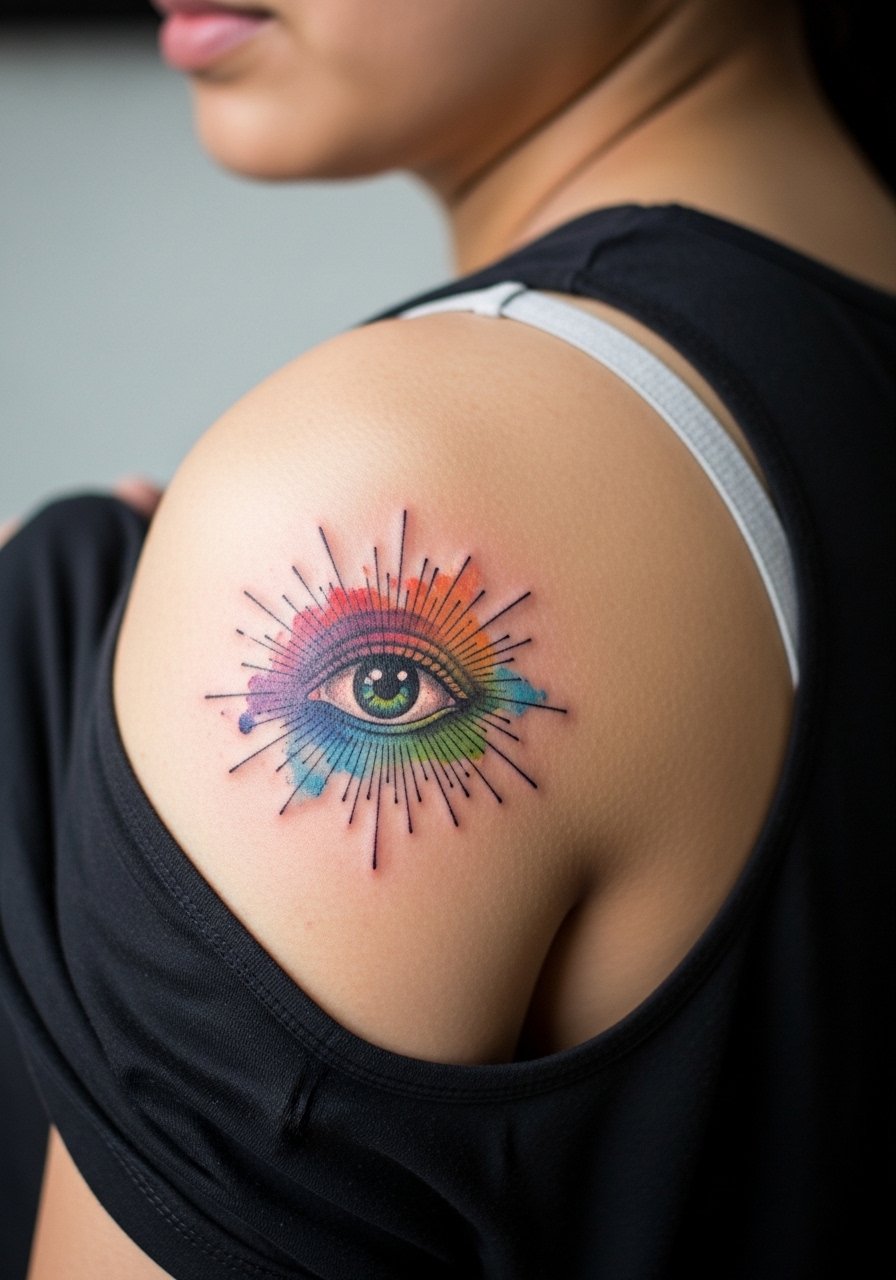
Watercolor treatments read as painterly when placed on flatter surfaces like the shoulder blade, but color loss can be dramatic if saturation is too light. Tell your artist you want concentrated color stops around the iris and softer washes radiating outward. A frequent mistake is asking for full-saturation watercolor without anchoring lines, which makes the eye lose definition as blues and pinks fade unevenly. Healing feels like normal shoulder work with low pain but watch friction from straps. For the session wear, a tank top that you can lift slightly is the easiest option.
6. Minimalist Single-Line Eye at the Ankle
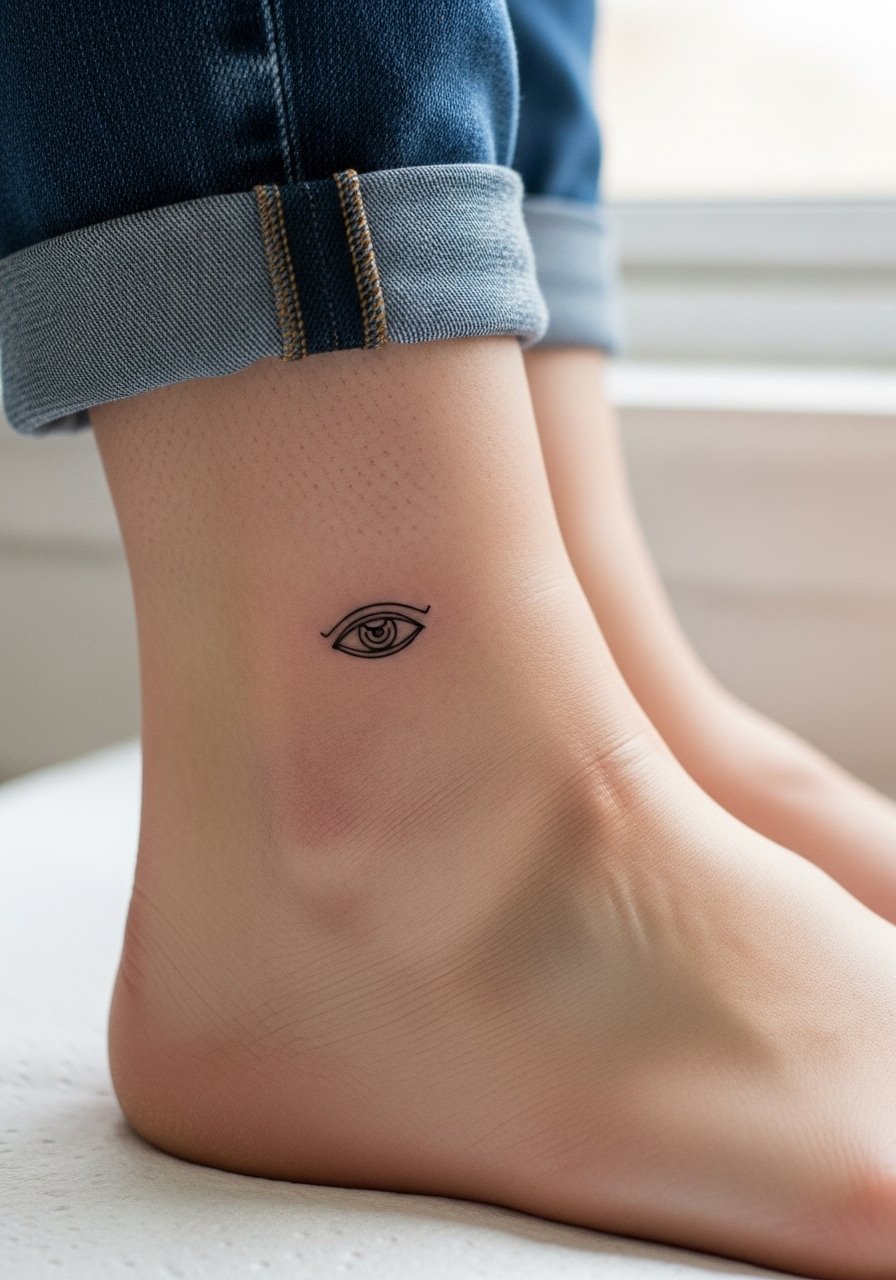
Tiny single-line eyes at the ankle are charming because they move with shoes and socks. The big mistake is placing them too close to bones or areas with high friction, which accelerates fading. Ask for a slightly bolder single pass and position the eye on a flatter plane of the ankle away from the heel seam. Sessions take under 30 minutes and are sharp but brief on pain. For showing it off, roll jeans or wear low-cut sandals so the piece sits visible above footwear without rubbing.
Pre-Session Essentials
The ankle, forearm, and shoulder pieces above each demand different prep. These five items smooth the studio day and the first week of healing for the placements covered in ideas 1 through 6.
-
Stencil transfer paper kit. Lets you and the artist preview exact placement on the forearm or ankle before the needle touches skin, which reduces repositioning and keeps linework crisp.
-
Topical numbing cream. Applied to thicker areas like the upper arm and shoulder about 45 minutes before can lower sensitivity without affecting line clarity.
-
Thin protective film roll. Useful for small ankle and wrist pieces that see constant friction from socks and shoes during the first few days.
-
Fragrance-free gentle body wash. Cleans the healing area without stripping the delicate saturation of watercolor and micro-realism inks.
-
Aquaphor healing ointment. A thin layer for the first 48 hours keeps fine line work from drying out while allowing the skin to breathe.
7. Traditional Sailor’s Eye on the Calf

The calf gives room for traditional pieces with bold outlines and saturated fills. This placement ages well because it avoids constant friction and sun exposure. Tell the artist you want classic saturation and a clean outer black rim, and avoid requesting micro-detail inside the iris which loses clarity as the skin moves. Sessions are medium length and the pain is manageable. For someone who wants a visible but coverable piece, the calf is a solid choice. The common mistake is undersizing a traditional motif, which causes the heavy black areas to merge into a solid blotch as it heals.
8. Gothic Eye with Ornamental Script on the Sternum

Sternum work reads directly at the torso center and can feel intense in the chair. Artists are split on depth and linework for this area. One camp says the sternum skin is tight and takes crisp fine line beautifully. The other camp warns that breathing and chest movement blur ultra-fine scripts over time. Ask your artist where they stand and plan for slightly bolder script strokes if you prefer longevity. Sessions can be more painful than arm work. This placement is intimate and best suited for those who do not need constant public display.
9. Eye Framed by Florals on the Outer Bicep
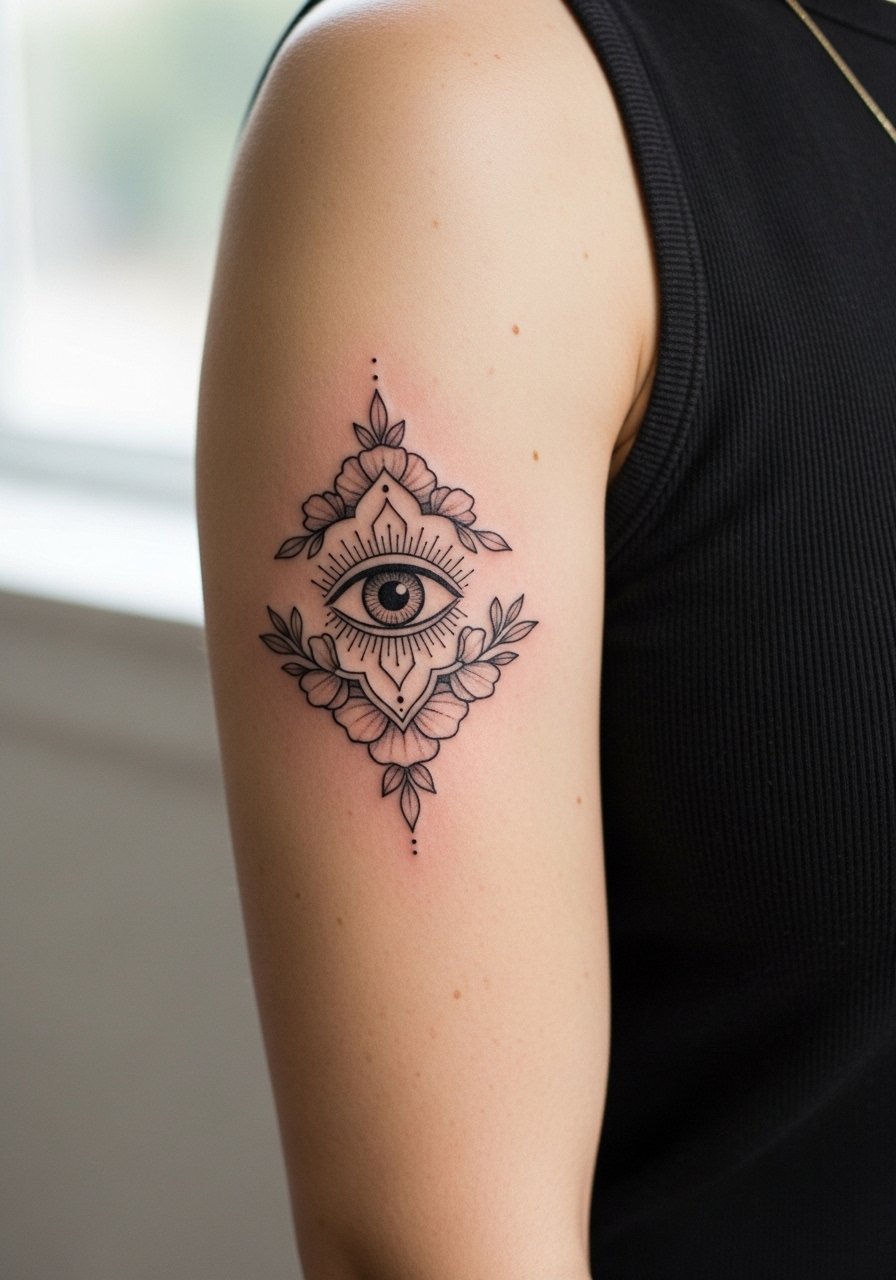
An outer bicep eye surrounded by florals gives a nice contrast between bold central linework and soft petals. In consultation, specify how much negative space you want so the eye doesn't disappear into the floral mass over time. A common mistake is asking for dense petal shading that competes with the iris, which then ages into a single dark mass. Sessions are mid-length and the pain is usually moderate. For session ease and a clean outline, wear a racerback tank that allows the artist to access the area without stretching fabrics.
10. Surreal Eye Merging into Landscape on Thigh

Thigh placements absorb saturation well and provide a large canvas for surreal compositions. Tell your artist you want bold anchor lines around the eye and softer gradients for the landscape so the two elements age differently and remain readable. The mistake is crowding too many micro elements into a small thigh panel, which flattens after a year. Sessions are comfortable but can be long depending on the detail, and touch-ups at year three are normal for fine shading. For showing this off, a pair of loose drawstring shorts or a skirt with a side slit helps the composition breathe.
11. Cosmic Eye with Tiny Stars on the Collarbone

Collarbone placements read like jewelry that catches collarlines. The key is to keep central lines slightly bolder than the tiny star work so the eye remains the focal point. A mistake is scattering too many micro stars that then blur into a single texture after repeat sun exposure. Sessions are shorter for compact pieces but expect sensitivity over the bone. Pair with a thin chain pendant necklace to echo the piece without crowding it.
12. Micro Eye on the Ring Finger
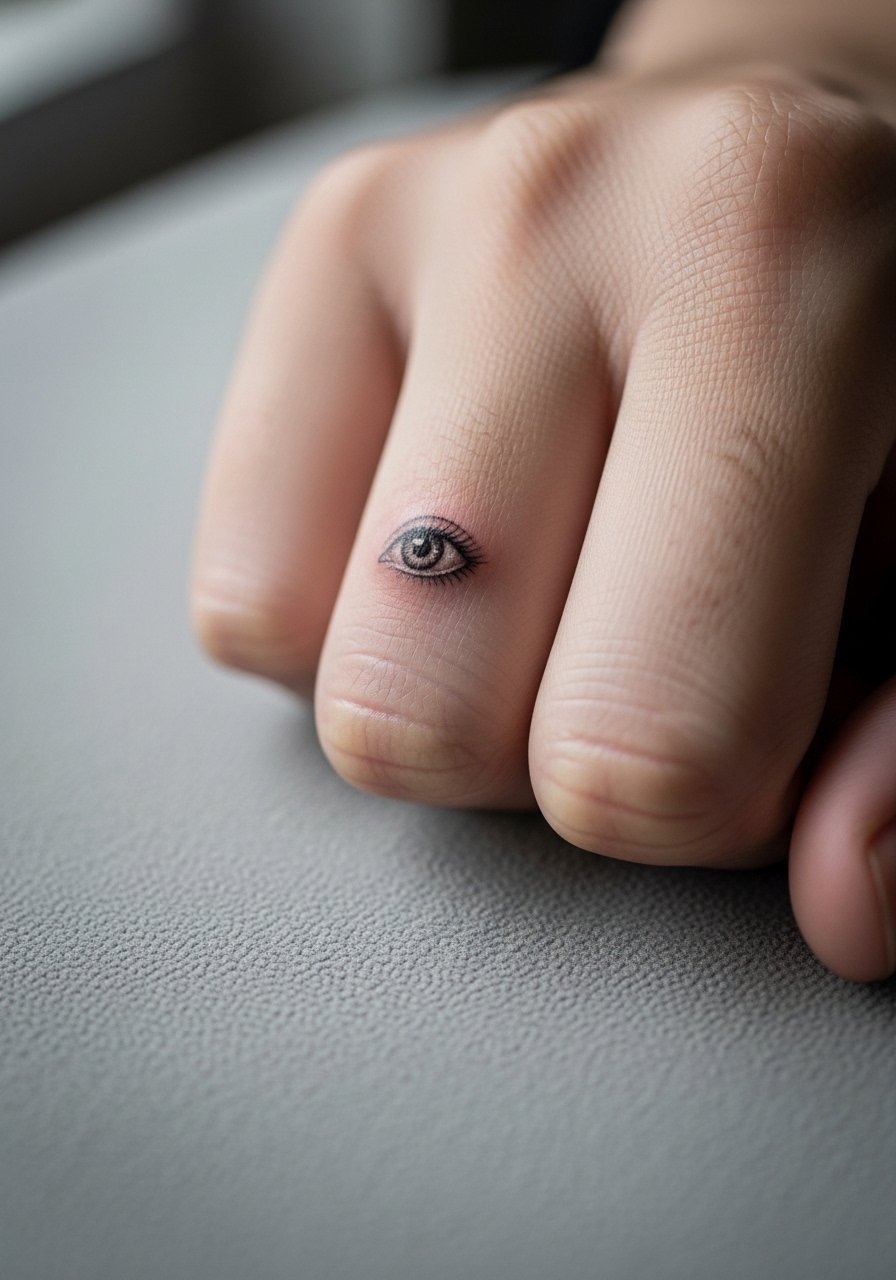
Finger placements are notorious for fast fading and frequent touch-ups because of constant washing and friction. Tell your artist you accept a maintenance timeline of touch-ups every 1 to 3 years for crisp micro work. The typical mistake is wanting a fully shaded pupil on a finger, which often becomes indistinct within months. Sessions are quick but the sensation is needle-on-bone sharp. For display, pair a simple thin stacking ring that sits just below the micro eye without hiding it.
13. Double-Exposure Eye Portrait on the Ribcage

Ribcage pieces can be dramatic because the skin stretches with breath and movement. Artists divide into two camps on delicate portraiture here. One camp says the ribcage provides a flat enough canvas for crisp micro-portraiture when the artist spaces lines correctly. The other camp warns that breathing and body shifts will blur the fine details within a few years. The safe middle is to scale up the portrait slightly and rely on stipple shading instead of crowded lines. Expect higher pain and plan for a two-part session to reduce fatigue. If you want a long-lasting double-exposure look, ask for wider contrasts and scheduled touch-ups.
14. Behind-the-Ear Minimal Eye Accent

Behind-the-ear accents are subtle and require careful placement below the hairline on the neck. The usual mistake is asking for too much tiny detail that the small canvas cannot hold. This area is sensitive and needs an artist experienced with small curves and skin that moves with hair and jaw. Keep the design simple and plan for touch-ups. Consider career implications since neck-adjacent work is still noticed in many professional settings. For session comfort, wear hair tied up so the artist has clear access.
15. Mechanical Eye Blackwork on the Upper Back

Upper back pieces age well because they avoid constant friction from clothing when chosen carefully. This mechanical eye uses solid fills, negative space gears, and bold outer lines to retain its structure over time. The common error is crowding small mechanical teeth too close to the eye, which can clog with healed skin. Sessions can be longer due to area size, but pain is usually moderate. For showing it off, open-back tops or open-back midi dresses reveal the composition without reducing its shelf life.
16. Minimal Geometric Eye on the Inner Bicep

Inner bicep placements hide well and stay protected from sunlight, but the skin there can be softer and prone to blowout if lines are placed too shallow. The mistake is asking for ultra-fine parallel lines in tight spacing. Ask your artist to space geometry and to use slightly stronger linework so the eye keeps definition. Sessions feel tender because the area is sensitive to touch. For the appointment, wear a loose button-down shirt you can pull aside so the artist has access without stretching skin.
17. High-Saturation Neon-Ink Eye on the Wrist

Wrist pieces are high-visibility but sit in a high-wash, high-friction zone. Neon-inspired inks read bold initially but can lose vibrancy quickly in exposed placements. The usual mistake is assuming neon will behave like black ink. Ask for strong black anchors around neon accents so the composition reads even as color fades. Sessions are short and the sensation is sharp for finger-adjacent areas. For styling, minimal watches or a thin cuff keep the wrist visible while avoiding constant rubbing.
Frequently Asked Questions
Q: Will a fine line eye on the forearm blur faster than a bold blackwork eye on the calf?
A: Yes, generally fine line on the forearm will need touch-ups sooner because forearms get more sun and friction. Bold blackwork on the calf tends to hold saturation longer. Ask your artist about spacing and contrast to stretch the life of fine line pieces.
Q: Are ribcage portrait eyes a bad idea because of breathing and movement?
A: It depends. Ribcage pieces are higher pain and the skin moves a lot. Some artists scale up portraits and use stipple shading so the image reads longer. Other artists avoid micro-detail there. Discuss both approaches with an artist who has healed photos of ribcage work.
Q: How often do finger and wrist eye tattoos need touch-ups?
A: Finger and wrist pieces often need touch-ups every one to three years because of constant washing and contact. If you want low maintenance, choose bold anchors and expect to book a touch-up appointment sooner than for larger pieces.
Q: Should I pick a specific clothing strategy for showing off a collarbone eye?
A: Yes. A wide-neck top or a thin necklace that sits just above the piece frames the collarbone eye without competing. For evenings out, an open-back midi dress or a wide-neck blouse keeps the work visible and protected.
Q: How do I find artists who specialize in micro-realism or dot work for eye tattoos?
A: Use local tattoo directories, hashtag searches that focus on the style, and shop portfolios that show healed photos. Visit conventions and look for healed shots rather than fresh photos so you can judge how their technique ages.
