
Fine line pieces are everywhere on feeds right now, and the reality is they age in very specific ways depending on placement, skin tone, and how conservative the line spacing was at the stencil stage. I see three repeat headaches in consults: delicate lines that blur faster than clients expect, small designs that end up costing more than planned after touch-ups, and uneven fading across skin tones. Read on for 27 delicate Japan tattoo design ideas with placement, what to tell your artist, and smart styling notes that help you wear the work well from day one.
1. Fine Line Koi on the Inner Forearm

I’ve seen a lot of inner forearm koi hold up well when the design keeps open negative space around the scales. Tell your artist you want slightly wider spacing between the tiny scales so the piece does not compact as it heals. The session is friendly for most people, usually one to two hours depending on length. Expect touch-ups around year two to three for very fine details. A common mistake is asking for micro scales in a two-inch band, which tends to blur. For showing this off, roll up a sage green button down shirt or a rolled sleeve linen shirt so the forearm sits clean in photos.
2. Minimalist Cherry Blossom Wrist Piece

Most wrist pieces are quick sessions but the wrist sees constant washing and friction. For a 1 to 2 inch cherry blossom, ask for a slightly bolder stem line to resist early fading while keeping the petals delicate. Pain is low to moderate for most people. The typical mistake is cramming too many petals into a small circle, which ages into a muddled blotch. Plan for a gentle touch-up at year two. When you show it off, a simple thin bangle bracelet set or a dainty chain bracelet on the opposite wrist keeps attention on the blossom without competing.
3. Neo-Japanese Peony for the Collarbone

I often recommend a collarbone peony to people who want a bold floral statement that still reads delicate at a distance. Book two sessions if you want color gradients and soft shading, and ask the artist to map the petal flow so the design follows your clavicle line. The collarbone can be sensitive at the bone edge, so expect intermittent sharp nips and longer sit times. A common aging issue is heavy saturation right at the bone that settles unevenly. Keep the petals slightly airy near the edge and you reduce that risk. For the appointment, a wide-neck top lets the artist access the area without full exposure.
4. Delicate Oni Mask on the Ankle

Ankle work is great for a hidden symbol that can peek out in summer. For an Oni mask, ask for simplified facial lines and selective red accents rather than full saturation, so the mask reads at small scale. The ankle is bony and tends to sting more than the forearm. Blowout risk is low if the artist uses light hand speed and thoughtful needle depth. A mistake I see is asking for dense shading around the malleolus, which can fuzz. Wear cuffed jeans or strappy ankle sandals after healing to show off the piece without rubbing it against shoes.
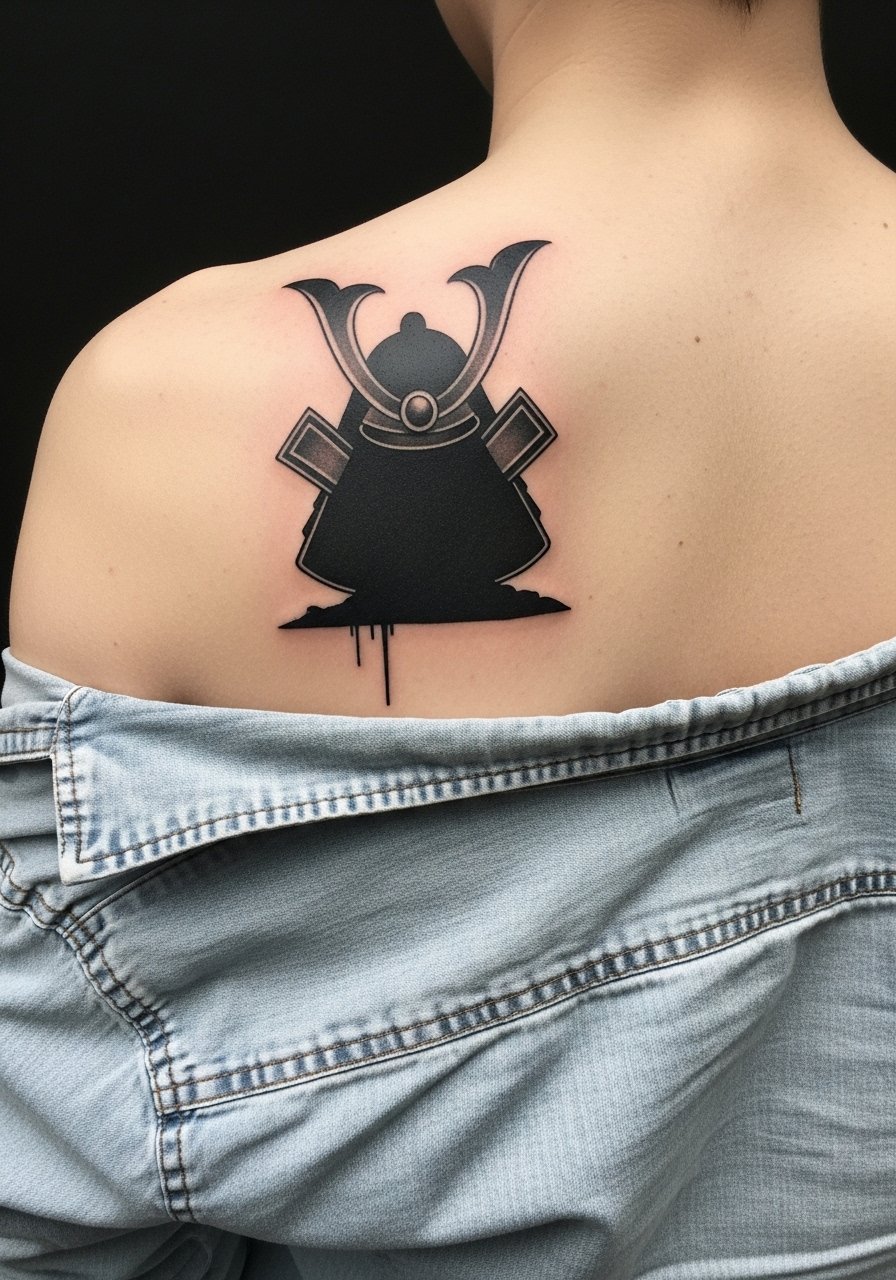
5. Black-and-Gray Samurai Silhouette on the Shoulder Blade

This placement gives a quiet profile that reads like a silhouette rather than a crowded scene. The shoulder blade is forgiving for depth and shading, which makes micro-realism silhouettes hold longer. The session can run one to three hours depending on detail. People often request tiny features that get lost on curved back tissue, so tell your artist you prefer a simplified profile with high contrast. For showing it off, a sleeveless racerback tank keeps the edge visible without competing patterns.
6. Minimal Geisha Outline on the Ribcage

Fair warning, the ribcage rates high on most pain charts, but it is also one of the most private spots for a personal symbol. Artists are split on fine line on ribs. One camp says the skin stretch and movement cause very thin lines to blur quickly. The other camp says with slightly deeper placement and more spacing fine line settles fine. Ask the artist where they fall before booking. A common mistake is requesting hair-fine strokes across the curve without accounting for breath movement during sessions. Expect one longer session and a likely touch-up around year two.
Studio Day Picks
The wrist, inner forearm, and ankle pieces above heal differently from larger chest and back work, so a small kit tailored to those placements makes studio time and the first week easier.
-
Stencil transfer paper kit. Lets you preview stencil placement on curved areas like the forearm or ankle before the needle hits skin.
-
Topical numbing cream. Applied about 45 minutes before the session it eases sharp rib and ankle sensitivity for people who need the extra help.
-
Thin protective film roll. Useful for wrist and ankle tattoos that face friction from washing and socks in the first week.
-
Fragrance free gentle body wash. Cleanses delicate new lines without irritating the skin, which matters for fine line wrist and forearm work.
-
Aquaphor healing ointment. A thin layer for the first few days helps keep fine line sections moisturized while they scab and settle.
7. Fine Line Lotus on the Thigh

Personal observation tells me the inner thigh is forgiving for larger delicate flowers because the skin sits flatter and is shielded from constant sun. Thigh placements heal with less everyday abrasion, but they can swell more after a session. Expect moderate pain and a single session for a 3 to 5 inch lotus. A frequent mistake is requesting ultra-thin outlines without enough negative space, which makes petals merge after healing. For consultation, show photos of the leg curve so the artist can orient the bloom to your musculature. Touch-ups are typically only needed if you sunbathe the area heavily.
8. Neo-Japanese Dragon Claw Wrap on the Forearm

When you want the energy of a dragon without a full sleeve, a claw wrap gives motion and keeps scale manageable. Tell your artist to use negative space between talon segments so the claw does not read as a solid band as it ages. Forearm skin tolerates detail but sun exposure speeds fading, so plan for annual sunscreen application. Sessions usually run multiple hours across two sittings if color is involved. A common mistake is asking for heavy saturation in tight bands, which tends to look heavy on the forearm over time. For a casual way to show it, roll sleeves on a rolled sleeve linen shirt during warm months.
9. Cherry Blossom Branch Calf Sleeve Starter

Outer calf work reads beautifully with vertical compositions because the muscle creates a flowing canvas. For a starter sleeve, plan two sessions that place major branches first and add blooms later. Calf skin heals well, though friction from pants can be an issue in early healing. A mistake is starting with too many small buds instead of anchoring the branch structure, which makes later expansion awkward. Expect lower pain compared with ribs, and a touch-up at year two if you live in high-sun environments. For showing it off, a midi skirt with a side slit frames the branch without covering movement.
10. Hannya Micro Version at the Nape

The hairline placement keeps this bold symbol discreet. The nape is sensitive but brief sessions for a micro Hannya are typical. A common mistake is asking for excessive detail that cannot be rendered cleanly inside two inches. Also consider social and career contexts for neck-adjacent work. Ask for a slightly simplified mask with emphasis on expression rather than micro textures. Expect minimal drag during daily life, though longer hair can catch at the edges while healing.
11. Peony and Koi Minimalist Back Piece
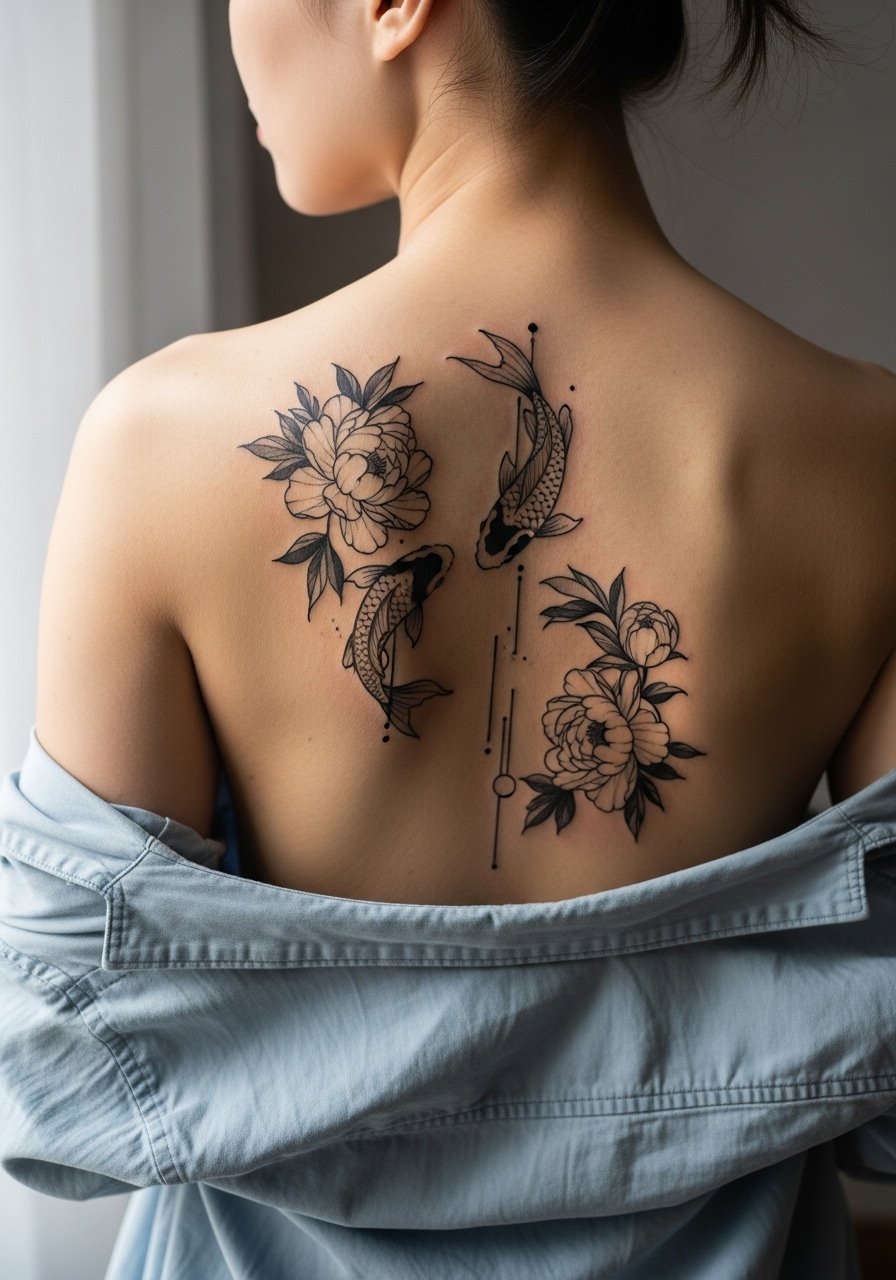
A back canvas lets you scale delicate Japanese motifs into a composed story without crowding. For a peony paired with a koi, ask that the koi be slightly elongated so its curve reads along the spine or shoulder blade. Larger pieces need multiple sessions spread months apart to allow skin recovery. The typical error is rushing color fill in one sitting, which risks uneven saturation. When you want to show the work, an open-button shirt or a low-back dress lets the upper back speak without full exposure. Build in a touch-up plan after the final session.
12. Swirling Wave Pattern Ankle Wrap

Ornamental ankle bands mimic traditional wave motifs while staying small and wearable. For longevity, ask for a clear band gap so wave crests remain distinct instead of merging into a continuous gray. The ankle needs careful aftercare because socks and shoes create friction. People often underestimate how often morning shoes rub the area and cause scabbing. Expect a single session and plan to wear sandals or rolled jeans for the first week when possible. A cuffed boyfriend jeans styling choice makes the wrap visible and low impact.
13. Tiny Sakura Behind the Ear

Behind-the-ear tattoos are quietly personal and very small. They demand a clean, simple silhouette because the area rarely takes dense shading. The sensitive anatomy and hairline mean working with an artist experienced in micro placements is important. A common mistake is asking for small color gradients that do not translate at tiny scale. Sessions are short, often under 30 minutes, and healing is quick if you avoid hair products on that spot.
14. Micro Samurai Crest on the Finger

Finger tattoos age differently because the skin is thin and the area gets constant use. I warn people that micro crests on fingers often need touch-ups within a year, especially along friction points. Ask for a simplified crest with strong linework rather than tiny interior ornament. Sessions are fast but the aftercare is demanding; expect some early fading. Consider placement on the lateral finger instead of the pad to extend clarity. If you need the work to last intact, plan touch-up budgeting into the decision.
15. Single-Line Crane Along the Collarbone

Single-line motifs that follow the clavicle look elegant and hold up when the artist respects spacing. For a crane, request a one-stroke feel with deliberate pauses where the wing meets the feather cluster. Collarbone placements catch light and show off contour, but bone-edge areas can be more sensitive. Sessions are usually one sitting under two hours. Avoid pushing for hair-fine curves right at the tip of the bone. An off shoulder knit top frames this sort of line work nicely for evenings out.
16. Small Koi on the Hip

Hip placements are flattering because the area moves and curves, which can enhance a koi’s flow. Expect moderate pain as you approach the pelvic bone. A mistake is packing too much detail into a 2 to 3 inch koi, which then blurs with years of movement. For a small hip koi, prioritize a clean silhouette and scale the tail to follow your hip line. Sessions are typically single sittings, with touch-ups scheduled if you plan to extend the piece later.
17. Wave Band Around the Wrist

A continuous wave band on the wrist creates a subtle motif and is quick to execute. The wrist endures constant movement and contact, which means tiny breaks in the band help prevent merging as the skin shifts. The common mistake is a fully closed, super-thin ring which fades unevenly. Sessions are short but the spot needs careful first-week protection. For a clean display, stack with a thin bangle bracelet set on the opposite wrist rather than piling metal on the same side.
18. Lotus Bloom on the Inner Bicep

Inner bicep pieces sit in a tucked area that rarely faces direct sun, which helps softer shading last longer. The trade-off is higher morning swelling and more tenderness during sessions. A common session-day tip is to wear a loose tank so the artist can ask you to raise or lower your arm without full undress. People sometimes request extremely thin petal lines that do not handle the skin’s micro-movement. Tell your artist you want petals with modest contrast so the bloom maintains shape.
19. Minimal Geisha on the Ribcage Side

Controversy around fine line on ribs comes up often. One group of artists argues the constant expansion and contraction blurs the finest strokes within two years. The other group says careful depth and extra spacing make fine line reliable on ribs. I suggest asking your artist which approach they prefer and planning a touch-up window. The ribcage is painful for many, and you should expect a longer single session. Keep shading sparse near the curve to avoid early pooling of pigment.
20. Swallow on the Upper Shoulder Blade

Small birds on the shoulder blade work well because the flat plane keeps edges crisp. These are low-risk for blowout compared with hands or ribs. A common mistake is cramming a flock into a tiny zone; single swallows read better and age more predictably. Sessions are brief and pain is low to moderate. Pair with a textured open knit vest when you want to show the motif without exposing the whole back.
21. Dot-Work Moon on the Outer Calf

Dot-work fares nicely on the calf because dotted gradients maintain their rhythm on thicker skin. The outer calf gives space for gradual stipple transitions that still read as delicate from a distance. A frequent mistake is wanting overly tight dot clusters in tiny areas, which can congeal. Sessions are steady and meditative by nature. For show-off days, try capri lengths or a capri leggings women option that keeps the silhouette visible.
22. Tiny Kanji on the Sternum

Sternum placements are intimate and can be high on the sensitivity scale depending on proximity to bone. When choosing kanji, be precise about the exact character and its exact script style so the lettering renders correctly. The typical error is using a font that is too ornate for a 1 to 2 inch space. The session requires careful positioning for breathing, and most artists recommend small sittings. Consider how the piece will interact with necklaces and clothing necklines.
23. Stipple Chrysanthemum on the Inner Forearm

Inner forearm stipple pieces age predictably when the stipple density is spaced to allow skin settling. Ask your artist for larger negative space between dense stipple clusters so the bloom does not compact. Sessions take longer than simple linework because stippling is time consuming. A common mistake is requesting tiny stipple shading in a narrow band, which looks muddy after a year. For casual display, a rolled sleeve linen shirt keeps the inner forearm in frame while staying low maintenance.
24. Small Green Dragon Accent on the Upper Arm

Green in dragon imagery can signal nature or renewal, which makes a small colored accent meaningful without needing a full sleeve. The upper arm is forgiving for color saturation and touch-ups. A mistake I see is pushing for too many color gradients in a compact motif, which increases sitting length and complicates healing. Sessions are moderate in length and the area tolerates two sittings if necessary. A short sleeve tee gives the artist access and later frames the accent for casual reveal.
25. Minimal Peony at the Ankle

A small peony can be reduced to a few elegant curves at ankle scale without losing floral identity. Ankle sensitivity varies but is manageable for small motifs. Avoid asking for heavy lower-petal saturation that contacts shoe lines. Expect a short session and a likely light touch-up if you wear closed shoes a lot. For summer reveal, strappy ankle sandals or cuffed pants place the peony in view.
26. Samurai Silhouette Extended on the Shoulder Blade
Scaling a silhouette across more of the shoulder blade gives you the sense of narrative without the density of a full scene. The shoulder blade accepts shading and soft gradients well, which helps preserve the silhouette over time. The common pitfall is asking for too many tiny interior details that disappear on curved tissue. Plan for two sessions and map the piece to your scapular movement to avoid distortion during daily motion.
27. Peony Vine Flowing from Calf to Ankle

A vertical vine ties calf and ankle pieces into a single story while keeping each bloom airy and distinct. When you plan a run like this, stage the main anchors first and leave room for filler blooms later to prevent future composition clashes. The calf-to-ankle line can be done in two sessions. A mistake people make is placing too many small filler leaves early on, which limits expansion. For show-off days, a skirt with a lift or side slit keeps the vine visible and graceful.
Frequently Asked Questions
Q: Will fine line koi and floral pieces fade faster on darker skin tones?
A: From what I’ve seen, fine line can appear to soften faster on darker skin tones because contrast behaves differently. That does not mean you should avoid the style. Ask an artist who has healed photos on similar skin tones and request slightly bolder line spacing or strategic negative space so details remain legible over time.
Q: How much should I budget for touch-ups on delicate neo-Japanese pieces?
A: It depends on size and placement, but plan for at least one touch-up within two to three years for very fine work. Small wrist and finger pieces often need earlier touch-ups because of friction. Treat touch-up budgeting like routine maintenance rather than an unexpected cost.
Q: Are ribcage fine line tattoos a bad idea because of the controversy?
A: Artists are split. One camp says ribs blur thin lines quickly. The other camp says extra spacing and controlled depth make fine line work reliable there. The practical step is to ask your artist which approach they use and request healed examples on ribs before booking.
Q: What should I wear to a collarbone or upper chest session?
A: Wear a wide-neck shirt or a strapless bra that you can shift so the artist has access without you being fully exposed. For showing work later, off-shoulder pieces and a pearl necklace choker can frame the area without covering the tattoo.
Q: How do I reduce blowout risk for a wrist or ankle fine line design?
A: Ask for slightly thicker primary lines and more spacing between clustered elements. Avoid super-dense shading at tight scales. Also follow aftercare and keep footwear or bracelets from rubbing the fresh tattoo in week one.
