
Fine line dotwork can look like a photograph on the skin, and it can also blur into a gray smudge if you ignore placement, needle spacing, or the way skin moves. If you want roses that read as crisp petals for years, think about scale, contrast, and where the skin will stretch. The first idea drops right onto the forearm so you can compare spacing, line weight, and what to ask for at consult.
1. Dotwork Rose on Inner Forearm

I've seen this placement hold up better than many because the forearm offers flat canvas and low friction. Ask your artist for slightly heavier linework at the petal edges and tighter stipple shading in the shadow zones so the dotwork reads at distance without getting lost. Fair warning, going too small is the most common mistake. Small dots packed too close merge after a couple of years, so size the bloom so each stipple has breathing room. Session time is usually one to two hours for a single rose and pain rates around a three to four out of ten. For showing it off, roll up a loose button-down shirt to frame the forearm without overwhelming the piece.
2. Single Stem Rose Along the Ribcage

Fair warning: the ribcage rates high on the pain scale for most people, often a seven out of ten. One camp in the community argues fine dotwork on ribs blurs quickly because the skin stretches with breath. The other camp says proper depth and spaced stippling can last. Name both camps when you ask an artist where they stand. For fit, choose a slightly elongated stem so the artist can work with the skin grain. Expect one medium-length session and a likely touch-up at year two or three. Bring a zip-up hoodie to the appointment so you can adjust comfort without disturbing the stencil.
3. Small Rose Behind the Ear, Subtle Dot Halo

There is a real difference between a dainty decorative dot halo and a micro tattoo that gets eaten by texture. When you want a behind-the-ear piece, ask for shallow stippling and slightly bolder outline to keep the shape readable over time. Session feels quick but awkward because the artist must angle their hand close to the hairline. Sensitive placement means seek an artist experienced with compact dot work. Career considerations matter here, so think about your job before committing. Wear hair loosely pinned up to the session so the artist can see the area without hair in the stencil.
4. Bold Dotwork Rose with Blackwork Leaves on Shoulder

There's something about pairing dotwork petals with solid black leaves that keeps the bloom readable from a distance. I've noticed shoulders tolerate heavier saturation because the skin is thicker and less prone to blowout. Ask for stronger contrast between the dot shading and the leaf fills so the rose stays defined as it heals. The session can run two to three hours if the fill work is dense. For the appointment, wear a loose tank top that you can pull aside without twisting your torso. Expect touch-up at year three if you want black fills to remain deep.
5. Stippled Rose Cluster on the Upper Bicep

I've seen clusters age differently than single blooms because groupings need space to keep petal edges clear. The common mistake is packing three roses into a small circle. Instead, ask the artist to stagger the stems and vary dot density so each bloom sits separately. Pain is moderate at about five out of ten and sessions usually last one to two hours. For showing this off, short sleeves or a rolled sleeve are ideal. Try pairing with a minimalist leather cuff bracelet that frames the bicep without drawing attention away from the dotwork.
Studio Day Picks
Those forearm, shoulder, and bicep pieces above need different prep than rib or chest work, and a few specific items smooth out the session and the first week.
-
Stencil transfer paper kit. Lets you preview the linework on skin before the needle hits, especially useful for inner forearm and finger placements in the first six ideas.
-
Topical numbing cream. Applied according to instructions, it softens rib and sternum sensitivity so you can sit through longer dotwork sessions.
-
Thin protective film roll. Keeps wrist and finger pieces clean during early healing when friction is highest.
-
Fragrance-free gentle body wash. Cleanses the healing zone without stripping the delicate stipple shading that fine dotwork needs.
-
Aquaphor healing ointment. Thin layers lock in moisture during the first few days, which helps fine dots settle rather than scab hard and flake.
6. Fine Dot Rose on the Outer Wrist

The wrist is one of those places where a piece looks great fresh and then asks for attention. The common aging issue is friction from watches and sleeves that dull the stipple. Ask for slightly bolder contour dots around the bloom and discuss a short touch-up window at year one. Sessions here are short but the pain is sharp for a brief moment, around a five. For showing it off, a thin chain bracelet or a minimalist watch with a removable strap keeps the tattoo visible and complementary. Remember that frequent washing plus wrist motion increases fading, so plan touch-ups accordingly.
7. Micro Dot Rose on the Finger Side

Finger tattoos split opinions in the community. One camp says fingers are fine for tiny bold icons if you accept the fade. The other camp warns that skin there sheds and flexes too much for fine dotwork to last. I tell people fingers are high maintenance. The mistake is asking for ultra-fine stipple inside a one centimeter bloom. If you still want one, request reinforced contour dots and plan for touch-ups every one to two years. Session time is brief but expect tenderness for a week. For the session, wear a long-sleeve shirt you can roll up easily so the artist has clean access without exposing more skin than necessary.
8. Black Dot Rose With Geometric Frame on the Calf

The calf offers a forgiving surface for mixing dotwork with geometric elements because the skin is thick and motion is predictable. A common mistake is making the geometric frame too tight around the rose which creates visual crowding as stippling softens. I recommend larger negative space and a firmer dot gradient that moves from dense to airy. Sessions can be longer when geometry is precise, expect two to three hours. For showing it off at summer events, roll jeans or wear shorts that stop just above the design. A loose drawstring linen pant that you can roll feels practical for the first two weeks of healing.
9. Dotwork Rose on the Inner Bicep

The inner bicep is softer and can absorb ink differently. A mistake is asking for ultra-fine dots without compensatory size; the flesh there can make dots spread subtly. When you consult, ask for denser dot placement near shadowed petals and a slightly bolder outline so the shape remains clear. The session feels more guarded because you must hold the arm position. Pain is variable, usually around a five. For comfort, bring a loose tank top that lets the artist work without you twisting. Inner bicep work often needs a touch-up at two to three years if you want the same crispness.
10. Sleeve Accent Rose in Dotwork and Stippling

There's a visual impact to using dotwork roses as negative space anchors in a sleeve. I've noticed sleeves that mix stipple shading with heavier black elements age better than all-fine-line sleeves because contrast preserves focal points. Common error is repeating identical roses across the arm; instead vary scale and stipple density so movement reads naturally. Sessions for an accent piece are modular and can fit into a typical sleeve booking. For showing a sleeve, roll the cuff of a casual linen shirt so the arm reads as intended without covering key motifs.
11. Tiny Dotwork Rose Near the Collarbone

Most collarbone pieces are visible and age under constant sun exposure, which is the main enemy of dot density. A common mistake is choosing tiny stipple that lacks protective contrast. Ask your artist to design a slightly denser center and to consider UV-resistant placement under a collarbone curve. Sessions are short and pain can spike when bone is near. For evening wear, a thin chain pendant necklace sits above the rose and keeps attention on the collar area without competing with the dotwork. Expect sun protection to be part of your long-term maintenance.
12. Traditional Rose Rendered with Dotwork Petals on the Thigh
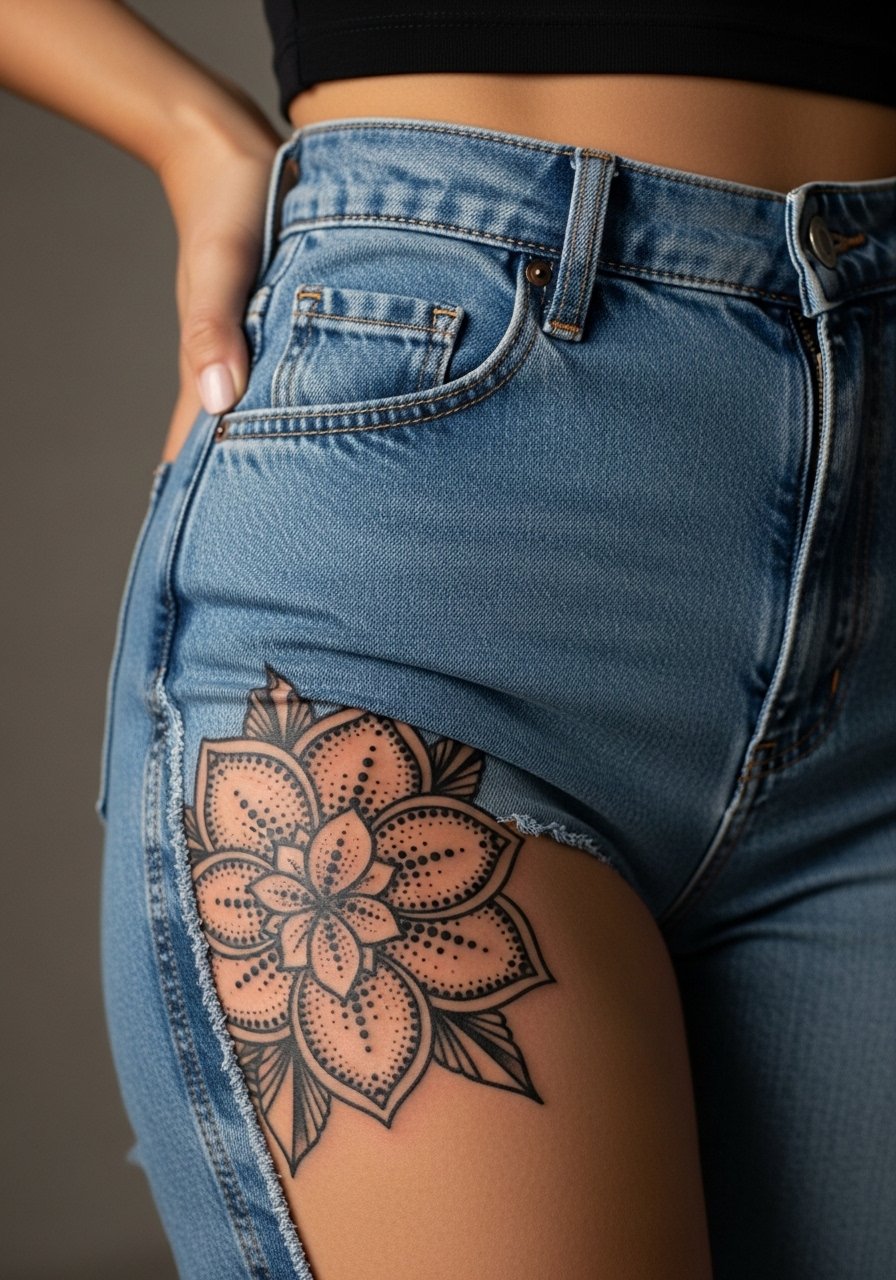
There's a useful hybrid here: retain traditional bold outlines for long-term legibility and fill with stipple to keep texture. The thigh tolerates saturation and blowout risk is lower than hands or ribs. The mistake is using too many tiny dots inside the bold outline which creates visual noise. Request a phased approach where outline and placement are tested first. Sessions can be long and comfortable; pain is typically a three out of ten. For the appointment, wear high-waisted shorts so the artist can access the area without you removing clothing.
13. Negative Space Rose on the Back of the Neck

Neck pieces are visible and require honesty about career impact and aftercare. The common debate is whether fine dotwork holds on neck skin. One camp says movement and sweat cause fading quickly. The other camp points to careful spacing and depth as solutions. Ask artists which camp their experience supports. Expect a focused one-hour session and soreness for a few days. For the session, wear a wide-neck shirt you can shift without full removal. Plan to avoid heavy necklaces during healing so friction does not accelerate fade.
14. Spiral Dotwork Rose on the Sternum

Sternum work needs precise spacing because the skin there can scab heavily if ink sits too shallow. A common mistake is asking for too many fine dots packed into a small central area. I recommend a spiral with graduated dot density so the center breathes. Pain is higher for many people, typically a six to seven. For the appointment, wear a fitted sports bra so the artist can access the area with minimal clothing removal. Expect a touch-up option after the initial healing window if you want to reinforce central stippling.
15. Clustered Mini Roses Along the Collarbone Edge

Visual impact here comes from repetition with variation. The mistake I see is identical mini blooms placed evenly so the effect reads flat over time. Ask for slight scale changes and alternate dot density so some roses read as foreground and others recede. Sessions are short but expect sensitivity near the bone line. For evening outfits, an open-collar shirt or a V-neck tee frames the cluster without covering it. Sun protection matters because collarbone pieces catch exposure daily.
16. Rose and Script Hybrid with Dot Shading on the Sternum-Side Chest

Combining dotwork roses with script adds personality but requires exacting spacing so letters do not get lost in stipple. The real mistake is choosing a tight script size next to dense dotwork. Tell the artist you want negative space around the lettering and a slightly stronger dot gradient near the rose to separate elements. Sessions can be split between the script and the rose to maintain steady handwork. For the session, wear a shirt that allows access without total wardrobe change. Expect the script to need touch-up sooner than the rose if it is thin.
17. Botanical Wreath of Roses on the Upper Back

A wreath benefits from symmetry but also needs organic variation. The most common mistake is a perfectly mirrored wreath that looks static as skin settles. Ask for asymmetry in petal sizes and varied stipple weight. Upper back sessions are often multi-hour and less painful. For showing off at summer events, consider open-back shirts or halter tops. Pairing with an open-back midi dress frames the wreath elegantly while keeping the focus on the dotwork.
18. Forearm Band of Tiny Dotwork Roses

Bands need consistent spacing because small errors repeat around the arm. The mistake is designing the band too tight so the pattern compresses with muscle movement. Tell your artist you want slight breathing room between blooms and a varied dot density so the band reads like cloth rather than a stamp. Band sessions are modular and can be done in segments to avoid excessive arm fatigue. For showing this off, roll sleeves or wear short sleeve shirts. A minimalist watch strap can rest above or below the band without crowding the artwork.
19. Ankle Rose with Delicate Dot Stem

Ankle pieces live in high-friction zones from socks and shoes. The common mistake is placing stipple too close to the shoe line where repeated rubbing accelerates fade. Ask for the bloom to sit slightly above typical sock height and for reinforced contour dots. Pain is brief but sharp near bone. For the session, wear shoes that slip on and off easily and pants that roll without pressure. A pair of sandals for the first week reduces rubbing and keeps the area visible as it heals.
20. Palm-Side Dot Rose Accent by the Thumb

Palm-side and inner-thumb placements are notorious for fast fading and frequent touch-ups. Artists are split about whether palm-adjacent dotwork is worth it. One camp accepts quick fade and plans touch-ups. The other avoids it entirely for longevity. Be direct in the consult about how often you are willing to maintain it. Expect high touch-up rates and a session that feels concentrated and sensitive. For the appointment, bring a shirt that keeps you warm without rubbing the palm during travel.
21. Full Back Rose Cluster in Micro Dotwork

Large back clusters need planning across sessions. A common mistake is rushing layout and then finding motifs unbalanced when complete. When you book, discuss a mapped plan that places focal roses where shoulder blades and spine create natural negative space. Sessions will be long and staged, often multiple days. Pain fluctuates by zone, with areas near the spine more sensitive. For appointments, a button-down shirt worn backwards or a tank that you can adjust prevents disturbing fresh work. Larger projects benefit from discussing long-term touch-up windows with your artist ahead of time.
Frequently Asked Questions
Q: How long does dotwork take to settle compared with solid black roses?
A: Dotwork usually needs a clearer settling window because the visual effect depends on dot spacing. Expect the first six months to show most of the change. Solid black fills appear more stable early on, but both styles can need touch-ups at year two or three depending on placement and sun exposure.
Q: Will a dotwork rose on the ribs blur faster than one on the forearm?
A: Yes, ribs move with breathing and the skin stretches more, so dot density that reads crisp on a forearm can merge on ribs. Ask an artist whether they favor deeper dot placements or slightly larger scale for rib pieces. If you want a showing option for after healing, a loose drawstring linen pant helps you avoid pressure from clothing during the early weeks.
Q: Are finger and palm placements realistic for long-term dotwork?
A: Those zones are realistic only if you accept maintenance. Fingers and palms have skin that regenerates faster and sees more abrasion. Many people plan yearly touch-ups and treat them like jewelry rather than permanent art.
Q: What should I bring to my consult to get the dotwork rose I want?
A: Bring reference photos that show line weight and dot density you like, plus photos of your skin area to help with scale decisions. Use hashtags and local shop directories to find portfolios, and ask which artists have experience with stipple shading. If possible, mention whether you sleep on that side or wear tight sleeves so the artist can adjust placement.
Q: How do I minimize long-term fading for a collarbone or chest dotwork rose?
A: Limiting sun exposure is the most practical step. Use broad-spectrum sunscreen once healed and consider clothing that shields the area in intense sun. For evenings, a thin chain or open-collar shirts show the work without exposing it to constant rays.
