
Fine line work and soft color sweeps are everywhere right now, and the gap between what looks amazing fresh and what reads clean five years later matters more than most people expect. I pick designs here that lean on spacing, placement, and modest scale so the star motif keeps its shape as skin moves and sun does its thing. Read the notes before you pick a spot and the first idea will show you why wrist choices deserve an extra question in consultation.
1. Fine Line Single Star on the Wrist

I recommend this if you want a discreet mark that still photographs clearly. Fair warning, the wrist is high friction and small lines need room or they will blur in a few years. Tell your artist you want a 1mm single needle lineweight and slightly larger negative space around points so the star ages clean. Session time is short, often under an hour, but the skin there is sensitive so expect a 3 to 4 out of 10 on pain. For showing it off pair with a thin gold chain bracelet on the opposite wrist, and wear a sleeveless tank to the appointment so the artist has clear access.
2. Watercolor Galaxy Cluster on Outer Forearm

This is for someone who prefers soft fades and color transitions over crisp outlines. The outer forearm photographs beautifully and tolerates color washes better than inner arms. Ask for staggered patches of saturation rather than a single saturated blob so the piece fades evenly over time. Expect two shorter sessions rather than one long marathon. For casual outfits, push a cream crewneck tee sleeve up to frame the design. Common mistakes include asking for ultra-fine watercolor edges that need constant touch-ups.
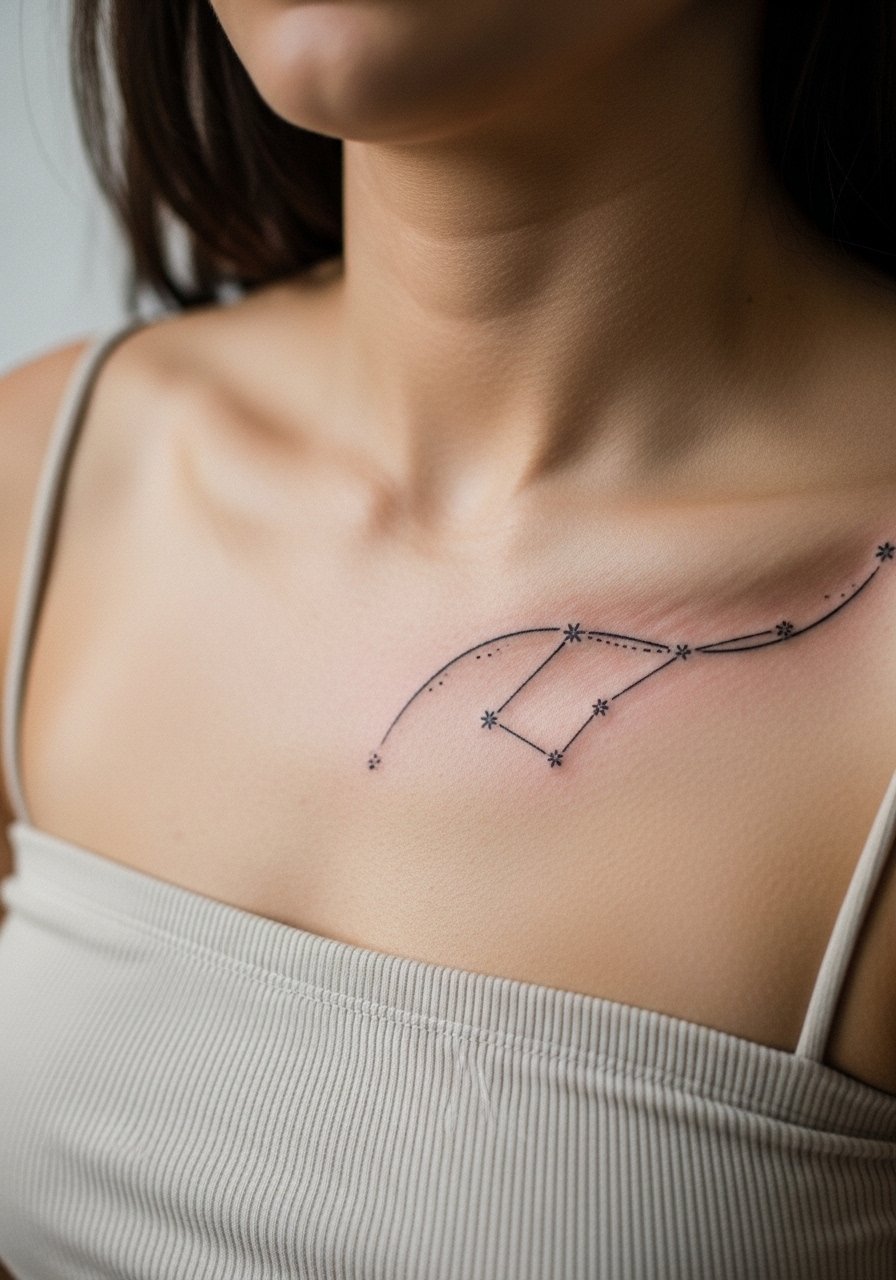
3. Minimalist Orion Constellation on the Collarbone

Collarbone pieces follow the bone and read like jewelry when placed well. In consultation, ask the artist to arc the connector lines to mirror your collarbone curve and to avoid crossing too many tiny muscles. This placement can be a three out of 10 for pain and usually finishes in a single session. Avoid requesting micro-dots between stars that are too close together because they merge with movement. Pair the final result with an off shoulder sweater for evenings, and arrive at your appointment wearing a strap-free or open-collar top for easy access.
4. Neo-Traditional Shooting Star on the Shoulder
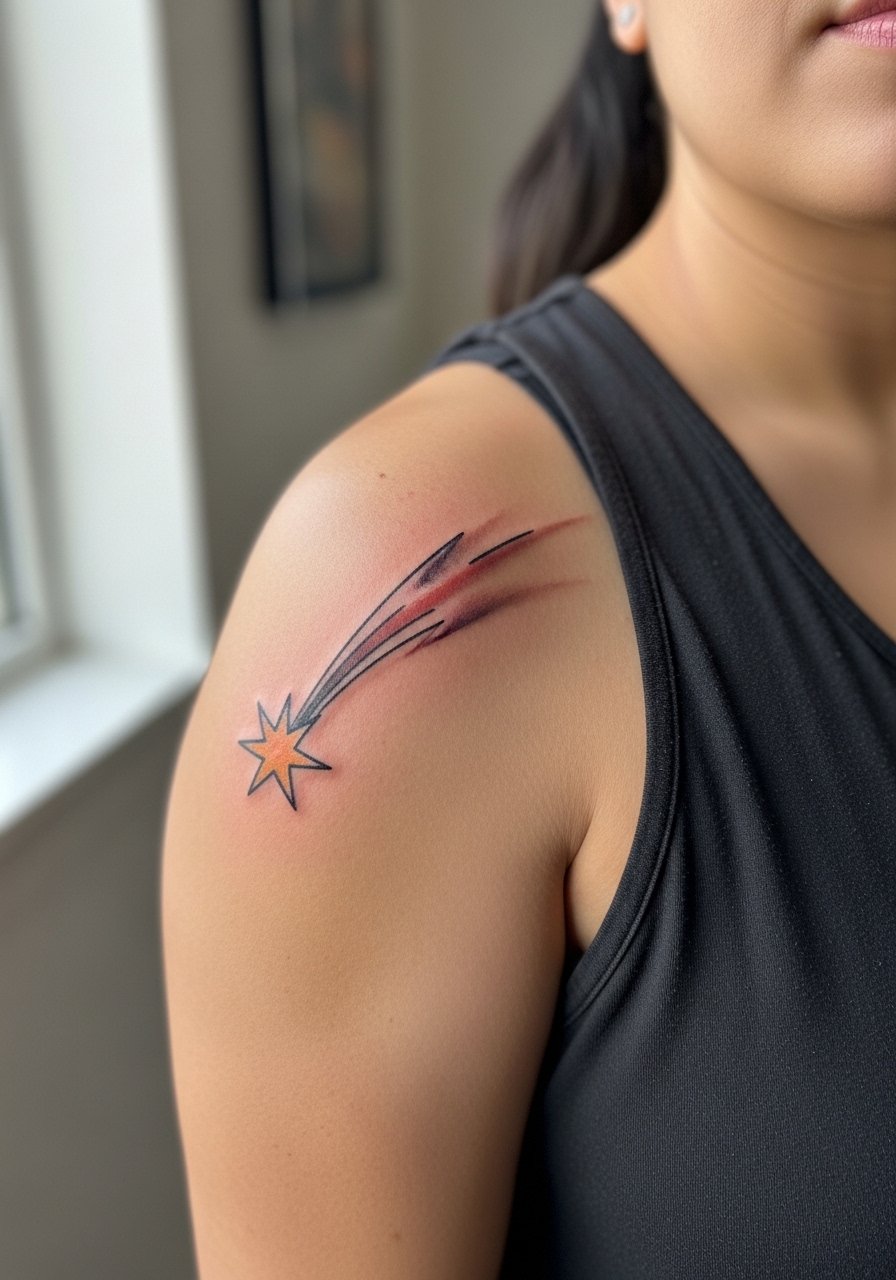
There is visual motion in a shooting star that benefits from the shoulder's broad canvas. Ask for softened whip shading on the trail and moderate color saturation so it ages into a soft vignette rather than patchy spots. Sessions run longer than a wrist piece and often need two sittings for color layering. The biggest rookie mistake is compressing the trail too tightly toward the shoulder seam where movement distorts it. Show off with a sleeveless tank women or halter for a clean silhouette. Expect a moderate pain level around four or five out of 10.
5. Blackwork Geometric Star Mandala on the Ribcage

Fair warning, the ribcage is often a seven or eight out of 10 on pain scales. That intensity is why clients pick bold blackwork here, it wears into clear, graphic shapes. Artists split on fine line on ribs. One camp says thin lines blur quickly because the skin stretches. The other camp says properly spaced geometry and correct depth keep the pattern crisp for years. Ask where the artist stands and look for healed photos on similar body types. Sessions usually span multiple visits, and plan for recovery that limits twisting. For showing this kind of work, a cropped top or side-cut tee frames the lines without exposing too much.
6. Micro-Realism Twinkling Star on the Ankle
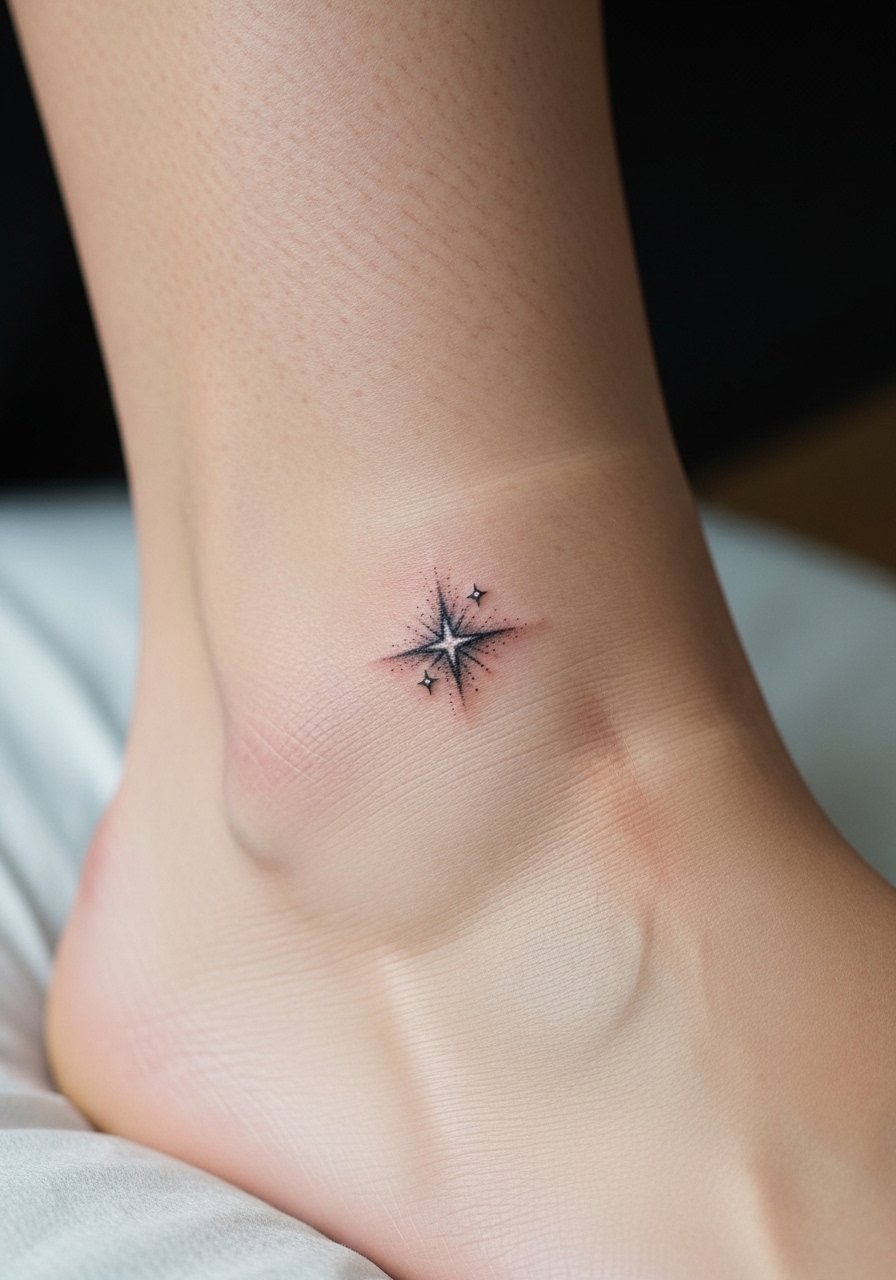
Ankle micro pieces read sharp in photos but face constant friction from socks and shoes, so they can need touch-ups earlier. For the appointment wear loose joggers you can roll up or shorts so the artist has unobstructed access. The session is short and the pain is moderate, especially near bone. Tell your artist you want a tiny white highlight to sell realism and to avoid packing too much black in the tiny negative spaces. Pair with cuffed slim jeans or cuffed ankle jeans to frame the tattoo when you want to show it off.
Studio Day Picks
The wrist, forearm, collarbone, shoulder, ribcage, and ankle pieces above each ask for slightly different prep and first-week care, so these five items smooth the session and the early healing window.
-
Stencil transfer paper kit. Lets you preview placement on the wrist and collarbone before the needle touches skin, which is especially useful for the fine line and constellation pieces above.
-
Topical numbing cream. Applied 30 to 45 minutes before helps shoulder and rib sessions feel more manageable without altering linework.
-
Thin protective film roll. Useful for ankle and wrist areas that rub against socks or bracelets during the first few days.
-
Fragrance-free gentle body wash. Cleanses without irritating fresh ink, which matters for outer-forearm and chest-adjacent pieces.
-
Aquaphor healing ointment. A thin layer in the first 48 hours helps keep fine line work from drying into tight scabs that pull on delicate needle channels.
7. Fine Line Shooting Constellation Along the Inner Forearm

This is a storytelling piece that follows the arm's length, which makes it ideal for linking milestones. In consultation, ask the artist to place tiny anchor dots at natural bends so the composition reads intact when you move. The forearm tolerates fine line well, but avoid cramming stars too close because connective lines can blur with elbow flex over years. Expect a one to two hour session and a mild to moderate pain level. For everyday outfits pair with a delicate silver cuff on the opposite wrist, and wear a loose button-down to the session so the artist can work comfortably.
8. Dotwork Milky Way on the Side Neck

Neck pieces are visible and carry social trade-offs, so think about visibility before committing. Dotwork gives texture that reads subtle from a distance and detailed up close. The nape and side neck can be sensitive but heal cleanly with proper spacing between dots. Ask for samples of healed neck dotwork on similar skin tones during consultation. Keep composition small to avoid frequent touch-ups. Expect a short session and a higher visibility effect than forearm pieces. Hand this design to an artist experienced in dot shading and neck placements.
9. Watercolor Nebula Burst on the Outer Thigh
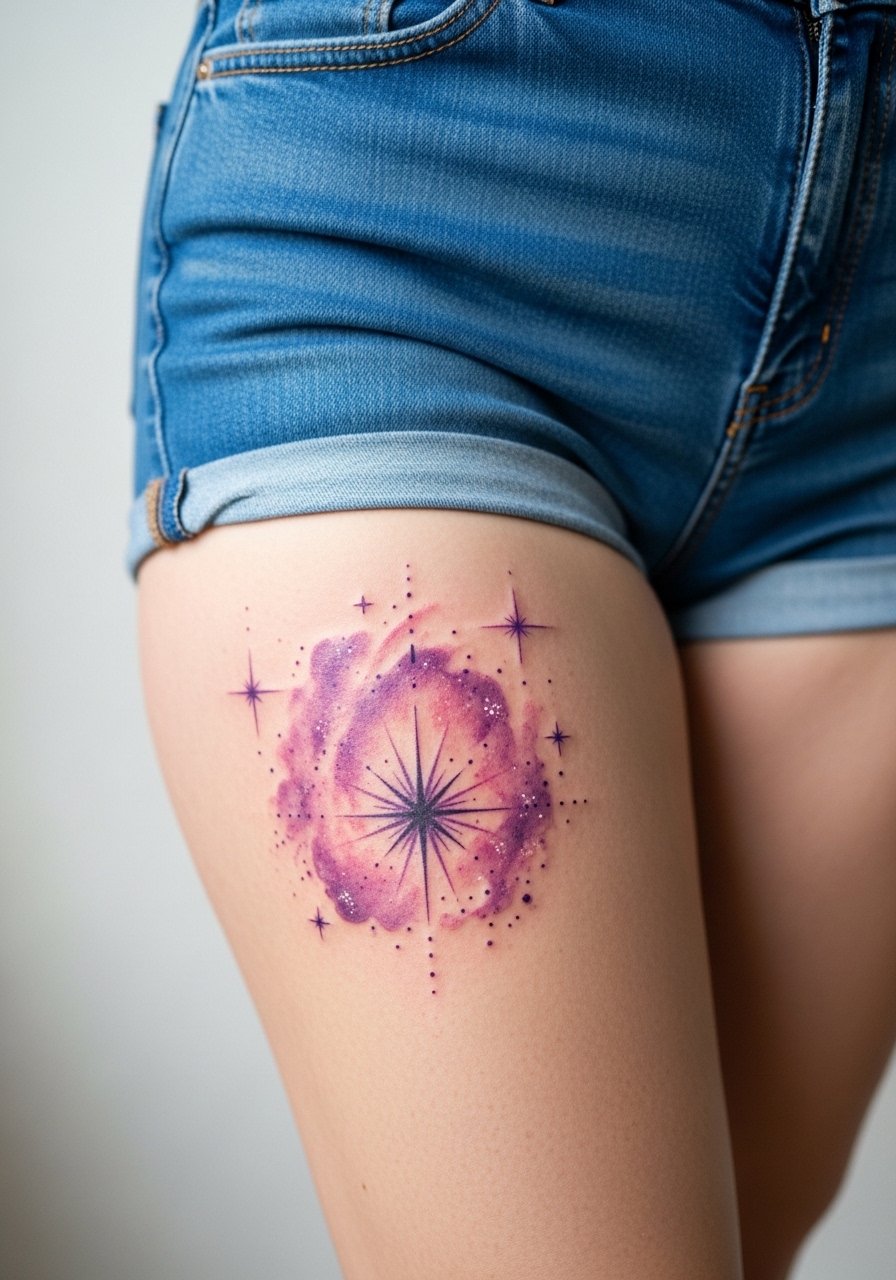
Thighs are forgiving for larger color work because they age with less sun exposure and friction. Request layered washes with gradual color stops so the piece does not form patchy faded islands. Sessions can be longer and often split into two. The main mistake is compressing too much color into a tiny area. For evenings out, pair the final look with high waist shorts or a side-slit dress to reveal the burst. Session wear should be loose shorts so the artist can access the area without fabric tugging.
10. Ignorant-Style Scattered Stars on the Outer Thigh

This style thrives on uneven hand-drawn charm and looks intentionally casual. The thigh accepts this playful placement well, but watch for scale. If the lines are too tiny they will smear into blobs over time. Ask your artist to keep the individual marks slightly larger than what you see in tiny flash sheets. Sessions are comfortable and usually finish in one visit for small clusters. For show-off outfits consider a side slit dress that reveals an angled glimpse of the cluster without overexposing it.
11. Ornamental Star with Vine Frame on the Upper Back
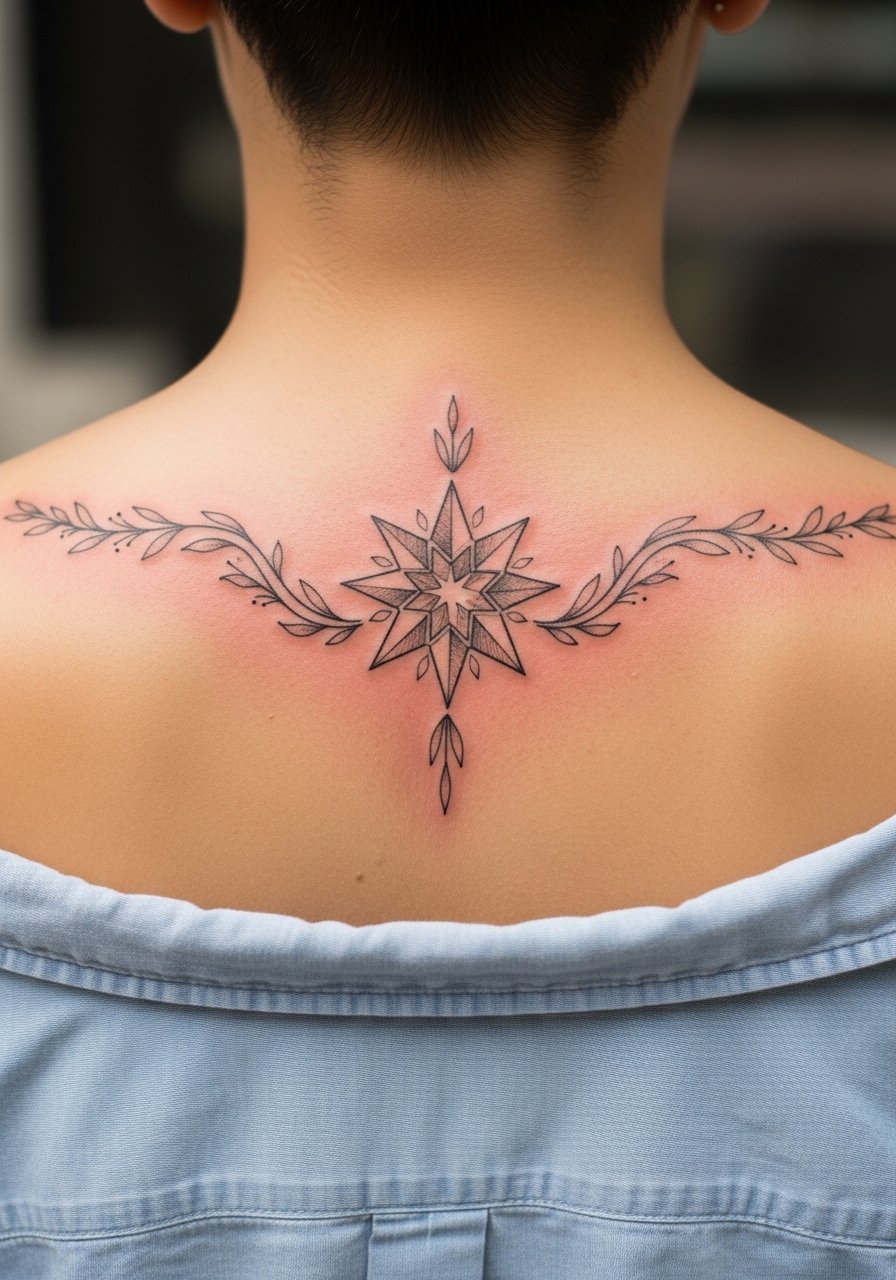
Upper back pieces lend vertical alignment that complements the spine and shoulder lines. For an ornamental frame, tell your artist to mirror the spine subtly without centering the entire weight on it so movement does not warp the pattern. Sessions require access that is easiest with a loose button-down you can shift aside. Expect moderate pain and multiple sittings if the detail is dense. Mistakes include over-detailing the vine veins in a way that creates busy, merge-prone areas as skin ages.
12. Traditional American Star with Banner on the Calf

Calf pieces take saturation well and read bold from down the street. The traditional approach uses heavy outlines and solid fills that age into crisp shapes. Tell your artist you want confident linework with solid saturation in a single sitting for the cleanest longevity. Sessions are typically moderate in length and pain falls in the mid-range. Avoid asking for overly tiny script inside a banner because those letters blur more than the star itself. Calf tattoos are great for people who want visible, long-lasting contrast.
13. Fine Line Shooting Star Trail on the Inner Arm

Inner arm pieces can be intimate and tell a story when placed along muscle lines. Have the artist show how the trail follows muscle curves and where flex points fall so the design avoids pinching in folds. Fine line sits well here when spaced for motion. Expect a one to two hour session and a mild pain score. For casual hours pair with a loose button-down shirt you can push to the elbow to show the trail without rolling sleeves permanently. A common mistake is compressing dots along the crease where touch-ups become common.
14. Dotwork Milky Way on the Nape

Nape work is subtle from the front and striking from behind. Dotwork allows for gradated density that reads like a whisper rather than a solid patch. The nape can be tender and sometimes needs touch-ups if hair or collars rub. Ask for healed photos on similar skin tones. Keep diameter modest to avoid migration into hairlines. Session time is brief and the recovery is straightforward if you avoid rough collars for the first week.
15. Micro-Realism Star Behind the Ankle

The posterior ankle has thin skin and shows detail well but is vulnerable to abrasion. For realism ask for a light touch and insist on minimal saturated black that could spread. Sessions are short but expect tenderness when walking the first few days. For footwear that frames the area, try nude low heel sandals that let the tiny highlight catch the eye. The common mistake is over-inking tiny highlights which then flatten once healed.
16. Asymmetric Star Cluster Along the Spine
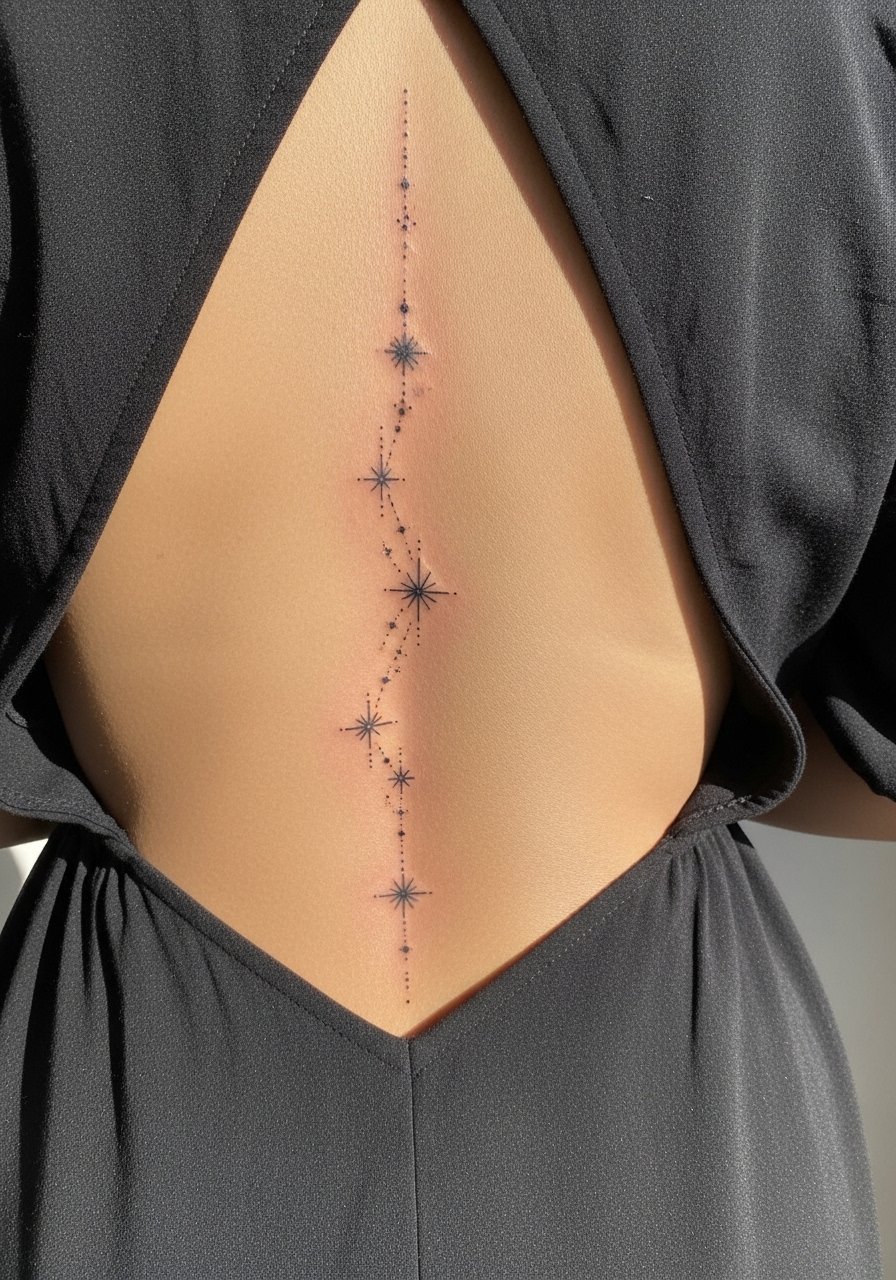
An asymmetric cluster down the spine reads organic and avoids forced symmetry. I like to suggest staggered spacing so the composition moves with posture and does not create a trail that collapses when you bend. Spine placements can be sensitive, and sessions may be split for comfort. For show-off looks pair the piece with an open back midi dress to reveal the line without overexposure. Ask the artist about spacing tied to your typical posture.
17. Tiny Accent Stars Around a Name on the Wrist
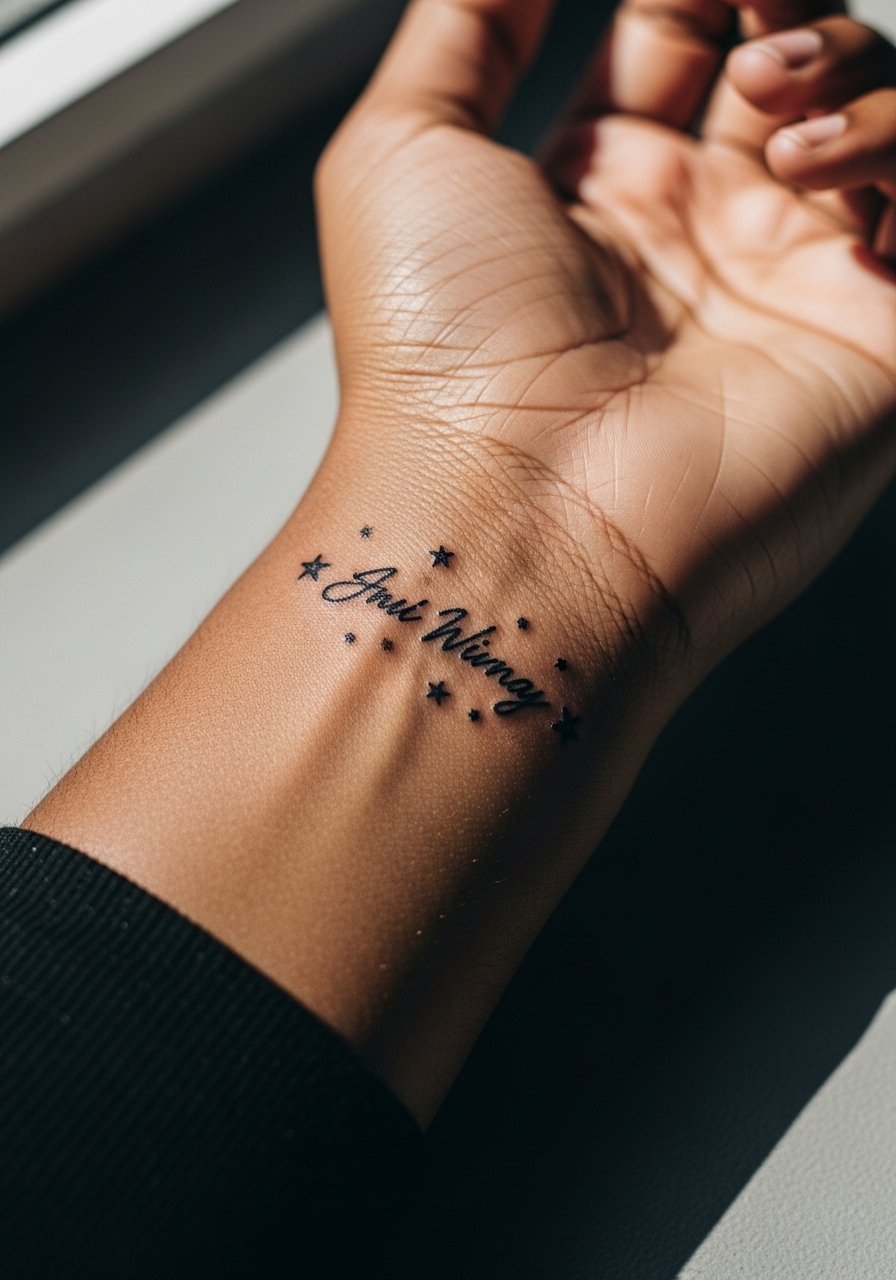
Adding stars to a name can frame text and bring lightness to a script mark. The mistake is placing stars too close to letters which causes the negative space to close up as ink spreads. Ask for at least a 2 to 3 millimeter buffer between stars and letters. The session is short and pain is manageable. This is a good first tattoo idea for someone who wants personalization without a large commitment. Consider how necklaces or bracelets will interact with the composition when choosing size.
18. Finger Cluster of Tiny Stars
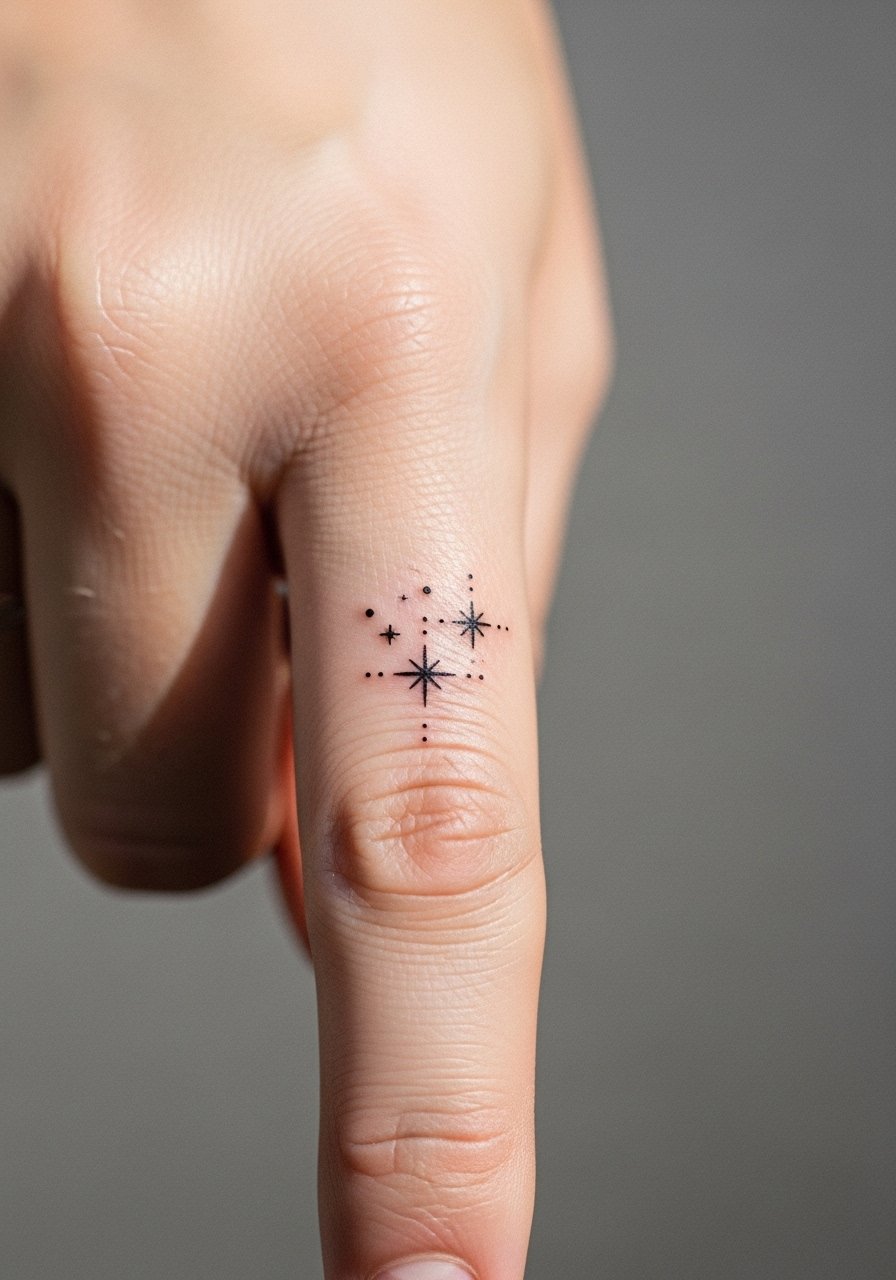
Fingers are high touch zones and fine line work can blur faster there than on other placements. Touch-ups are common for finger tattoos, so plan for that and expect faster fading from constant washing. Ask your artist for slightly bolder line weight than you might choose for wrist work so the motif stays legible. Sessions are fast and usually done in under an hour. The real trade-off is visibility and maintenance, not artistry.
19. Star Halo Framing on the Collarbone
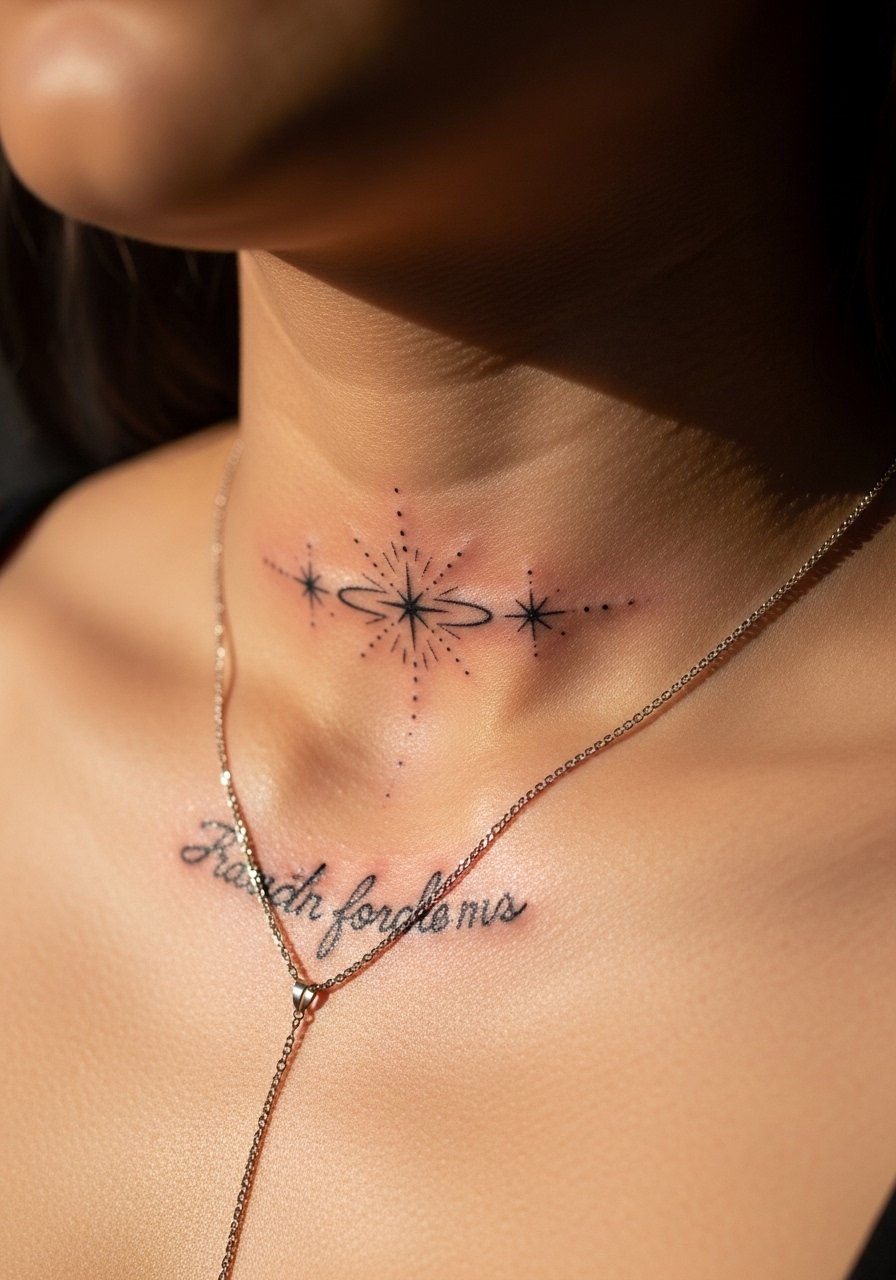
A halo of small stars above a collarbone script reads like jewelry when placed carefully. Ask your artist to scale the halo so it sits above natural necklace lines and to test how layered necklaces will interact. The collarbone sees frequent movement and sunlight so expect the design to soften slightly over years. For styling choose a thin layered necklace that drops below the script and does not compete with the stars. The session is usually a single visit and pain is mild.
20. Star Band Encircling the Wrist
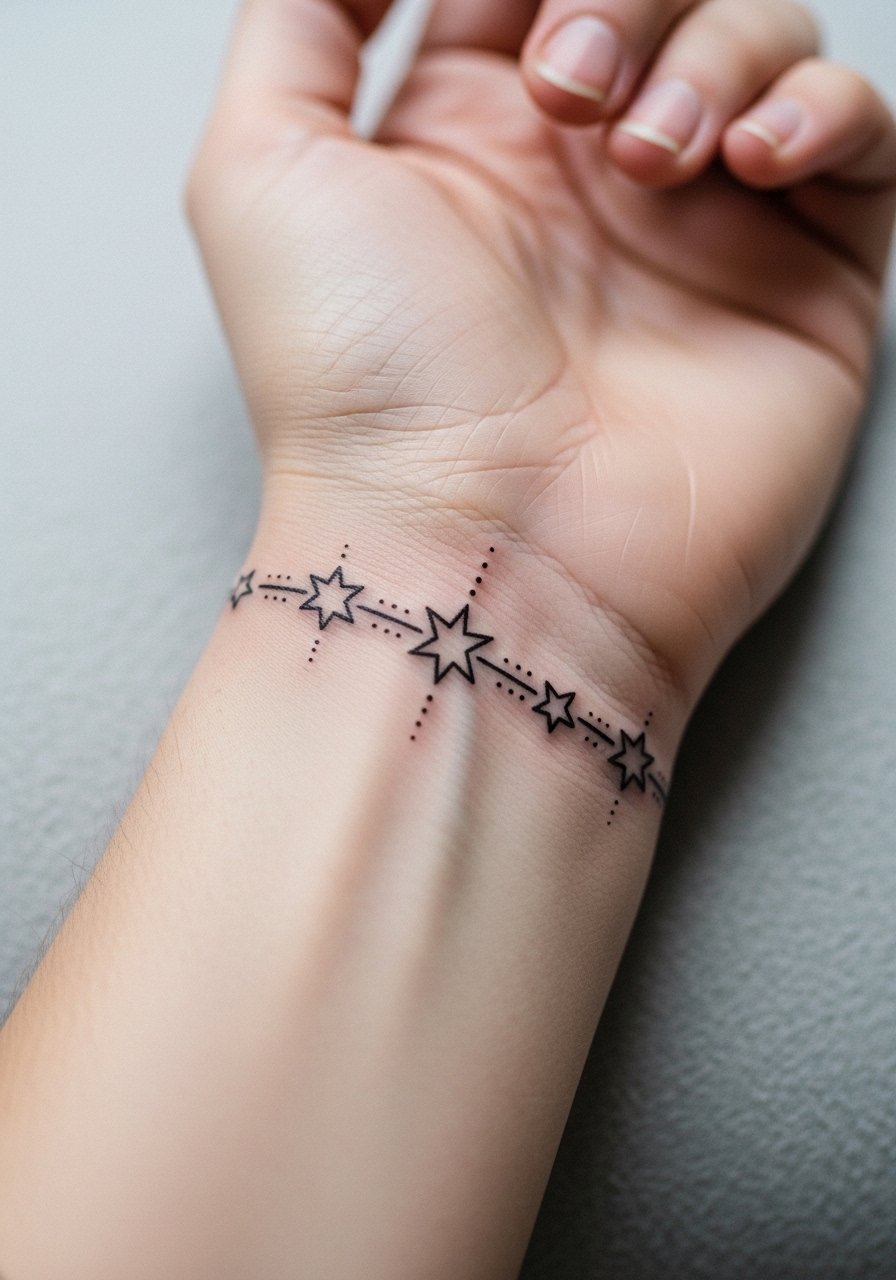
A repeating star band reads like a bracelet and is a subtle alternative to jewelry. The wrist is a friction zone so ask for slightly more spacing between motifs than you think you need. The session is short and pain is manageable. For a daily look pair it with a sheer blouse women with the cuff rolled to frame the band. Avoid asking for ultra-small connected stars that risk merging along the inner wrist over time.
21. Star and Moon Combo on the Shoulder Blade

The shoulder blade is forgiving for paired iconography and gives some distance for the eye to appreciate negative space. Ask for softened shading around the moon that will age into a soft gradient rather than patchy spots. Sessions are moderate and often finish in a single visit. For showing off the composition, wear a halter top solid color so the silhouette reads clean. Avoid over-detailing tiny stars next to larger motifs which disrupt balance.
22. Blackwork Geometric Star Panel on the Side Rib

Ribcage blackwork benefits from strong contrast and breathing room. Dense black areas should be balanced with clear negative space so blowout becomes less noticeable over time. Sessions are lengthy and usually split across visits. Artists differ on fine line on ribs, so if you want crisp geometry ask for healed photos of similar scale and skin type. Expect a higher pain level and a recovery period where twisting should be minimized.
23. Star Accent Sleeve on the Outer Forearm

Accent stars integrated into a sleeve add focal points without competing with stronger imagery. When the sleeve includes many elements ask the artist to reserve breathing space around star motifs so they remain distinct as nearby shading softens. Sleeve work can be done in segments across appointments. For session day wear a button-front shirt so the arm is easy to expose without shifting the rest of the piece. Avoid clustering stars into dense knots that age into texture.
24. Tiny Star Behind the Ear

A behind-the-ear star is a whisper of ink that is easy to hide with hair or reveal when you want. The area is tender and sometimes needs touch-ups near hairlines. Make sure the artist frames the mark below the hairline to avoid the impression of ink in the hair. Sessions are very short and the visual payoff is high. Consider career visibility and how often you'd like to show the spot before committing.
25. Geometric Star over the Kneecap

Knee-adjacent work flexes with walking and bending so spacing is critical. Large geometry that sits above the kneecap can hold up better than tiny repetitive lines that cross the joint. Plan for a design that gives the joint breathing room. The session may be uncomfortable when the artist works near bone plateaus, and touch-ups are not uncommon. The practical upside is seasonal visibility; shorts reveal the design without daily friction from clothing.
26. Sternum Shooting Star Tail

Sternum pieces can be visually striking and intimate. The area may require a multi-part session and can be sensitive for many people. Ask your artist for shallow spacing across the central line so the ink does not blur into a single streak as skin moves. Session wear of a fitted sports bra helps access and keeps you modest during needle work. Expect higher pain and a recovery that avoids tight undergarments for several days.
27. Constellation Curve Along the Upper Collarbone
A curved constellation along the collarbone feels like a natural extension of neckline jewelry when scaled for the bone. Tell your artist to map the curve while you stand and sit so the line does not end up where clothing seams rub it. The session is usually under two hours and the pain is mild. For an evening look wear a strapless tank top that frames the piece without straps cutting across it. The common error is choosing too small a scale which loses the pathway effect.
Frequently Asked Questions
Q: Will fine line stars blur faster on wrists and fingers than on forearms and thighs?
A: From what I have seen, yes. Wrists and fingers take more abrasion and washing which accelerates softening. Forearms and thighs have thicker skin and less constant friction, so fine lines there tend to hold longer. Plan for touch-ups on wrists and fingers at year two to three if you want absolute precision.
Q: Do watercolor galactic pieces need different care than blackwork stars?
A: Watercolor work benefits from sun avoidance because pigments fade unevenly in bright colors. Blackwork holds contrast better under the same conditions. Treat both with sunscreen once healed and expect occasional color refreshes for watercolor pieces in the long term. For early sessions avoid tight clothing on the area so washes settle evenly.
Q: Why do geometric mandalas on ribs sometimes look fuzzy after a few years?
A: The rib skin stretches and thins in places, and dense lines packed too closely can merge over time. One camp says avoid fine line on ribs, and the other camp says proper spacing and depth make it work. Ask the artist to space the geometry and show healed photos of similar rib work on real clients.
Q: How should I dress to my appointment for a shoulder or collarbone session?
A: Bring a loose button-down or a strapless/low-strap top depending on the exact placement so the artist can access the area without tugging. For shoulder pieces a loose button-down shirt or a shrug works well. Comfort and easy removal win over style for session day.
Q: Are there star designs that hide movement or aging better than others?
A: Bold blackwork and slightly larger motifs hide movement better than ultra-fine single-needle stars. Dotwork that uses density rather than thin lines can also age gracefully. If longevity matters, favor spacing and modest scale over ultra-fine detail on high-motion zones.
Q: How soon will I need a touch-up for micro-realism stars on ankles?
A: Expect the possibility of a touch-up within two to four years because ankle areas rub and take impact. Proper initial spacing and moderate saturation help delay that. If you want very long-term minimal maintenance pick a slightly larger scale or a placement with less friction.
