
Fine line wolf tattoos are everywhere on feeds right now, and the gap between what trends and what lasts shows up fast. The look is delicate and striking at first, but placement, spacing, and needle strategy decide whether it still reads at year three. Read on for practical picks that feel fierce now and keep believable lines later, plus what to ask your artist at consult.
1. Fine Line Wolf Head Outline on Outer Forearm
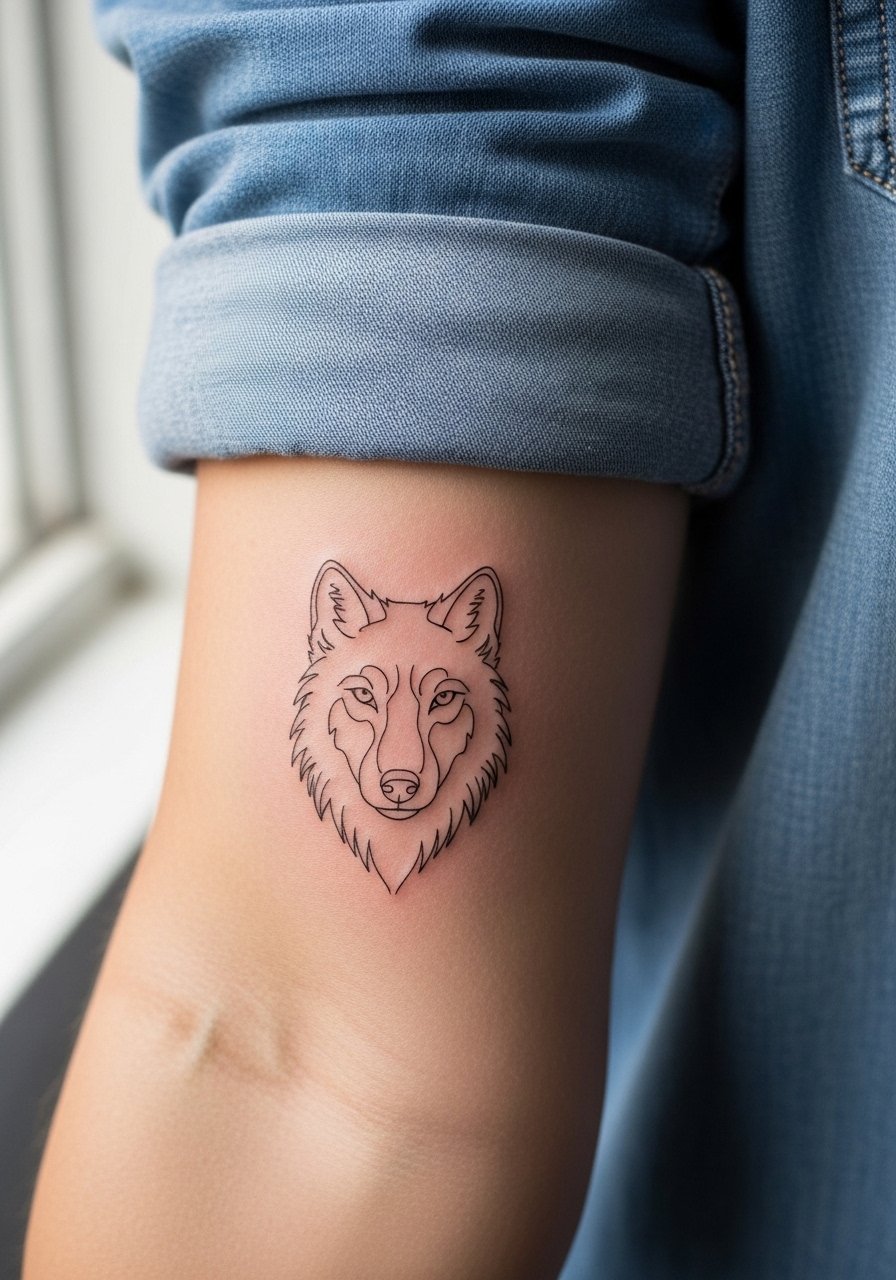
I've seen this one work best when the artist spaces fur lines slightly wider than a pure micro design. Tell your artist you want the snout and eye defined with slightly heavier linework so the face remains readable at year two. Common mistake is shrinking it to wallet-card size, and then the eye detail merges into a dot after healing. For the session plan on about 45 minutes of lining and brief shading, with mild forearm discomfort that most people rate a 3 or 4. Pair it for evenings with a rolled cuff chambray shirt to frame the arm when you want it seen.
2. Single-Needle Wolf Silhouette on Inner Bicep
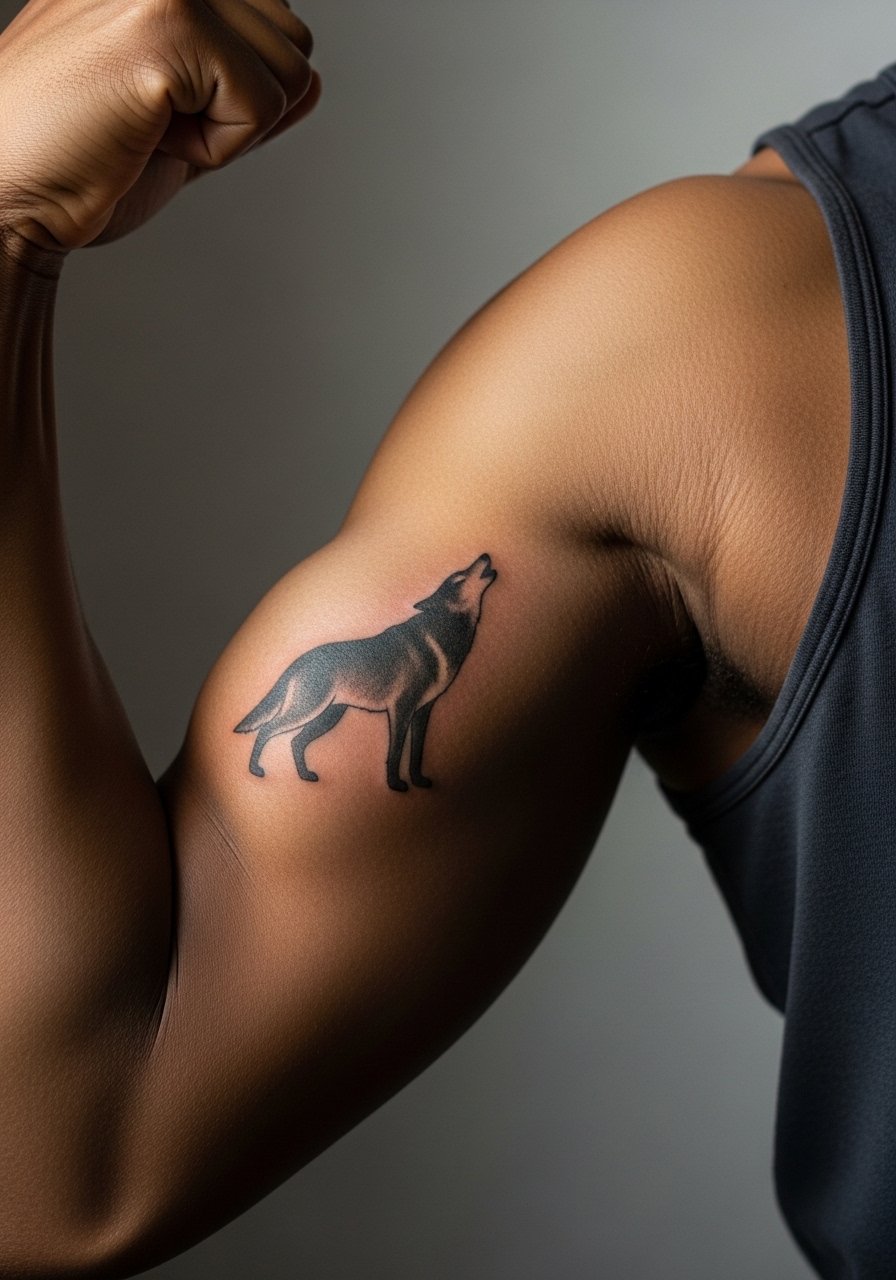
Inner bicep skin takes ink differently, and I recommend a slightly bolder silhouette than photo-only vectors. In consult, ask the artist to preview the stencil with consistent spacing and to avoid hairline details that blur with arm movement. Expect a 1 to 2 session plan and a higher pain rating than outer arm because of sensitivity. Blowout risk rises if the needle rides too deep, so discuss touch-up timelines openly. For session wear, a tank top keeps the area accessible and avoids fabric rubbing afterward.
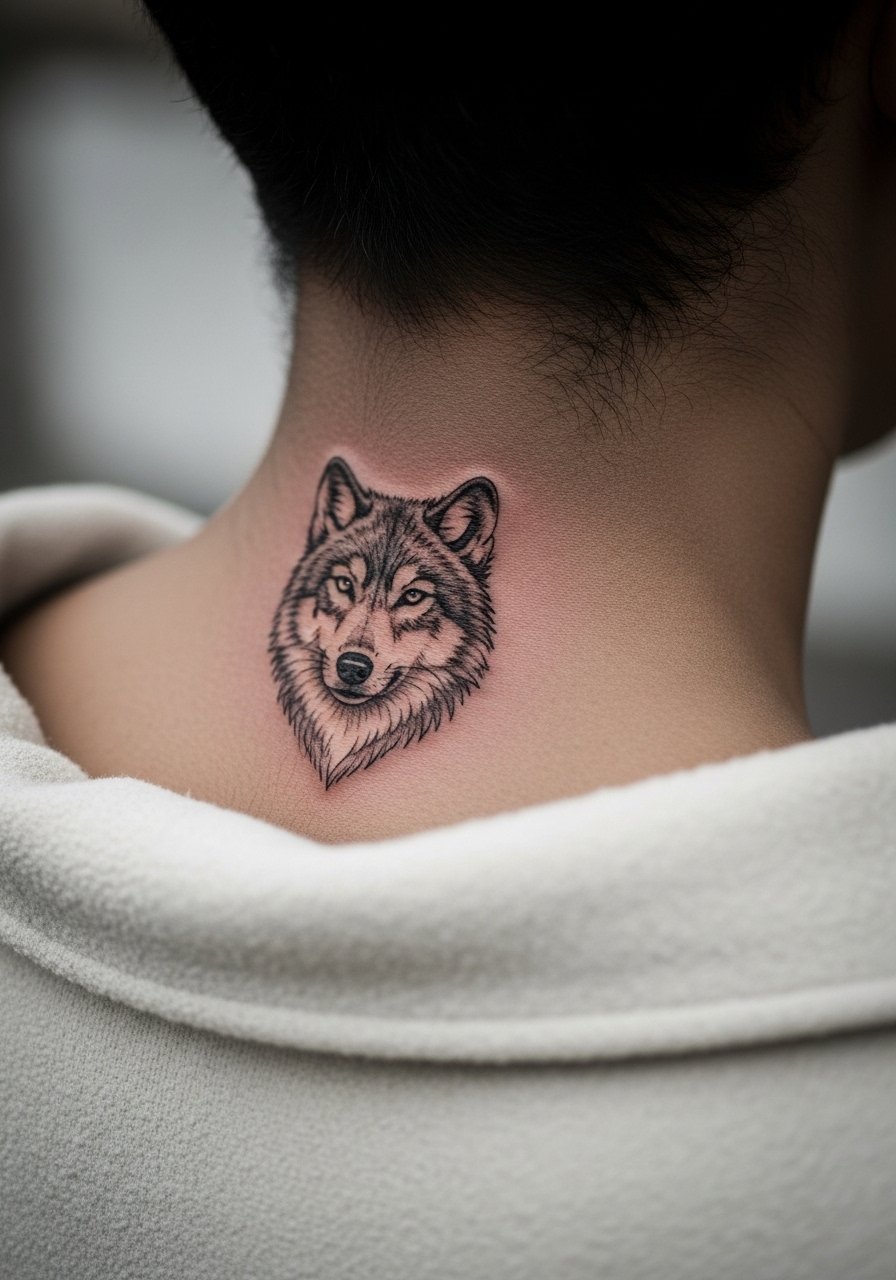
3. Howling Fine Line Profile on the Collarbone
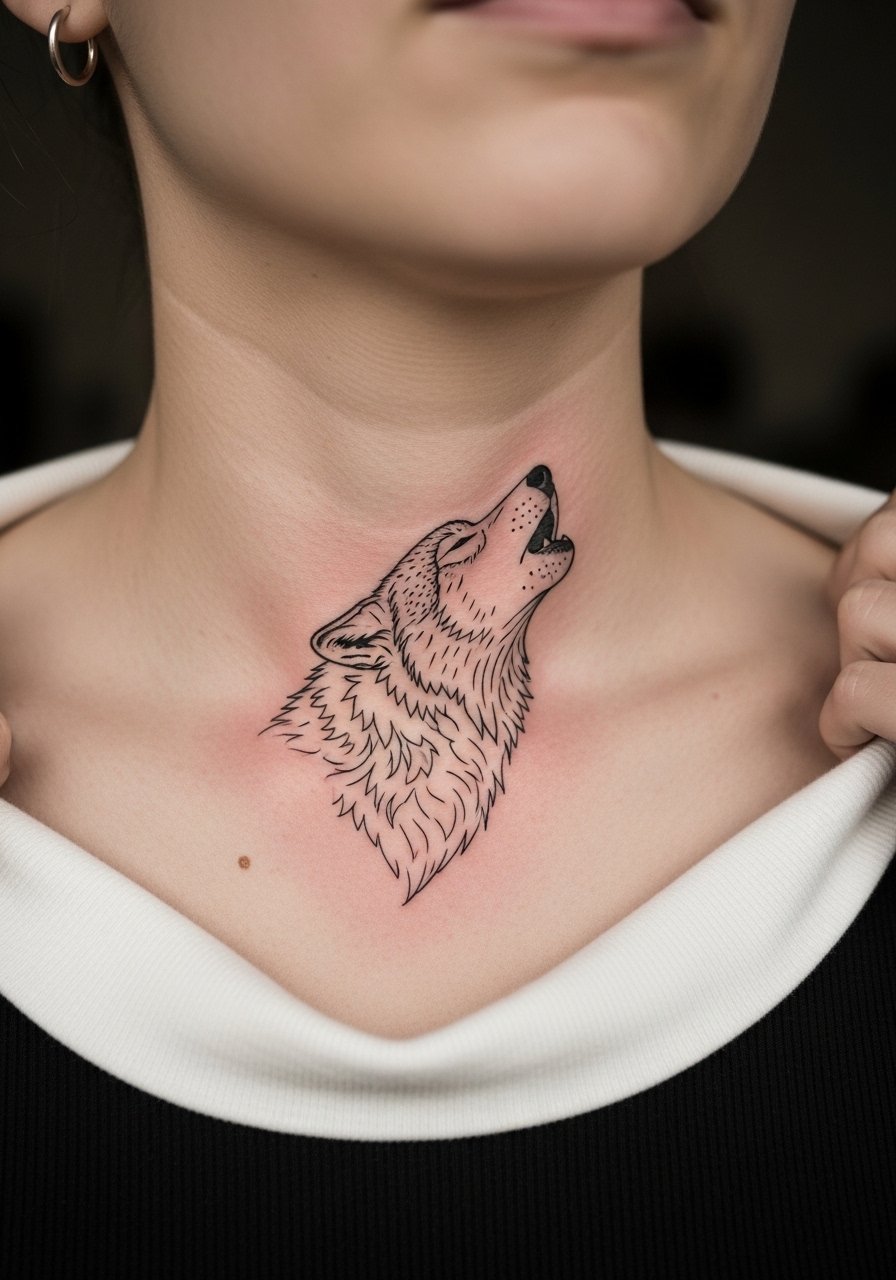
Collarbone pieces look cinematic but the area moves with breathing. Tell your artist you want gentle spacing between fur marks and soft fades rather than dense clusters. The common mistake is crowding the throat-side edge which later blurs into a shaded patch. Expect a single session around an hour and a 5 out of 10 pain nod for many people. For showing it off, pair the piece with an off shoulder sweater that drops just enough to reveal the line without competing with necklaces.
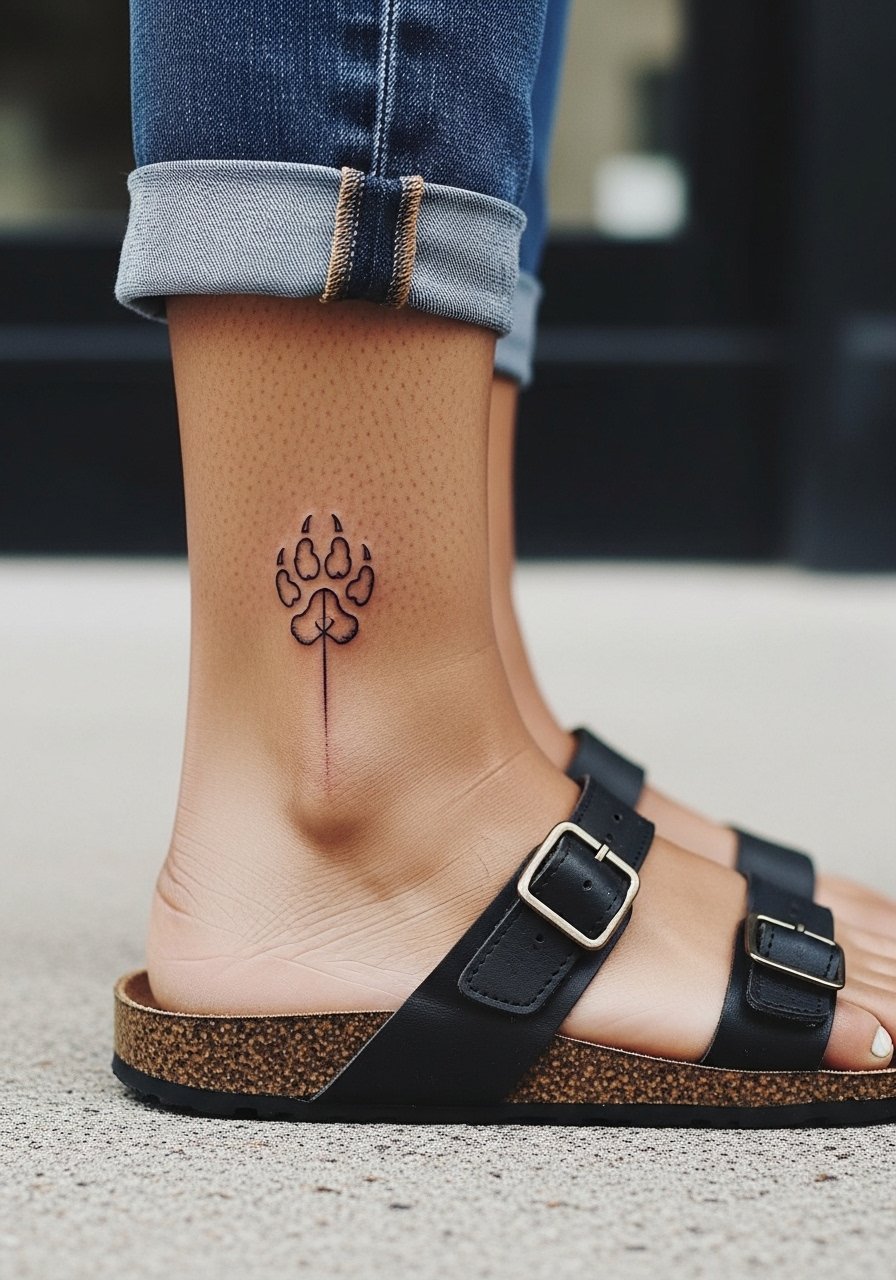
4. Tiny Wolf Paw Print at the Ankle
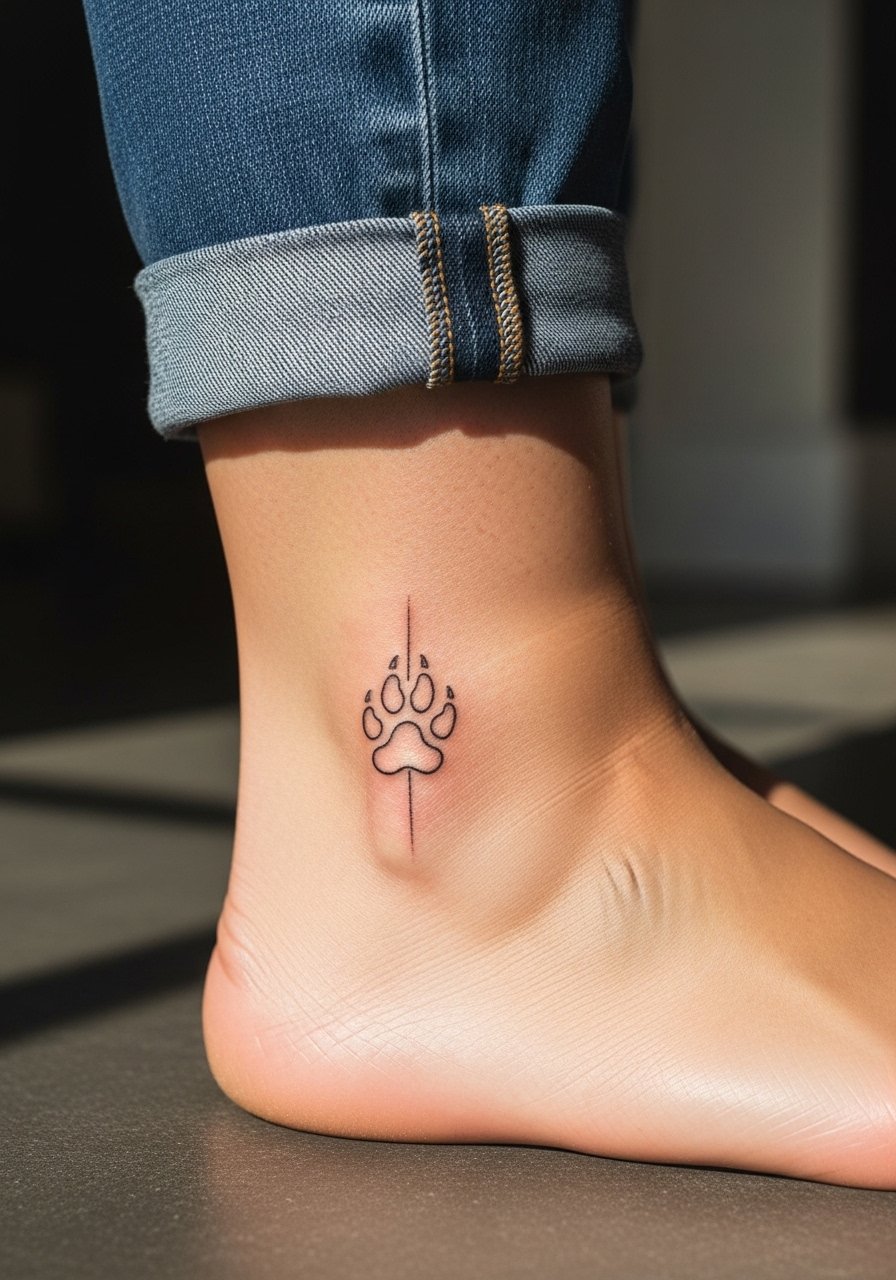
Ankle tattoos face friction from shoes and socks, so the trick is to keep the paw simple and slightly larger than you think. A common mistake is tiny dots that soften with walking and washing. Ask for solid single-needle outlines with one small negative-space pad to keep the print readable at six months. Session time is short, maybe 20 to 40 minutes, but the spot scores higher on pain than the forearm. When you want to show it, cuffed straight-leg jeans and a gold ankle chain highlight the area without covering the ink.
5. Geometric Fine Line Wolf Face on the Shoulder
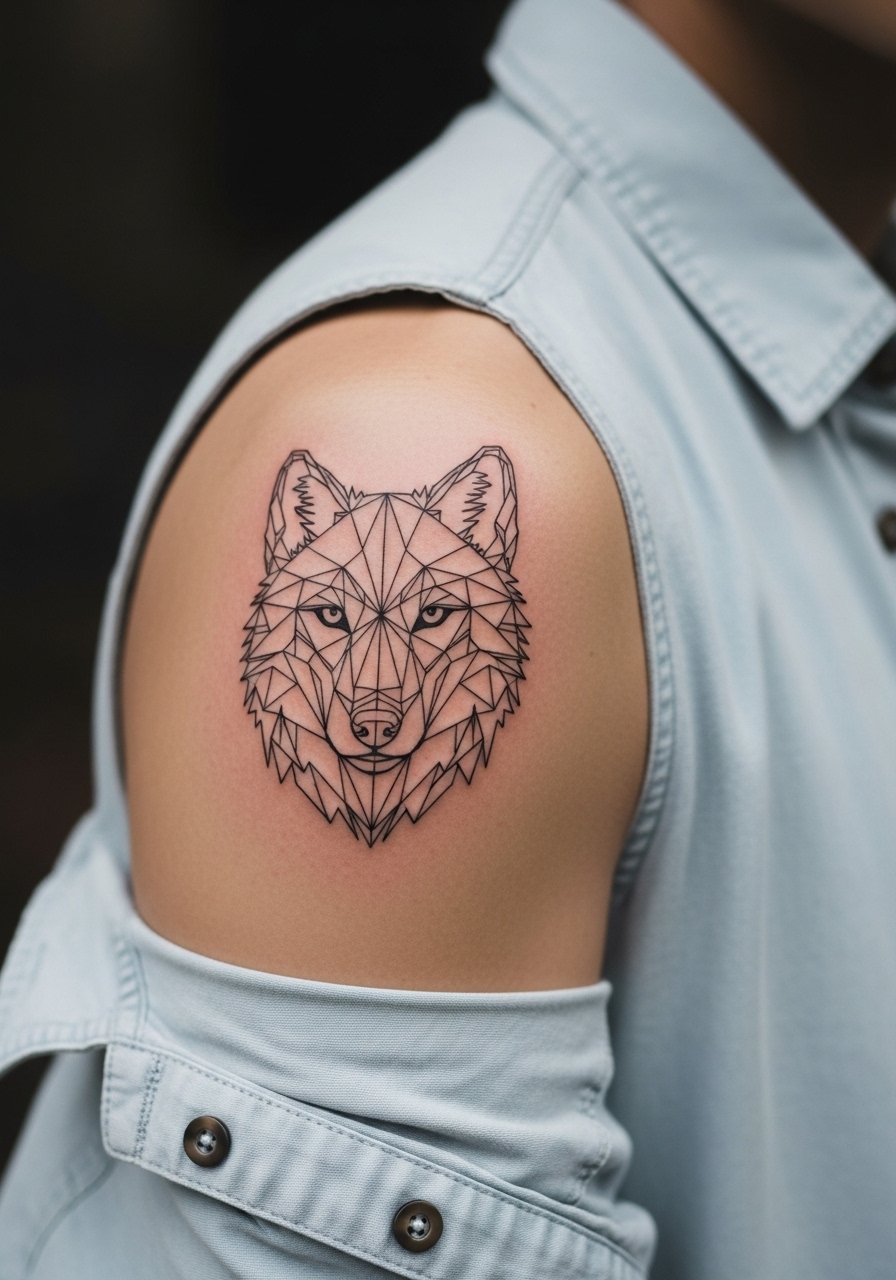
Shoulder placement gives breathing room for geometry to stay crisp, so I recommend a 3×3 inch layout. Tell the artist you want open intersections rather than a lattice of tiny triangles. The frequent error is packing too many shapes into a small square, which leads to merged lines later. Expect one to two sessions and low to moderate pain. For warm-weather show-off, a sleeveless button-up shirt keeps the shape visible and balances the bold geometry.
6. Wolf with Starry Fine Line Background on Upper Arm
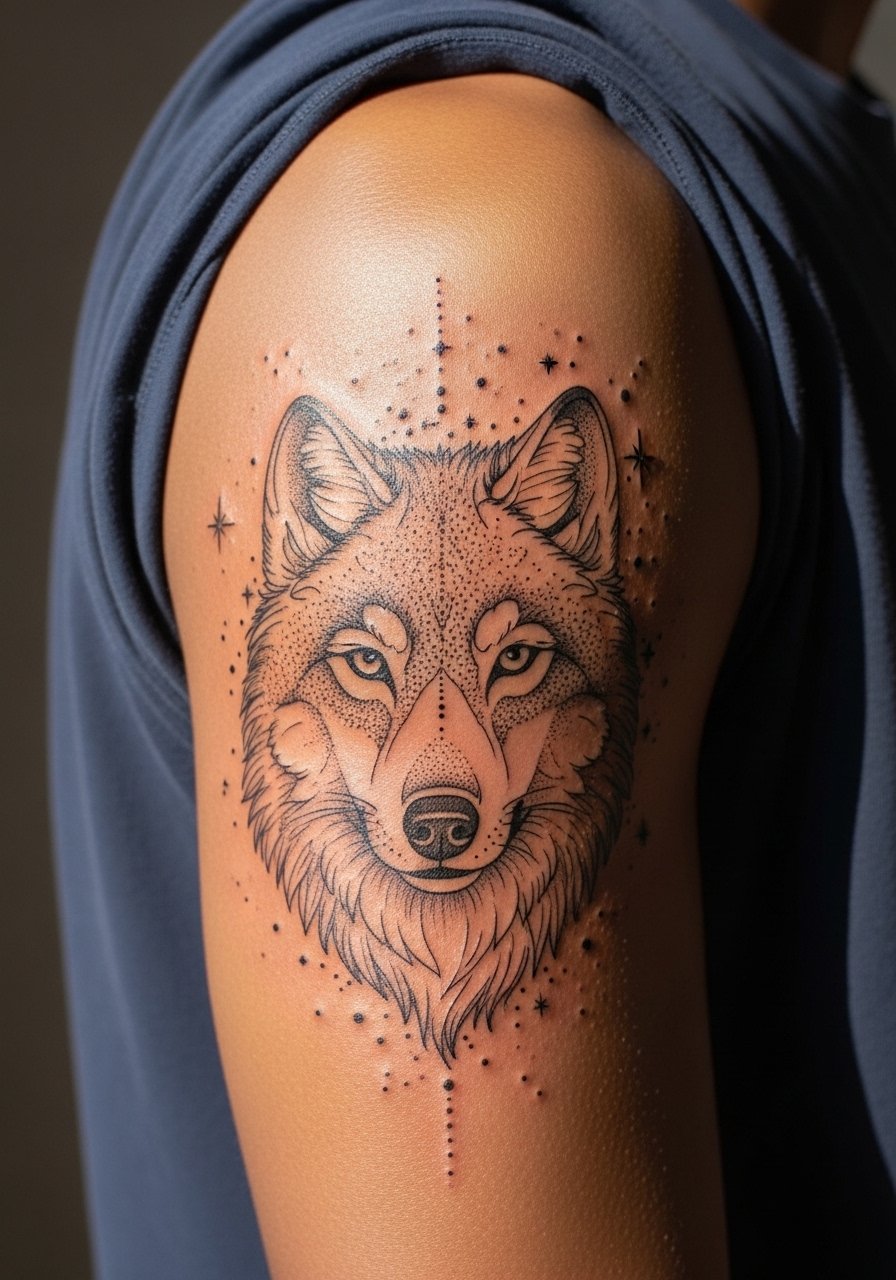
This ornamental pairing uses dot work and tiny stars to place the wolf in negative space. Tell your artist you want stipple shading behind the jaw and clean linework on the snout so the face stays primary. A mistake I see is placing dots too densely near lines, which creates a muddled edge after healing. Sessions typically run 90 minutes split into linework then dot shading. For a night out, pair with a fitted tank and a thin leather wrap bracelet on the opposite arm for balance.
Pack Smart
Those first six picks lean on visible arm and shoulder placements, so a few small items make studio day and the first week easier.
- Transparent PNG wolf stencil pack. Lets you print exactly to scale and test placement on skin before committing to the chair.
- iPad stylus for detail edits. Useful if you plan to tweak the stencil in Procreate before the appointment so the fur spacing matches your body.
- Gaussian blur brush pack for Procreate. Softens non-focus areas in your digital mockup so the face reads stronger when tattooed.
- Procreate app for design prep. The app handles transparent backgrounds and precise scaling which most artists appreciate when clients arrive with cleaned-up files.
- Healing ointment search. A thin, fragrance-free ointment for the first 48 hours helps keep fine line channels from drying into flaky scabs that pull ink.
7. Running Fine Line Wolf Side Profile on Outer Forearm
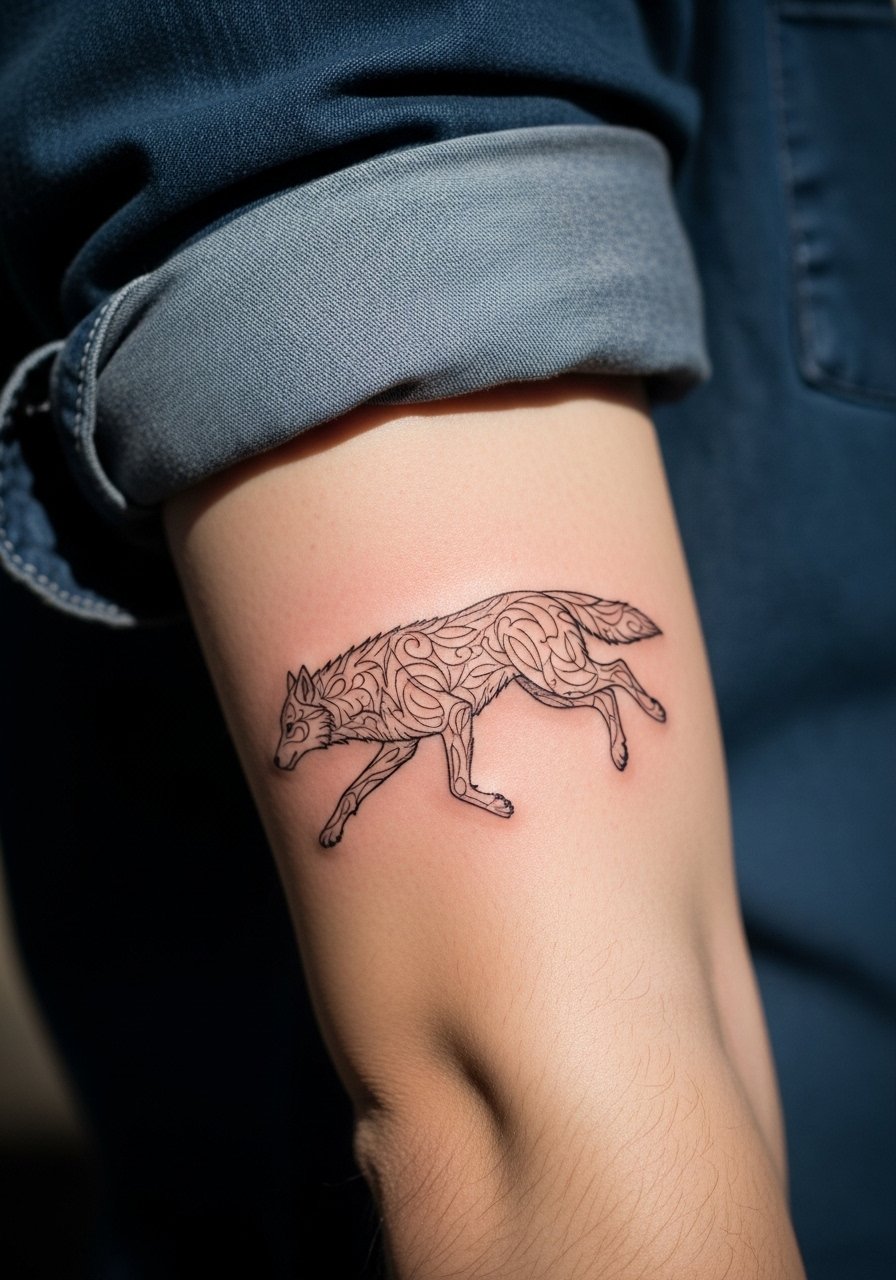
For motion and speed, elongated composition helps the profile read at a glance. Ask your artist to emphasize the leg and muzzle lines with slightly varied weights so the motion reads without dense shading. A common mistake is compressing the run into too small a band which causes overlapping feathering after a year. Expect about an hour of work and a 3 out of 10 pain level. For session comfort, wear a loose short sleeve tee. To show it off, roll the cuff or opt for a sleeveless muscle tank on sunny days.
8. Tiny Wolf Eyes Behind the Ear
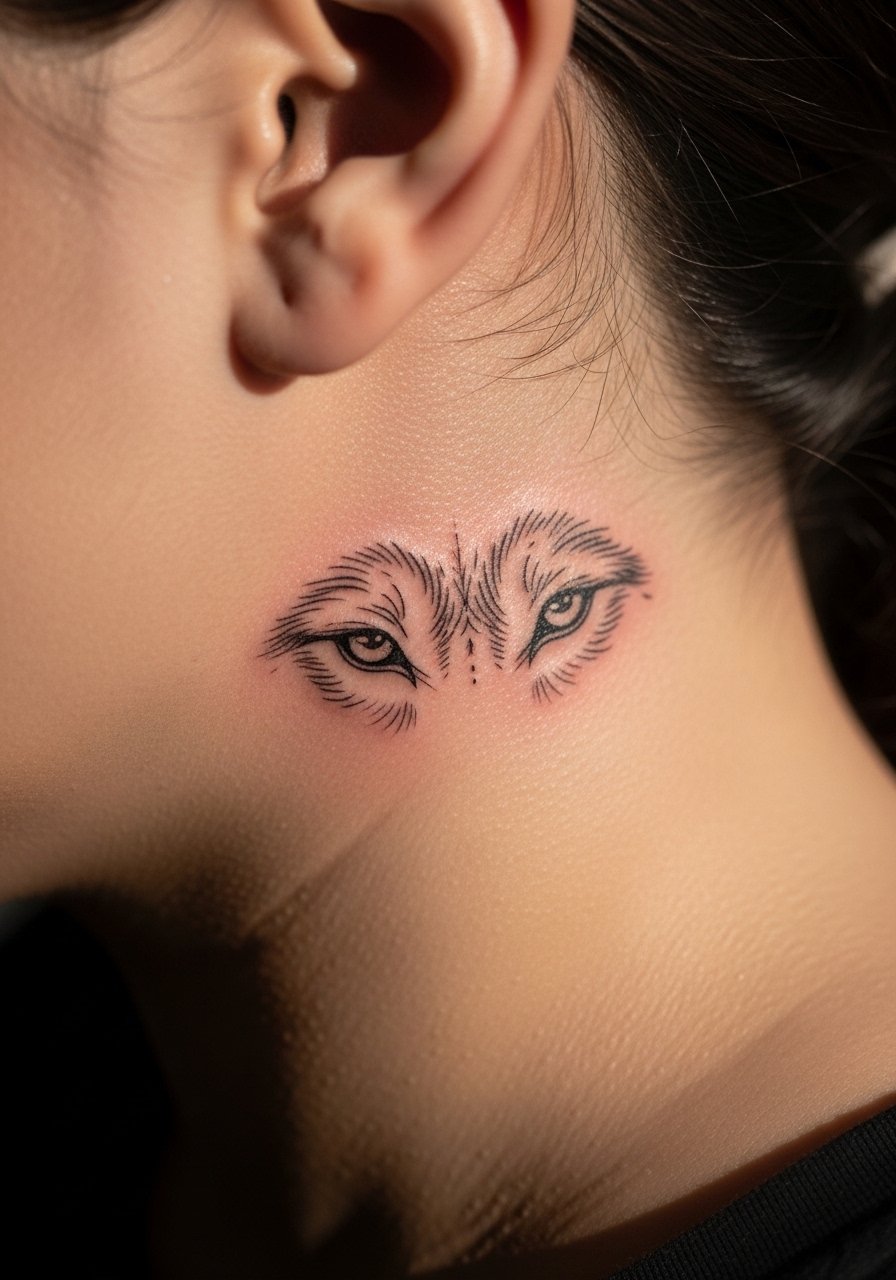
Behind-the-ear micro pieces are discreet and intimate, and the skin there tends to be thin. Tell the artist you want a focused gaze with minimal surrounding marks so the eyes do the work. A mistake people make is asking for extra detail that the area cannot hold, which fades into an unreadable smudge. Session time is short but the spot can be unpredictable for healing. For this placement, keep hair back during the session and avoid tight collars afterward. A simple thin silver ring can mirror the delicate scale of the tattoo when you show it.
9. Wolf and Moon Duo on the Ribcage
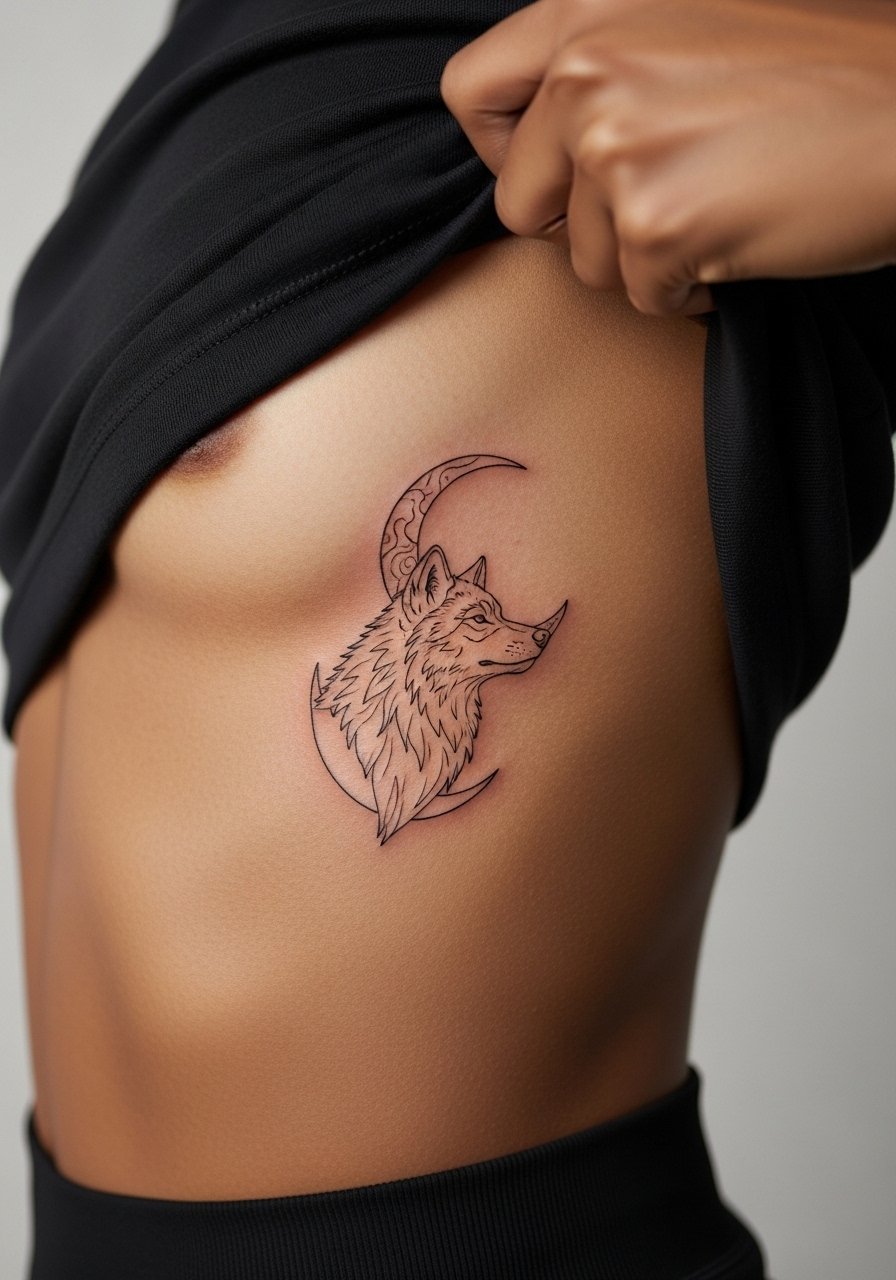
Ribcage pieces split artists into two camps. One group argues the skin stretch and movement there blur fine single-needle details within a couple of years. The other says with careful spacing and slightly stronger line weight the design settles fine. Tell your artist you want safe spacing around the moon and intentional gaps in fur detail. Expect a higher pain rating and a two-session plan if you include gray shading. For session wear, bring a strapless or cropped top so the artist can access the area without fabric drag.
10. Abstract Wolf Skull on the Calf
Calf pieces age predictably because the area sees little friction, so abstract fractured lines hold well. Ask for thin breaks in the contour to keep the skull feeling intentional rather than damaged. Common mistake is making the cracks too close together which invites merging. Sessions usually run about 45 to 75 minutes and pain is moderate. Cuff shorts or a midi skirt with a cuffed straight leg jean silhouette to show off the vertical composition.
11. Fine Line Wolf Pack Silhouette on the Thigh
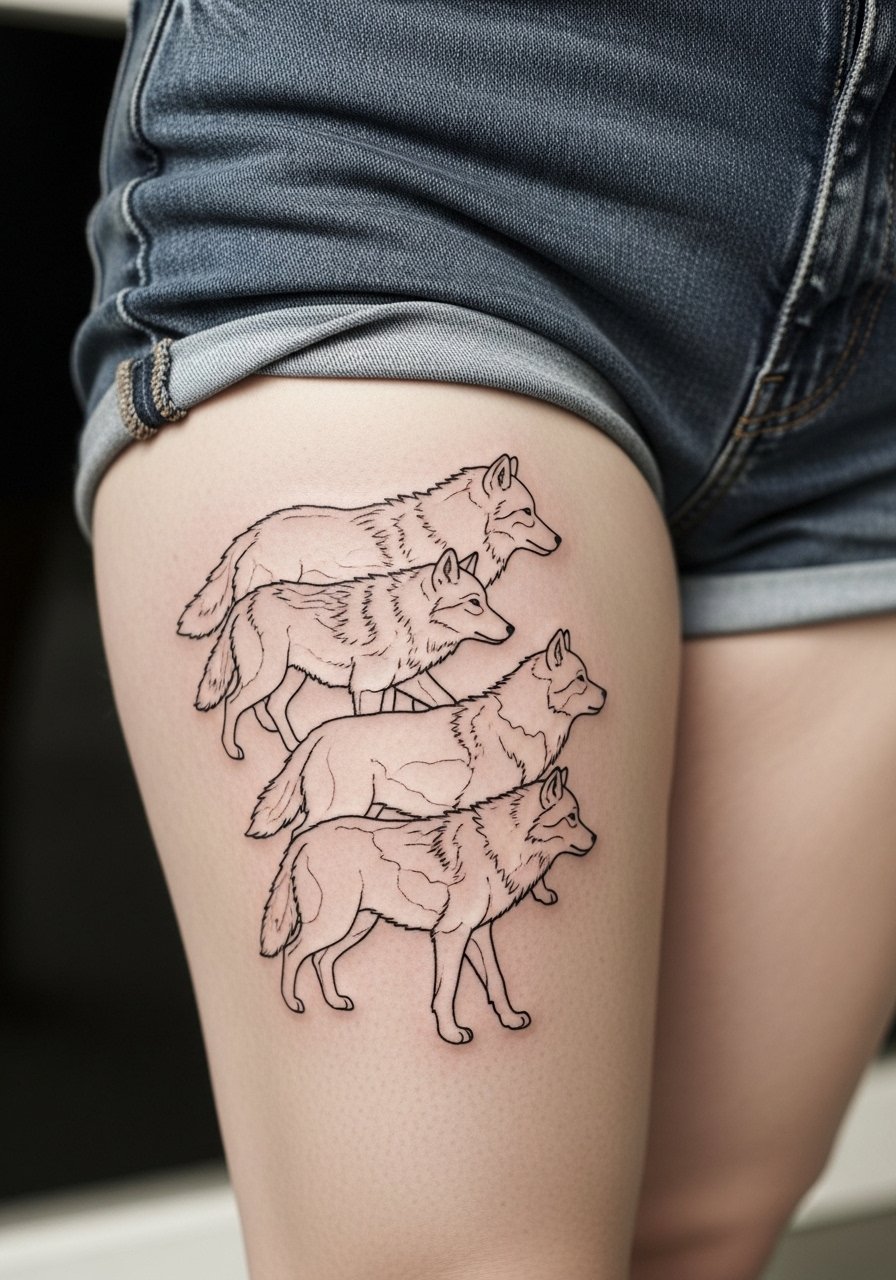
Thigh work gives room for multi-figure composition and tends to heal with less blowout than joints. In consult, specify which figures should appear closer to the viewer using thicker outer contour lines. A mistake I see is crowding the pack horizontally which makes individual wolves vanish at two-year marks. Sessions can be longer and may need two sittings. For showing it off, pair with high-waisted shorts or an A-line skirt and a high waisted linen short.
12. Single Line Continuous Wolf on the Wrist
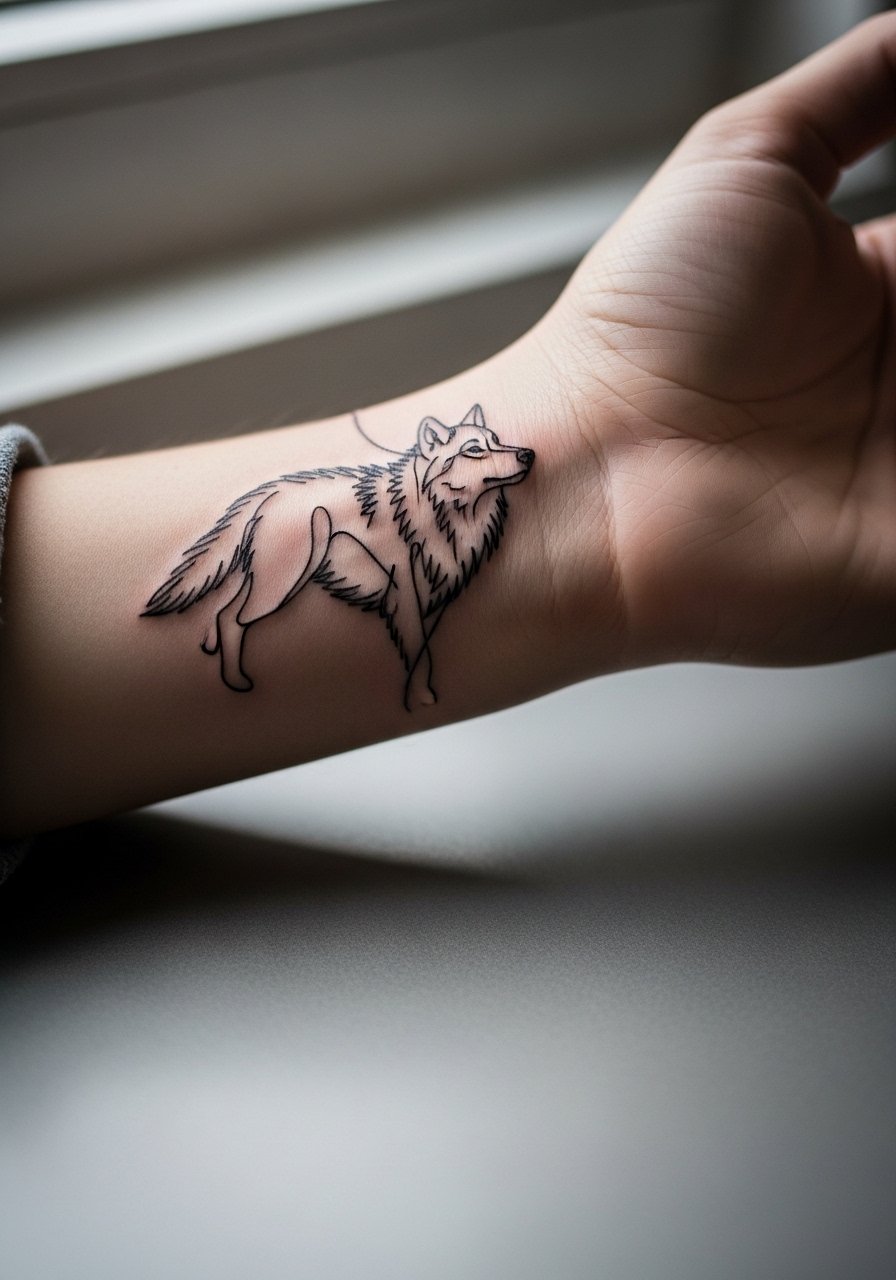
Wrist pieces face a lot of washing and friction, so a small continuous line can be elegant but fragile. Ask the artist to avoid ultra-thin single strokes where the line travels across tendons. The common error is placing the line too close to the wrist crease which accelerates fading. Expect a short session under 30 minutes and more frequent touch-ups. For session day, wear a short sleeve and no jewelry. When wearing it out, a minimalist gold watch or thin chain bracelet can frame the loop without crowding.
13. Micro-Realism Wolf Face on the Back of the Neck
Neck pieces are visible and require an artist used to micro-realism on thin skin. Ask to see healed photos on similar skin tones so you know how detail settles. The usual mistake is insisting on extreme tiny detail that simply does not last in that area. Expect a 4 to 6 pain rating and a single short session. Keep collars loose after the session to avoid rubbing. For visibility, a delicate chain necklace can rest just above without hiding the art.
14. Wolf Eyes as a Tiny Fingertip Tattoo
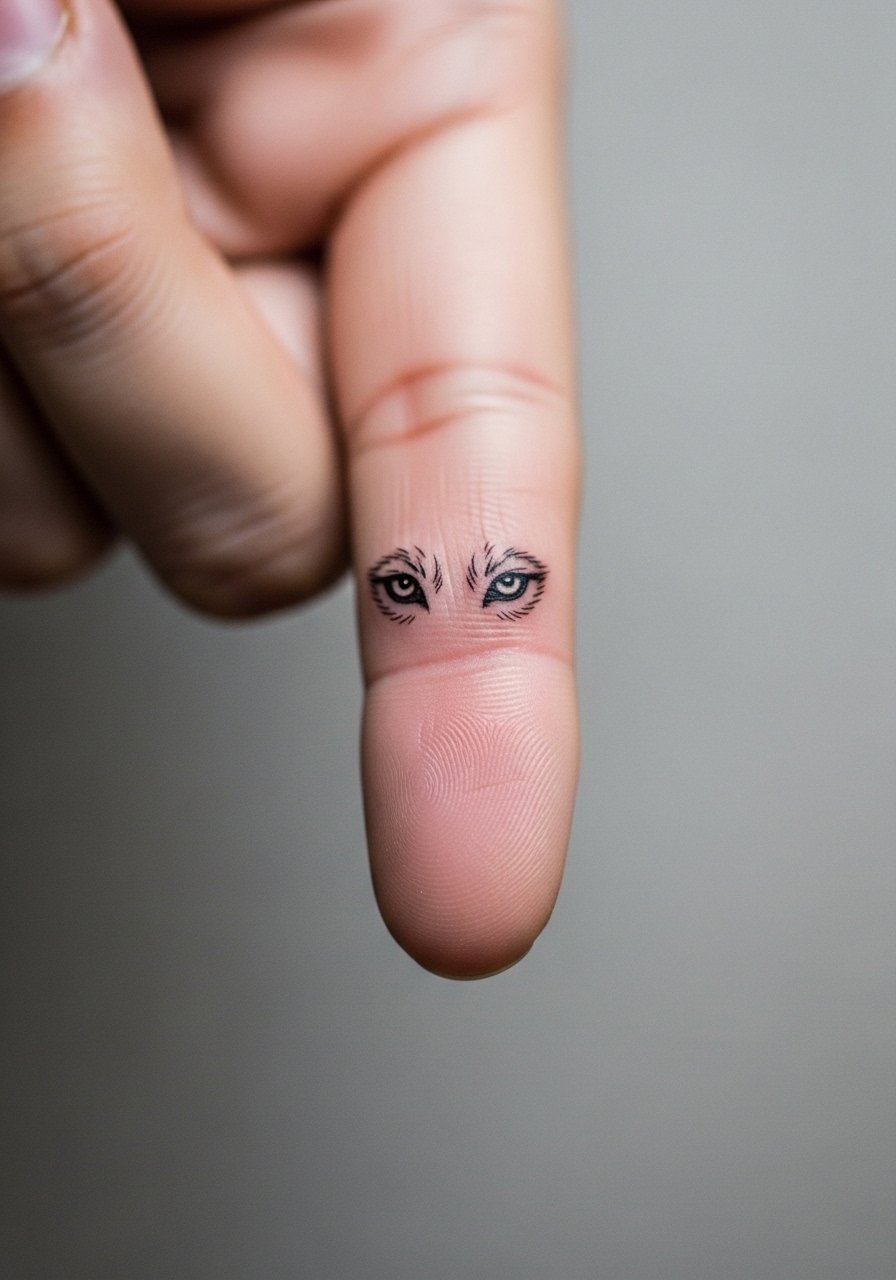
Finger tattoos live in high friction zones and often need touch-ups. If you want intense gaze micro work, plan for quarterly check-ins in year one. Tell your artist you accept probable fading and want the eyes simplified with bold contrast rather than micro hatching. A mistake is loading tiny cross-hatching into a fingertip which disappears into a blur. Sessions are fast but healing demands care with handwashing. Pair with rings that leave the tattoo area unobstructed, like a thin stacking ring set that complements without covering.
15. Wolf and Lunar Cycle on the Rib Side Panel
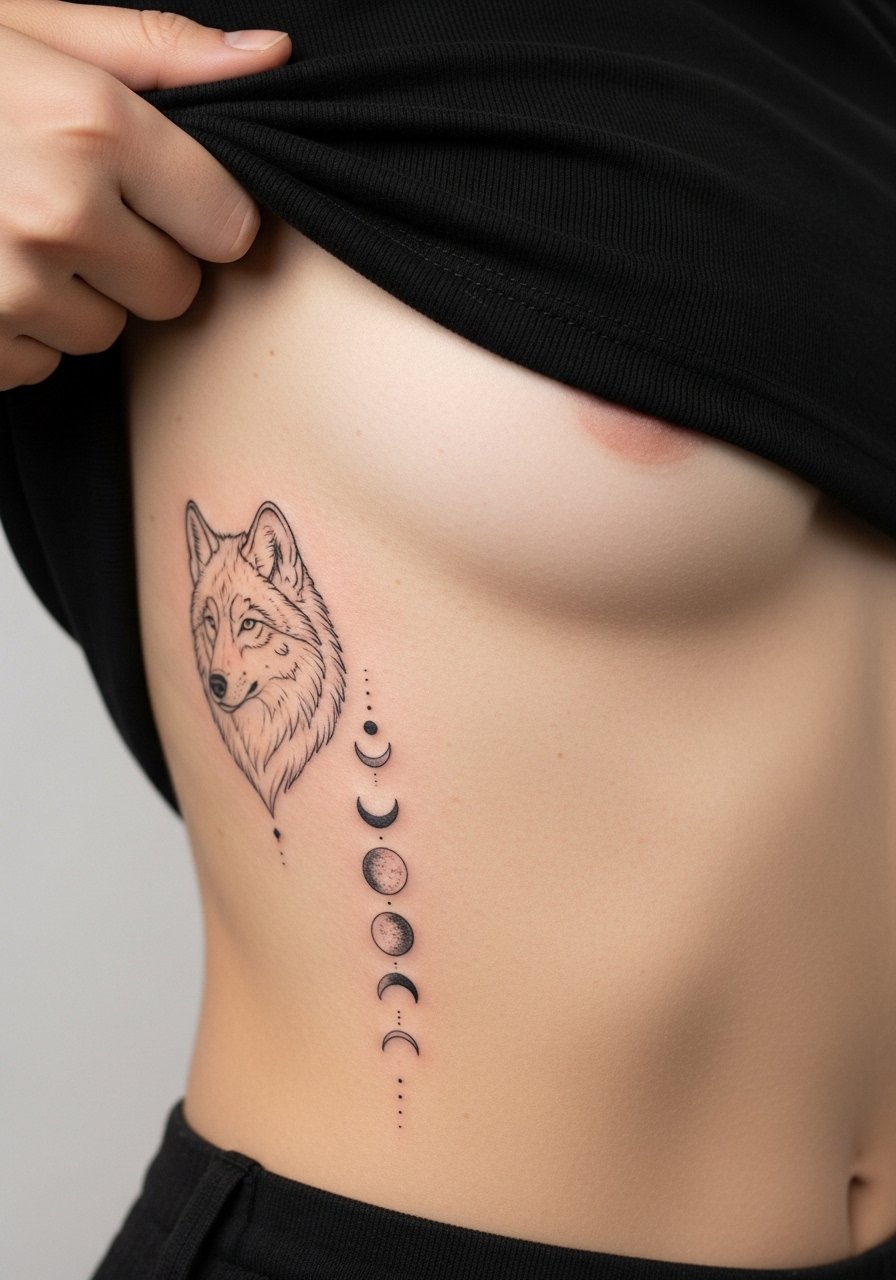
This illustrative rib piece combines small icons with a main wolf face. Because ribs are a debated spot for fine line longevity, name both camps when you book. One side says single-needle blurs there quickly. The other says the right spacing keeps the icons distinct. Ask for deliberate spacing around moons and a slightly heavier mouth line so expression holds. Plan for a two-session approach if you want gray washes.
16. Minimalist Wolf Paw with Negative Space on the Calf Ankle Junction
Placing simple negative space pads at the calf-ankle junction uses natural contours to keep the paw crisp. Ask the artist to map the paw over the bone and avoid thin pads near the ankle crease. A common error is putting pads too close to a sock line which accelerates scuffing. Session time is brief and healing is straightforward. Show it with sockless loafers or a pair of sandals for summer.
17. Stylized Geometric Wolf Head on the Upper Chest
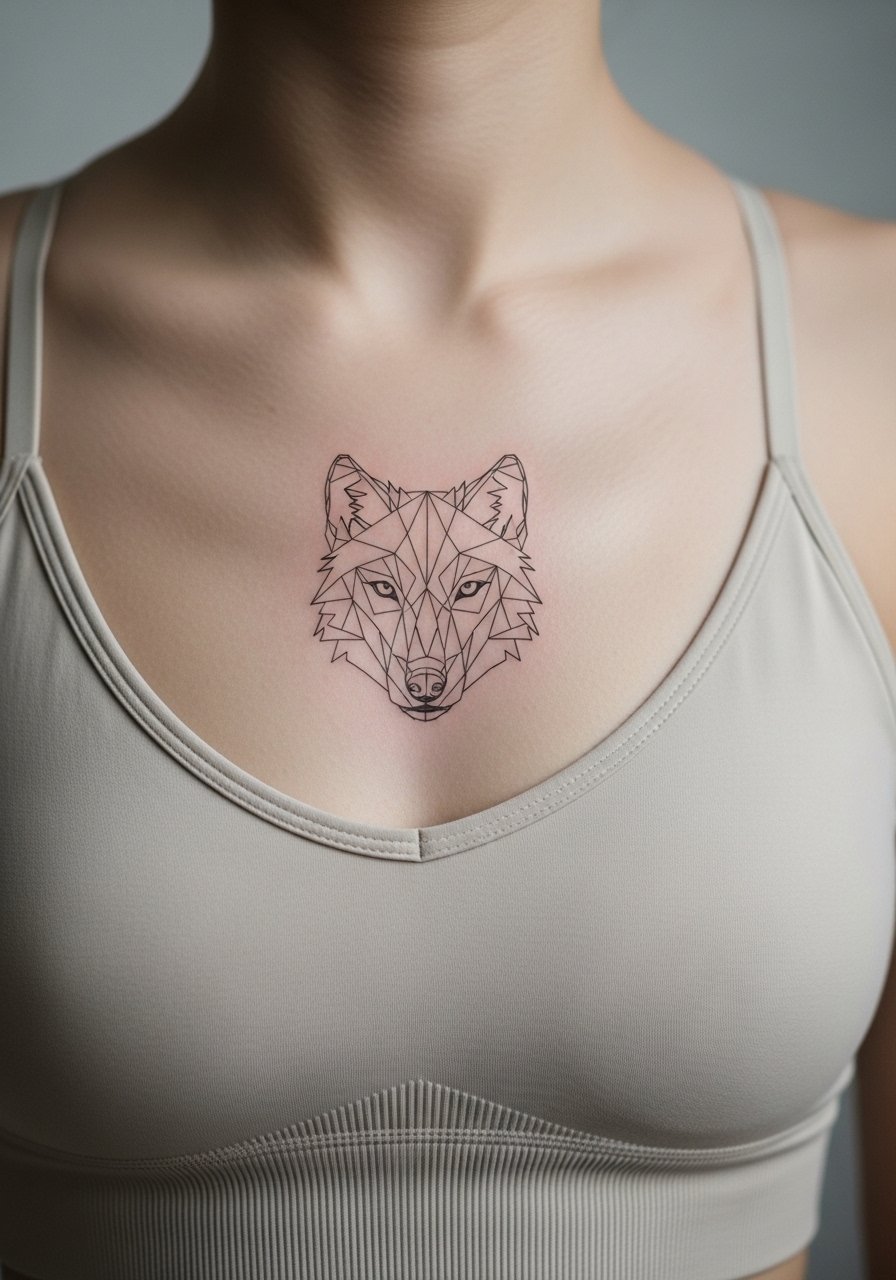
Upper chest allows a strong centered graphic that can read from a short distance. For safety with sensitive anatomy, wear a fitted sports bra to the session and ask the artist to stencil while you move slightly so placement hugs your sternum curve. A mistake is compressing geometry into a strict square which fights the chest contour and warps after healing. Expect moderate pain and a single longer session for clean alignment.
Frequently Asked Questions
Q: Do fine line wolf tattoos fade faster than bold styles, and what should I expect for touch-ups?
A: Fine line designs often require touch-ups more frequently than bold blackwork because the single-needle channels are shallower. From what I have seen, plan to revisit for a tidy touch-up around year two to three for wrist and finger placements, and maybe every three to five years for forearm or shoulder pieces depending on sun exposure and friction.
Q: Can fine line wolf designs work on darker skin tones, or do they need extra shading?
A: They can work, but you should seek an artist who shows healed photos on similar skin tones. Slightly increased saturation in focal areas and subtle stipple shading around eyes or jaws helps the face read better without turning heavy. Bring reference images edited on your phone so the artist can match contrast expectations.
Q: If I want a micro wolf behind the ear, what should I wear to the appointment and afterward?
A: Wear your hair up and in a loose ponytail or clip so the artist can stencil cleanly. After the session, avoid tight collars and sleep on the opposite side for the first few nights. A small silk hair tie helps keep hair from rubbing the area while it heals.
Q: Is Procreate editing worth learning before bringing a stencil to a studio?
A: Yes, learning basic Procreate moves like adding a dark background behind light fur or applying a slight Gaussian blur to non-focus areas makes your reference clearer for the artist. If you do edits, export a transparent PNG so the artist can resize without background artifacts.
Q: How do I choose between a single-needle wolf and a geometric blackwork wolf for my first fine line piece?
A: Think about lifestyle and placement. For high-friction zones like wrists or hands, geometric blackwork with slightly heavier linework ages more predictably. If you want subtlety and will accept touch-ups, single-needle micro-realism reads delicate on the inner bicep or shoulder where skin is more stable. Trust your consult to match scale to placement.
