
Sitting in the chair with the stencil over the elbow is where the stakes suddenly feel real. Pain spikes on the bone, the skin shifts when you flex, and small touch-ups usually follow up if the artist misjudged line depth. For men who want bold illustrative elbow work, that trio matters more than the reference photo. Read on for designs that respect the joint, advice to ask your artist, and wearable outfit ideas to show the ink off.
1. Koi Wrapping the Elbow Cap
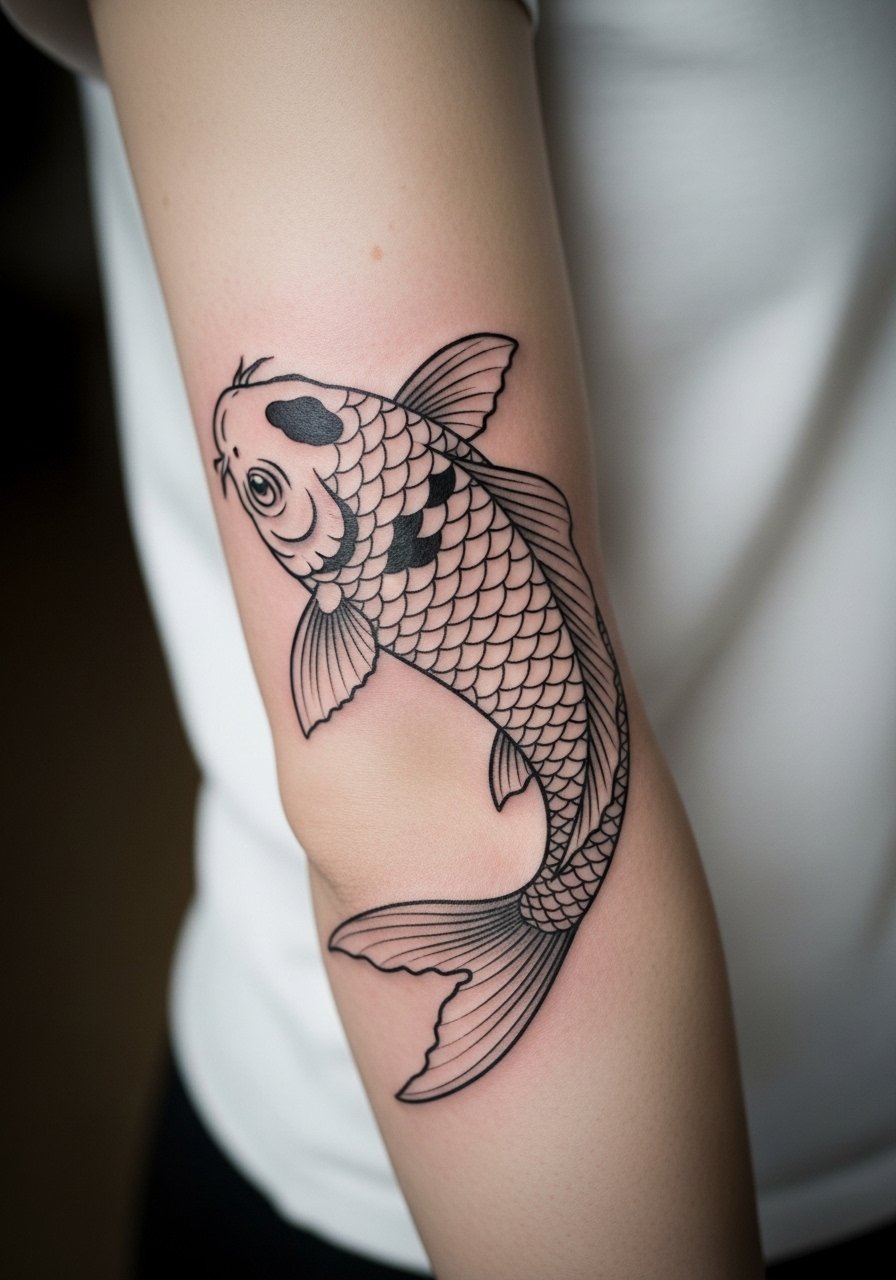
A flowing koi that wraps the elbow cap makes use of the joint curve instead of fighting it. I recommend asking for slightly thicker linework where the fish crosses the bone so the contour reads after movement. Expect a sharp look at six months and softening around year two if the lines sit too shallow. Common mistake, people ask for tiny scales and the detail blurs into texture. For the session wear a loose short-sleeve shirt so the artist can roll the sleeve out of the way without rubbing the fresh ink.
2. Comic-Style Elbow Portrait

I've seen comic-style portraits age well when the artist uses bolder contour lines around the elbow bone and reserves small facial details for the surrounding forearm. Pain spikes over the bone, so sessions are shorter and more focused. Tell your artist to simplify tiny facial lines and emphasize silhouette and contrast. Blowout risk is higher if the linework sits too deep in one spot. Pair this look with a rolled-up denim sleeve to show the portrait without covering it.
3. Botanical Elbow Band

A band of leaves makes a bold statement and keeps detail away from the bone center where blowout is most likely. The big advantage is spacing, which helps longevity. In consultation, ask for negative space between leaves and for stipple shading on the forearm panels rather than dense fills on the bone. This placement hurts more than flat forearm work, but sessions are short. For showing it off, a short-sleeve linen shirt frames the band without competing with color or linework.
4. Nautical Compass Across the Elbow

Most compass designs fail on the elbow when the central point lands exactly on the bone with too many thin directional lines. The better approach is to let the compass point stretch onto the forearm and upper arm, keeping the center simple. Mention to your artist you want thicker cardinal points and softened interior details. Expect touch-ups around year two if exposed to sunlight. Wear a short-sleeve camp shirt when you want the compass visible without rolling sleeves constantly.
5. Neo-Traditional Snake Coiling the Joint
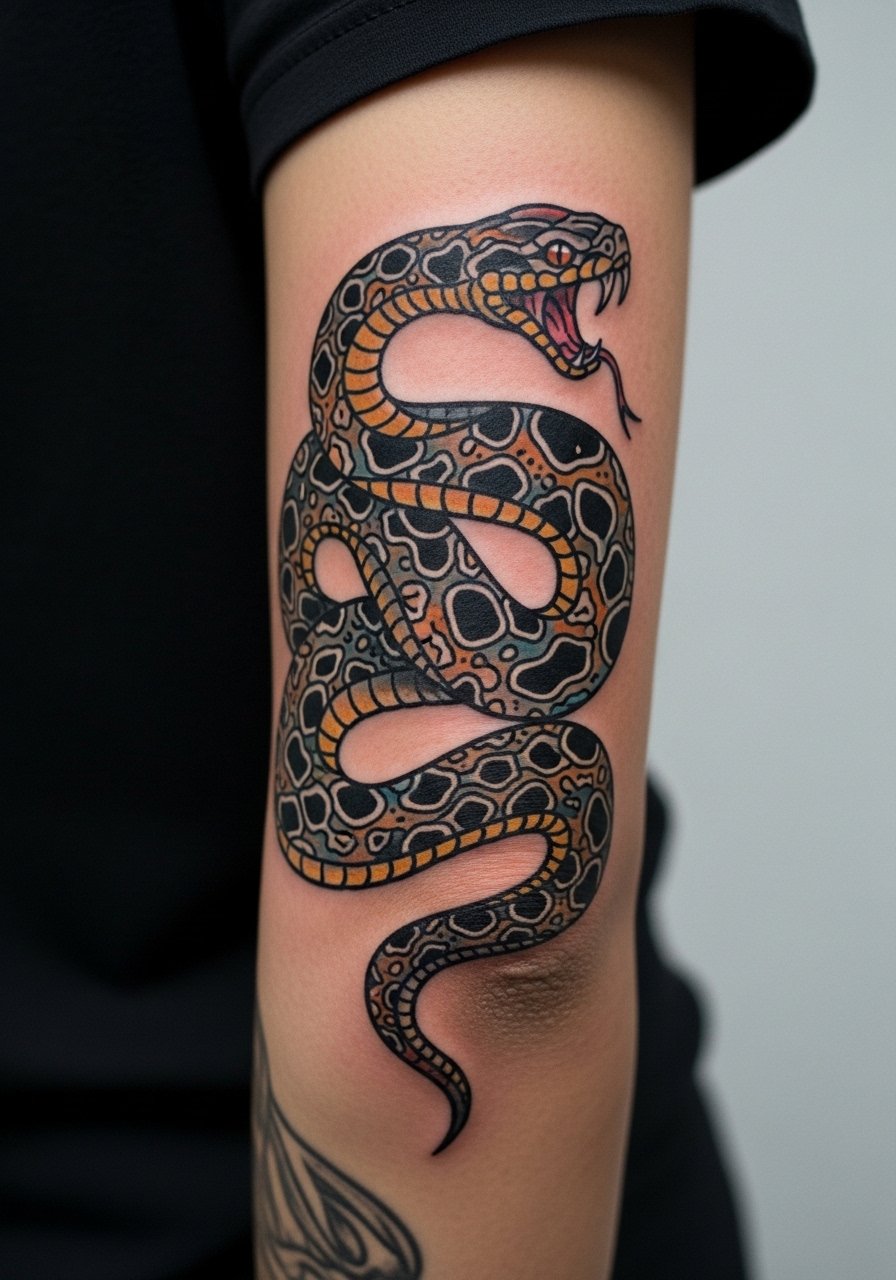
Neo-traditional saturation helps the silhouette hold up over time, which is useful on a mobile place like the elbow. The trick is to avoid tiny scales across the bone and to use larger color blocks that read from a distance. The session will include strobe-like sensations as the needle crosses bone, so plan for short breaks. A common mistake is packing microlines into the coil, which later softens into a mushy texture. Pair this with a banded leather bracelet to balance the sleeve when you show it off.
6. Minimalist Linework Arrow Through the Crook
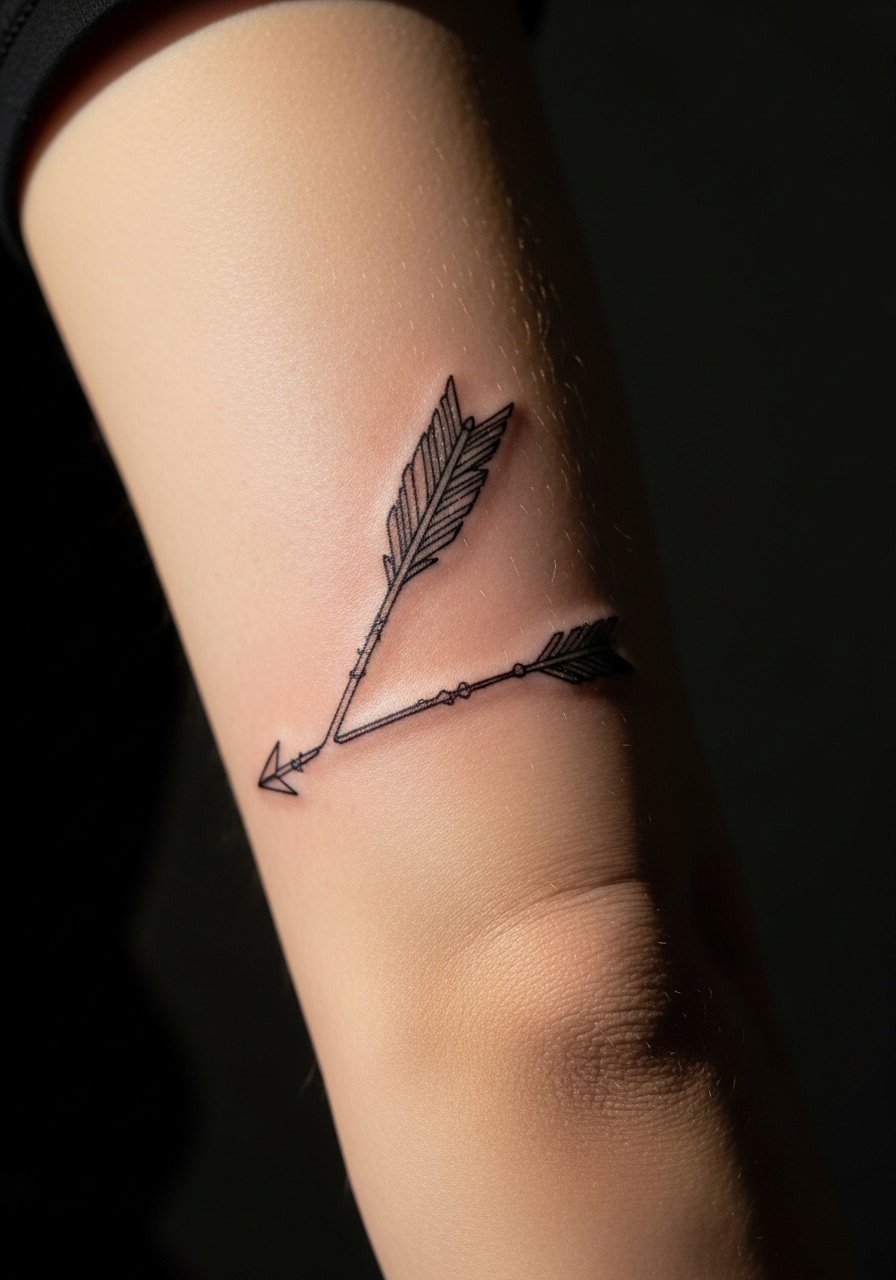
Fair warning, the inner elbow reacts differently than the outer. Thin minimalist lines here risk early fading because the skin flexes constantly. If you want a clean arrow, ask for slightly heavier lineweight where the arrow crosses folds and for more spacing around the tip. The session feels sharp near the crease but manageable with short stabs and frequent breaks. For the appointment, wear a racerback tank or a loose sleeve that can be shifted so the artist has clear access.
Pre-Session Essentials
The elbow-focused ideas above ask for different session prep than flat arm pieces, so a small kit smooths the day and the first week.
-
Stencil transfer paper kit. Lets you test placement on the joint before the machine touches skin, especially handy for wrap and band designs from ideas 1 through 6.
-
Topical numbing cream. Applied as directed an hour before can reduce the sharp hits over the bone without dulling the artist's work.
-
Thin protective film roll. Useful for keeping elbow caps shielded from clothing friction during the first couple of days.
-
Fragrance-free body wash. Cleanses the area gently while you avoid scrubbing heavy detail that fine line elbow pieces need.
-
Aquaphor healing ointment. A thin layer in the initial days helps maintain moisture on moving skin without clogging, which is important for elbow joint work.
7. Mechanical Gears on the Elbow Hinge

There's something about gear motifs that reads like it belongs on a joint, because the shapes follow movement. In consultation, ask that the smallest teeth be placed off the bone and that the main pivot be slightly larger so it remains crisp after settling. Pain is noticeable as needles hit the hinge, but the session breaks well into phases. A frequent mistake is over-detailing small cogs that later blend. For display, pair this with a rolled-up chambray shirt to keep the mechanical edge visible.
8. Stippling Mandala at the Elbow Edge

Artists split on mandalas near the joint. One camp says dense dotwork around the elbow blurs into a shaded patch within a few years. The other camp argues that with careful spacing and heavier outer rings the pattern stays readable. Name both approaches in your consultation and ask how they handle dot density near bone. Expect longer session time because stippling is slow, and plan for a touch-up if you want crisp centers after two years.
9. Anchor and Rope Across the Joint

A classic anchor is forgiving on the elbow if you prioritize silhouette over micro-detail. Tell the artist to scale the rope so it sits thick where it crosses the bone and to use texture on the forearm strands instead of tiny knots at the joint. The session feels punchy over bone. To show the anchor off, wear a short-sleeve henley that lets the design sit in view.
10. Compass Rose with Weathered Shading

Most weathered or vintage styles rely on texture and negative space to age well, which helps on the elbow where crisp micro-lines fail. Ask for broken-line effects and stipple shading placed off the bone to preserve the compass geometry. A typical error is packing tonal gradients into the center, which flattens with time. Sessions can be split because shading across the hinge takes longer than outline work.
11. Mythic Beast Wrapping Joint
Personal observation, mythic creatures read best when their key features avoid the exact bone pivot. For example, place the head or eye on the forearm panel and let the tail cross the joint. During consultation, show side-angle photos so the artist can map how the design will sit when you move. Expect varying pain as the machine crosses muscle and bone. For a night out, a short-sleeve bomber jacket with sleeves cut to hit just above the elbow keeps the beast visible.
12. Script Ribbon Curving Over the Elbow
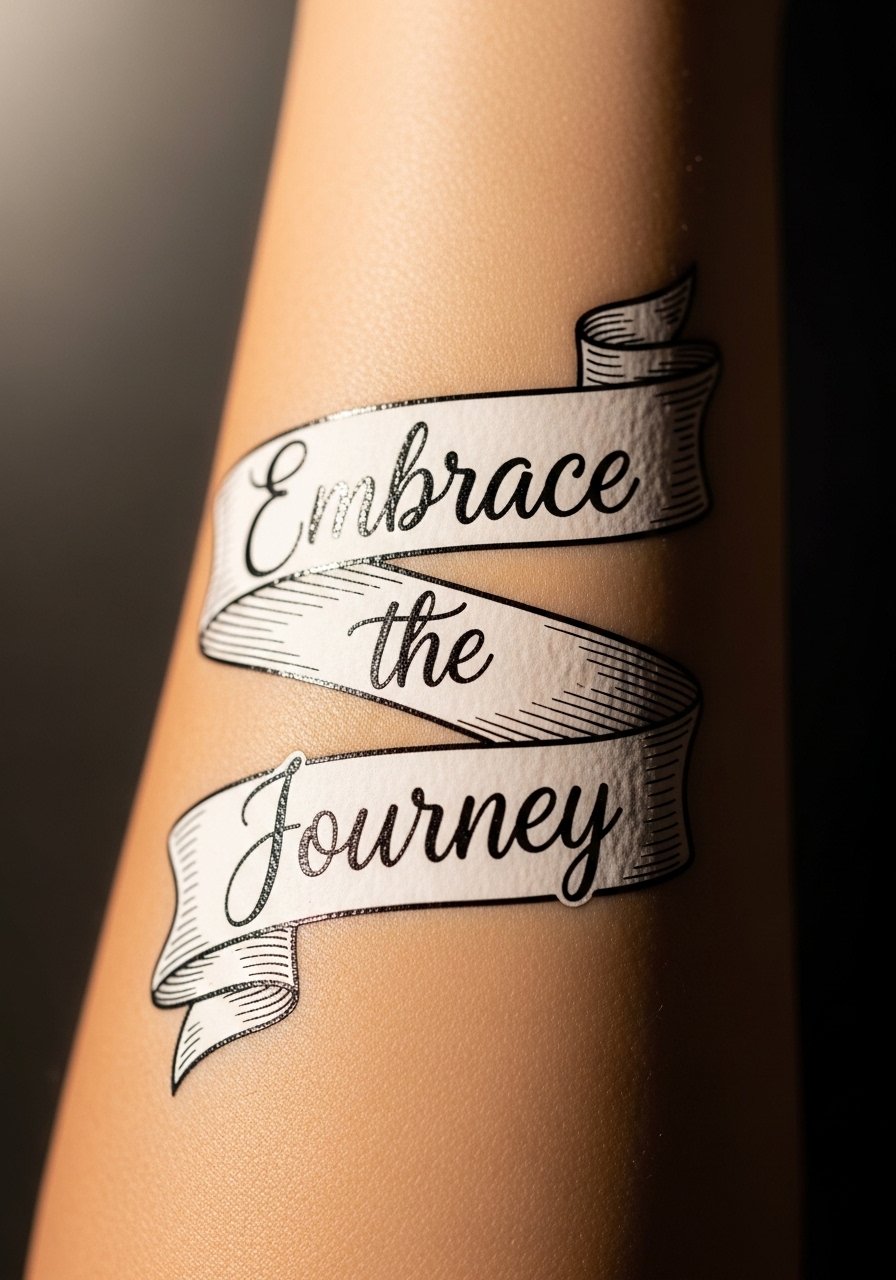
Lettering on or across the elbow invites debate about readability. One camp says script should avoid the joint entirely because flexing distorts the text. The other camp suggests bold block lettering with negative space that handles movement. If you want script, pick letters that are thicker and ask your artist to test the transfer with the arm bent. Plan on a touch-up to keep edges crisp after healing.
13. Geometric Knotwork Framing the Elbow

The biggest mistake with knotwork near a joint is going too small. The lines need room to blur slightly before they merge. Tell your artist you want spacing no tighter than a pencil-width between strands and ask for heavier outer boundaries. The session will be repetitive and precise. For daily style, a rolled-sleeve flannel frames the pattern nicely without covering the elbow.
14. Elbow Cap Wolf Howl Illustration

Visual impact is key with animal heads on the elbow, because the silhouette must read when you bend your arm. Ask for simpler facial planes and heavy outer lines along the jaw. The common mistake is over-rendering fur on the bone, which later softens into gray patches. Sessions hit hard on the hinge, so short blocks or two sittings work best.
15. Nautical Wave Cresting the Joint
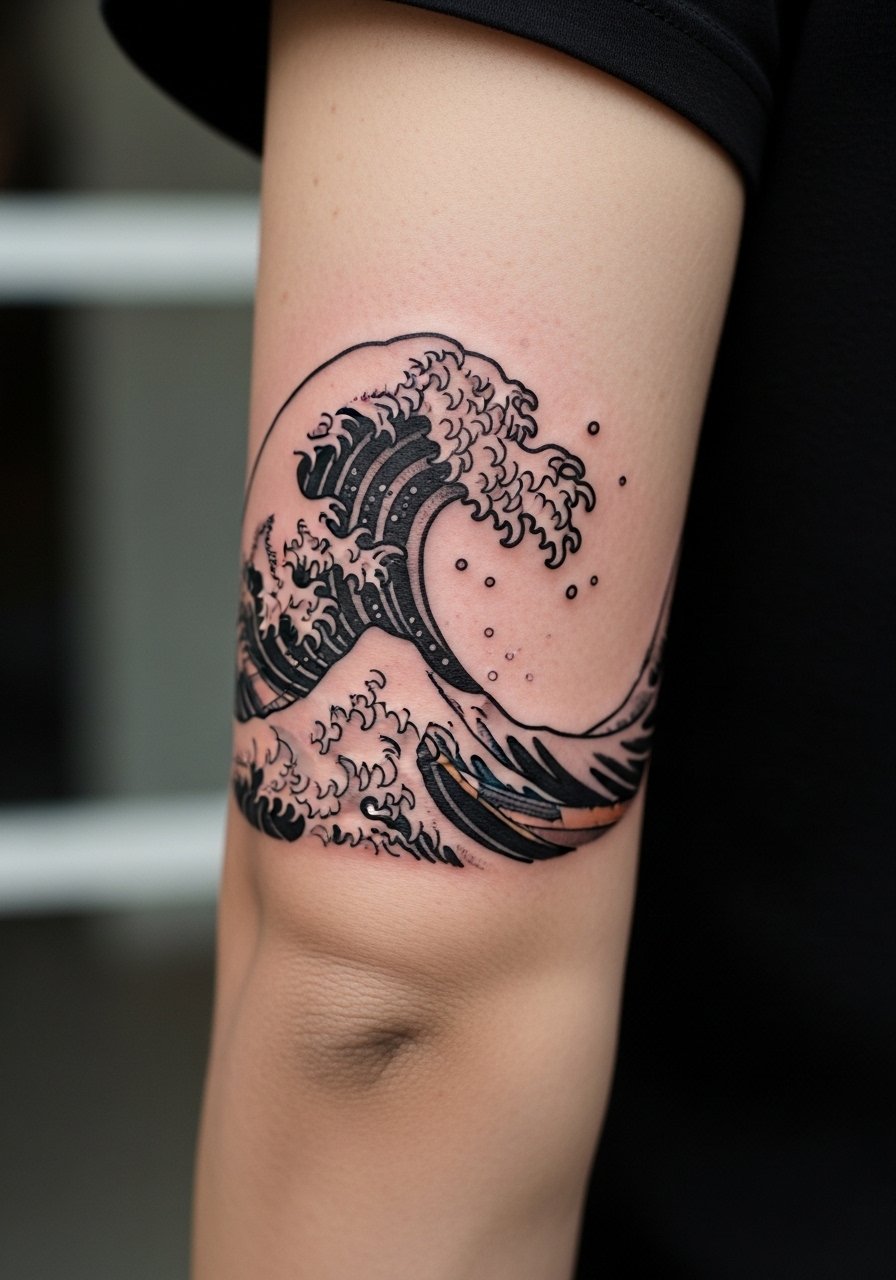
Most wave motifs benefit from motion-based composition that works with the elbow’s bend. Consult with your artist about directional flow so foam highlights avoid the bone center. The touch-up timeline depends on exposure to sun and friction, but bold shapes last longer than tiny line curls. For beachwear, a rolled-up swim tee keeps the crest visible while you move.
16. Industrial Rivet Plate Design
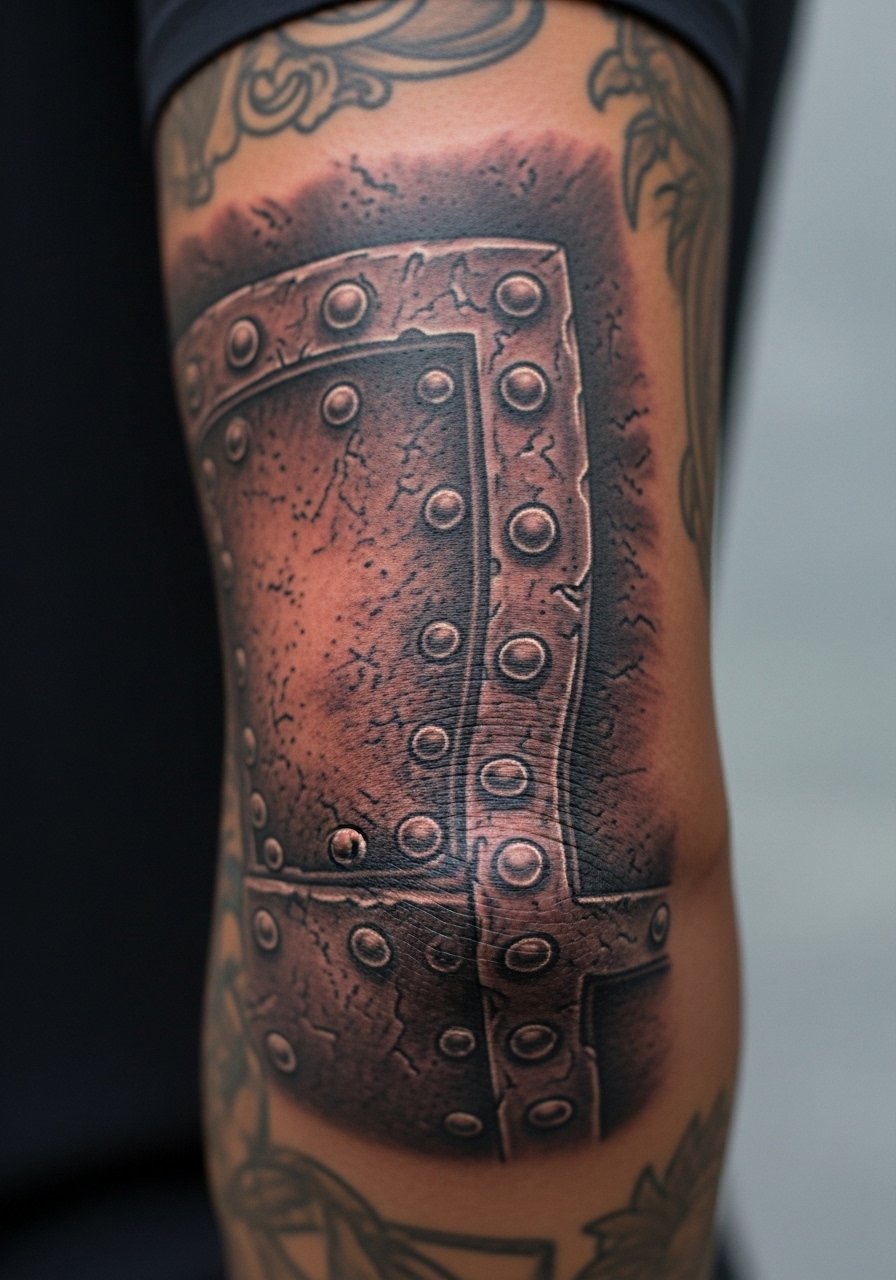
When a design intentionally mimics hardware, you can lean into thicker outlines and strategic shading that ages into a believable patina. Ask for heavier rivet outlines and flat shading zones away from the hinge. A common error is trying for photoreal rivets at too small a scale. For sessions, wear a loose utility shirt you can roll without stressing fresh ink.
17. Celestial Sun and Moon Split at the Elbow

A split celestial motif plays the joint like a hinge and can be elegant if balanced. Tell the artist to avoid tight dot gradients on the bone and to make the transition area simpler. Pain varies across the split, so expect uneven discomfort. For showing off, a short-sleeve cotton tee keeps both halves visible.
18. Heraldic Shield Centered on the Elbow
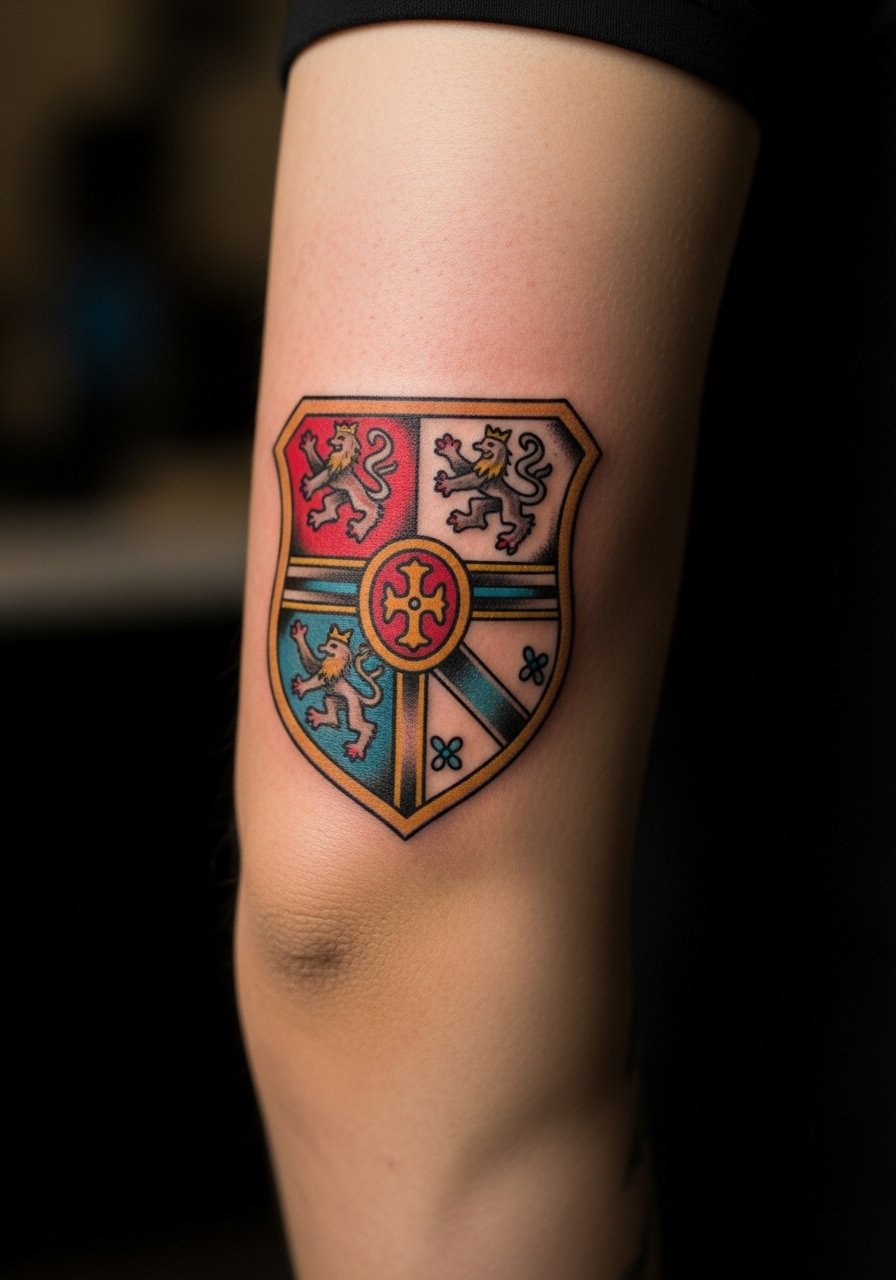
Consultation lead, bring clear references that show how the shield will sit when the arm bends. The worst mistake is packing too much fine iconography into the shield field. Ask for simplified symbols and thicker borders that stay legible as the skin moves. Sessions are shorter for bold outlines and longer if you want interior texture. Pair with a rolled-up Oxford shirt when you want a smart casual look that still reveals the piece.
19. Floral Wreath Crossing the Elbow

A floral wreath works if petals and stems avoid collecting near the bone pivot. Recommend to the artist that focal blooms sit off the hinge and that tiny stamens be omitted. Aging-wise, petals with negative space hold better than packed shading. Session sensations vary around the curve. For daytime wear, a short-sleeve chambray shirt frames the wreath without overwhelming it.
20. Viking Knot and Rune Band

Controversy exists about runes and cultural appropriation, so acknowledge origin respectfully and avoid direct replicas of sacred symbols without proper context. If you proceed, choose transliterations or personal phrases instead of wholesale cultural copies. From a technical view, wide knots and thick rune strokes last longer than thin script on the hinge. Plan for a touch-up within a few years if the runes sit too thin.
21. Americana Swallow in Flight Across the Joint
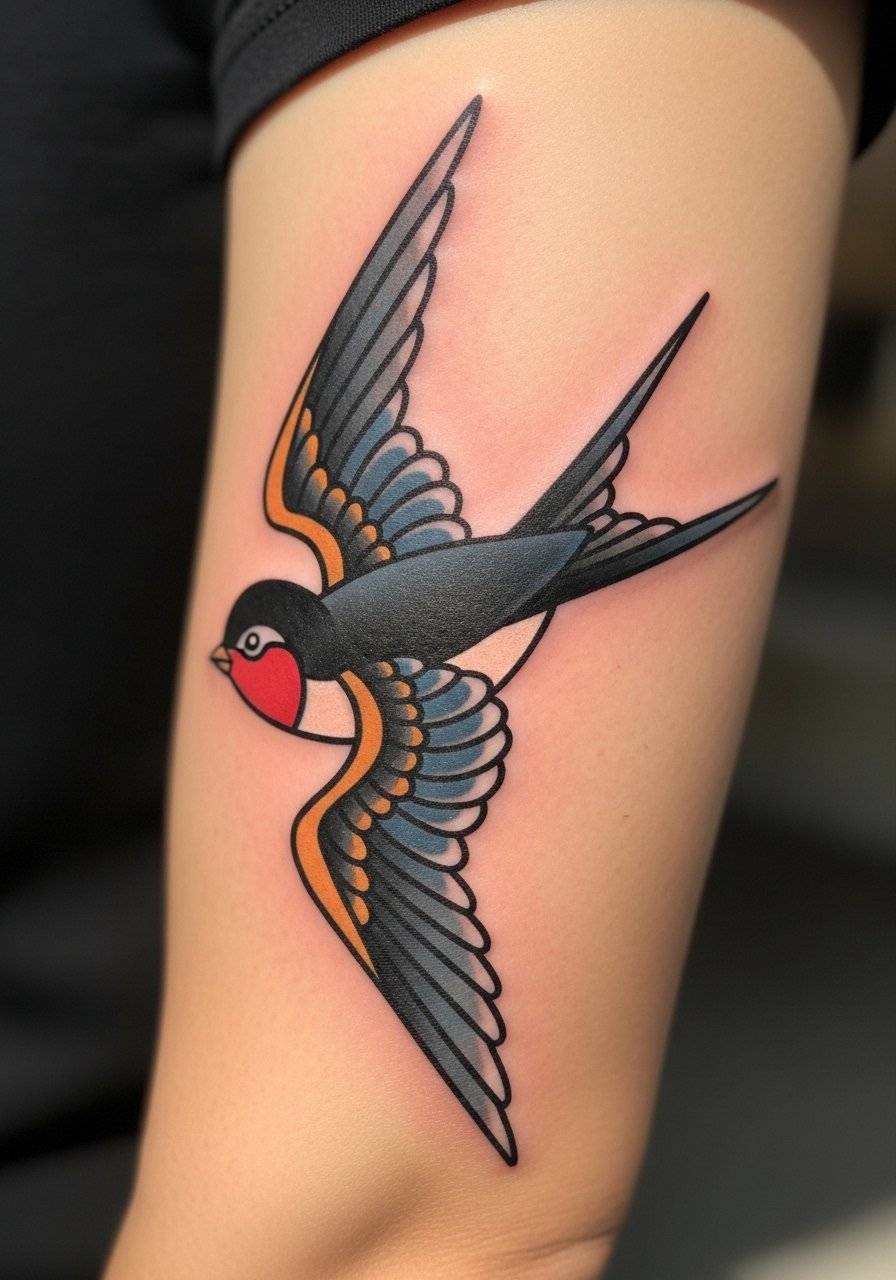
Visual impact lead, classic swallow shapes translate well to the elbow when the wings sweep onto forearm and upper arm panels. Ask for saturated color blocks and solid black anchors so the motifs read even as lines soften. The session is quick when limited to bold fills. For showing this piece, a short-sleeve baseball tee keeps fluttering wings visible.
22. Abstract Brushstroke Elbow Accent

Most abstract strokes rely on composition more than tiny detail, which is an advantage on the elbow. Tell the artist you want intentional breaks in the strokes so movement reads as part of the design. Expect variable pain as the needle crosses the hinge. A common mistake is trying to force micro texture on moving skin. Pair this with a rolled-sleeve linen shirt for an artsy casual look.
23. Winged Elbow Crest
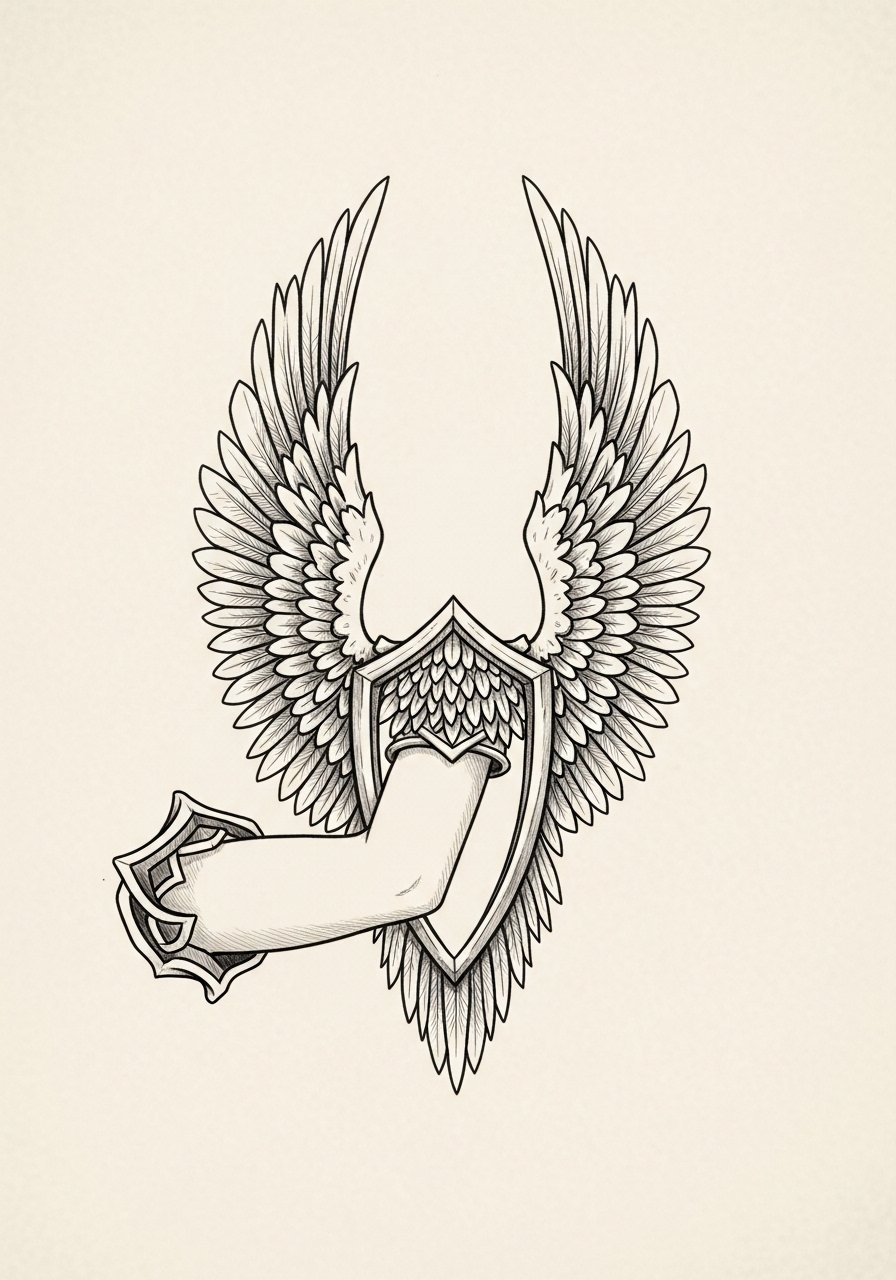
The visual trick is to place wing feathers off the hinge and to use larger feather shapes close to the bone. When you consult, ask to see sketches with your arm bent. The session is punchy where the artist works across the joint. For evenings, a short-sleeve blazer shirt keeps the wings visible without full exposure.
24. Traditional Dagger Piercing the Elbow

Mistake lead, the dagger looks forced when the blade detail is too fine at the hinge. Recommend a bolder blade with simplified hilt work and let the point cross the forearm rather than the bone center. Sessions are brisk for line-focused traditional pieces. This motif pairs well with a short-sleeve graphic tee that shows off the vertical composition.
25. Floral Skull Balanced on the Joint

Aging/healing lead, heavy skull outlines hold up better than tiny teeth and nasal details when centered on a joint. Ask the artist to simplify the skull interior and to focus on floral framing that sits off the bone. Sessions require care as the needle crosses multiple textures. For a rugged look, pair the piece with a rolled-up leather cuff that complements the motif.
26. Optical Illusion Ring Around the Elbow

Mistake lead, the main issue with optical rings is scale. Too narrow and the bands blend; too wide and the illusion flattens. Ask for middle-ground band widths and for the artist to test the effect with your arm bent. Pain is consistent across the ring. For clean display, wear a short-sleeve polo that keeps the ring unobstructed.
27. Stylized Map Fragment Spanning the Elbow
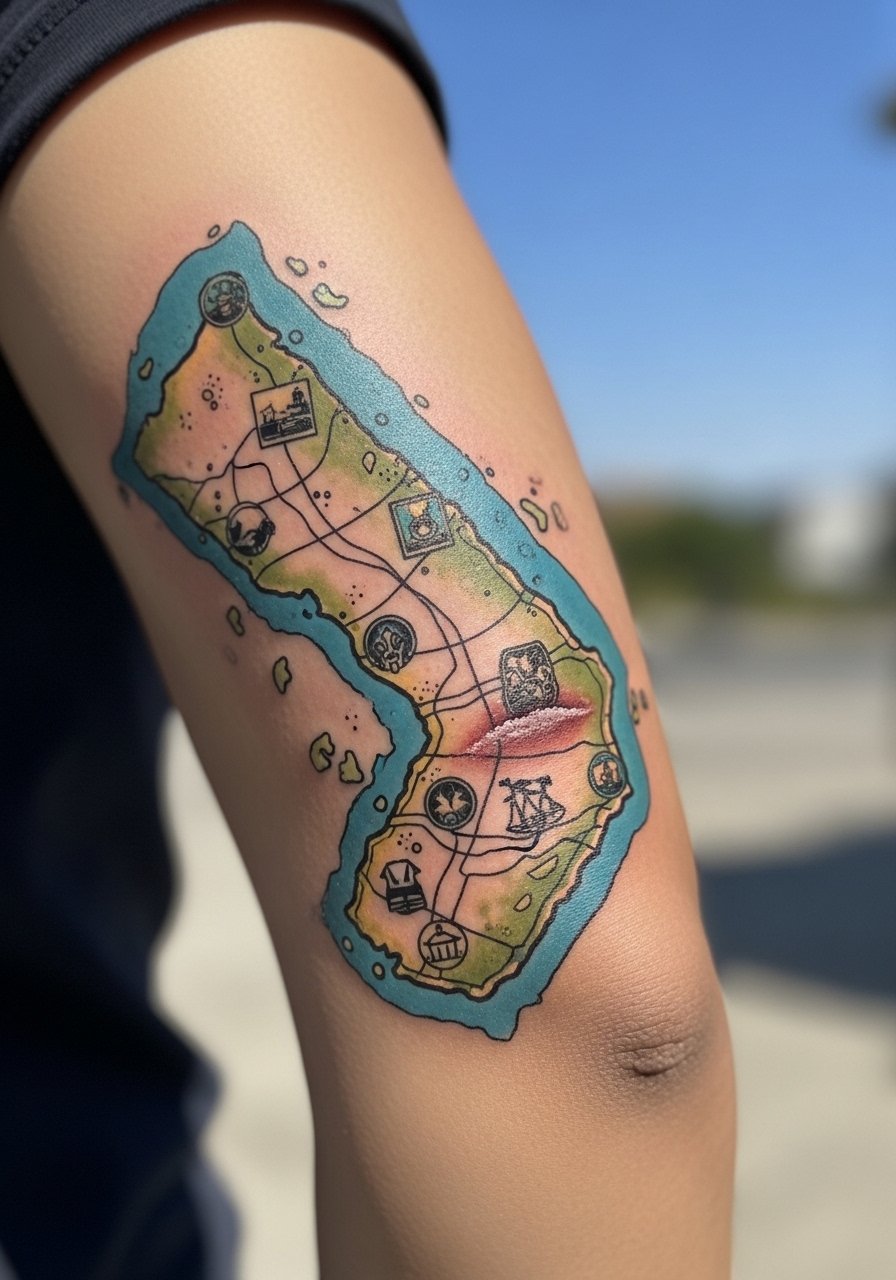
Consultation lead, bring the exact map section and ask the artist to simplify coastlines and landmarks so the hinge does not warp tiny icons. Textured fills should be placed off the bone. Sessions can be split into outline and shading phases. For travel-ready style, a rolled-sleeve field shirt shows the map without covering it.
Frequently Asked Questions
Q: How painful is elbow tattoo work compared with flat forearm pieces?
A: The elbow and its hinge are noticeably sharper in pain because the needle contacts bone more directly, and the skin there is thinner. Sessions tend to be shorter or split into multiple sittings. Numbing options and breaks help, but expect a different sensation than a flat forearm session.
Q: Will fine line illustrative details blur if I put them right on the elbow?
A: Fine line on the bone is risky because movement and thinner skin cause lines to soften faster. If you want fine detail, plan to keep the most delicate work off the hinge and ask your artist for heavier anchor lines that preserve the silhouette over time.
Q: How soon should I plan a touch-up for elbow tattoos?
A: From what I've seen, touch-ups are common around year two to three for elbow pieces, especially if the design crosses the bone or sits in a high-friction spot. If you spend a lot of time outdoors or wear tight sleeves, expect earlier fading.
Q: Are there wardrobe choices that help show an elbow tattoo without risking irritation?
A: Yes, short sleeves that sit just above the elbow, rolled sleeves, and loose shirts frame the joint while minimizing fabric rubbing. For appointments, choose something that can be moved without dragging the fresh area, like a loose short-sleeve shirt.
Q: Should I worry about workplace acceptance of a bold elbow piece?
A: Elbow tattoos are highly visible and sometimes still influence workplace perceptions in certain industries. If that matters to you, consider placement slightly off the hinge or discuss discrete options with your employer before committing.
