
Bold line Japanese anklets are trending, and the trick is knowing which small details keep a design readable after a year of socks and sandals. Fine line looks gorgeous fresh but often softens on the ankle unless the artist adjusts spacing and needle depth. Read on for 27 ankle-specific Irezumi ideas, how they age, what to ask your artist, and the clothing choices that actually show them off.
1. Koi Wrap with Wave Flow

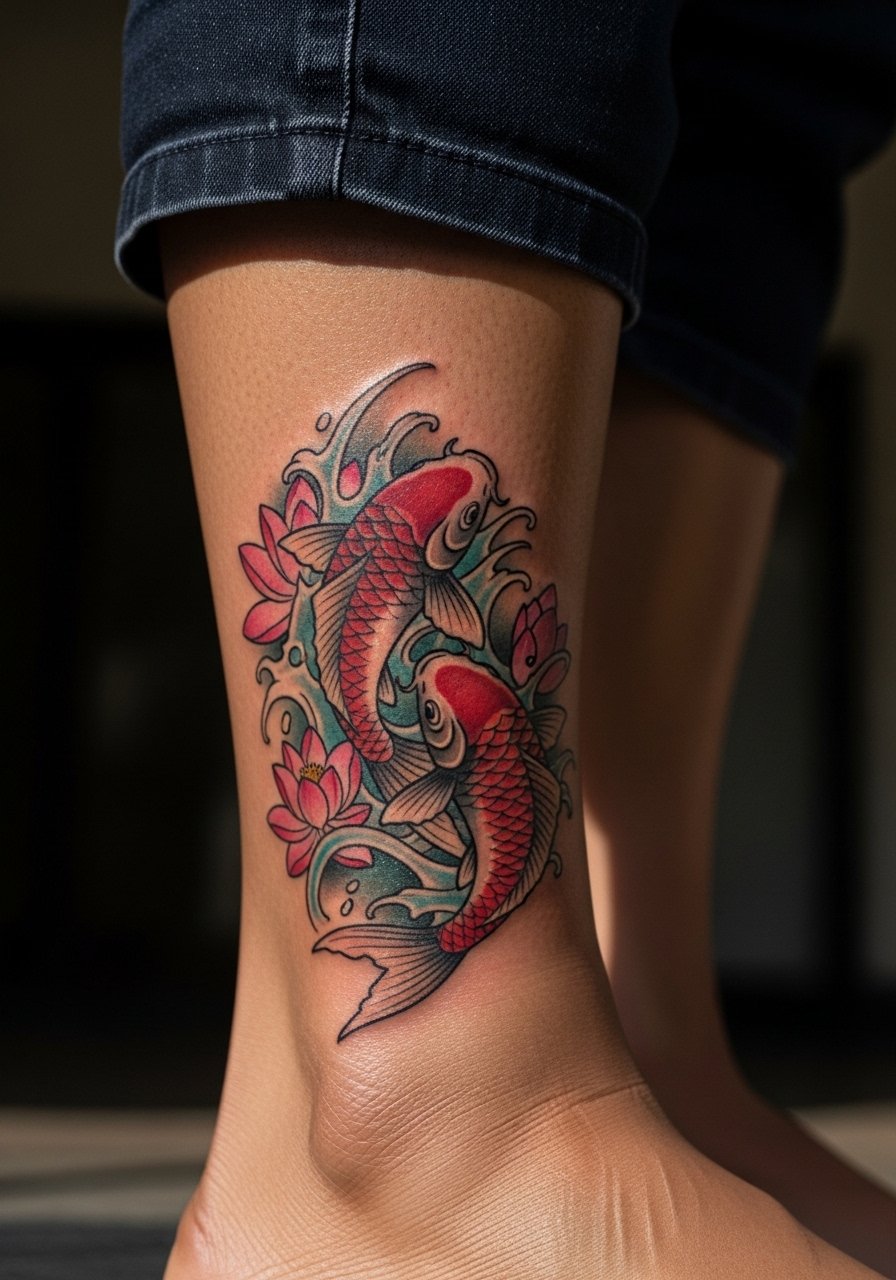
A koi curled around the ankle reads like motion captured in a small space. I recommend bold outlines with medium saturation so the scales hold through friction from socks. Tell your artist you want the tail and waves to follow the bone so the design breathes when you walk. Common mistake is packing too many tiny scales into a cramped footprint. Pain sits at a four to six for most people because the ankle bone will register sharper spots. Expect a touch-up around year two if you run fine line here. For show-off looks, pair with cropped straight leg pants that frame the color without covering the wrap.
2. Cherry Blossom Branch Encircling the Anklebone
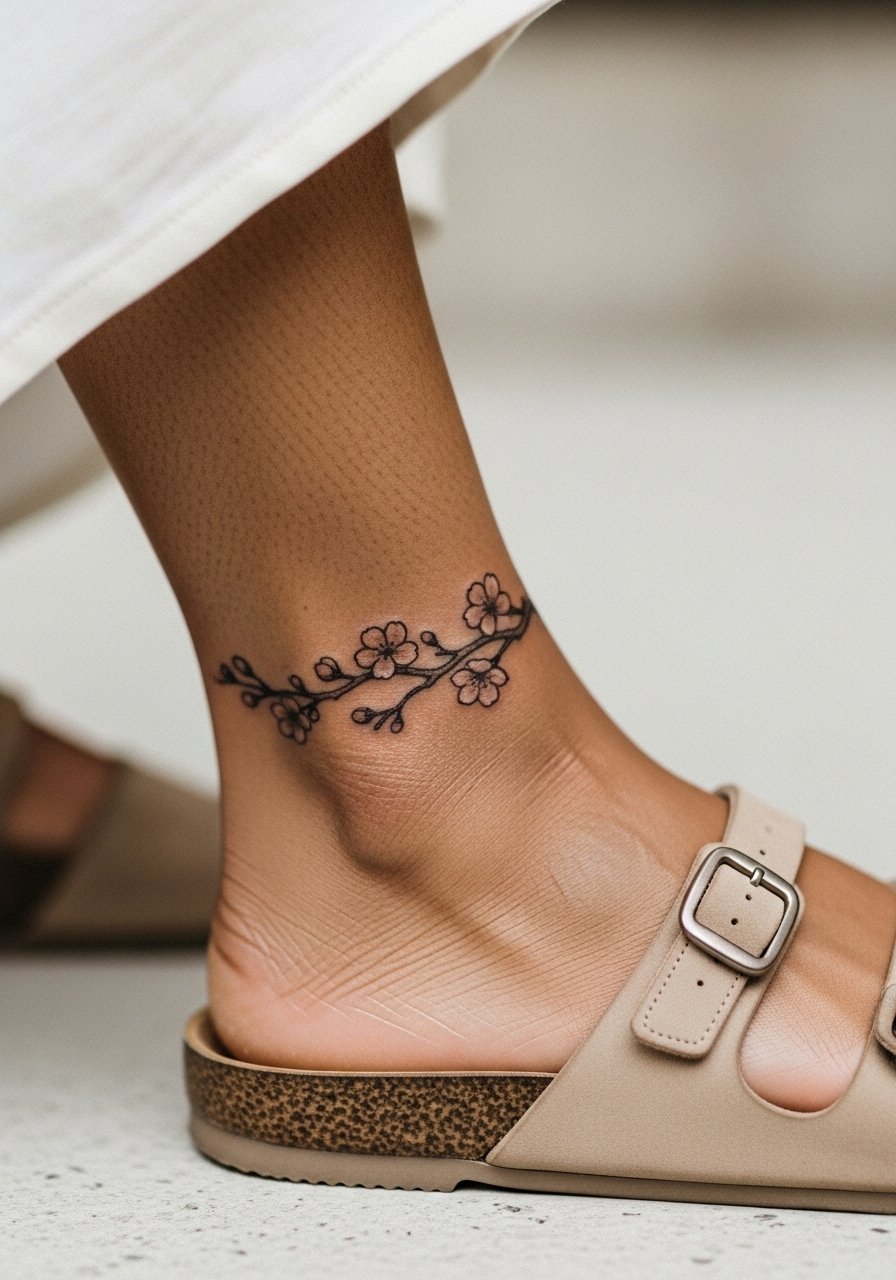
Cherry blossoms work as a ring that can expand later into a calf piece. Ask for gradient petal work with slightly heavier black anchors so the pinks do not blur into skin tone over time. A common regret is choosing ultra-fine stems that disappear after a year on mobile areas. This placement is friendly for one- to two-session work and lands around a three to five on pain charts. For summer wear, show it off with neutral tan sandals and bare ankles. If you want to extend later, leave negative space toward the calf for future flow.
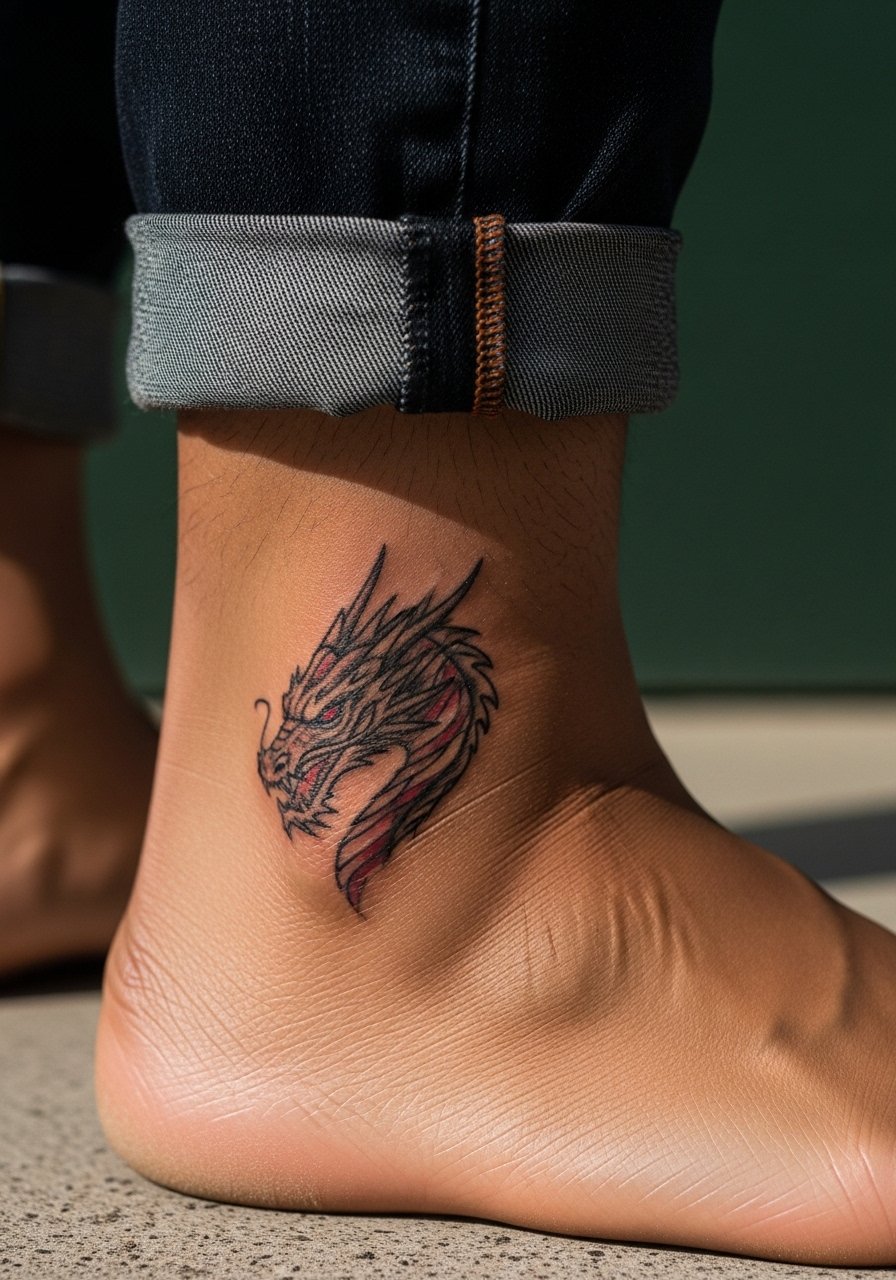
3. Dragon Head Emerging Toward the Calf

A dragon head is dramatic when it follows the leg’s contour. This one asks for bolder blackwork at the outline and selective red accents for the eye or tongue. During consultation, stress the directional flow you want so the head does not look like it is sliding off the bone when you stand. Expect a longer session time and a higher pain moment where the tail meets bone, but the payoff is a design that scales well into a sleeve. Blowout risk is higher if lines are too tight across curved tendon areas. For showing it off, roll the hem of bootcut jeans dark wash so the dragon peeks from under the cuff.
4. Samurai Mask Anklet That Reads Like Jewelry

A samurai mask as an anklet marries warrior motifs with wearable proportions. Tell the artist you want thicker black outlines and restrained color fills to keep the mask readable from a short distance. The mistake is squeezing too much facial detail into a 2-inch band. Pain is moderate to low depending on how much wrapping hits bone. This design also doubles as an everyday accessory when paired with a minimalist leather anklet on the opposite foot. Expect one touch-up within the first two years to refresh edges after healing.
5. Vertical Koi Swimming Up the Inner Ankle
An inner-ankle koi benefits from vertical composition that reads with the leg. Ask for bolder outlines on the belly and head and softer gradients on fins to prevent muddying on medium skin tones. Common mistake is over-detailing the fins with thin hatch work that fades into blur. The inner ankle is slightly less painful than the outer bone though the tendon areas still react. Plan for two sessions if you want rich color. For session comfort, wear bermuda shorts loose fit so the artist can access the inner curve without sock interference.
6. Lotus with Wave Halo

A lotus with surrounding wave lines adapts cleanly to the ankle’s curve and can serve as a seed for later leg work. Tell your artist you want stipple shading and heavier black anchors under petals so the form keeps depth as it heals. People often ask for watercolor fills here and then regret the patchy fade in hot summer months. Pain level is comfortable for most with short session times. Pair an outer-ankle lotus with strappy espadrille wedge sandals that leave the design visible and let the linework breathe.
Pack Smart
The designs above include ankle wraps and inner-ankle pieces that need different prep from larger calf work, so a few targeted items smooth out the session and the first week.
- Frida tattoo salve. A non-greasy balm many people reach for during humid summer heals on ankles, helpful where socks and shoes cause extra moisture.
- Ink-Ichiban balm. A lighter alternative to thicker ointments that users say preserves color saturation without clogging.
- Australian tea tree tattoo salve. Anti-itch properties can make the first week on bony ankles more manageable.
- Indie Ninja tattoo paste. Fast-absorbing option for active legs that need a quick thin layer after cleaning.
- Second skin barrier film. Thin protective film that contours the ankle better than bulkier sheets, useful for the first 3 to 5 days when friction is highest.
7. Phoenix Feather Anklet Chain

A feathered anklet reads as jewelry and stays discreet when done with moderate spacing. If you want color pops, ask for small orange or red accents only at the feather tips so saturation does not blur into a muddy block on medium or dark skin. The main mistake is requesting ultra-fine single filaments that disappear after a year. Pain is low, session short, and touch-up needs are modest. Pair with a dainty ankle chain gold on the opposite foot to create a balanced look when wearing sandals.
8. Carp Tail Flicking Over the Ankle Bone

Putting a carp tail atop the ankle bone emphasizes movement across bone contours. Request thicker outer lines on the tail edge that press against the bone so the silhouette remains sharp. A frequent error is layering too much color on the bone itself which tends to soften faster. Expect sharper moments of pain over the bone during the session. For longevity, schedule a touch-up at the one- to two-year mark rather than waiting until the piece looks washed out.
9. Geisha Fan One-Point Accent

A single geisha fan is a refined one-point choice that reads professional in many workplaces. Ask for solid black contours and a single muted color wash to avoid muddying on medium tones. The main mistake is packing face-level detail into the fan; keep it suggestive rather than portrait-level. Pain is manageable, session quick. Pair this one with ankle-grazer trousers or cuffed chinos so the fan peeks under your hem without competing elements.
10. Wave and Cloud Border Wrap

A background wrap of waves and clouds makes a great starter for future leg expansions. Request heavier negative space and punchy black anchors so the border remains a clean frame. A common pitfall is asking for thin filler lines that lose contrast after frequent abrasion. This is low to moderate on the pain scale and usually fits into two sessions if you want solid saturation. The border also masks the edges of future calf pieces, so plan the seam with your artist.
11. Tiny Lantern Charm on an Anklet Chain
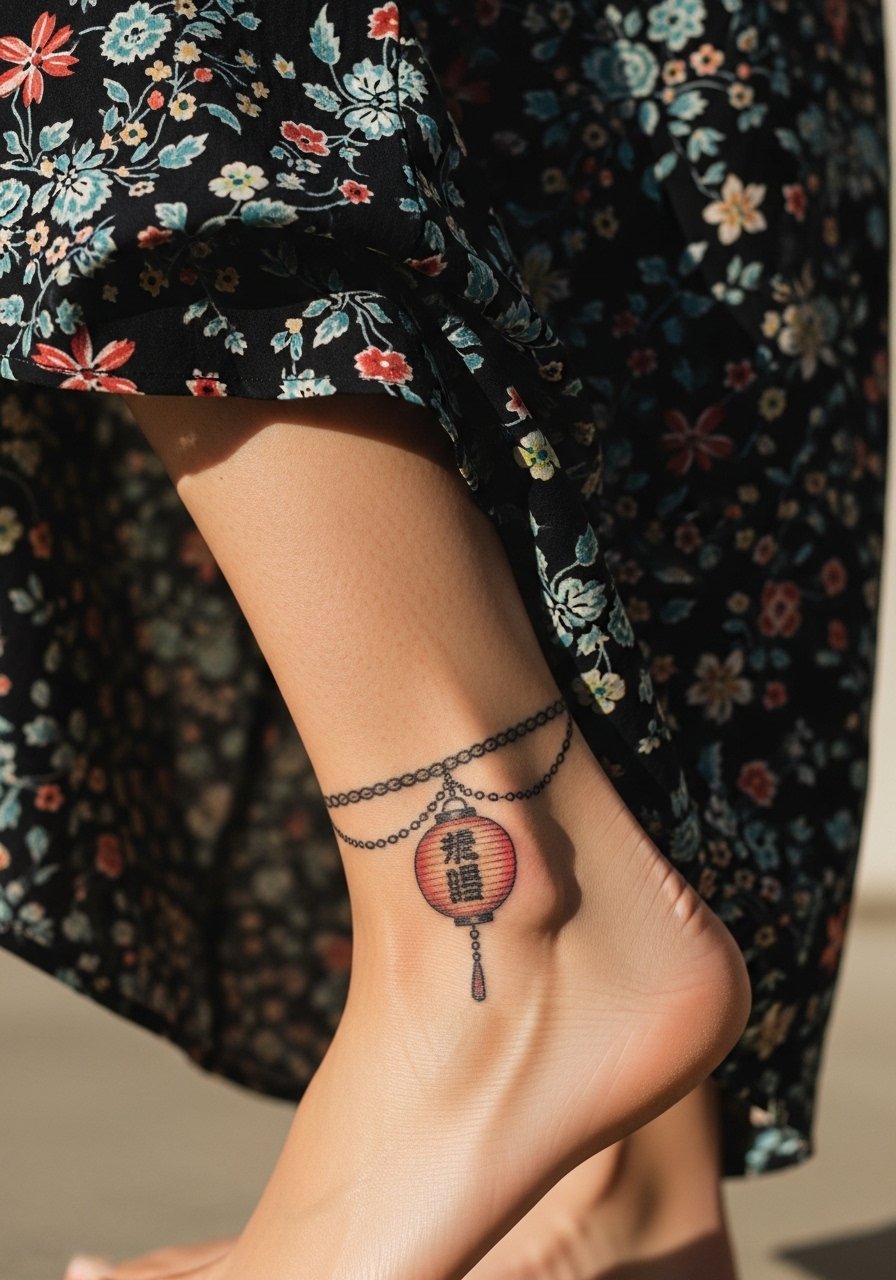
A tiny lantern charm reads like jewelry and scales well into an anklet composition. Tell your artist you want the chain links spaced and the lantern silhouette bold so details do not vanish. The mistake is over-detailing the lantern’s face which can blur. Pain is low and session short. For a deliberate contrast, pair with a thin chain pendant necklace on the other foot or simple sandals that do not press into the design.
12. One-Point Dragon Head for High Impact
A one-point dragon head brings intensity without committing to a full sleeve. Specify heavy outline and controlled dot shading so the head reads from a distance and ages into a strong silhouette. Artists are split on fine detail here. One camp warns that too many thin lines fade quickly on ankles. The other camp says careful depth and spacing keep details for years. Ask the artist where they sit on that debate before booking. Pain is moderate. Expect a single touch-up at year two if you want crisp edges.
13. Hannya Mask Mini Anklet

A tiny Hannya lends edge and reads as a bold charm when simplified. Tell the artist you want the facial lines exaggerated and the horns slightly thicker so the mask does not lose character as it settles. Common mistakes include trying to squeeze facial realism into a tiny band. Pain sits at a moderate level where the mask curves over tendon areas. Style it with a minimalist leather anklet on the opposite foot for a matched, lived-in vibe.
14. Peony Sprig Near the Achilles

A peony near the Achilles benefits from open petal shapes and heavier anchors at the base so the form does not vanish where the tendon flexes. Ask for stipple shading instead of dense gradients if you want the texture to age well. The Achilles area can spike pain because it sits over the tendon and bone junction. Expect to plan for at least one touch-up after the initial settling period. For session comfort, pull on [loose joggers or shorts] that make access simple without rubbing afterward.
15. Maples and Seasonal Leaves Anklet
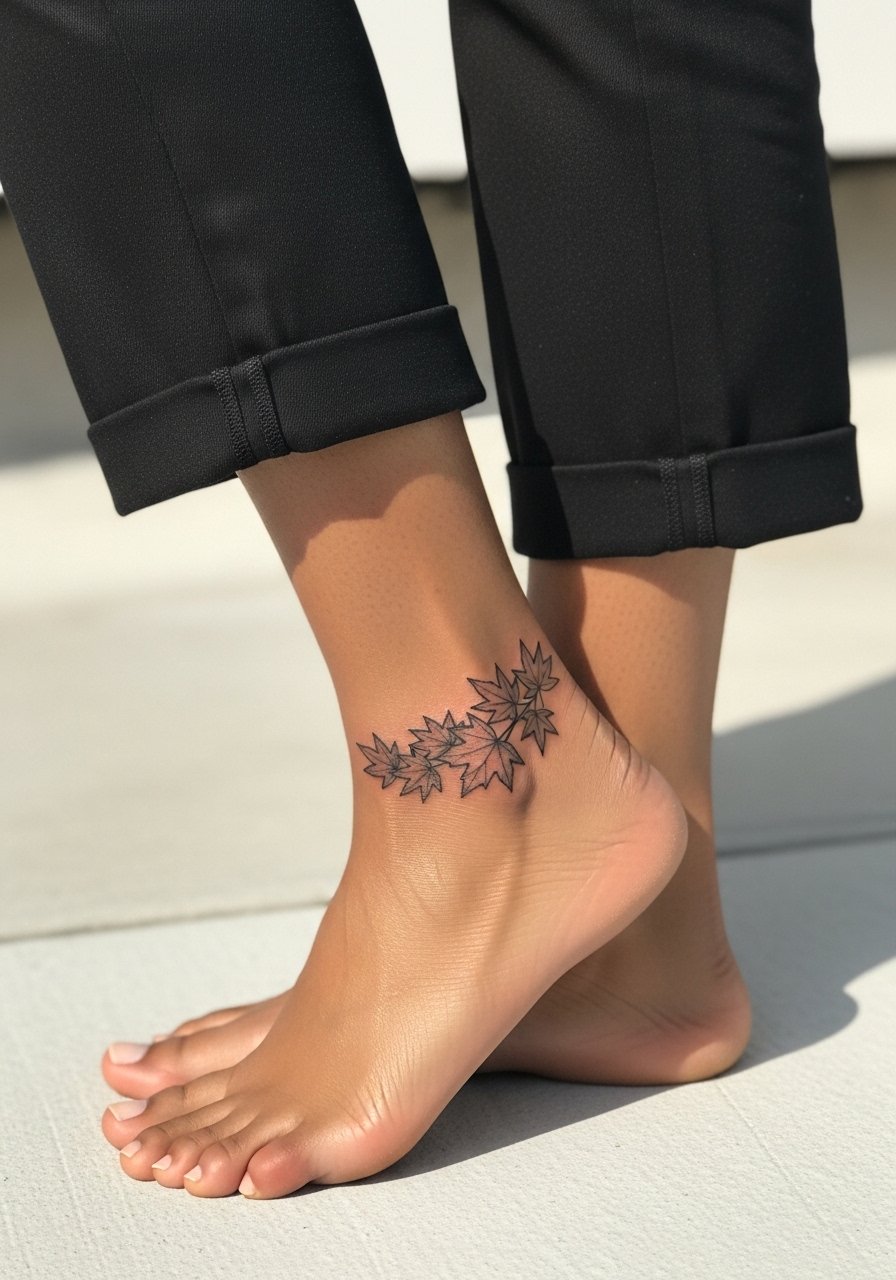
Seasonal leaves make a quiet anklet that ages predictably if given breathing room between elements. Ask for negative space and slightly thicker leaf outlines to guard against edge loss on active legs. Tiny veins are tempting but often become muddled. Pain is low and sessions are short. Show this off with cropped straight leg pants or sandals that highlight the garland shape.
16. Small Torii Gate at the Ankle Flank
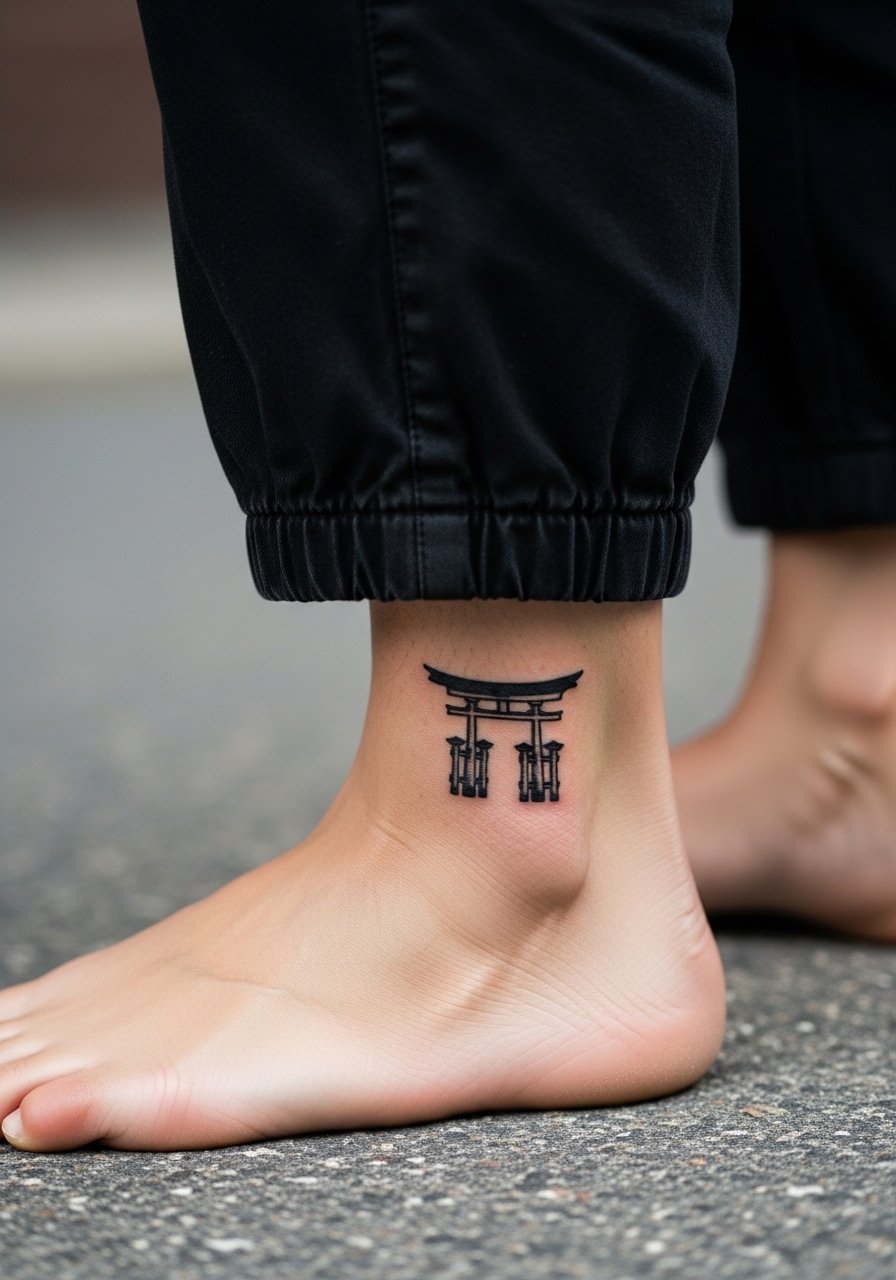
A tiny torii gate is a one-point cultural nod that works best when simplified. Tell the artist you prefer bold structural lines and minimal crossbars so the gate remains geometric as it settles. The main misstep is trying to cram wood grain or minute carvings into the tiny gate. Pain is light and the session is brief. Keep in mind this motif traces to shrine architecture so many people choose slight stylistic variation rather than an exact replica.
17. Bamboo Stem Sliding Down the Inner Ankle

A vertical bamboo stem suits the inner ankle and reads elegantly when spaced correctly. Ask for segments with heavier nodes and modest shading between to prevent the stalk from dissolving into skin. The frequent error is requesting hairline segments that become invisible after healing. Pain is moderate but manageable. For showing it off, wear bermuda shorts loose fit that keep the inner curve visible without sock rubbing.
18. Small Script Hidden at the Ankle Crease
A tucked script can be intimate and discreet but requires exact spacing. When text appears in an ankle crease, specify font size and ask the artist to stencil and let you view placement in motion. The main mistake is guessing on letter spacing; small type can blur or read like a smudge. Pain is mild. For visibility, cuff jeans or choose rolled hem jeans so the lettering is revealed when you want it to be.
19. Minimalist Fan-and-Flower Combo

Combining a fan and one bloom gives a compact composition that looks deliberate rather than cramped. Tell your artist to keep the fan lines bold and the flower shaded with dot work to avoid color bleed. People who ask for watercolor washes here often find the colors fade unevenly. Pain is low. A strappy espadrille wedge keeps the ankle visible while avoiding fabric that will rub the healing area.
20. Small Carp Face Peeking Over the Ankle

A face-focused carp needs large, legible eyes and a bold jawline to avoid loss of character. Ask for simplified scale indications and a clear silhouette rather than tiny tonal work. Mistakes include overworking the face with stipple that fills in. Expect sharper discomfort where the needle crosses bone. Plan for a touch-up once the fish settles to refresh the key outlines.
21. Lotus Petal Anklet in Black and Gray

A black and gray lotus anklet reads elegantly across skin tones when anchors are bold. Ask for stipple shading and strong blacks near the petal bases to hold contrast. Fine gray gradients near the tips can disappear on darker skin so discuss pigment choice with the artist. This placement is moderate pain with quick sessions. Style it with neutral tan sandals to keep attention on the monochrome texture.
22. Small Samurai Crest Near the Heel

A crest near the heel must be crisp since that area flexes with footwear. Ask for simplified heraldry and thick outer lines so the emblem stays legible. The common error is trying to replicate tiny heraldic detail that bleeds together. Pain is modest though there are ticks where tendons meet the heel. For the session, wear [loose joggers] so the artist can access the area without sock interference.
23. Small Wave Crescent Along the Lateral Ankle
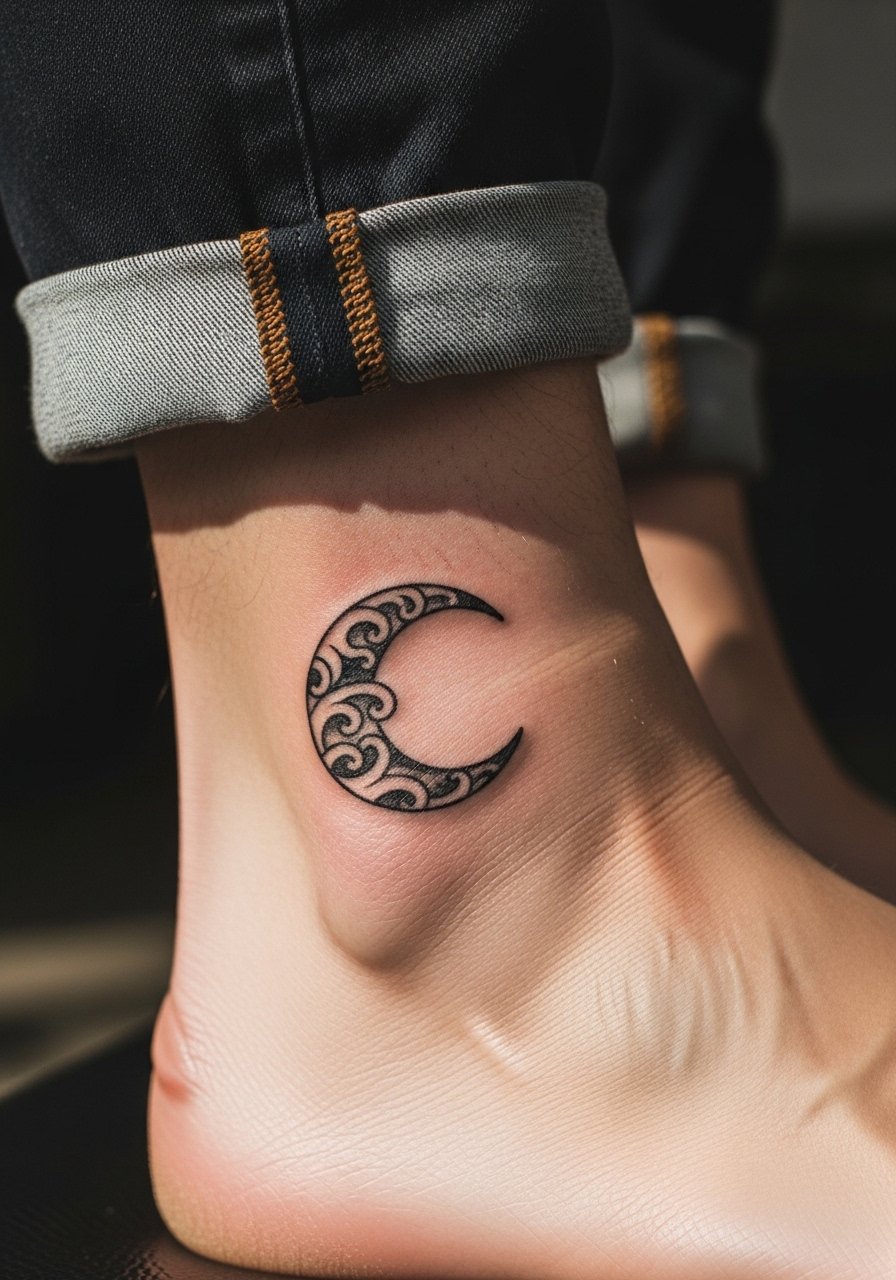
A crescent wave is a small, high-contrast choice that survives ankle wear when the black anchors are strong. Specify bold negative space alongside the curve so it reads from distance. The mistake is trading contrast for delicate curls that vanish. Pain is low. Pair with cuffed chino pants or ankle-grazing trousers so the wave shows during casual wear.
24. Tiny Fishing Net Motif Wrapping the Ankle

A small net motif looks great as a texture piece but needs breathing room. Ask the artist to widen the mesh slightly and anchor key intersections with tiny dots so intersections do not merge. The most common mistake is insisting on ultra-fine meshes that blur into a gray patch. Pain is moderate. This works well as a background element that other motifs can sit on top of later.
25. Miniature Lantern Festival Scene

A mini festival lantern scene is playful but must be simplified to avoid muddiness. Tell the artist to focus on silhouette and a couple of small spark dots. Over-detailing the lantern body makes it look like a smear later. Pain is low and session times are short. Show it off with [strappy sandals] that leave the ankle open and avoid rubbing during the first week.
26. Small Samurai Sword Tip Peeking Downward

A sword tip needs a clean blade edge and a simple hilt so it remains legible when flexed. Ask for heavier black on the blade outline and avoid tiny ornamental hilts. Common mistake is trying to carve in too many decorative elements in a small space. Pain is moderate near bone. For sessions, wear loose pants you can roll up easily so the artist has clean access without compressing the area.
27. Asymmetrical Seed for Future Sleeve Expansion

Start small with an asymmetrical "seed" designed to grow into a full leg piece later. Tell the artist you want an anchor point that leaves flow toward the calf and foot. The common regret is placing symmetrical pieces that make expansion awkward. Pain is low and sessions are short. This approach solves the commitment problem and lets you test motifs on your ankle before building a sleeve. For showing it off, cuff jeans or choose cropped straight leg pants so the seed is visible without overwhelming the leg.
Frequently Asked Questions
Q: Will fine line Japanese motifs on the ankle fade faster than bold Irezumi work?
A: From what I have seen, fine line pieces tend to soften sooner on mobile zones like the ankle, while bold Irezumi outlines keep their shape. Some artists argue great depth and spacing make fine line last, while others stick to thicker anchors for ankle work. Ask your artist how they adjust line weight for this placement and plan touch-ups accordingly.
Q: How should I prepare clothing-wise for an ankle session so healing is less of a nightmare?
A: Wear loose bottoms you can roll up without compressing the area and choose sandals for the first 48 to 72 hours if possible so socks do not rub. For longer evenings, pack a pair of [loose joggers] you can pull on after the session to keep the area protected but not tight.
Q: Is Saniderm or air-dry better for healing an ankle tattoo that will see a lot of friction?
A: Artists and community members split into two camps on this. One group favors barrier films because they limit rubbing and contamination, especially for ankles. The other group prefers dry or minimal-ointment healing, arguing films trap moisture and increase infection risk if applied incorrectly. Decide with your artist based on their experience and your day-to-day footwear.
Q: Do Japanese reds and oranges look different on olive or dark skin, and how should I ask about pigments?
A: Pigment choice matters on medium to dark tones. I have seen orange and red shift faster on olive skin when an artist used standard stock mixes. Ask for custom-mixed pigments and request healed examples on similar skin tones when possible. Many artists will recommend bolder outlines with selective color pops to preserve contrast.
Q: How often will an ankle Irezumi need touch-ups compared with a calf sleeve?
A: Ankles typically need touch-ups sooner because of constant movement and footwear friction. Expect a touch-up in the first one to three years for fine work. Full calf pieces that avoid bone and high-friction zones often hold longer and need less frequent refreshing.
Q: Where can I find artists who actually know how to scale Irezumi down for ankles without making it look cramped?
A: Search discovery pathways like #Irezumiankle or #Japaneseanklettattoo on Instagram, check Tattoodo filters for "Irezumi" plus city, or look for guest-spot listings with "Japanese leg tattoo guest spot" keywords. Community threads on Reddit and booking apps like Booksy also turn up artists who specialize in small-format Irezumi.
Q: Is it okay to use numbing cream for ankle tattoos that hit bone, or will that cause problems?
A: Numbing opinions split. Many beginners use topical numbing for the sharp moments on the ankle and find it helpful. Traditionalists warn that numbing can change how the artist senses skin tension. If you plan to use it, discuss timing and product choice with your artist and follow their guidance to avoid affecting the linework.
