
Fine line is trending hard right now, and the pieces that get the most saves are not always the ones that hold up. Lines ghost, guest spots cancel, and body changes warp placements that seemed perfect on the phone. I picked 21 pretty back of arm tattoo ideas that factor in fading, session comfort, and wardrobe so you walk into a chair knowing what will still read clean after a few years.
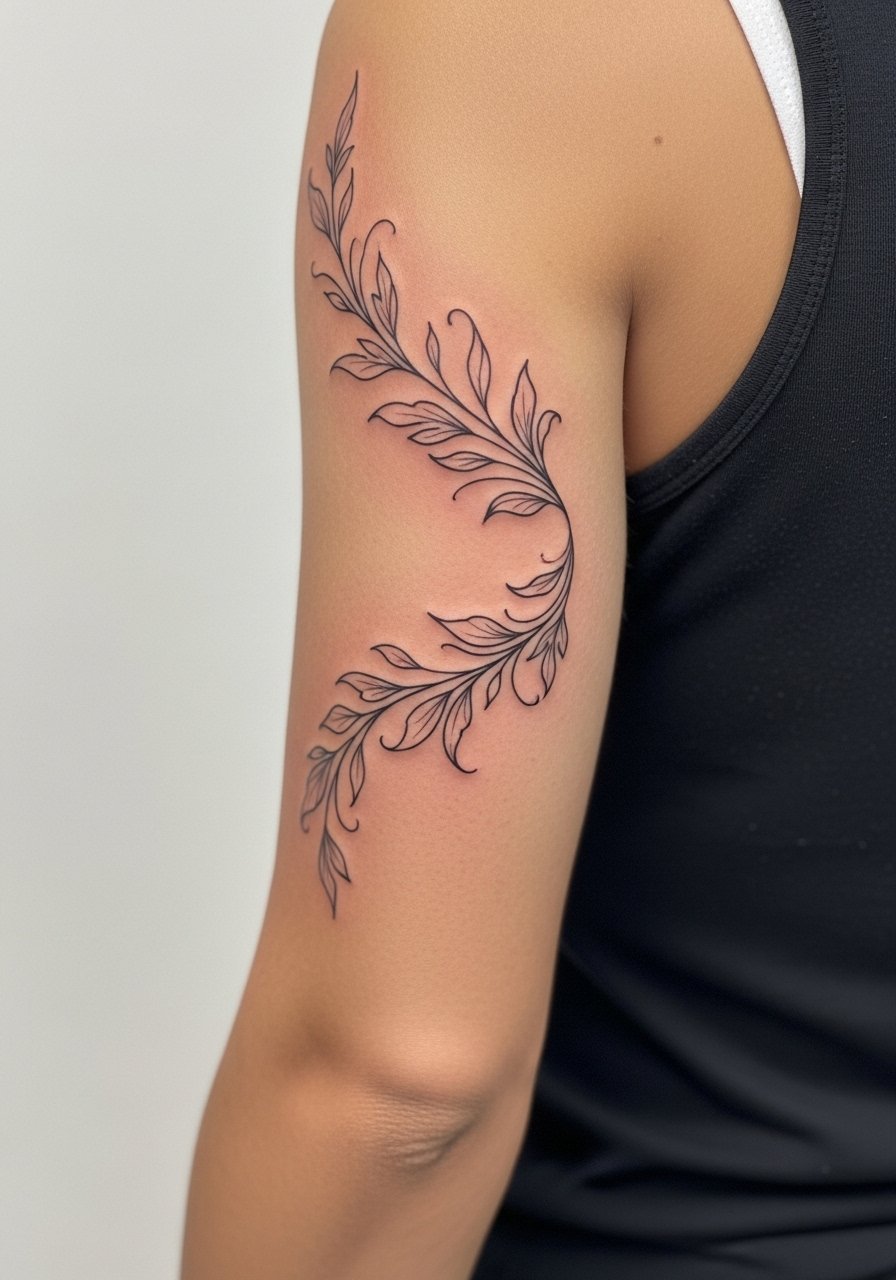
1. Fine Line Floral Branch on Outer Upper Arm Back
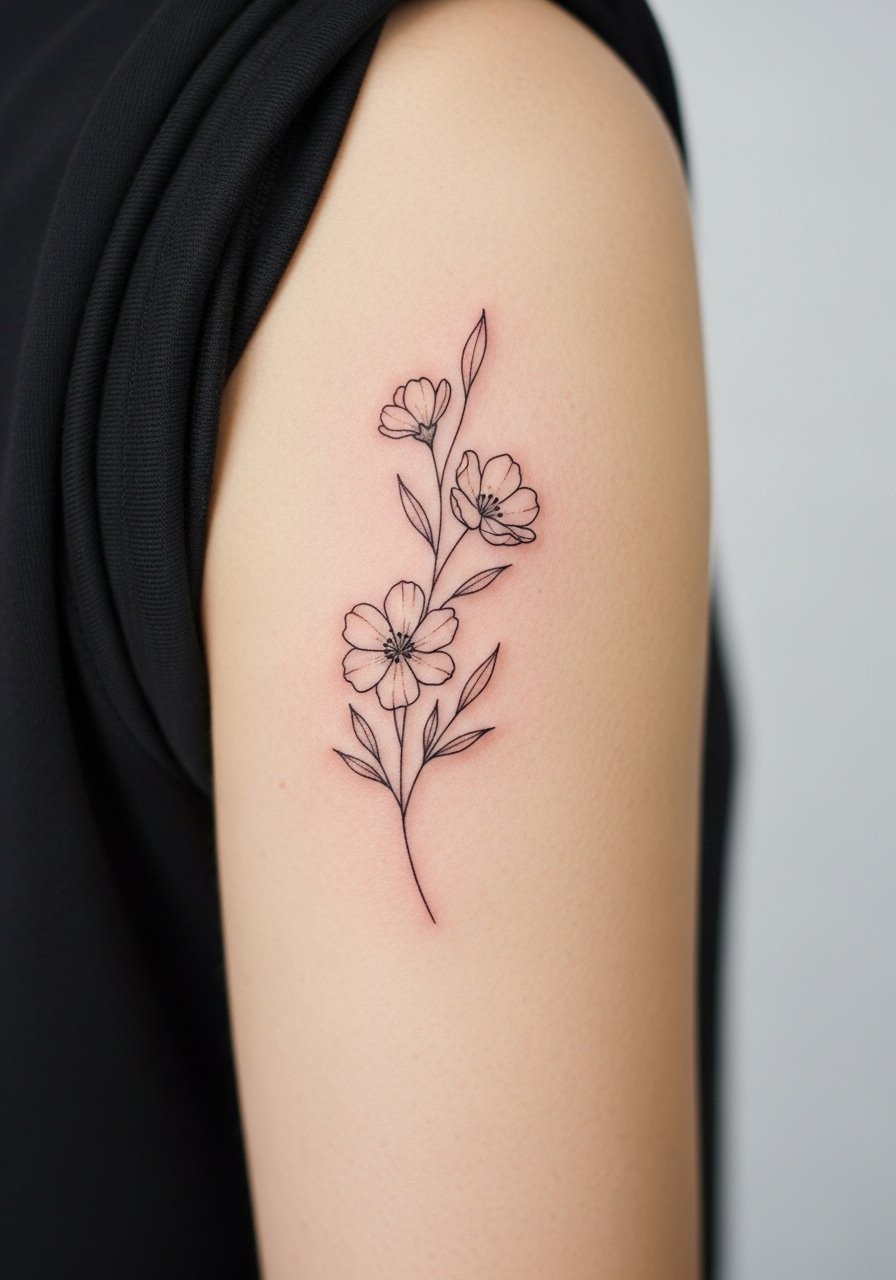
I recommend this if you want an elongated, delicate motif that follows the arm muscle. Bring photos showing the exact line weight you like and tell your artist you want slightly thicker fine lines for longevity. The fine line fading debate splits artists into two camps. One camp says fine line on arms blurs fast and needs annual touch-ups. The other camp argues that "thick fine line" and correct needle depth let the style age well. Expect moderate pain around the tricep curve and a one-session piece for 2-4 inches. For showing it off, pair with a sleeveless tank or a thin leather cuff bracelet to frame the branch.
2. Neo-Traditional Rose with Banner on Tricep Back
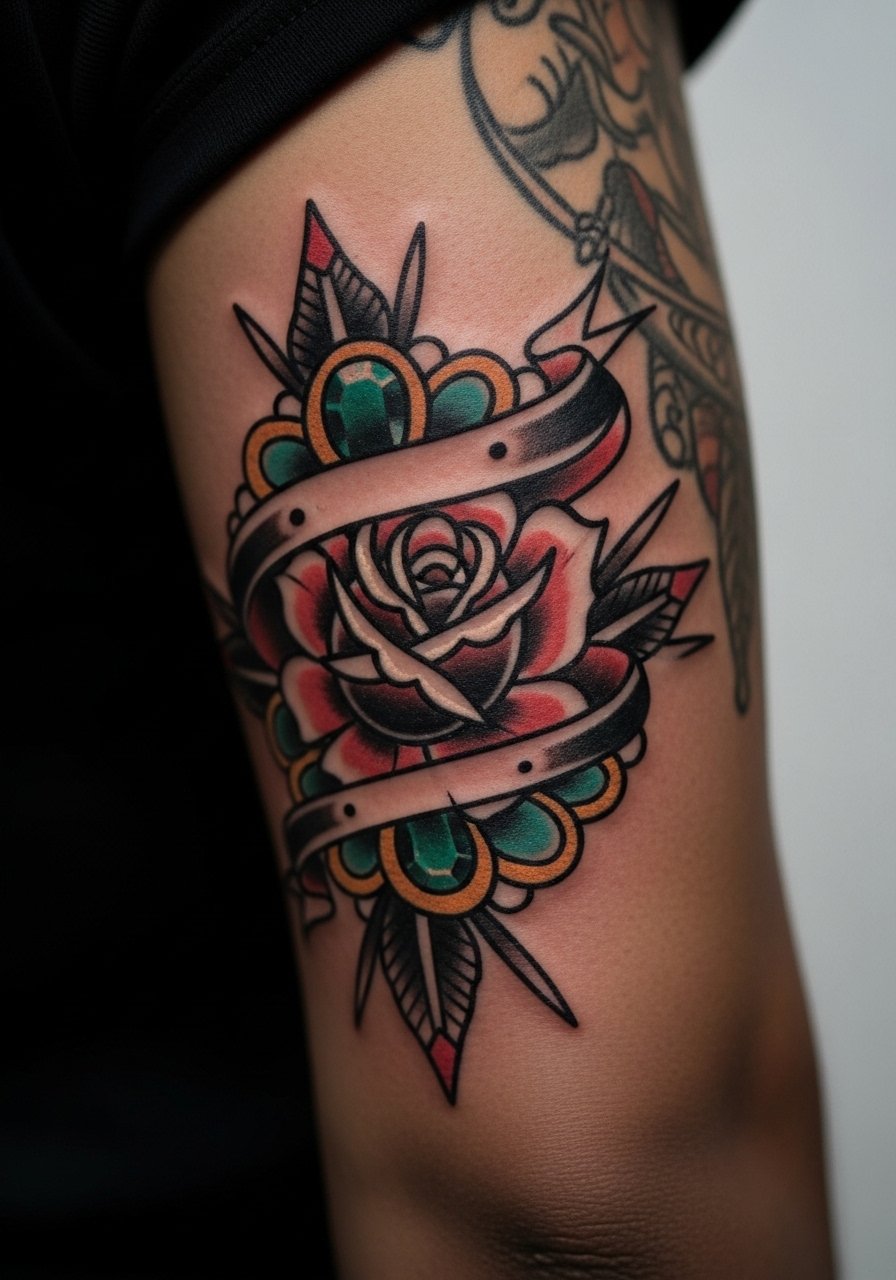
This is a classic for a reason. Bold outlines and saturated color keep the silhouette readable even as pigment softens. Tell the artist you want slightly larger line weight than the reference and a simple banner for a name or date if you want personalization. The tricep area sits flatter than the outer curve so blowout risk is lower here. Expect two sessions if you want color saturation and a touch-up slot within the first year. Wear a halter top or racerback sports bra or a loose open cardigan on session day so the artist can access the shoulder and tricep easily.
3. Minimalist Arrow Trio on Elbow Crease Back

This tiny trio reads directional without crowding the joint. The elbow crease moves a lot so the biggest mistake is centering too close to the fold. Ask for the arrows placed slightly above the crease and for bold minimalist lines rather than hair-thin strokes. Pain spikes when the needle hits near the bone, so short 10-20 minute bursts are normal. One session, quick touch-up if the artist spots any early blowout. For both style and comfort wear a rolled sleeve denim shirt you can pull up easily while keeping the elbow uncrowded.
4. Blackwork Geometric Mandala on Shoulder-Back Transition
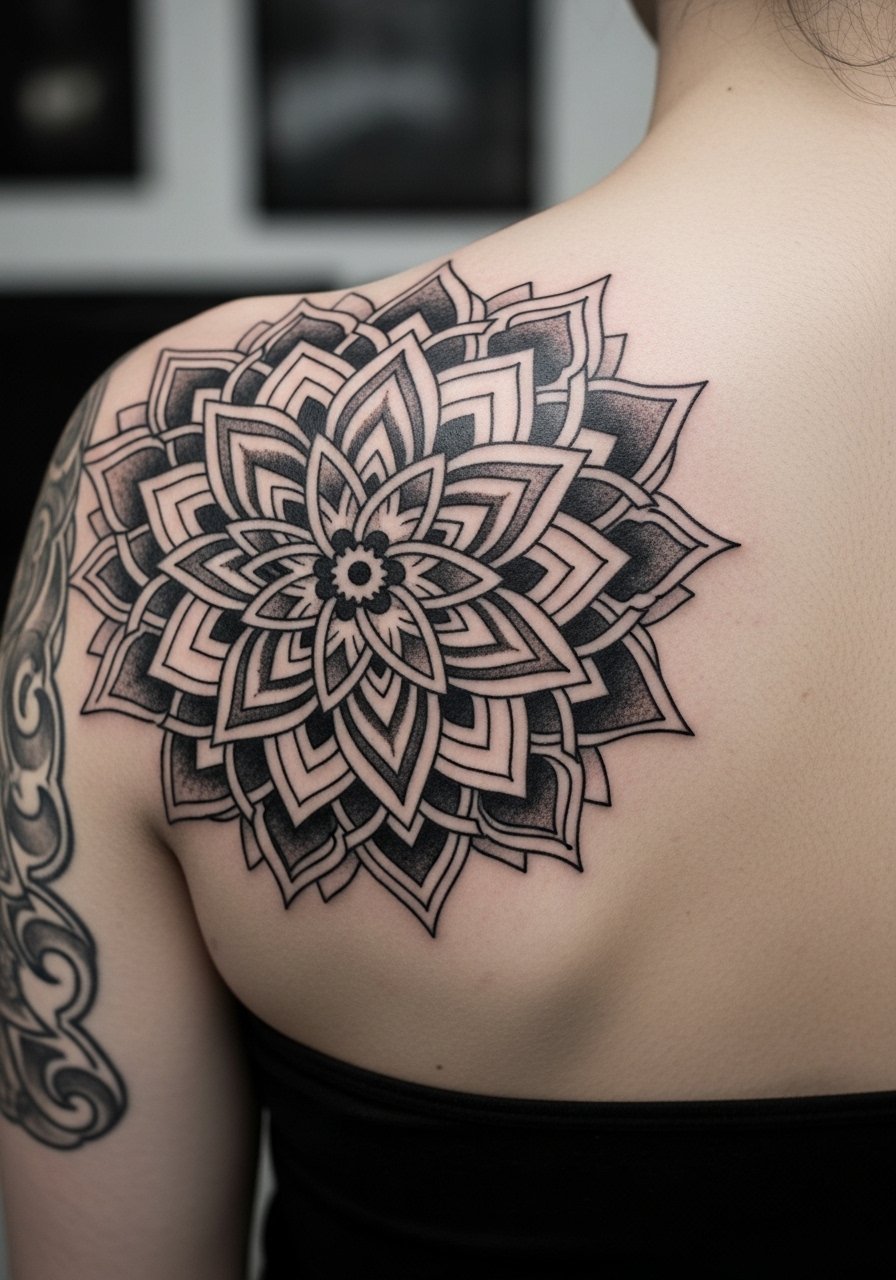
A mandala here uses the shoulder-to-arm transition to create a meditative panel that reads from a distance. The common mistake is making the pattern too dense for the scale. Ask for larger gaps in the pattern and stipple shading where you want softer edges. Blackwork holds up much better than painterly color on arms because saturation resists fade. Expect two to three sessions for a five-inch panel and a touch-up at three to six months if needed. Pair this with a strappy black camisole or an off-shoulder blouse to show the geometry without covering it.
5. Watercolor Butterfly Cluster Extending from Forearm

This painterly option is lively when fresh but requires honesty about aging. Watercolor fades faster on sweaty summer arms, so pick areas with less friction and ask your artist for subtle outlines to hold shape. The mistake is trusting pure wash without anchoring linework. One to two sessions, and expect color fade that may need re-saturation by year two depending on sun exposure. For session comfort wear a sheer chiffon blouse you can unbutton to expose the forearm without pulling tight fabric over the area.
6. Micro-Realism Feather Quill on Inner Tricep
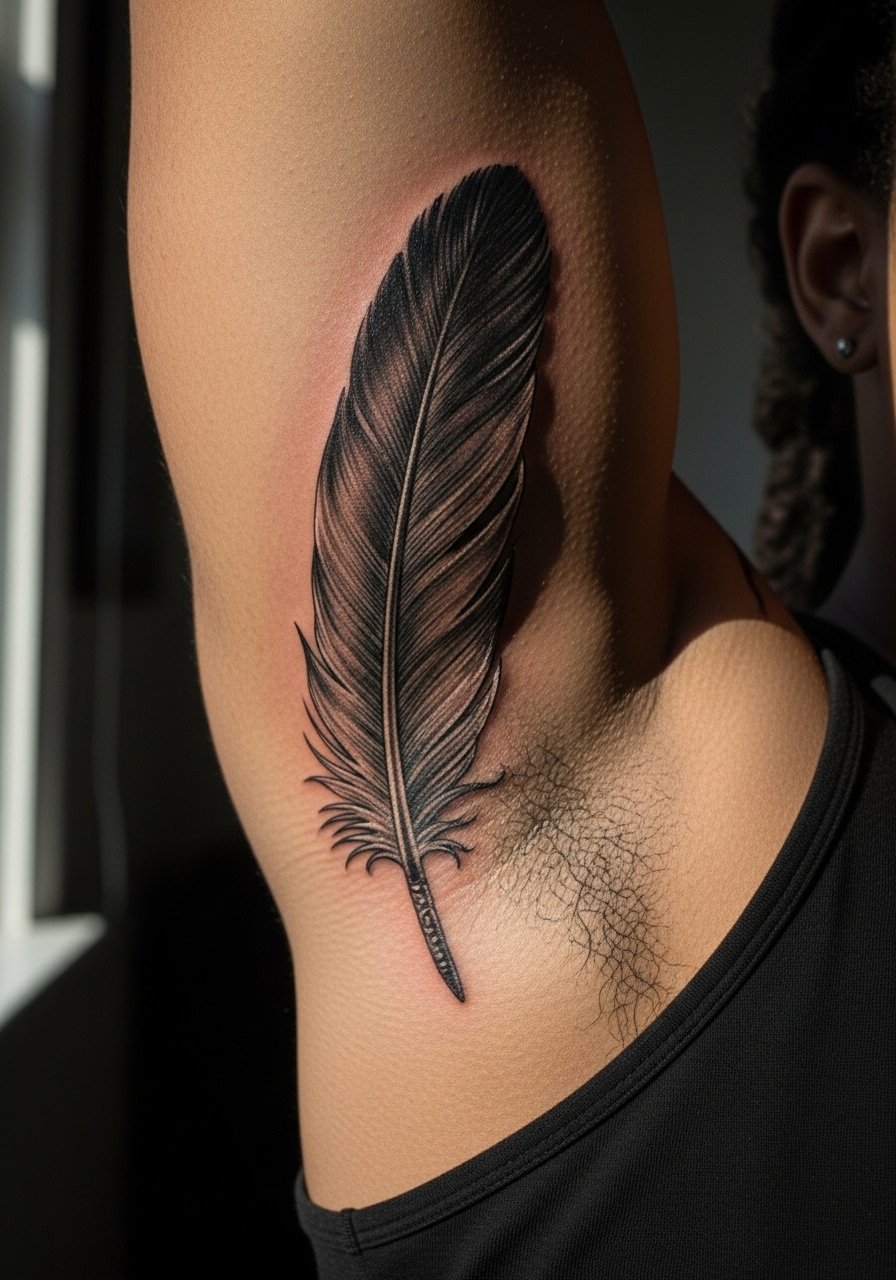
Micro-realism demands precision and a steady hand. The inner tricep curve gives a discreet reveal but the skin there can be softer, which affects how fine details settle. Ask the artist to plan a three-session approach if you want true texture and depth. A real mistake is compressing too much detail into a small area, because blowout hides the nuance. Pain is moderate because of muscle and movement. For the session wear a button-front shirt you can pull aside so the artist can access the inner arm without fabric dragging.
Pack Smart
The first six ideas lean on both delicate linework and small color fills, so a few targeted products smooth the session and early healing.
-
CeraVe Healing Ointment. Lightweight and non-greasy for tiny delicate work like the feather quill and fine line branch, helps avoid the pore-clogging heaviness some people get with thicker balms.
-
Australian Gold Antimicrobial Tattoo Lotion. Good for arm pieces that see sweat, it absorbs fast so the linework on the tricep and elbow crease stays readable during warm-weather healing.
-
Tatt2Away Balm. A lighter option mentioned by people who've had fine line work on the upper arm, less shine and less chance of clogging delicate needle channels.
-
Sugarcane-based gentle lotion. Breathable formula artists sometimes recommend for tricep areas that rub against clothing.
-
Hustle Butter Deluxe. Popular for active arms because it spreads thin and soothes sensitive areas without leaving a heavy residue that traps sweat.
7. Ornamental Vine Wraparound from Elbow to Shoulder
Vine wraps follow muscle contours to feel like "arm jewelry." The trick is to keep the linework open so the pattern breathes when the arm flexes. During consultation ask your artist to draw the vine on while you flex so the path complements your movement. Mistakes include making the vine too tight around the elbow joint which leads to distortion with weight gain or loss. Plan for one to two sessions depending on length. For show-off pairing a flowy peasant blouse with elbow slits keeps the vine visible without fabric rubbing.
8. Traditional Anchor with Rope on Mid Back Arm

Traditional work is forgiving over time because bold outlines and saturated fills age predictably. Ask for a slightly larger scale than your phone reference and insist on solid black outlines to anchor the color. A common mistake is shrinking the motif to fit a social media mockup, which erodes readability after a few summers. Expect two sessions if color saturation is important. For session wear consider a loose tank top that keeps the shoulder and mid-arm free.
9. Ignorant Style Mushroom Patch on Upper Arm Back

Ignorant style embraces the hand-drawn and imperfect, which is part of the appeal. It heals like any small color patch, but the mistake is asking for too many tiny color dots that later fade unevenly. One session usually suffices. For sessions wear a halter or racerback top so the artist can reach the shoulder without fabric tugging. This style is great for starting a back-of-arm patchwork because the loose lines integrate with future pieces.
10. Dotwork Sacred Geometry Panel on Tricep
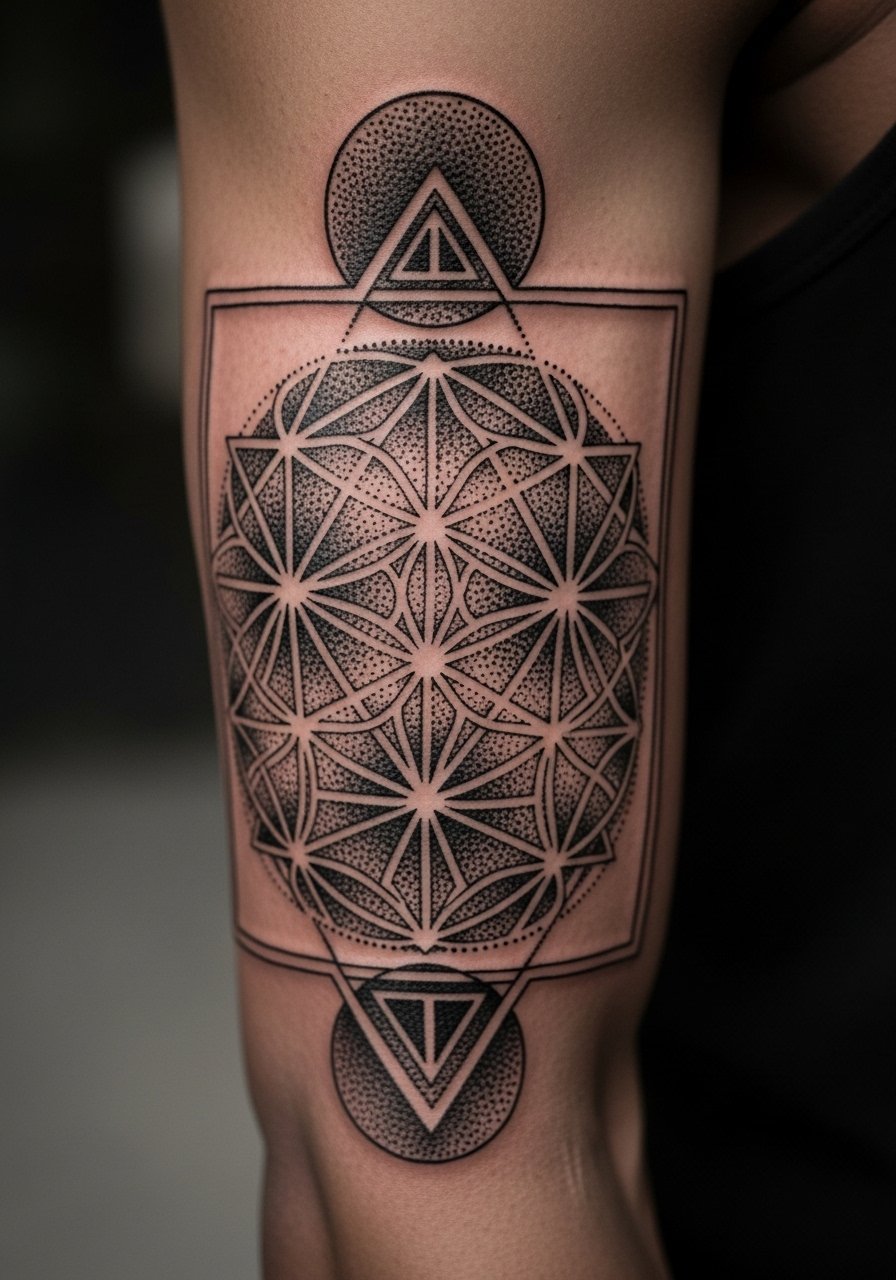
Dotwork needs space to breathe. The biggest mistake is compressing too many dots into a small square which causes merging as the skin ages. Ask for clear negative space in the design and for a plan that stages denser areas across multiple sessions. Pain is moderate because the tricep lies over muscle not bone. Expect three sessions for a five-by-five inch panel and a possible touch-up once the dots settle. For visibility choose strappy tops or an off-shoulder blouse so the geometry reads without competing accessories.
11. Fine Line Constellation Map on Inner Upper Arm Back
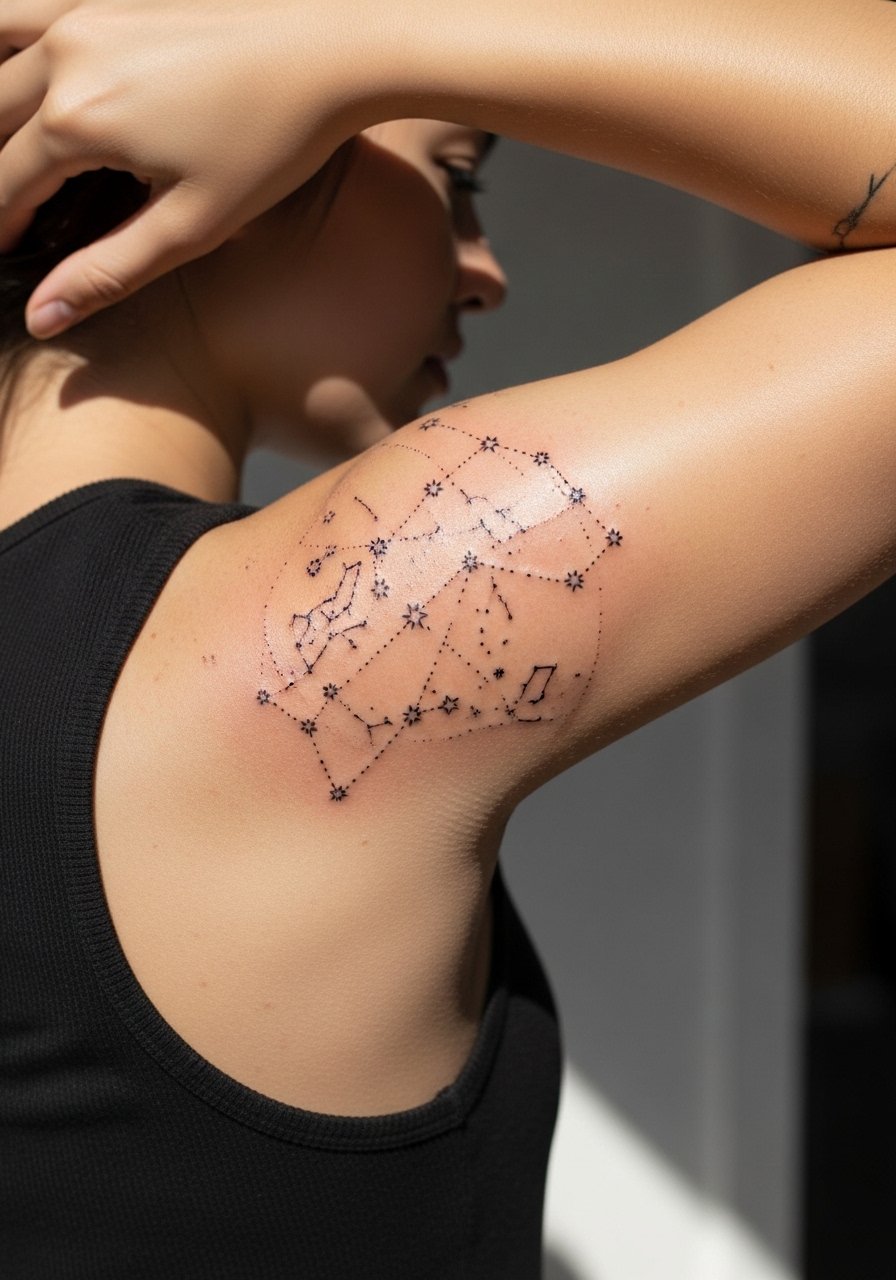
Constellation maps on the inner curve are intimate and directional. The inner upper arm can soften the finest strokes so request slightly heavier point dots and spaced connectors rather than long unbroken lines. A common issue is placing too close to the armpit crease where sweat and friction cause faster fade. One session for a 4-inch map and expect touch-up within one to two years depending on exposure. For both session comfort and exposure wear a linen kimono blouse or a button-front shirt you can shift to grant full access.
12. Neo-Traditional Hummingbird in Flight on Elbow Back

Dynamic placements like the back of the elbow make motion part of the piece. The common mistake is over-detailing the wings in a space that folds. Ask for bold outlines and simplified color planes so the motion reads even as pigment softens. Pain peaks when the needle crosses the elbow fold, so expect short focused passes. Two sessions can secure saturation and give the artist a chance to touch up any areas that need reinforcement. For the appointment wear a loose short sleeve tee that you can roll up without tight cuffs pressing the area.
13. Back Arm Hidden Gallery Patchwork Starter Piece

Think of this as the first tile in a future mosaic. Start with a small, well-spaced shape and plan spacing for future patches. The mistake is overcommitting the area with a large motif that restricts future flow. Ask your artist to sketch how a second and third piece could sit around the starter work. One session, quick and forgiving, and ideal for testing how your skin responds to linework over time. For the session wear a loose tunic or sleeveless top so the artist can reach the area without fabric friction.
14. Tricep Echo Placement Mirroring Front Arm Art

Echo placements create symmetry without a full sleeve. The key is to photograph both arms and show those views to the artist for size matching. A common mistake is not accounting for arm circumference differences, which can make the pieces look mismatched when flexing. Expect one to two sessions depending on size and a short touch-up if the mirrored lines need alignment. For showing it off wear a racerback tank so both echoes are visible in casual outfits.
15. UV-Reactive Outline for Darker Skin Night Glow

UV-reactive ink can add a playful night-time pop for darker tones that sometimes read lower-contrast in photos. The research here is sparse so bring examples and ask about safety and pigment longevity. The common mistake is relying solely on UV lines for visibility in daylight. Combine UV accents with bold black outlines for daytime readability. This is typically a one-session add-on to another piece. If you plan nightlife reveals test photos under blacklight to confirm the glow effect before committing.
16. Arm Muscle Flex Mockup Friendly Geometric Band

This is for people who want the design to move with muscle. Ask your artist to photograph your arm flexed and relaxed and to sketch the band for both positions. The main error is designing a static pattern that distorts when you flex. Planning for movement avoids future complaints about warped symmetry. One session for a simple band, two if you add dotwork panels. For the appointment wear a fitted muscle tank or something you can pull to show both relaxed and flexed shapes.
17. Small Script Memorial on Back Arm Curve

Memorial script belongs on the curve where it reads like a whisper. The mistake is selecting a font too thin or ornate for the arm curve. Ask for a test stencil and to see how the letters sit with your muscles relaxed and flexed. Fine scripts can blur over years if placed too close to the crease, so space letters and plan for a touch-up in year one. Wear a button-front shirt you can move aside during the session for easier access.
18. Whip-Shaded Stippled Fern on Outer Tricep
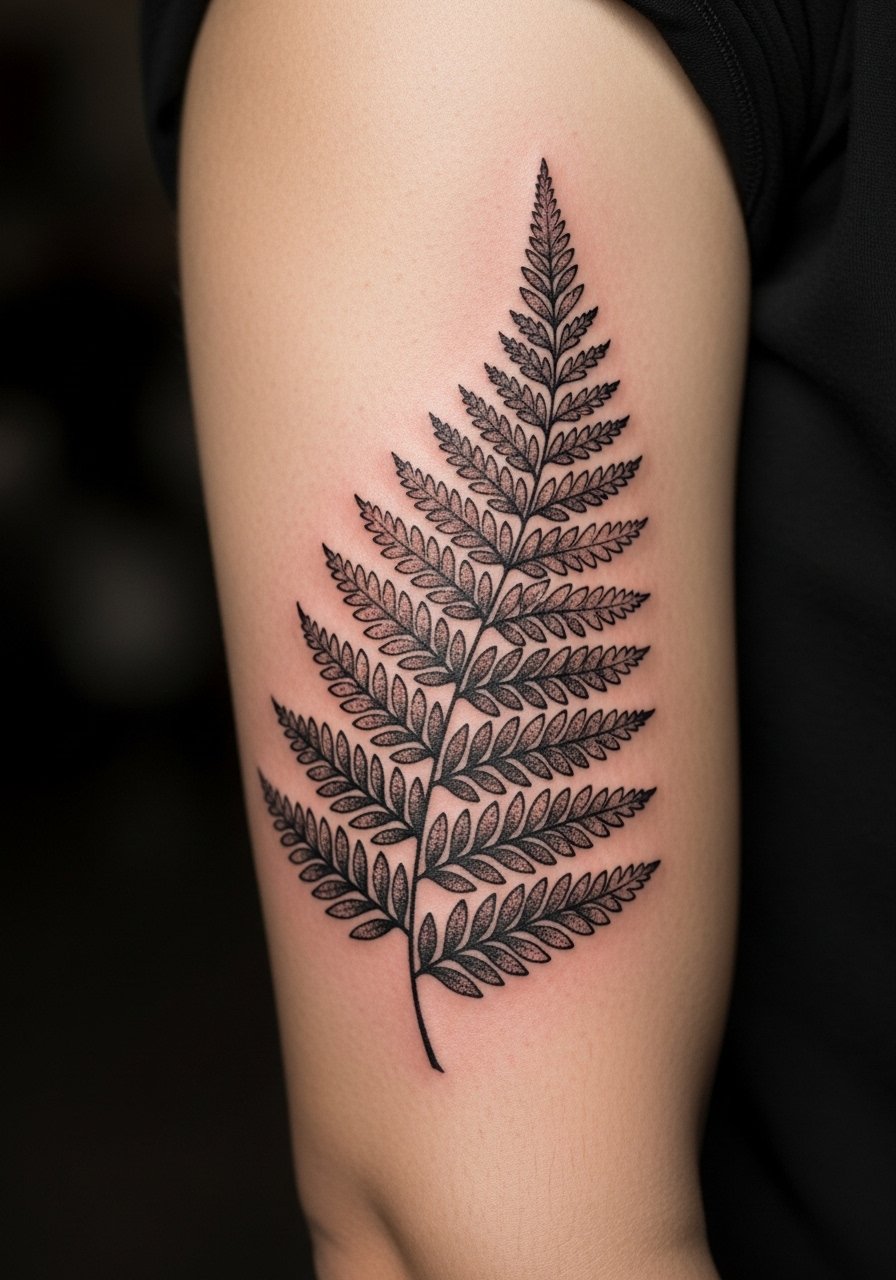
Whip shading gives a soft, organic fade that suits botanical forms. The mistake is asking for uniform smooth shading that loses texture as it heals. Request stipple edges where you want the gradient to keep texture long term. One to two sessions depending on size and complexity. Expect moderate discomfort on the outer tricep when the artist works long sweeps. For showing it off pair with a wrap-style kimono blouse in neutral linen so the fern reads against clean fabric.
19. Minimalist Chain-Link Wrist Extension onto Back Arm
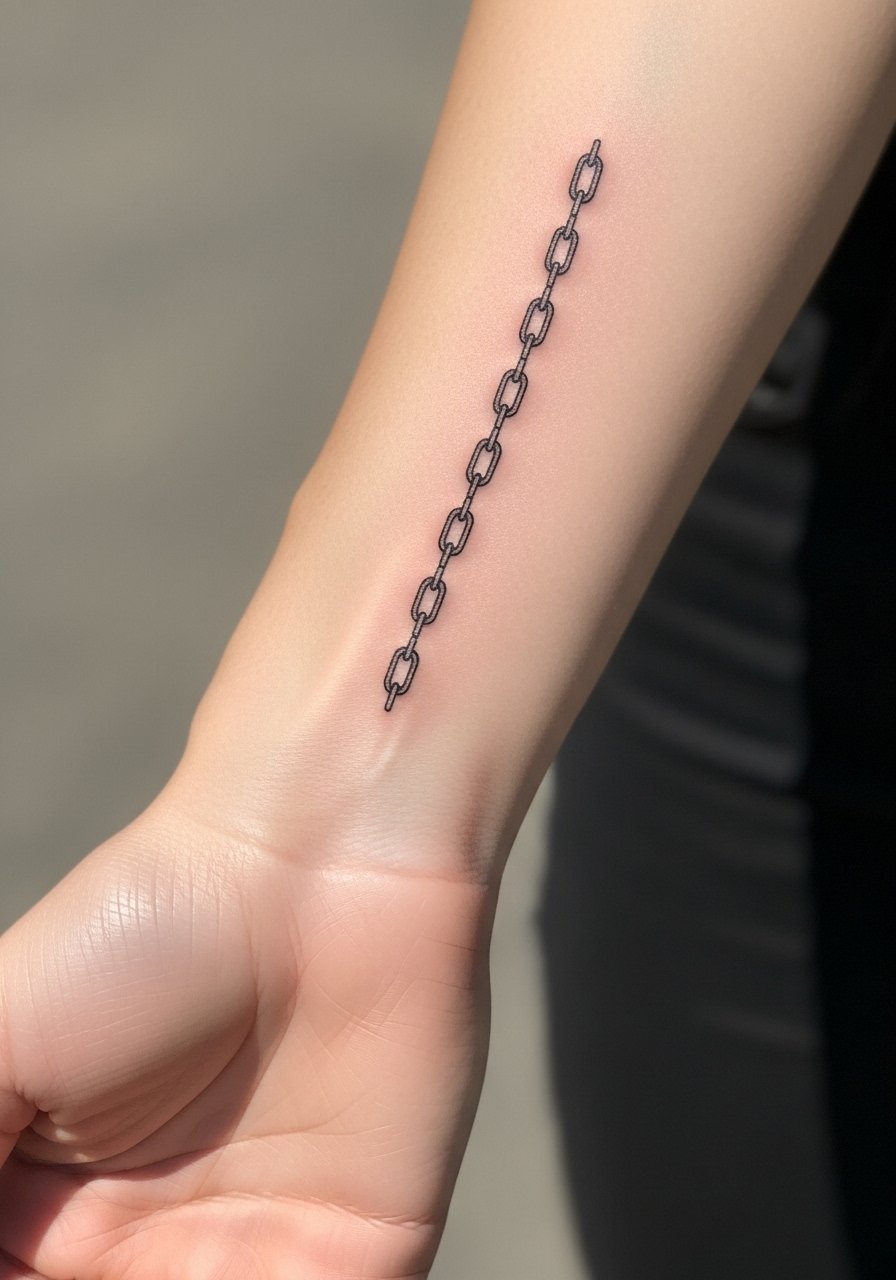
Extending a wrist motif up the back of the arm creates continuity. The common mistake is making each link too fine, which causes the chain to blur. Ask for slightly heavier link edges and spaced negative areas so the chain keeps its form. Pain at the wrist can be sharp but the upper extension is easier. One session for a short extension and a possible quick touch-up at three months if any links soften. For the session wear a thin chain pendant necklace to balance the look without covering the wrist.
20. Micro-Realism Portrait Fragment on Upper Back Arm

Portrait fragments can be striking and discreet. The inner tricep and upper back arm vary in skin texture so the challenge is choosing an artist who posts healed photos of similar placements. A common mistake is pushing for photo-level detail in a space too small to hold it. Expect multiple sessions and a careful touch-up plan. For the session bring a loose open cardigan or button-up so you can keep comfortable while the artist works the upper arm.
21. Ornamental Crescent Moon Panel on Back Bicep

A crescent panel reads like jewelry and sits neatly on the back bicep. Mistakes include over-detailing tiny filigree that clogs as it ages. Ask the artist to scale filigree elements up slightly and to plan negative space for lightness. One to two sessions based on ornamentation and a touch-up at six months if any filigree needs reinforcement. For evenings out pair this with a open-back midi dress to let the panel show without interference.
Frequently Asked Questions
Q: How worried should I be about fine line tattoos on the back of the arm fading quickly?
A: Fine line does fade faster on arms than bold blackwork because the skin there stretches and sees sun. I've noticed that "thick fine line" and slightly heavier dots help them last longer. Plan for a possible touch-up within one to three years depending on your lifestyle and sun exposure.
Q: Is Saniderm or dry healing better for back of arm pieces that see sweat?
A: Artists and veterans split on this. One camp favors adhesive films that keep the area moist and protected for several days. The other camp says trapping moisture can invite irritation if you sweat a lot. For active arms I recommend testing a thin breathable film for the first 24 hours and switching to a light lotion after any itch or excess moisture shows up.
Q: My arm tattoos shifted shape after weight change. Which placements resist stretch best?
A: Outer upper arm placements that sit over firmer muscle tend to resist stretch better than areas that gain or lose fat quickly. Triceps and the shoulder-back transition are safer bets than the inner arm crease if you anticipate body changes. Ask an artist to mock up the design while you flex to visualize movement.
Q: How do I find an artist who actually has healed photos of back-of-arm work?
A: Search hashtags like #backarmtattoo and filter by recent posts in cities you can travel to. Use directories and guest spot calendars to find portfolios that show healed shots, not just fresh stencils. Book a consultation and ask to see healed examples in the same placement and skin tone.
Q: Will dark skin hide my back arm tattoo in photos and on social feeds?
A: Darker tones sometimes need bolder outlines and saturated fills to read on camera. Many people add strong blackwork anchors to keep the shape visible. For night visibility you can ask about small UV accents but pair them with black outlines for daytime clarity.
Q: For a first back of arm tattoo, what should I wear to the session?
A: Wear something loose that exposes the specific area without dragging across the fresh work. For shoulder and tricep pieces a loose tank or button-front shirt works. For inner arm work wear a tank you can raise slightly so the artist has clean access.
