
Fine line tattoos dominate Pinterest right now, and the same artists pushing them are quietly booking touch-up appointments at year two. The aesthetic reads delicate at first, but pain, placement scale, and the way ink settles into moving skin are the reasons many people change plans. These 21 realistic girl tattoo ideas focus on designs that look like art both the day they heal and years later, and the first one starts with a low-profile forearm piece you can live with.
1. Fine Line Arrow on Inner Forearm
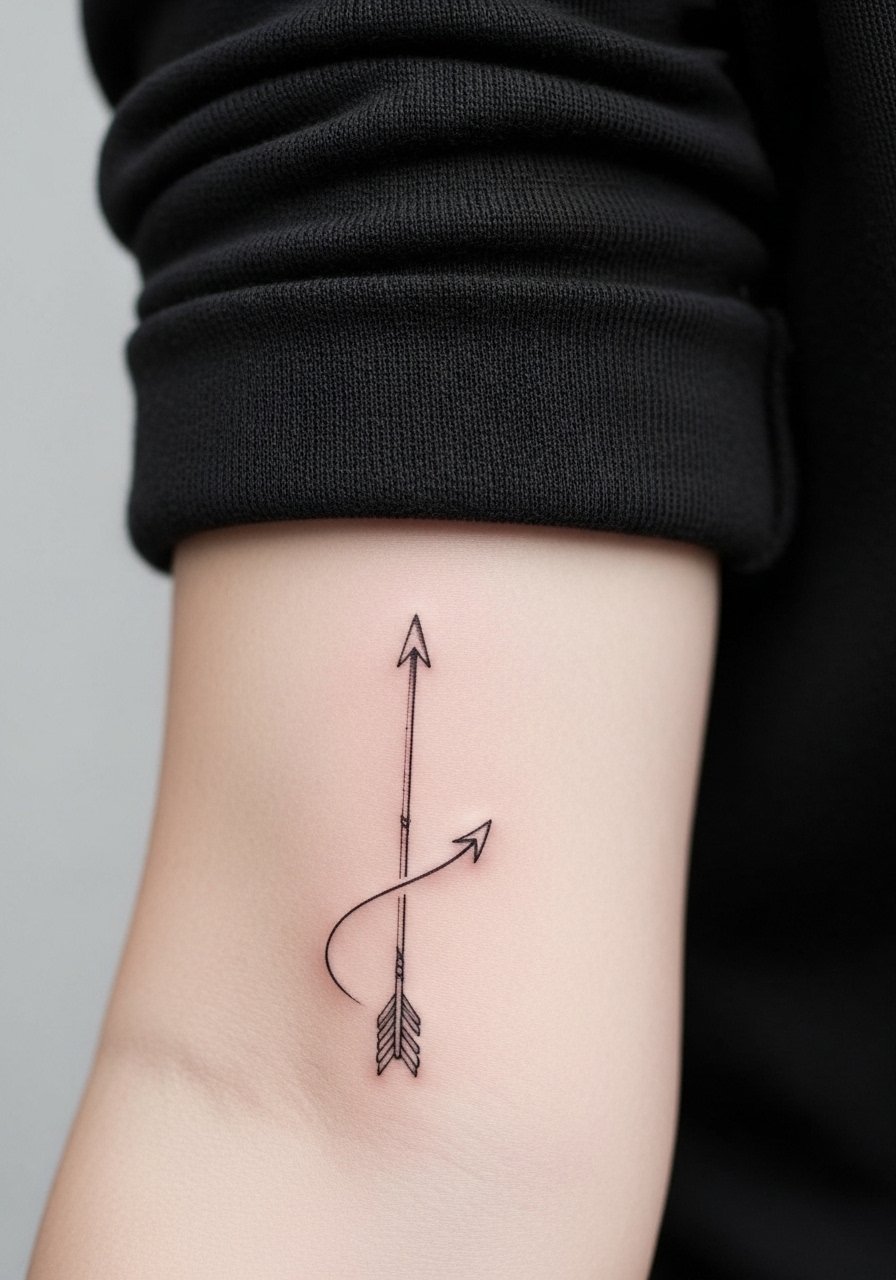
I have seen this small arrow age clean when it has deliberate spacing and slightly bolder spine linework. Ask your artist to keep the shaft slightly thicker than the tiny decorative lines so the arrow still reads at year three. Common mistake is asking for ultra-thin lines with dense crosshatching, which merges over time. Expect a one to two hour session and modest discomfort on the inner forearm. For showing it off, roll up sleeves and pair with a stackable thin chain bracelet that frames the arrow without crowding the wrist.
2. Micro-Realism Portrait at the Collarbone
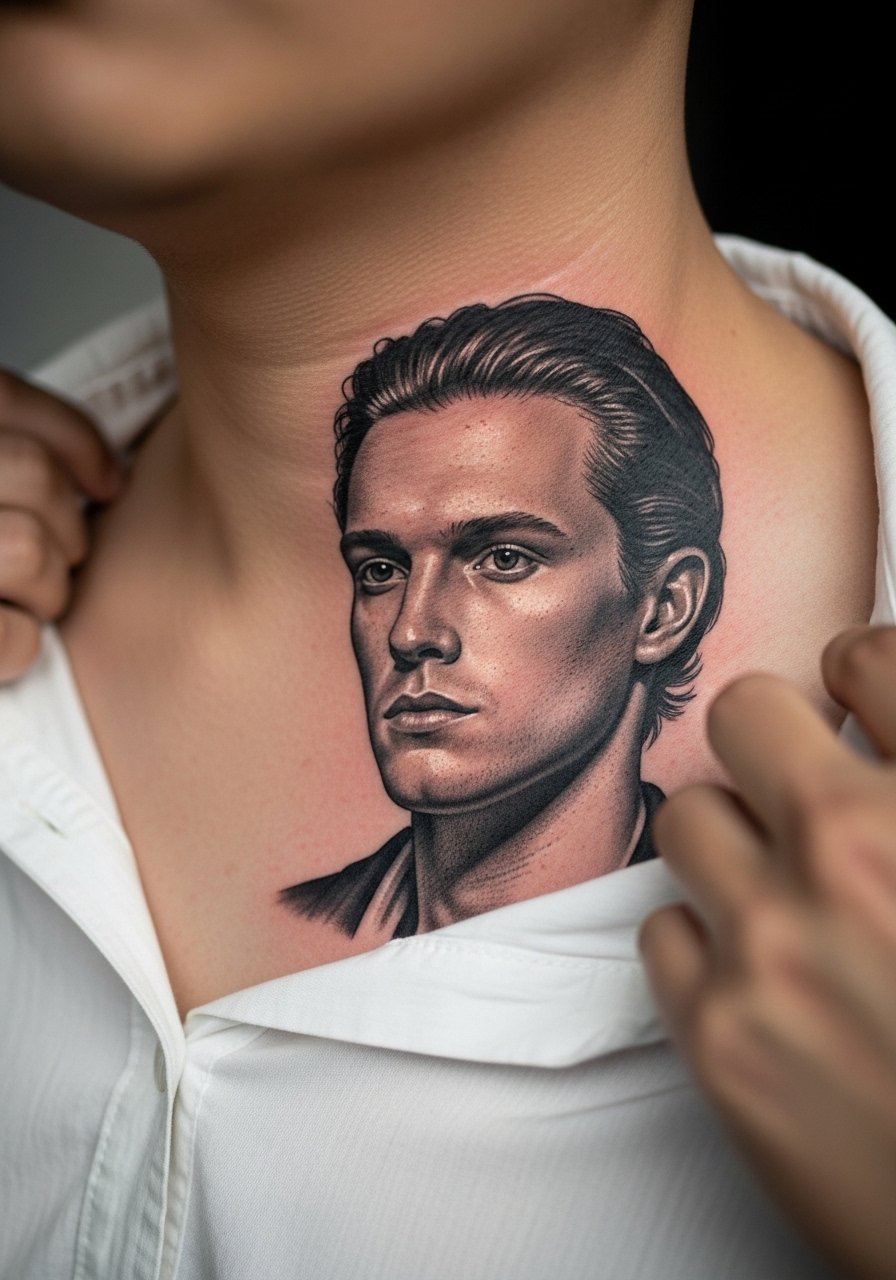
A small portrait near the collarbone reads intimate and artistic if it stays around three to four inches across. In consultation, bring photos showing head angle and lighting so the artist can translate facial planes into stipple and soft shading. The chest skin moves with breathing, so touch-ups are more common here than on the forearm. During the session, wear a wide-neck shirt you can pull aside without exposing the torso. Expect moderate pain and a two to three hour appointment depending on detail. Avoid cramped halftone in the reference because dense shading tends to blur faster on the chest.
3. Botanical Wrist Band with Negative Space
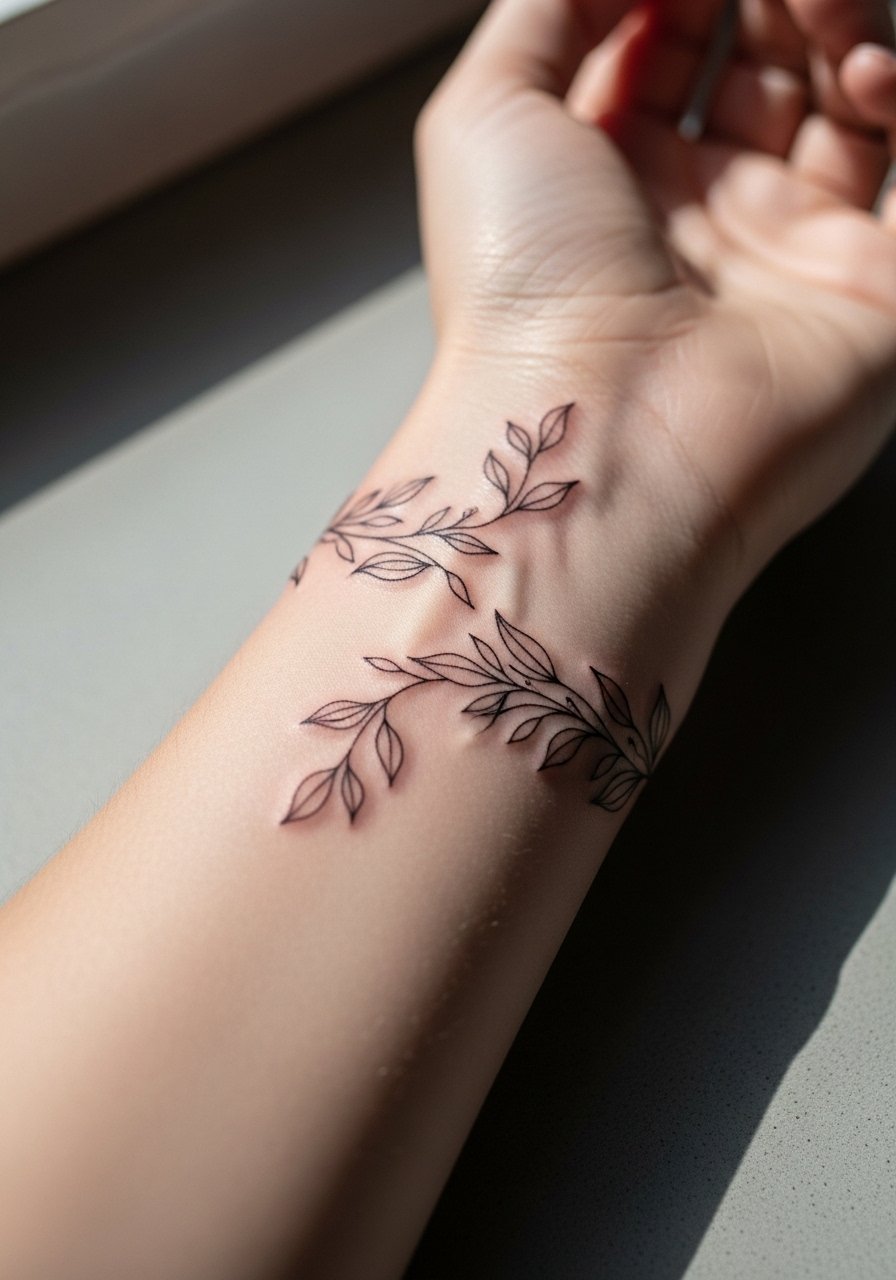
The botanical band reads like jewelry when the leaves include deliberate gaps. Tell your artist to map negative space instead of packing every vein with ink. A common error is a continuous heavy vine that looks tight fresh and becomes a dark ring after a couple of years. Expect one hour and mild to moderate wrist sensitivity. This placement needs careful line depth to avoid blowout. For showing it off, wear a minimalist watch with a slim strap so the tattoo remains the focal point.
4. Stipple-Shaded Ribcage Floral
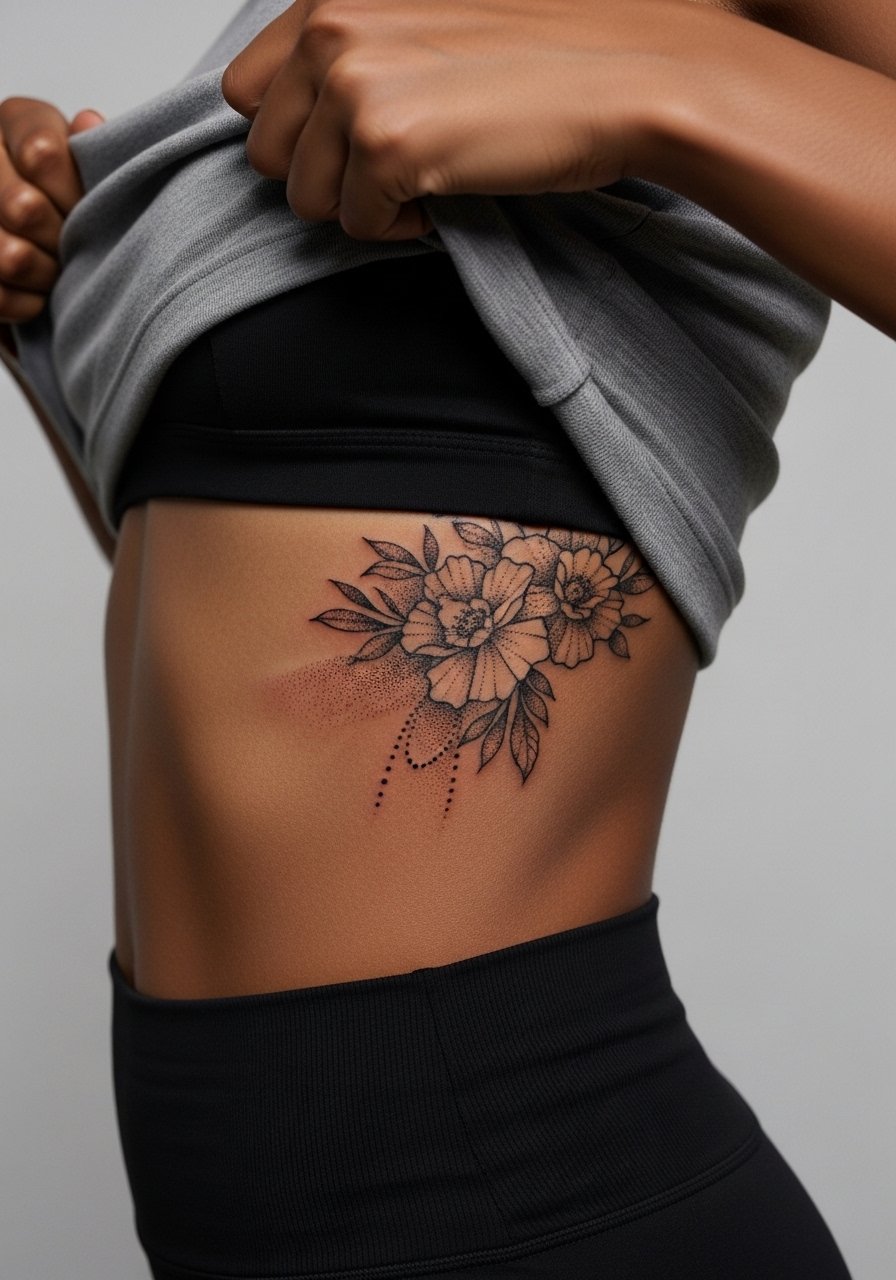
Fair warning, the ribcage is one of the higher pain areas. Artists split into two camps on fine line here. One group says the shifting skin and breathing blur delicate lines within two years. The other group argues that with proper needle depth and spacing, stipple shading settles beautifully. Ask the artist which camp they fall into and to show healed examples on similar skin. Sessions can be long and broken into parts. For appointment day, bring a zip-up hoodie you can lift easily without pulling at the area. The floral looks most enduring when the shading uses dots rather than dense fill.
5. Tiny Script Behind the Ear
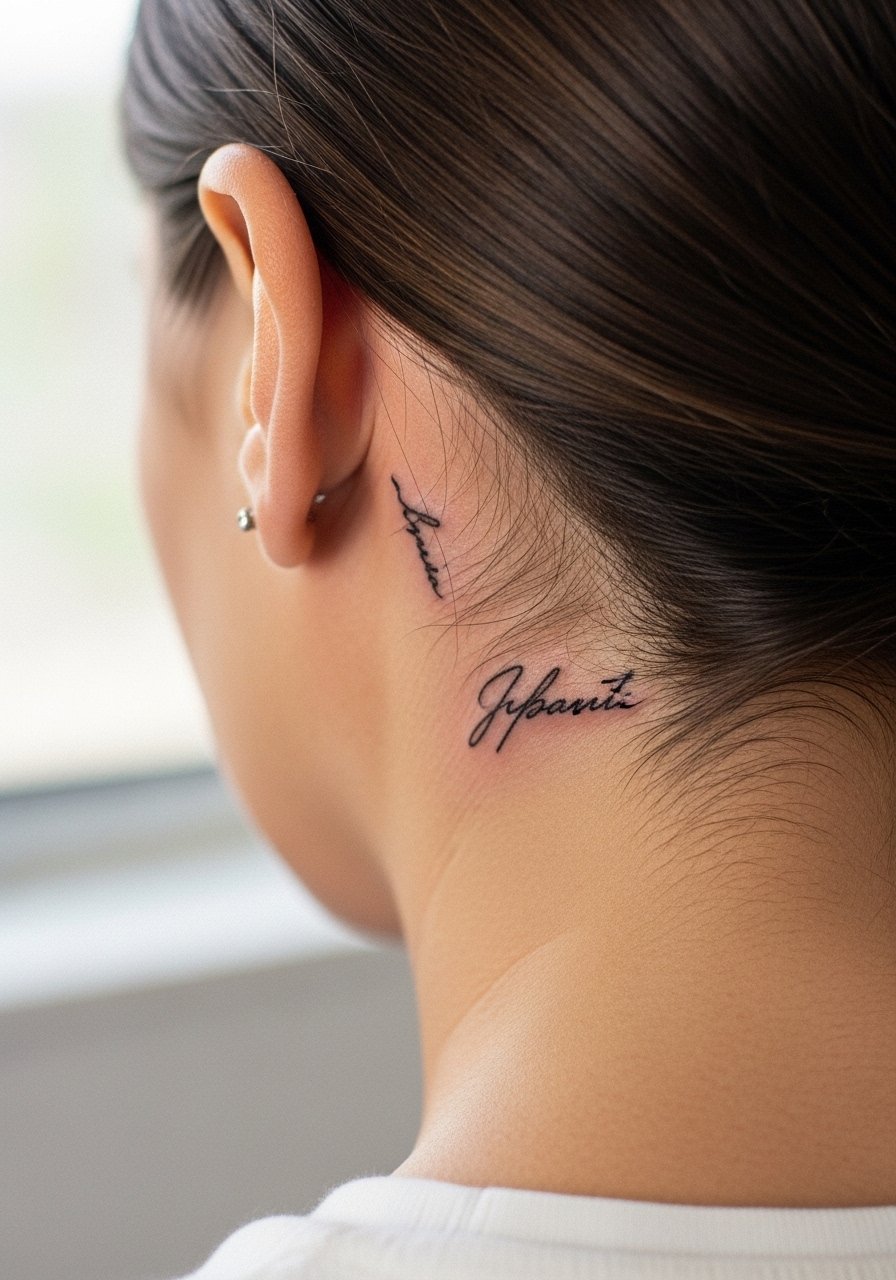
Behind-the-ear script reads private and delicate, and the exact lettering matters. Specify the exact word or short phrase in the reference so the lettering renders clean in the photo you see. The biggest mistake is requesting ultra-tiny script without checking healed photos on similar skin, because letters can blur into one another. Pain is low to moderate. For session access, tuck hair back and wear a button-down so the artist can work without excessive shifting. This placement is subtle for workplaces that still have conservative policies, so think about long-term visibility.
6. Micro-Realism Eye on Upper Arm
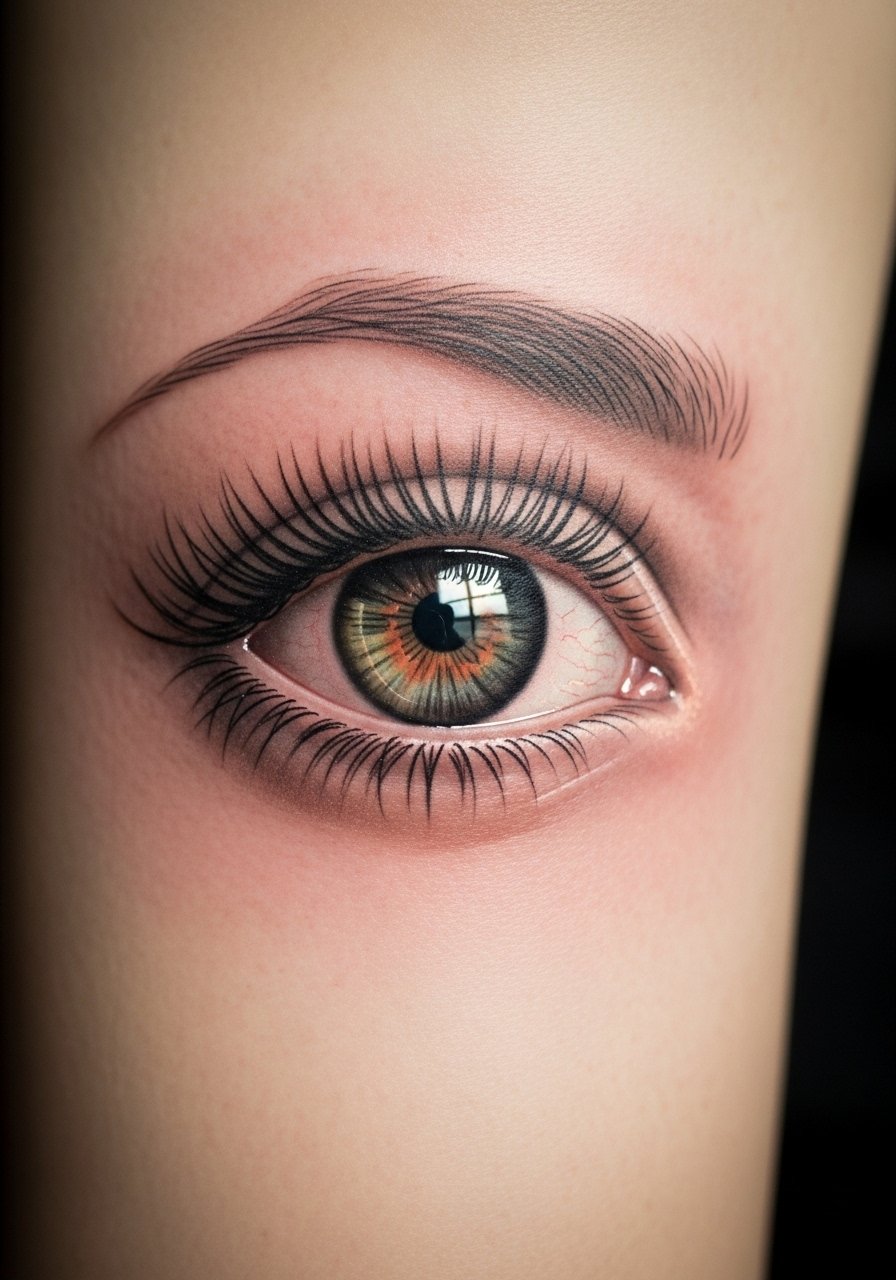
I have seen micro-realism eyes hold up well on the upper arm when shading is soft and contrast is measured. In the consult, request references that show the catchlight and shadow so the pupil doesn't flatten into a dark blob after a year. This placement is lower on the pain scale and often fits into a one to three hour session. Avoid dense black outlines around the iris because heavy saturation ages differently than soft greywash. For showing it off, short sleeve tees and a loose linen shirt let the piece peek from under fabric without competing with bold sleeves.
Studio Day Picks
The inner forearm, collarbone, and wrist pieces above each demand small session comforts and slightly different prep to keep lines neat during the first week.
-
Stencil transfer paper kit. Lets you preview the exact placement and line weight on skin, which is vital for the tiny script and arrow pieces above.
-
Topical numbing cream. Applying per instructions before a ribcage or collarbone session can ease the first hour without obscuring fine shading.
-
Thin protective film roll. Useful for wrist and hand tattoos that face constant washing and friction during the initial healing window.
-
Fragrance-free gentle body wash. Cleanses healing skin gently after showers, especially helpful for collarbone and ribcage work.
-
Aquaphor healing ointment. A thin layer in the first days locks in moisture without clogging the fine channels that delicate linework depends on.
7. Geometric Mandala on Upper Back
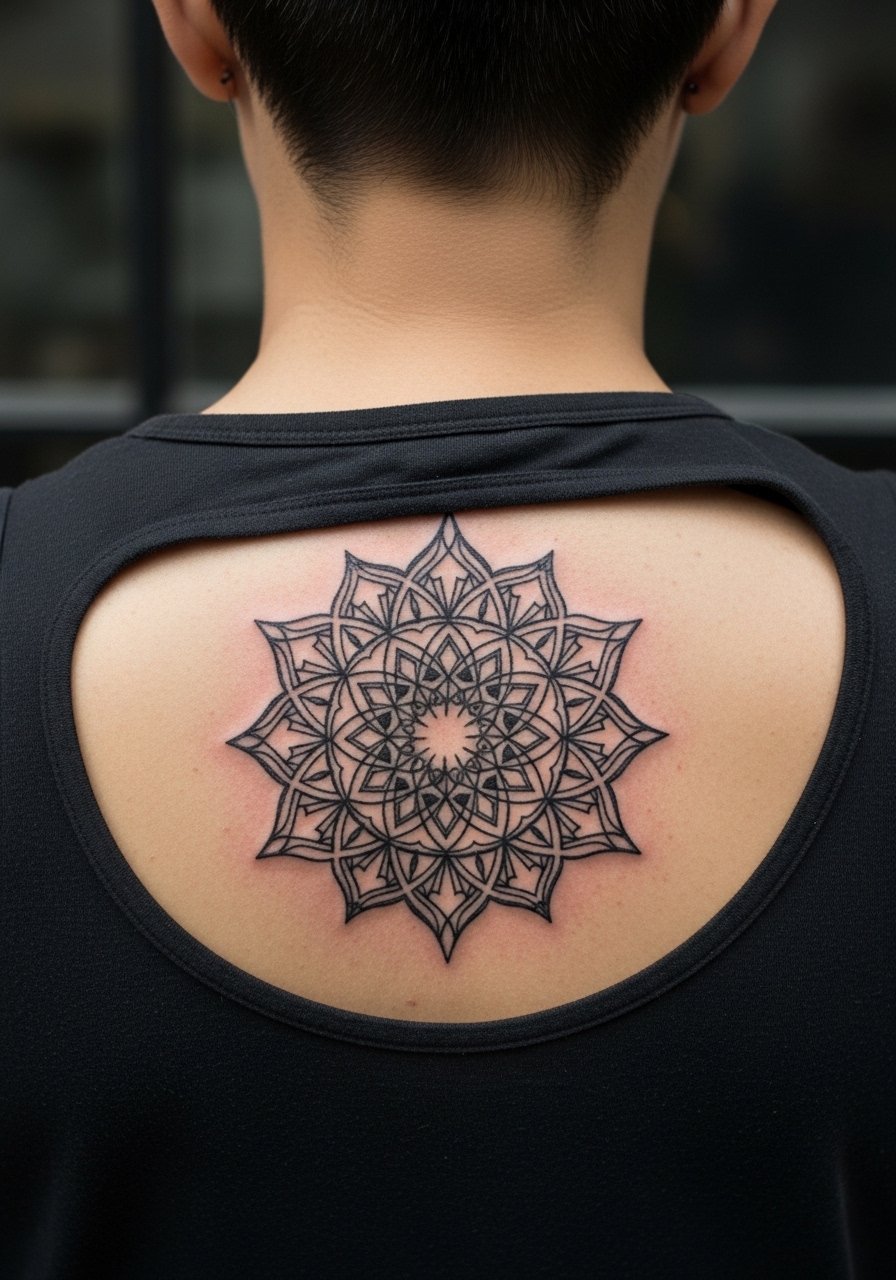
A mandala on the upper back reads architectural when the artist spaces the concentric rings. The mistake is shrinking it too small. Small dense mandalas become muddied after a few years. Tell the artist to prioritize negative space between rings and to center the design on a stable bone landmark like the spine line. Pain is moderate and sessions often run two to four hours. For the appointment, wear a tank top that you can pull aside without being cold. The upper back tolerates heavier blackwork better than the forearm.
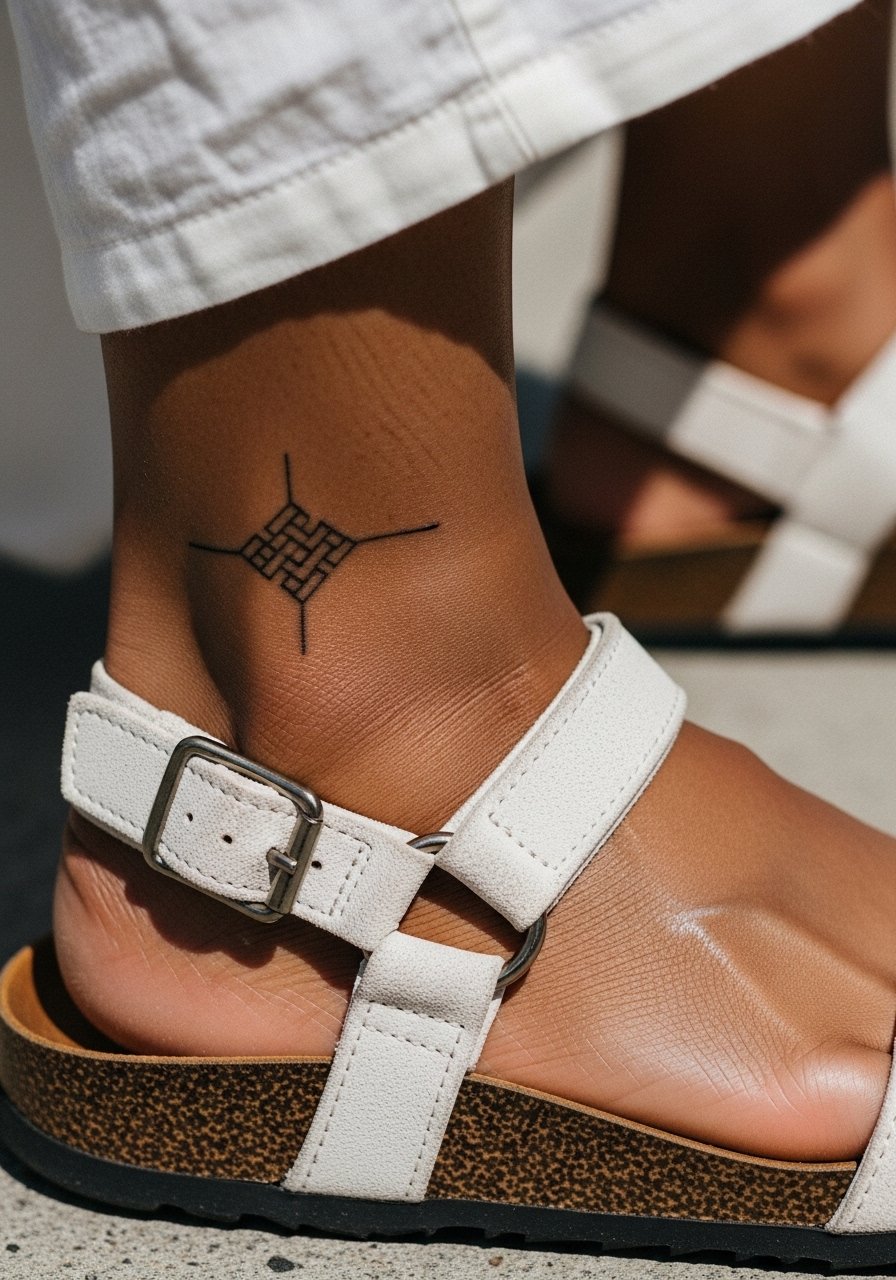
8. Fine Line Ankle Constellation
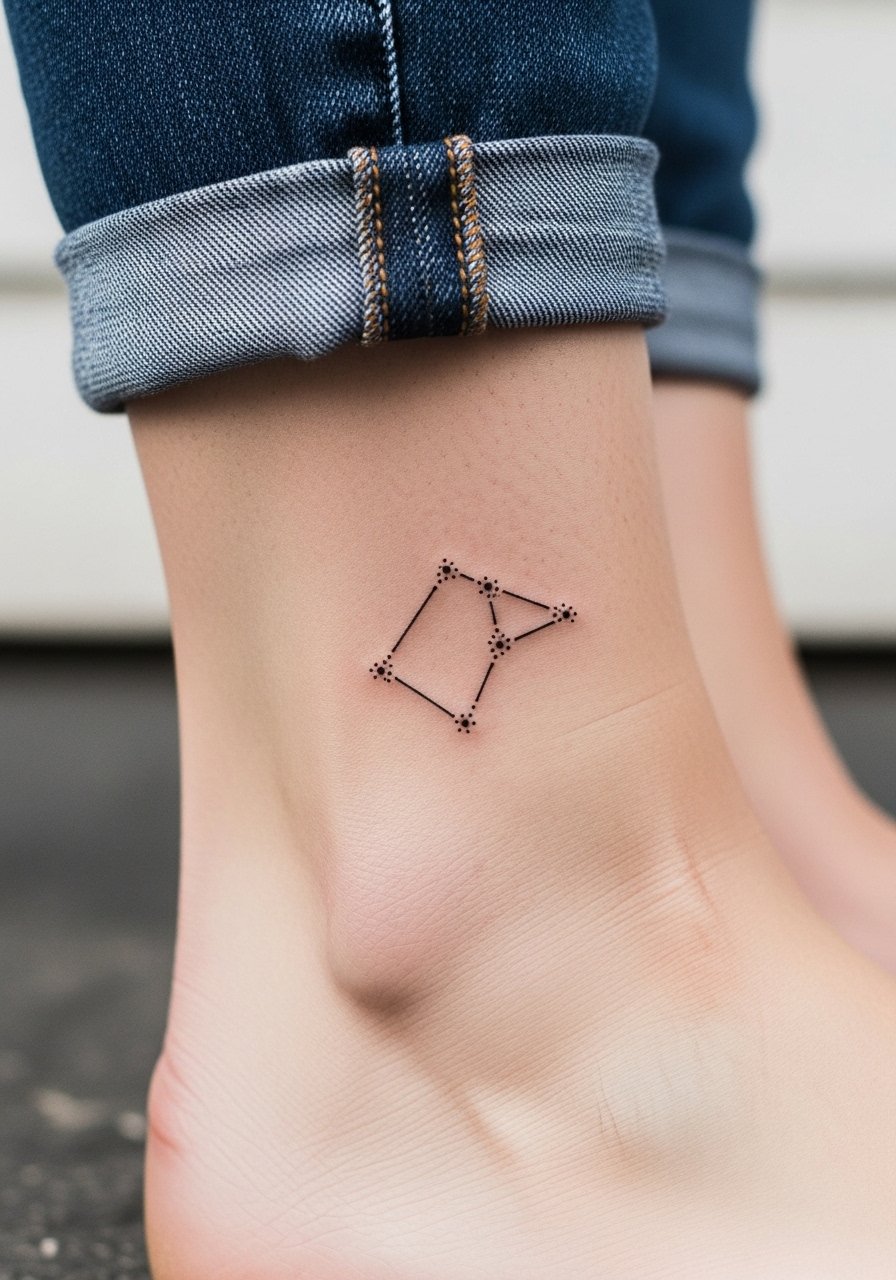
Ankle tattoos face constant rubbing from shoes and socks, so spacing and touch-up plans matter. Ask for slightly bolder dot endpoints and a touch of contrast in the connecting lines to prevent early fading. Sessions are short and pain is variable depending on bone proximity. For showing the tattoo, roll jeans or wear sandals that expose the ankle but do not press across the ink. Expect a touch-up in year one if you wear tight footwear often.
9. Watercolor-Influenced Peony on Thigh
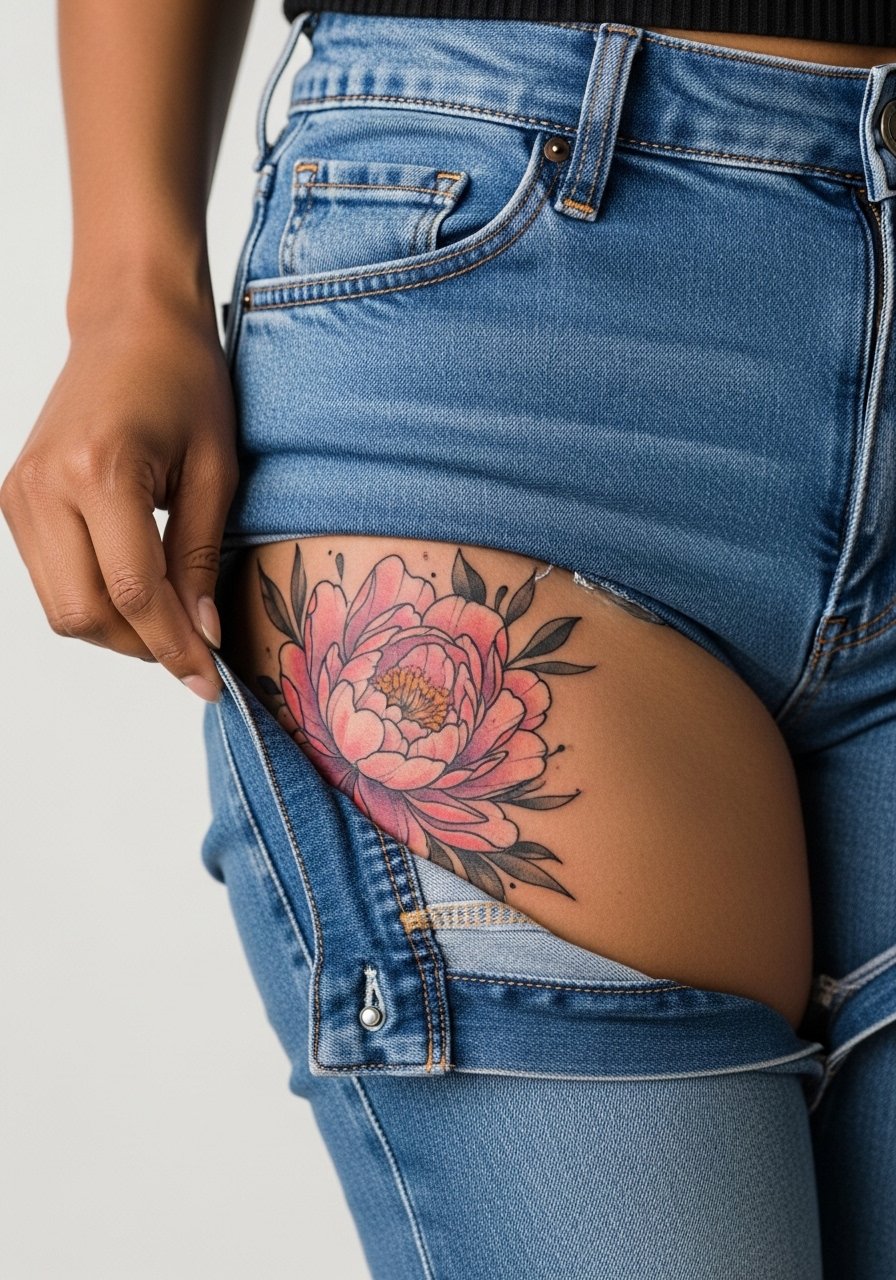
Watercolor-style tattoos cause debate in the community. One camp dismisses watercolor as a pure artistic look that fades into a patchy blur on many skin types. The other camp says that when artists translate watercolor into controlled washes and anchor them with fine line outlines, the effect lasts much better. If you like painterly edges, request subtle outlines or stipple anchors around petal shadows. Thigh skin is forgiving and the session feels less sharp than ribs. For the appointment, wear loose shorts that you can pull down slightly without stretching the area. Plan a follow-up touch-up for color refresh if you spend a lot of time in the sun.
10. Script Bracelet Tattoo Around Wrist
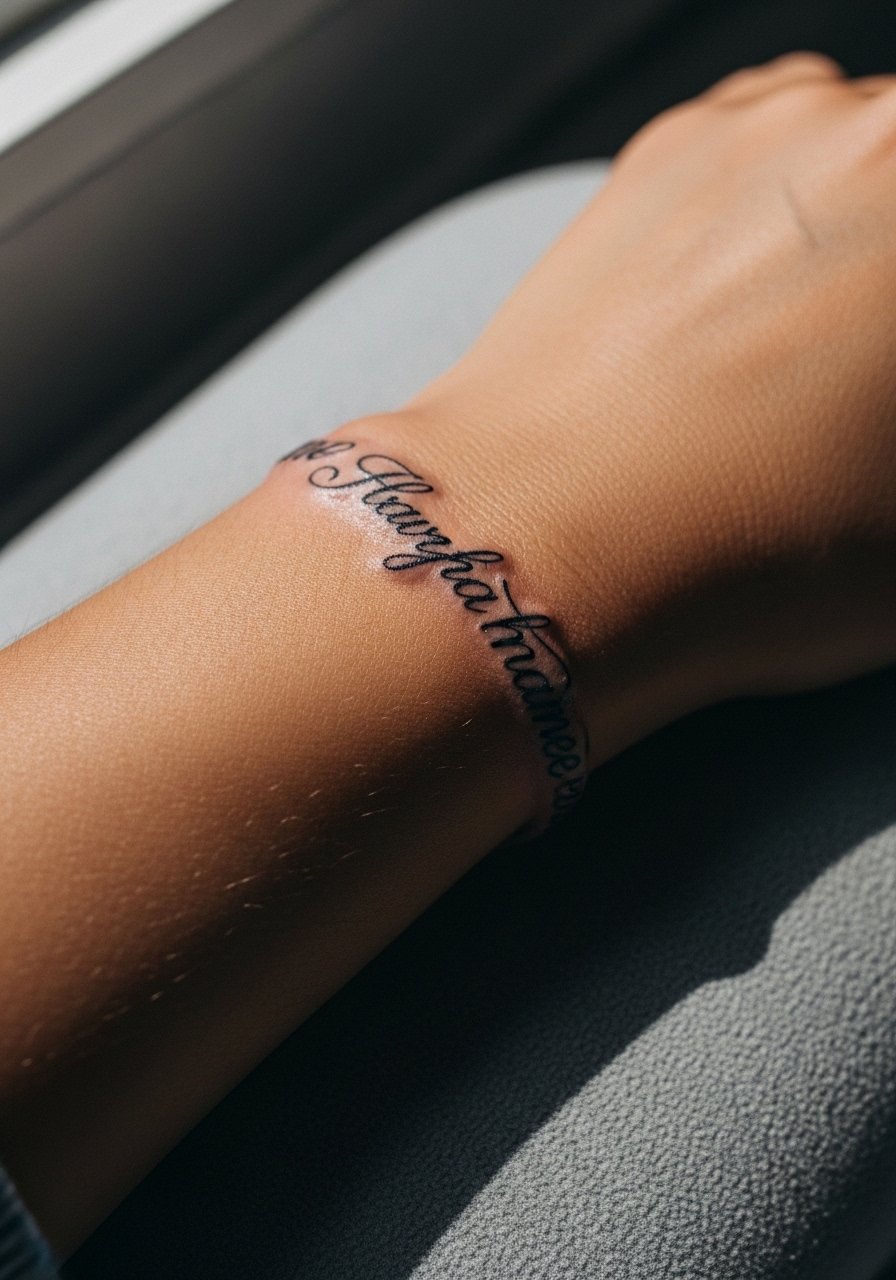
A script bracelet reads like a sentence that travels around the body. The critical consultation point is spacing. Have your artist print the script at full scale and wrap it around your wrist to check readability. Too-tight lettering becomes illegible as lines soften. Session time is short but expect to shift position for precise placement. For showing off the band, pair it with a thin chain pendant or simple bangles that do not sit directly on top of the ink. Fingers and wrist are high-motion areas so a touch-up at year two is common.
11. Classic Rose on Outer Thigh
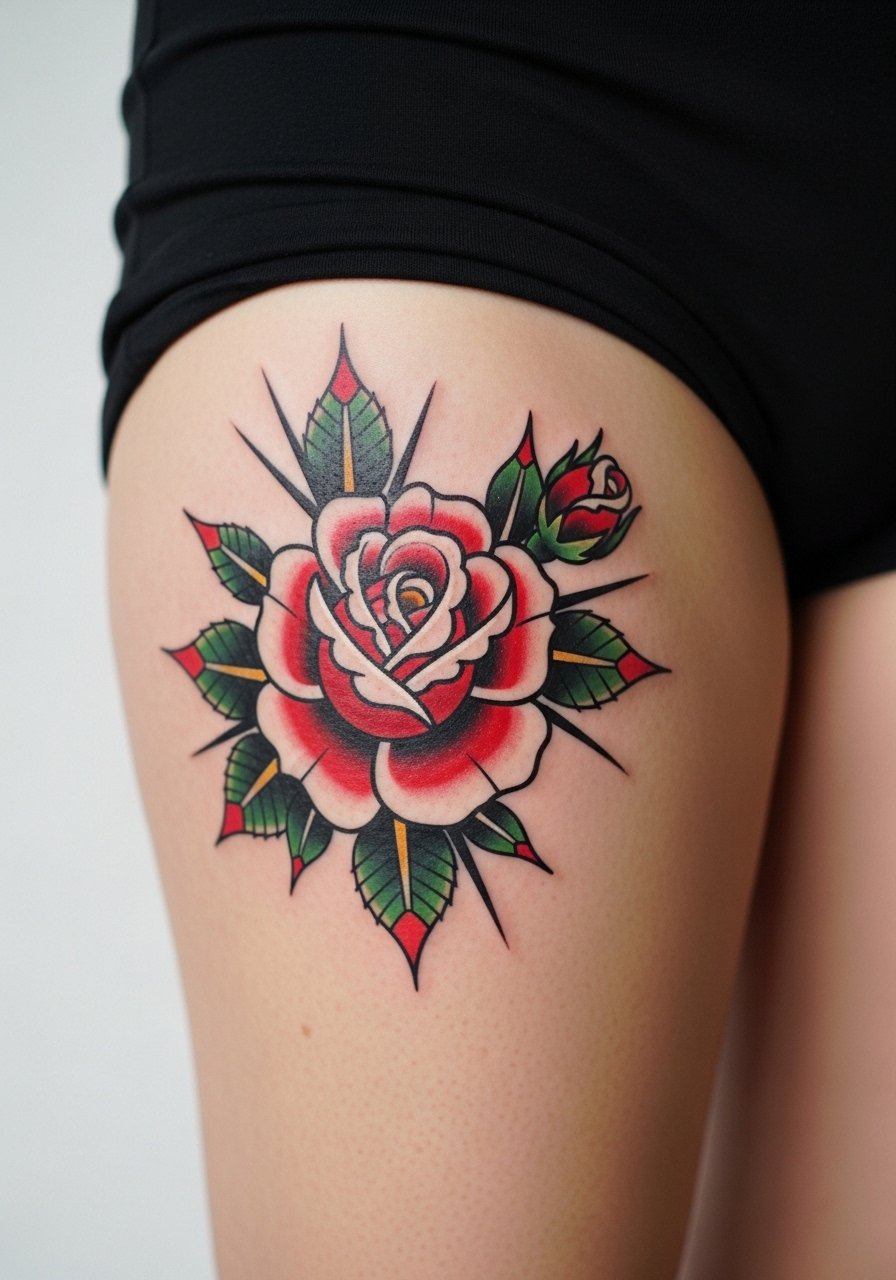
Outer thigh roses age well because the skin there is stable and less exposed to sun. The session can be comfortable and allows for more saturation. A frequent mistake is compressing too much detail into a small area, which can prevent the petals from staying readable over time. Bring larger references and ask for bold petals with measured negative space. For the session, loose bottoms or a wrap skirt make access straightforward. This piece is a good choice if you want color with lower long-term fading risk than ankle or hand placements.
12. Minimalist Spine Line with Dots
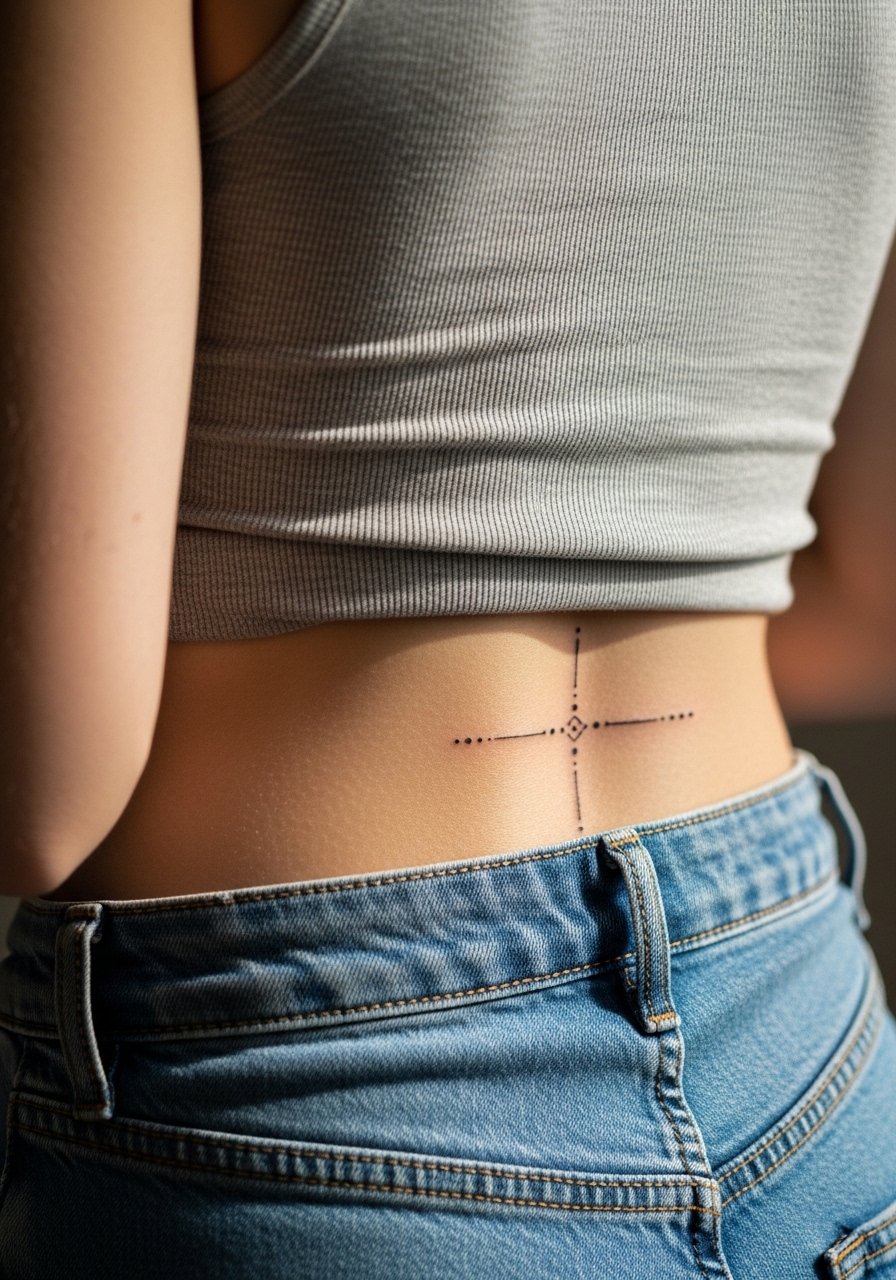
Spine work is visually striking and plays well with open-back clothing. Tell the artist how long you want the line and whether dots should be evenly spaced or clustered. Pain is moderate to high depending on how close the needle runs to the bone. The common error is starting the line too close to the waistband where friction will occur. For showing it off, an open-back dress or a backless top frames the spine without covering key areas. Expect touch-ups if the lower back sees frequent rubbing from belts or bag straps.
13. Realistic Hummingbird on Shoulder Blade
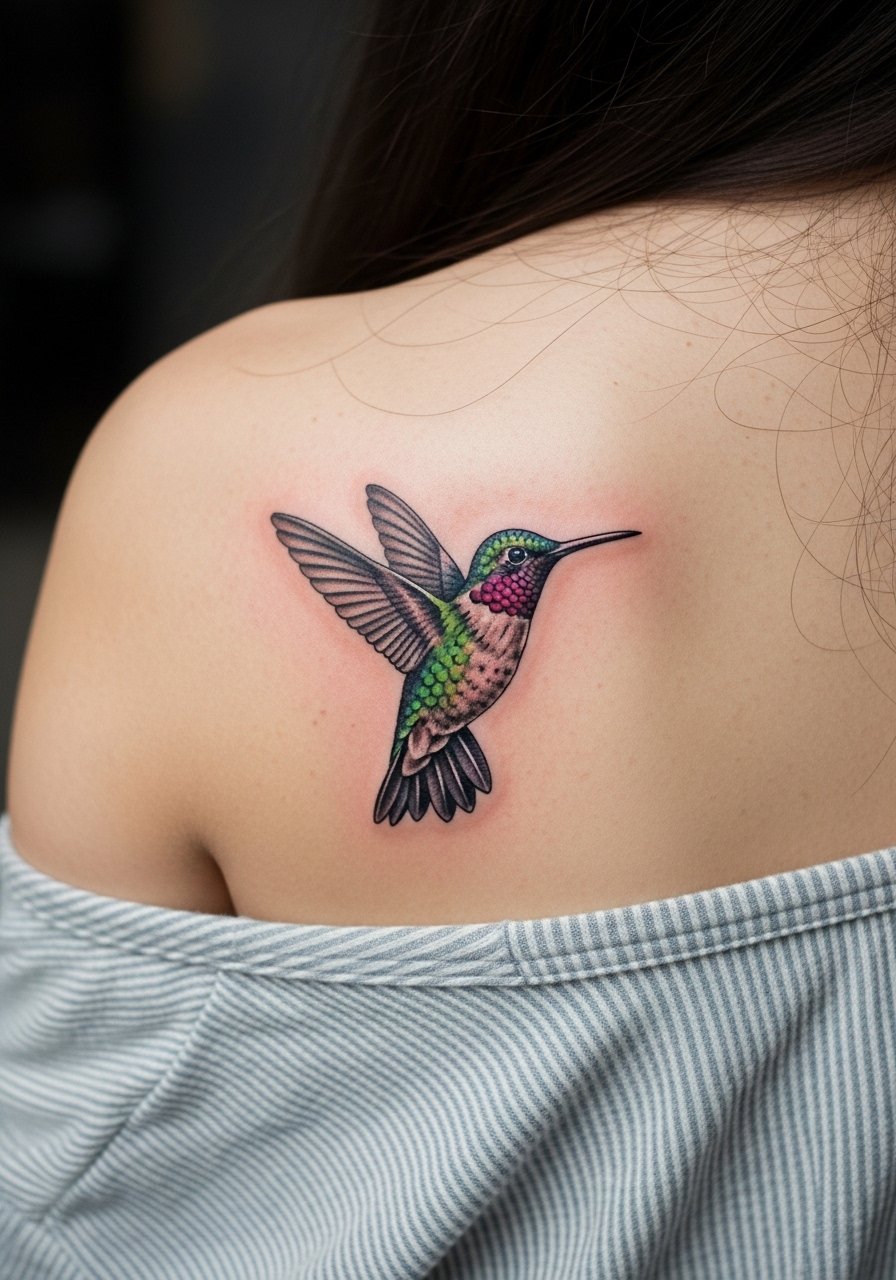
Shoulder blade placements handle detail well because the skin is firm and sun exposure can be controlled. Ask your artist to keep a small margin of untouched skin between dense feathers to reduce the chance of merging. Sessions are usually two to three hours with breaks. A common mistake is selecting overly detailed reference scaled too small, which loses life when reduced. For the session, a wide-neck shirt makes access easy and keeps comfort. Healed photos on similar skin tones help set realistic expectations.
14. Single-Needle Finger Lettering

Finger work has a high fade and touch-up rate because of constant washing and skin turnover. Artists split on this one. One side says single-needle letters look crisp for a little while but need frequent refreshes. The other side prefers micro-saturation and thicker hairlines to keep readability. If you choose finger script, plan for a touch-up in the first year and pick letters with open counters so they do not fill in. Session time is brief but painful near joints. For wearing jewelry, choose thin bands that sit beside the tattoo and avoid heavy rings that rub the ink.
15. Blackwork Mandala Over the Sternum
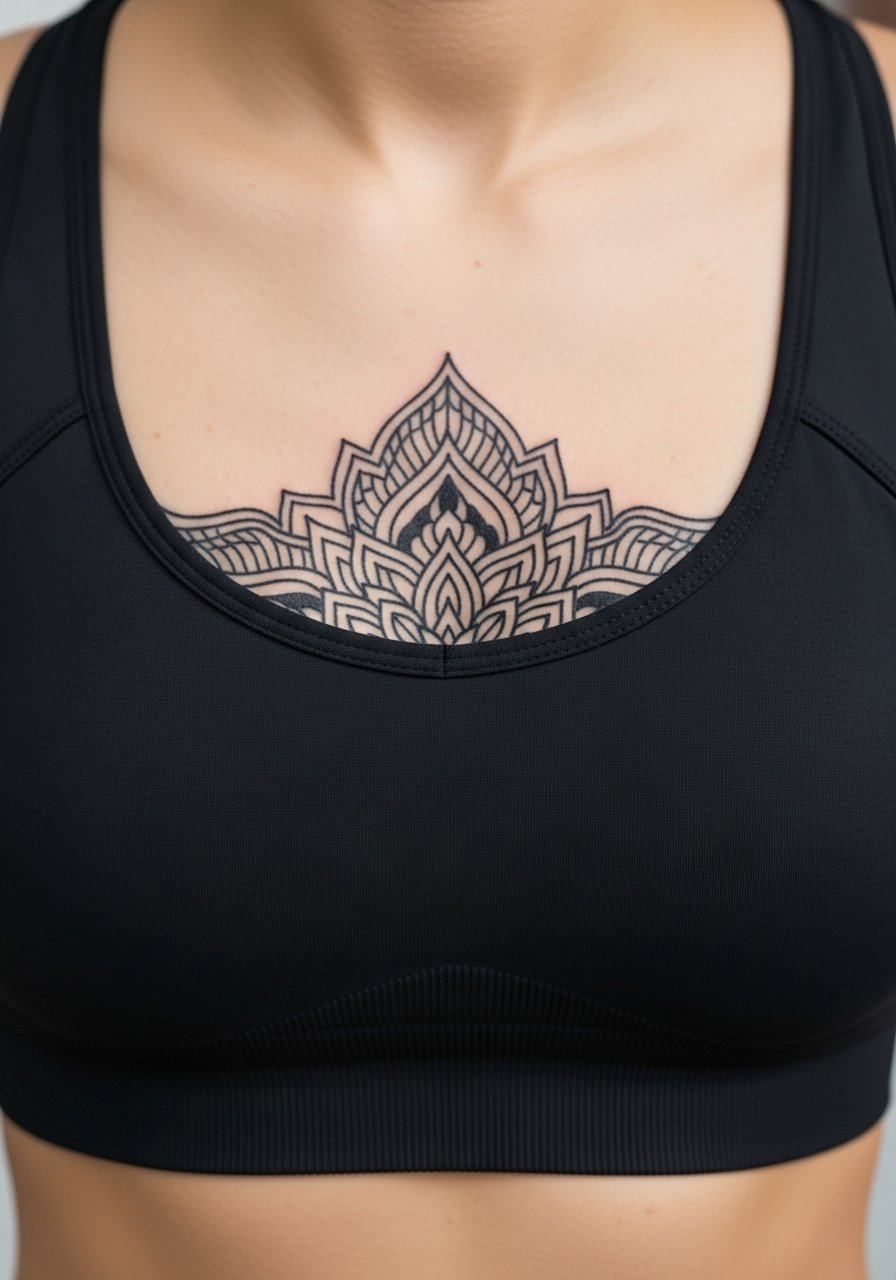
Sternum pieces are dramatic but sensitive. The skin there moves and can be patchy for fine lines. The design benefits from bolder linework and open geometry to resist early blurring. Pain is high and sessions are often split into shorter sittings. For appointment comfort, wear a fitted sports bra that allows access and covers you between work bursts. Also consider how the piece will sit under swimwear or low-cut tops. Ask to see healed sternum examples from the artist before committing.
16. Micro-Realism Small Animal on Calf

Calf skin tolerates shading and looks consistent over time if you avoid tiny dense crosshatching. When you consult, specify the size and whether the animal will be stylized or photoreal. Sessions are comfortable lying prone and often finish in one sitting. A common mistake is choosing a complex pose that reads poorly at small scale. For the session, wear loose drawstring pants so the artist can roll the leg up without tugging. Calf pieces photograph well in casual outfits.
17. Delicate Script Behind the Collarbone
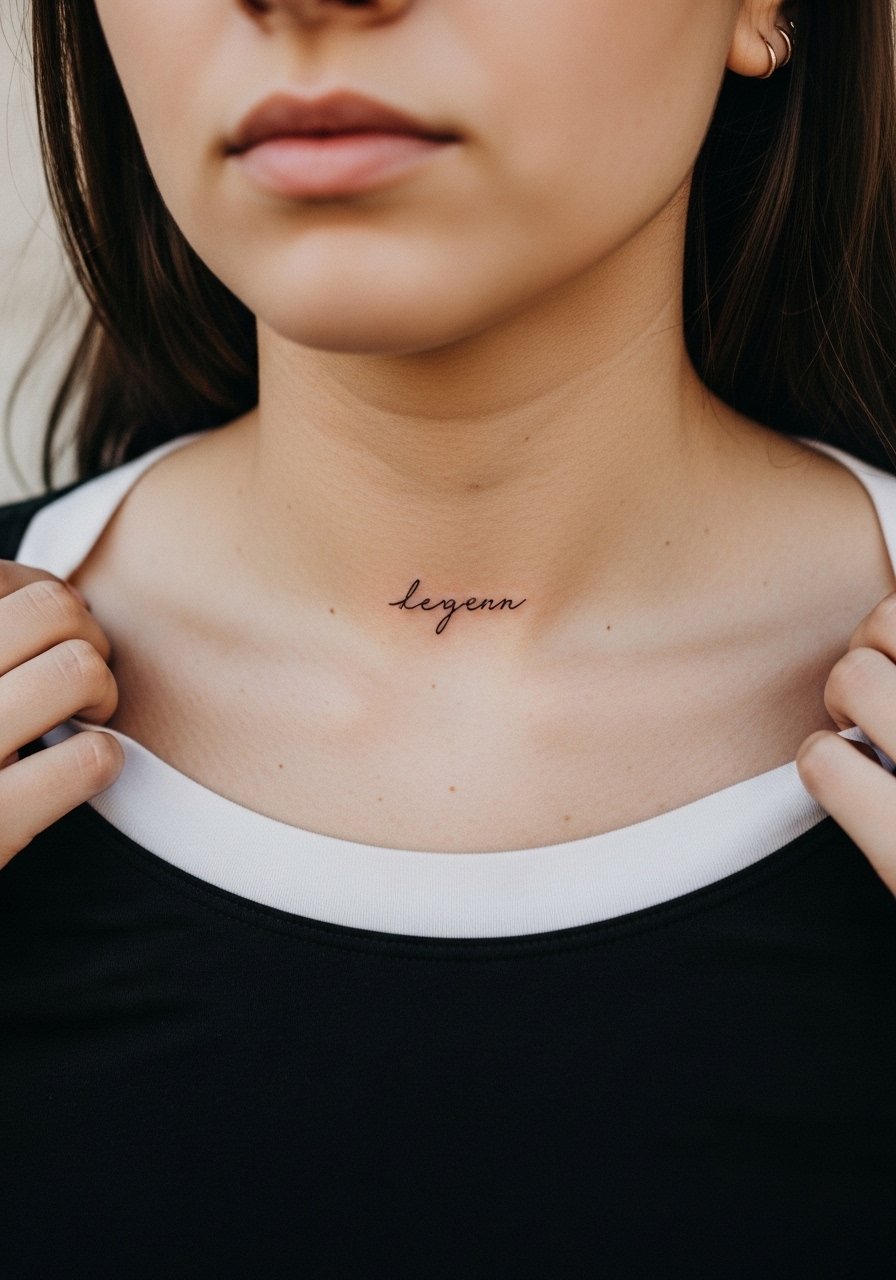
The area above the collarbone reads refined when the lettering follows the bone angle. Ask for the script to curve gently so it sits with natural anatomy. This spot can be sensitive and the skin sometimes reacts with more texture as it heals. A mistake is choosing heavy swashes that overlap the bone shadow. Sessions are brief and precision matters more than time. For showing it off, a delicate chain necklace can sit just above the text without obscuring it. Think about how shirts and straps will cover the piece in daily life.
18. Small Linework Mandala on the Palm Edge

Palm and inner hand work face heavy wear and fast fading because of constant friction. If you want a mandala there, ask your artist about deeper, bolder anchors and plan for more frequent touch-ups. The session may sting and requires careful aftercare to prevent scabbing loss. A typical mistake is treating the palm like forearm skin. For daily life, avoid heavy gloves that rub across the area during the first month. This placement is best if you accept a living piece that may need regular refresh rather than permanent crispness.
19. Single-Needle Nose Line Accent
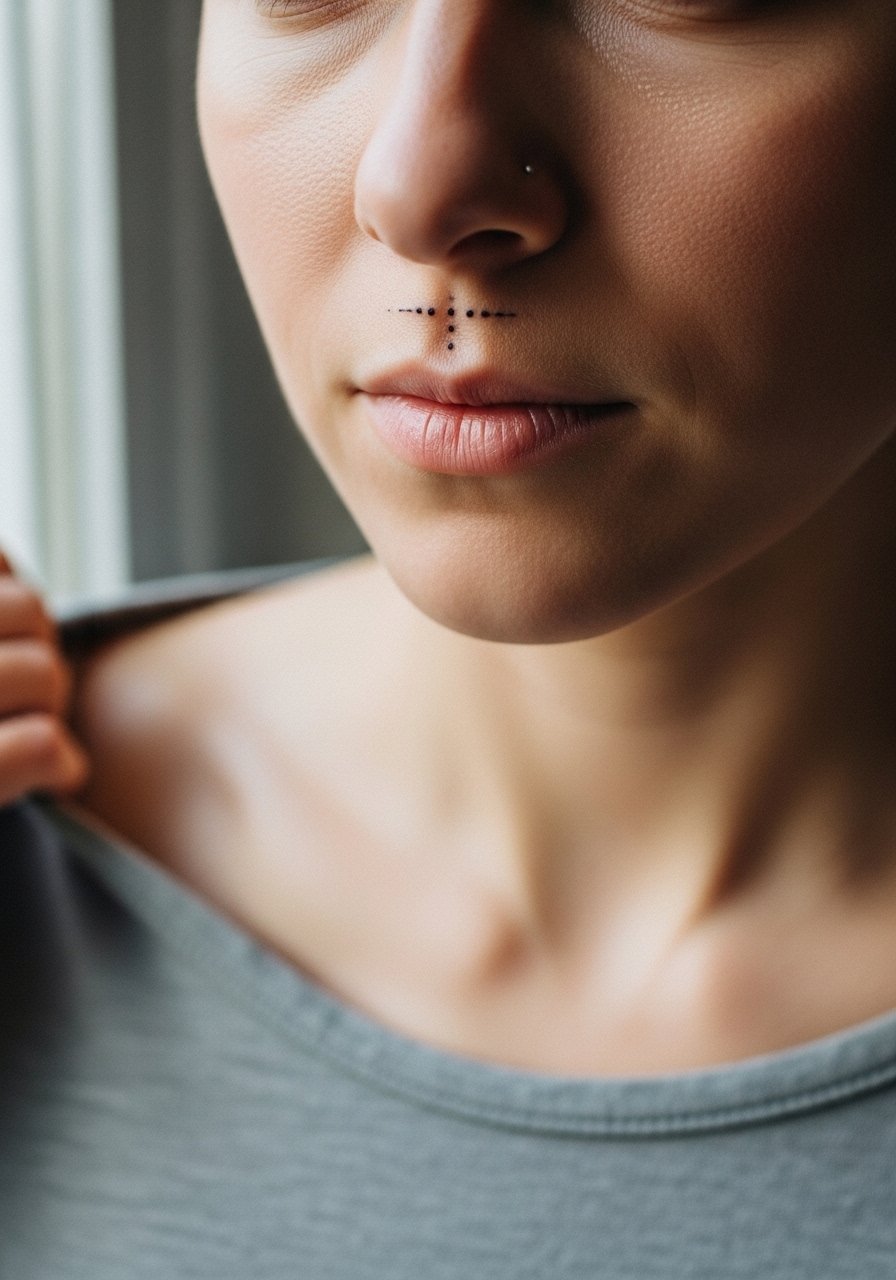
Facial tattoos require a specialist and an honest talk about social and career implications. The nose bridge can take tiny accents that read like jewelry, but artists caution that facial skin and public visibility make regret more consequential. If you pursue it, find a studio that has healed facial examples on similar skin. Sessions are short and painful but the risk of migration and visibility is higher. For appointment access, a button-down makes the process easier. Also consider long term: simple dots and thin lines tend to need touch-ups more frequently than other areas.
20. Tiny Ankle Geometric Knot
Ankle knots look crisp when the lines are given breathing room and slight line weight. The mistake is asking for millimeter-thin intersections that the skin cannot hold. Pain varies with ankle bones and sessions are brief. For showing the piece, a pair of strappy sandals or cropped trousers frame the knot well without rubbing. Expect to plan a touch-up in the first year if you wear tight footwear that crosses the tattoo frequently.
21. Realistic Portrait Mini on the Upper Arm
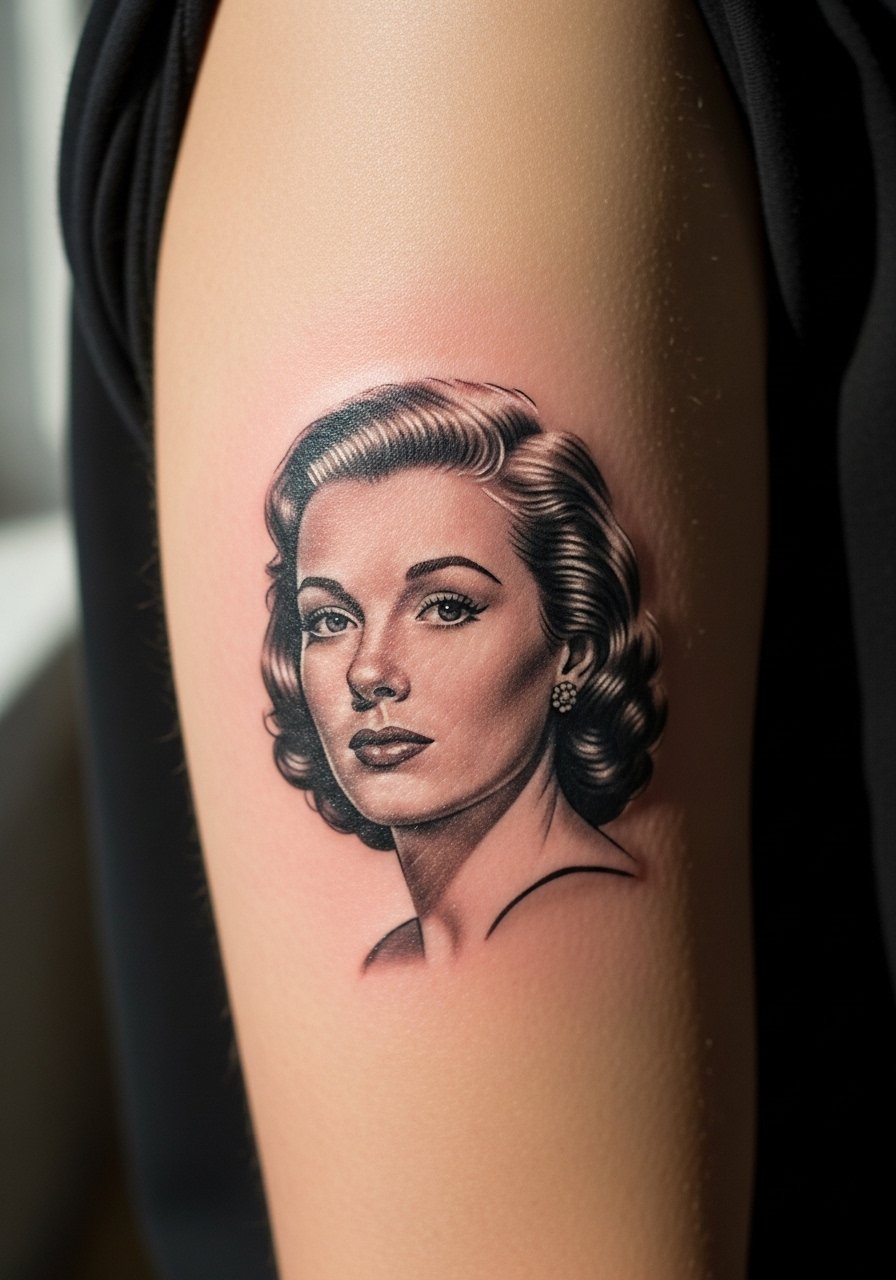
A mini portrait on the upper arm makes for a personal small-scale keepsake. The consult should focus on lighting, grain, and the size you want the face to be. A common mistake is pushing for eight inches of detail in a two inch space. That reduces readability after healing. Sessions are moderate in pain and can be split. For showing it off, short sleeves and a loose cotton tee let the piece peek out naturally. Ask to see healed portraits from the artist on similar skin tones to set realistic expectations.
Frequently Asked Questions
Q: Will fine line tattoos blur faster on areas like the wrist and fingers than on the forearm?
A: Small, high-motion zones like fingers and wrists do blur faster. The skin texture and constant washing wear down thin lines. If you want longevity, ask the artist for slightly stronger line weight and plan a touch-up at year one or two.
Q: How should I prepare for a ribcage or sternum session to manage pain and comfort?
A: Get a good night of sleep, hydrate, and wear layers that can be pulled aside. Use the studio's break schedule to manage discomfort. Some people use topical numbing per the artist's guidance, and others prefer breathing techniques. It depends on your tolerance.
Q: Do watercolor-style tattoos need different aftercare or touch-ups compared with blackwork?
A: Watercolor effects rely on color saturation and soft edges, so sun protection and color-boost touch-ups matter more. Keep the area shaded and expect possible color refreshes sooner than solid blackwork. Ask your artist about their color-retention practices.
Q: Are hand and face tattoos likely to affect job prospects long term?
A: Some industries still react to visible tattoos, and acceptance varies widely. Think about long-term goals before choosing highly visible spots. If in doubt, a placement on the upper arm or thigh offers similar creative results with lower visibility.
Q: What should I bring to a consultation to help get the exact portrait or script result I want?
A: Bring high-resolution photos that show lighting and angles for portraits, and full-scale printouts for script so you can wrap them on your body. Also ask to see healed examples from the artist on similar skin tones and placements.
Q: How do I find a reliable artist who specializes in the style I want without naming people online?
A: Use local shop portfolios, search guest artists on convention pages, browse community forums, and follow style-specific hashtags to see healed work. Prioritize artists who show clear healed photos, not just flash, and ask to see pieces on skin tones like yours.
