
Fine line work is everywhere, and the same delicate sakura branch that looks ethereal fresh can turn into a soft blur if the spacing and depth are wrong. What holds up is not just the design, but where you place it, how much negative space you allow, and what you ask your artist before the needle starts. Below are 17 Japanese-inspired ideas built around how they age, what to request in consultation, and how to dress them so they get seen the way you want.
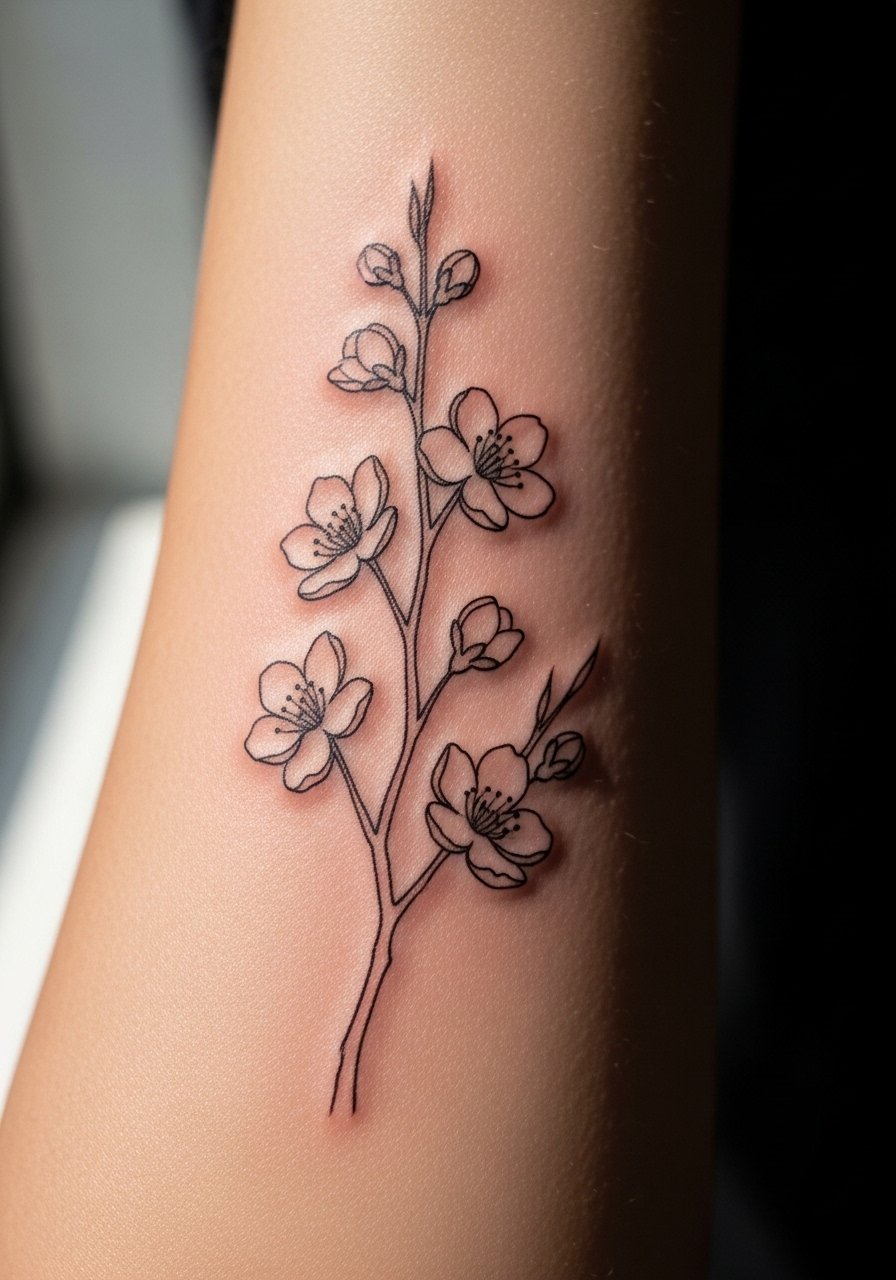
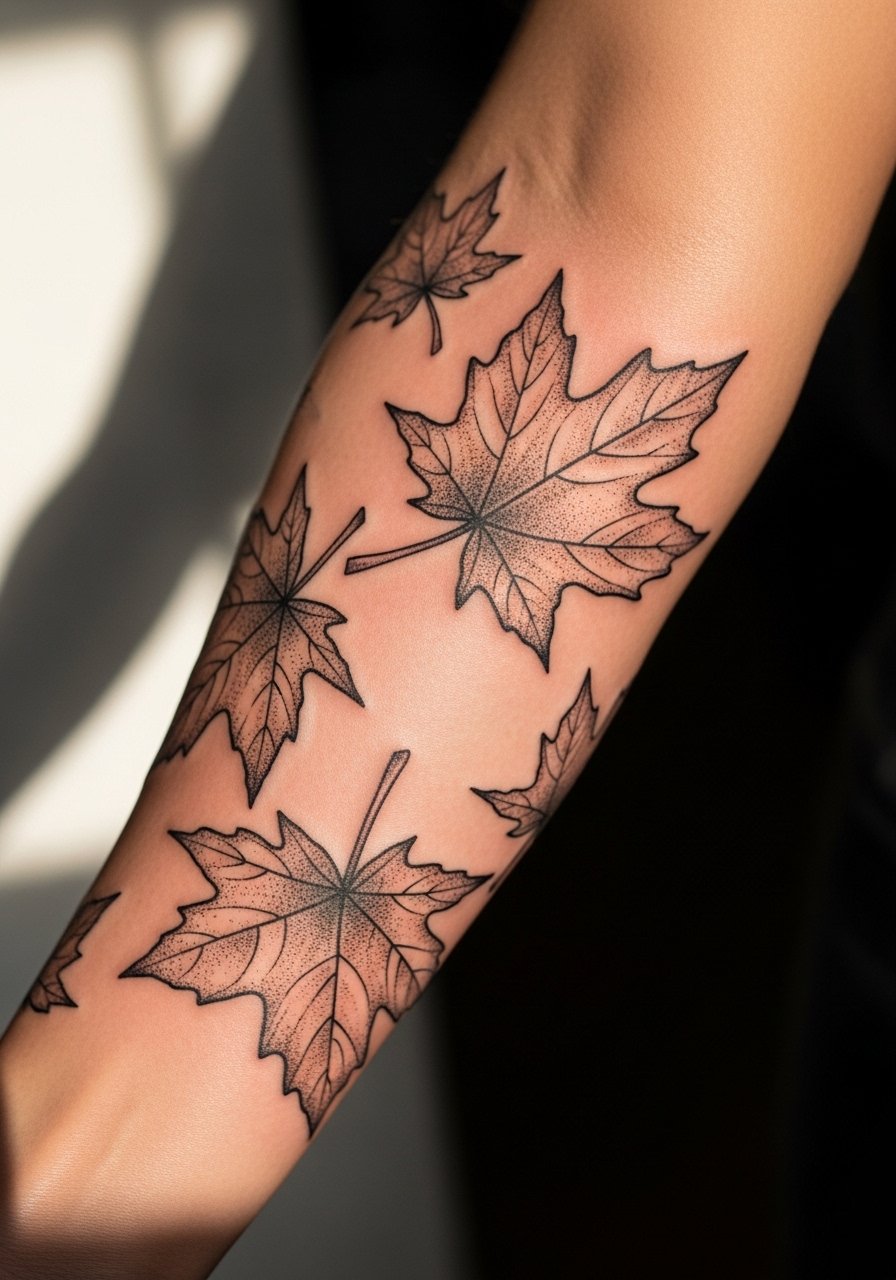
1. Fine Line Sakura Branch on Inner Forearm
I’ve seen this one age well when artists leave breathing room between blossoms and twigs. Ask for slightly thicker main stems and lighter twig details so the primary shapes remain legible after a few years. Fair warning, small clusters packed too tightly are the common failure. On the inner forearm the pain is mild and session time is under two hours for a short branch. Expect the petals to read sharp at six months, soften at two years, and need a touch-up by year three if you want crisp edges. For consultations, bring photos that show exact branch spacing and point out which petals should remain focal. Image prompt below shows the forearm placement and fine line detail.
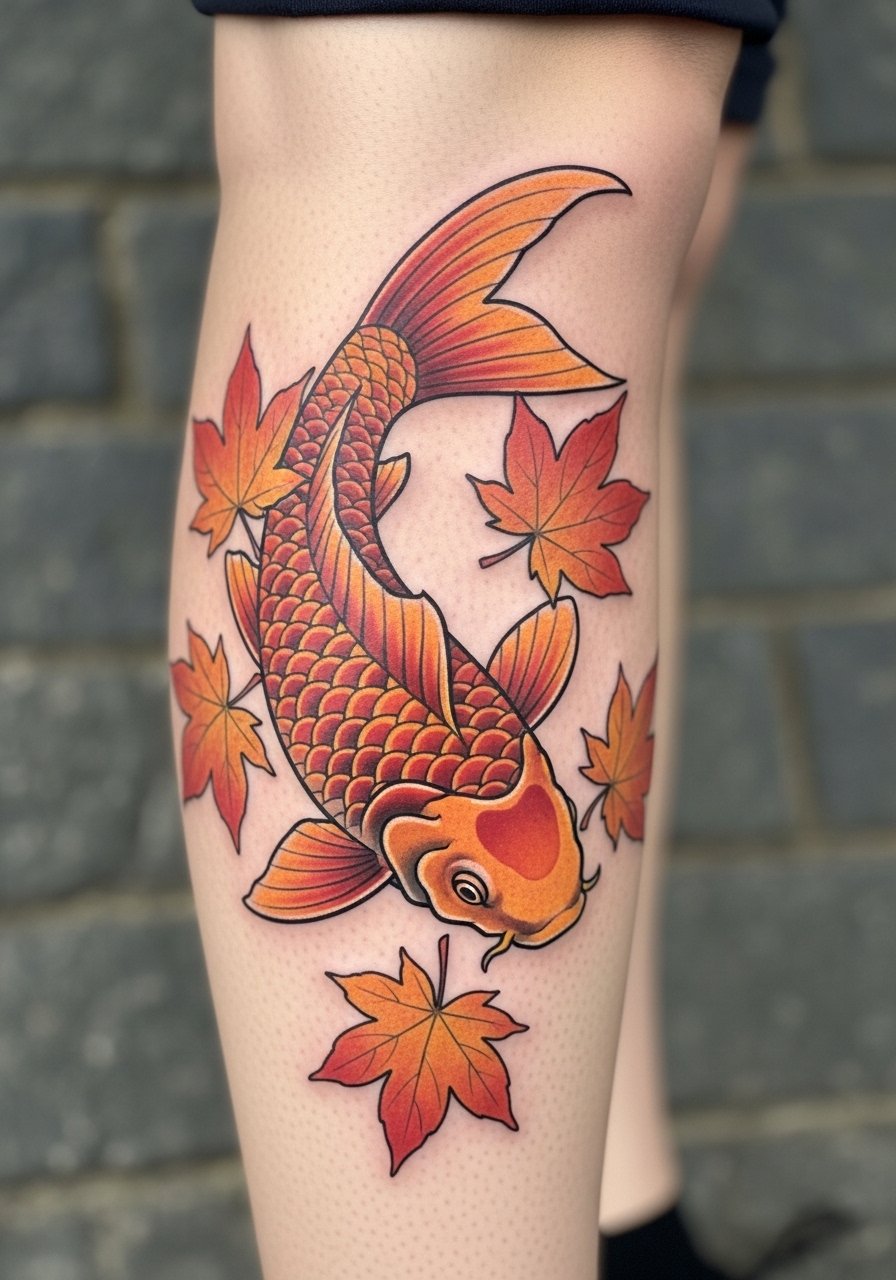
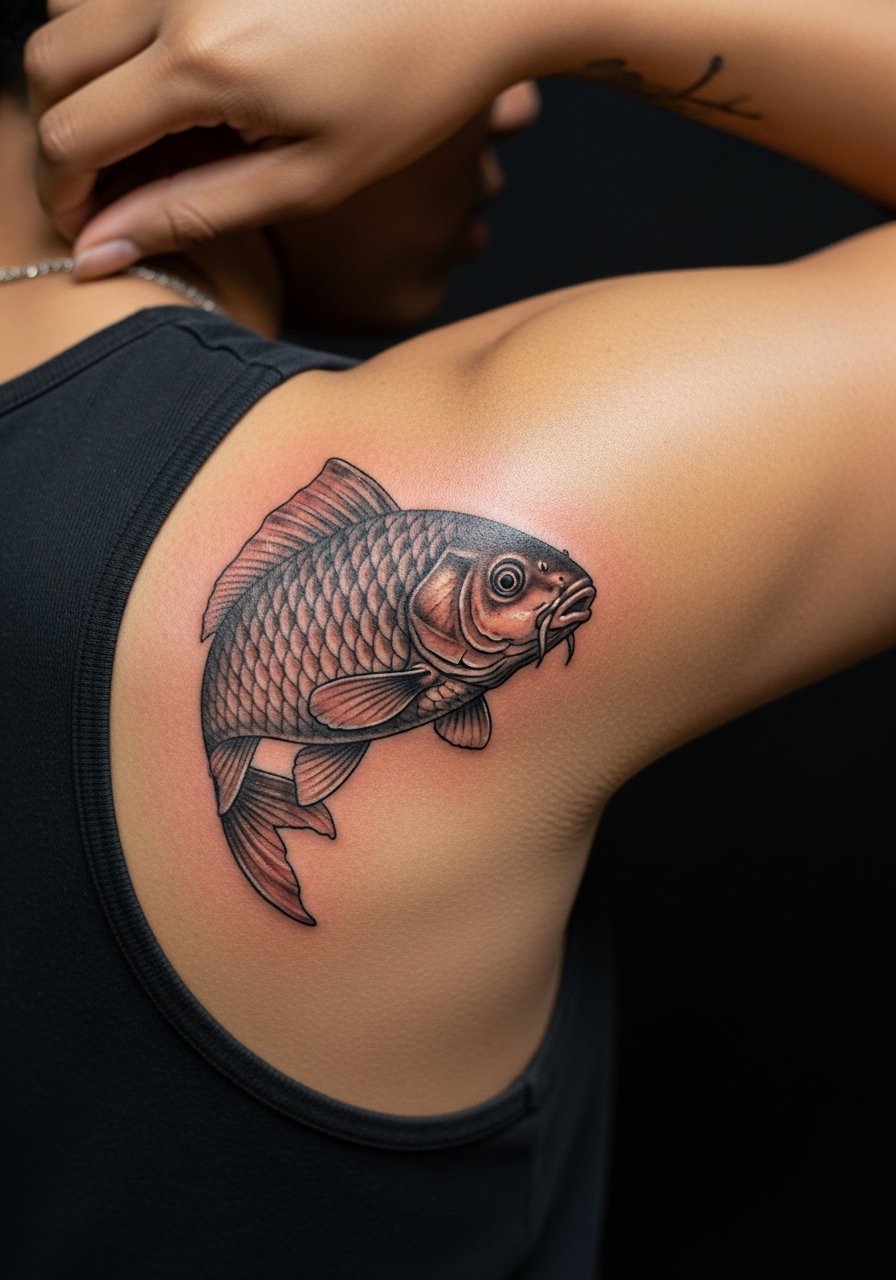
2. Koi Swimming with Maple Leaves on the Calf
Fair warning, the calf can hide swelling during long sessions so session pacing matters. This placement lets the koi have curve and flow with the muscle movement, which keeps the composition dynamic as you move. Tell your artist you want the koi scales suggested with stipple shading rather than dense saturation to avoid heavy color migration. The calf is comfortable to tattoo and takes color saturation well, but thicker color blocks will age differently than fine details. For showing it off, pair the design with mid-calf boots or rolled trousers and a loose linen pant when you want a casual reveal. Expect a touch-up window at year three for saturation refresh.
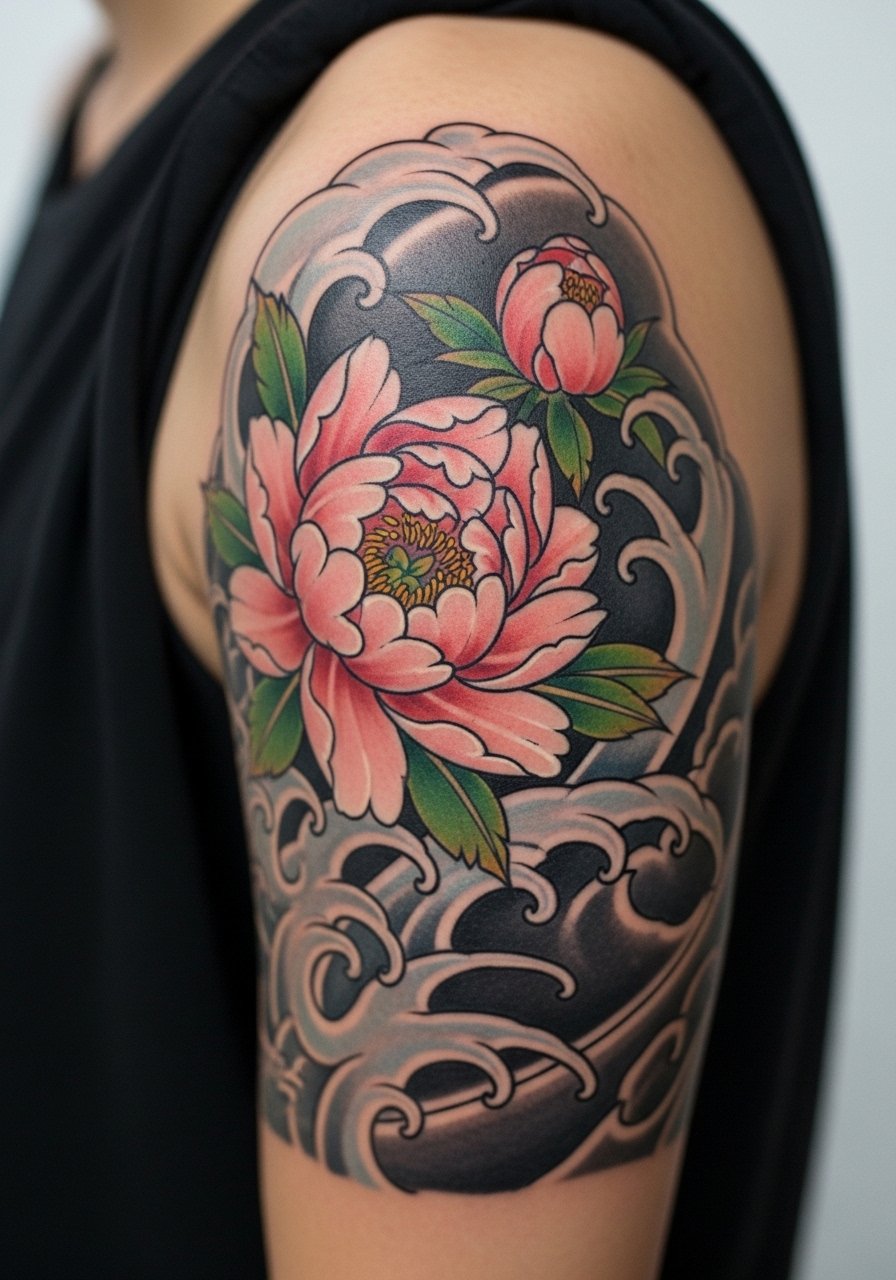
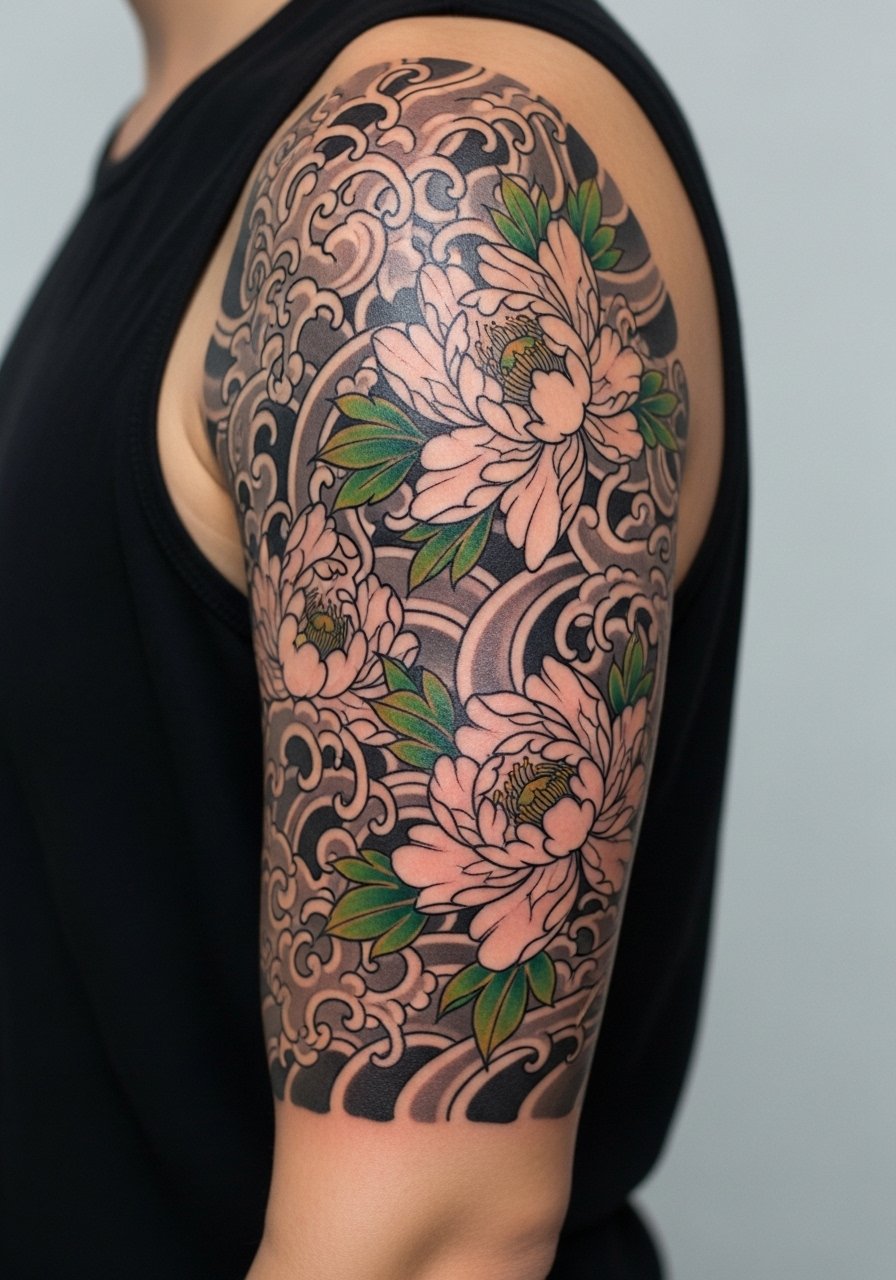
3. Peony and Ocean Wave Half Sleeve on Upper Arm
When you sit down with your artist for a half sleeve, bring photos that show flow around the bicep and where you want the peony to anchor. A common mistake is centering the bloom so it flattens when the arm moves. I recommend placing the peony slightly to the outer arm so the wave elements wrap naturally. Session time runs from three to five hours depending on saturation. Upper arm skin holds color well, which means heavy saturation can last, but dense shading close to delicate linework risks softening after a few years. For casual wear, roll a sleeve up over a loose button-down shirt to frame the piece without cutting it off.
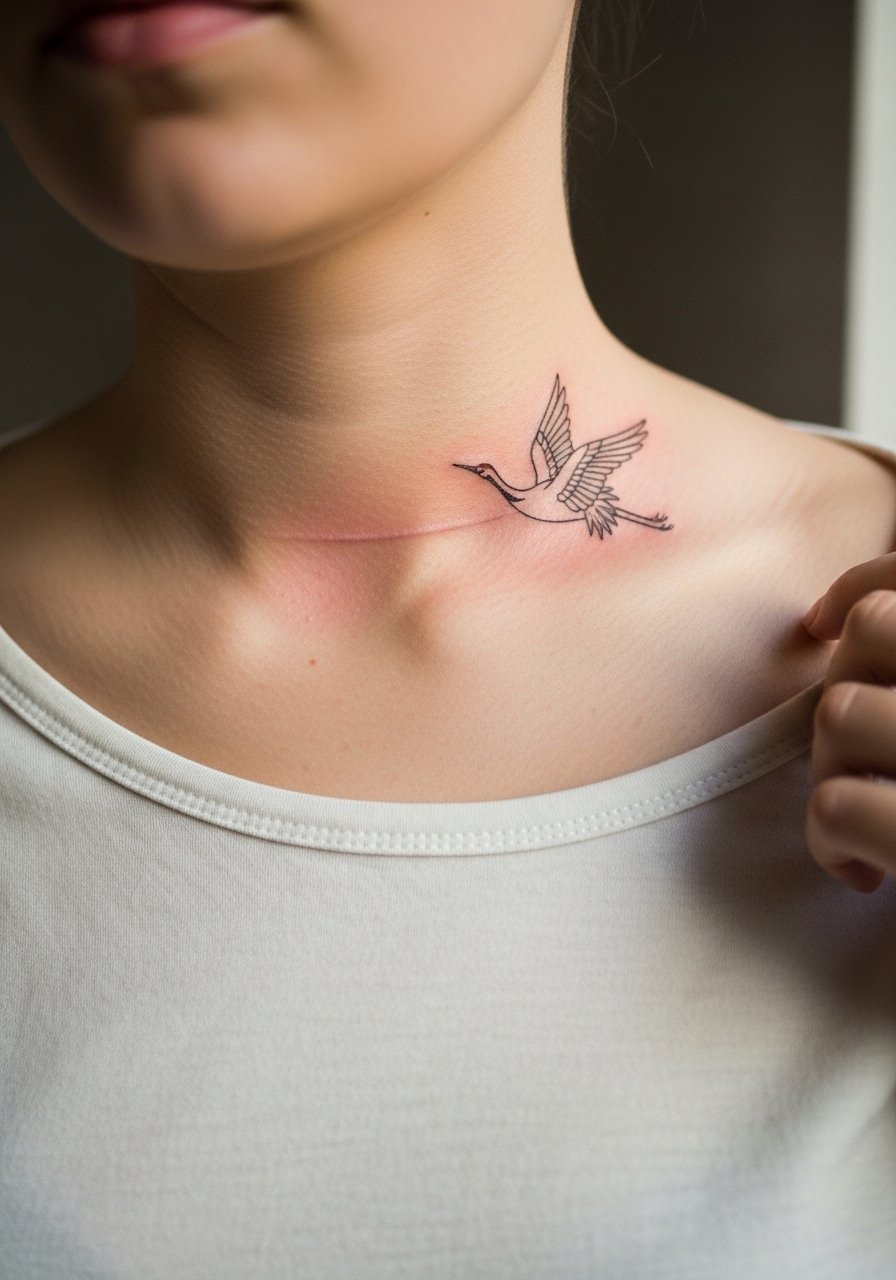
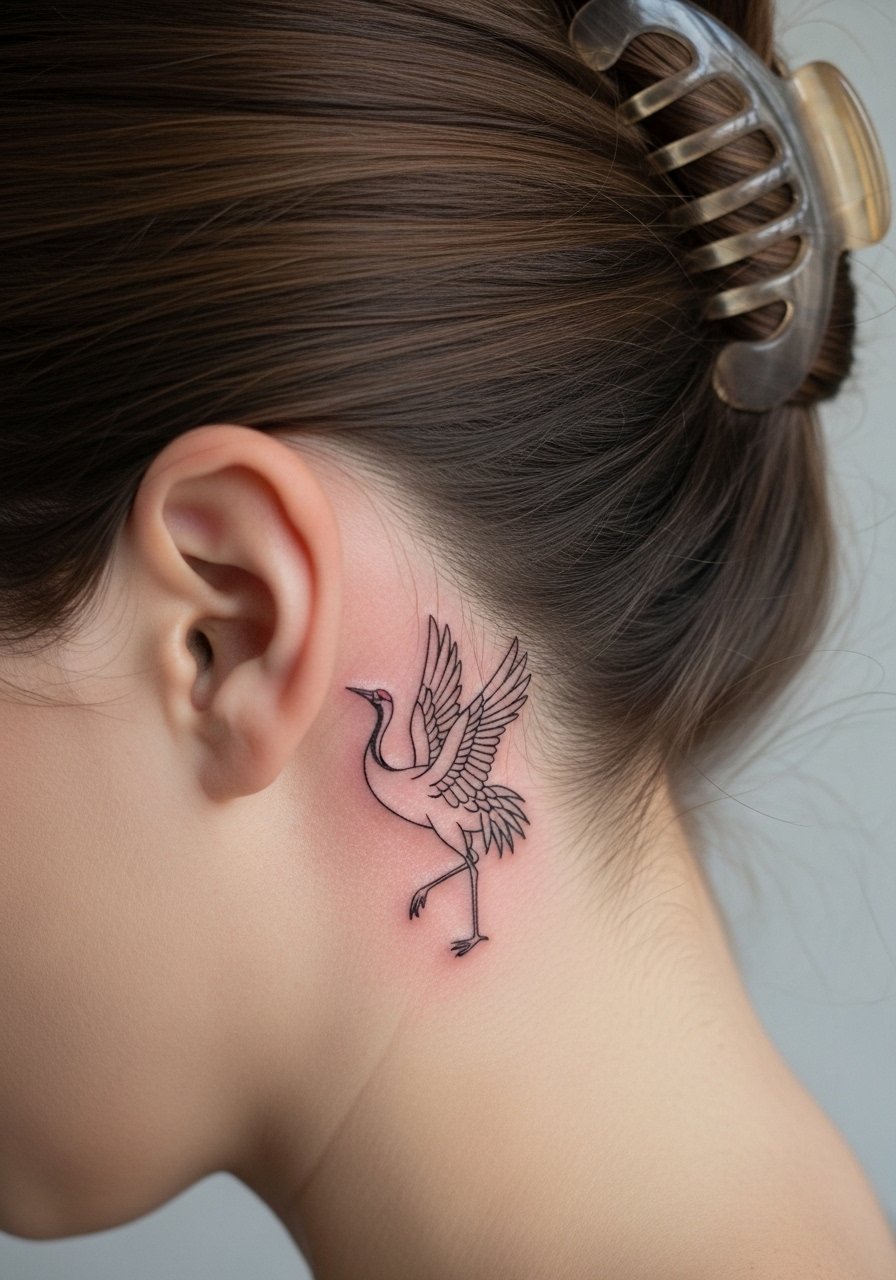
4. Minimalist Crane Along the Collarbone
This placement looks elegant when the crane’s neck follows the collarbone line instead of sitting perpendicular to it. The biggest mistake is making the crane too small and intricate right next to bone, which causes linework to blur faster. Expect a single short session for a well-scaled minimalist crane. For the session wear, choose something easy to pull aside like a wide-neck shirt so the artist can access the area without rubbing against the stencil. Styling-wise, a thin chain pendant sits just above the bird without competing with the linework. Be mindful that collarbone ink is visible at job interviews, so weigh visibility against career requirements.
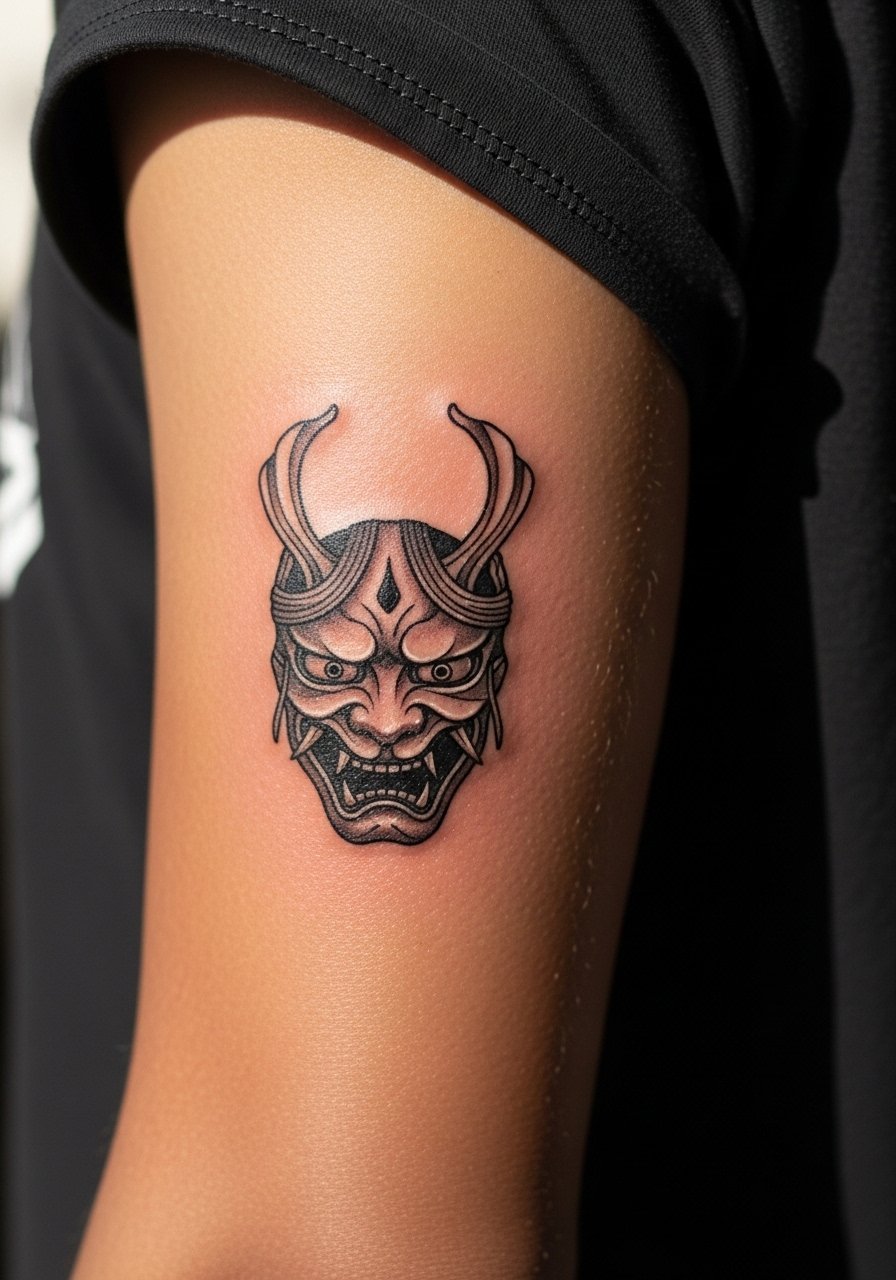
5. Hannya Mask Micro on Outer Bicep
Artists split on Hannya iconography and cultural use. One camp treats Hannya as a traditional Japanese theatrical motif that can be adapted respectfully. The other camp urges avoiding literal replicas unless you are deeply familiar with the cultural context. This compact Hannya works as a micro piece on the outer bicep when the mask is stylized rather than copied directly. The outer bicep tolerates low pain and holds mid-tone shading well. Tell your artist to simplify horns and grain the face with whip shading so the expression reads at a distance. Expect touch-ups around year four if you keep saturated blacks dense. Mention cultural origins to your artist and ask about tasteful variation.
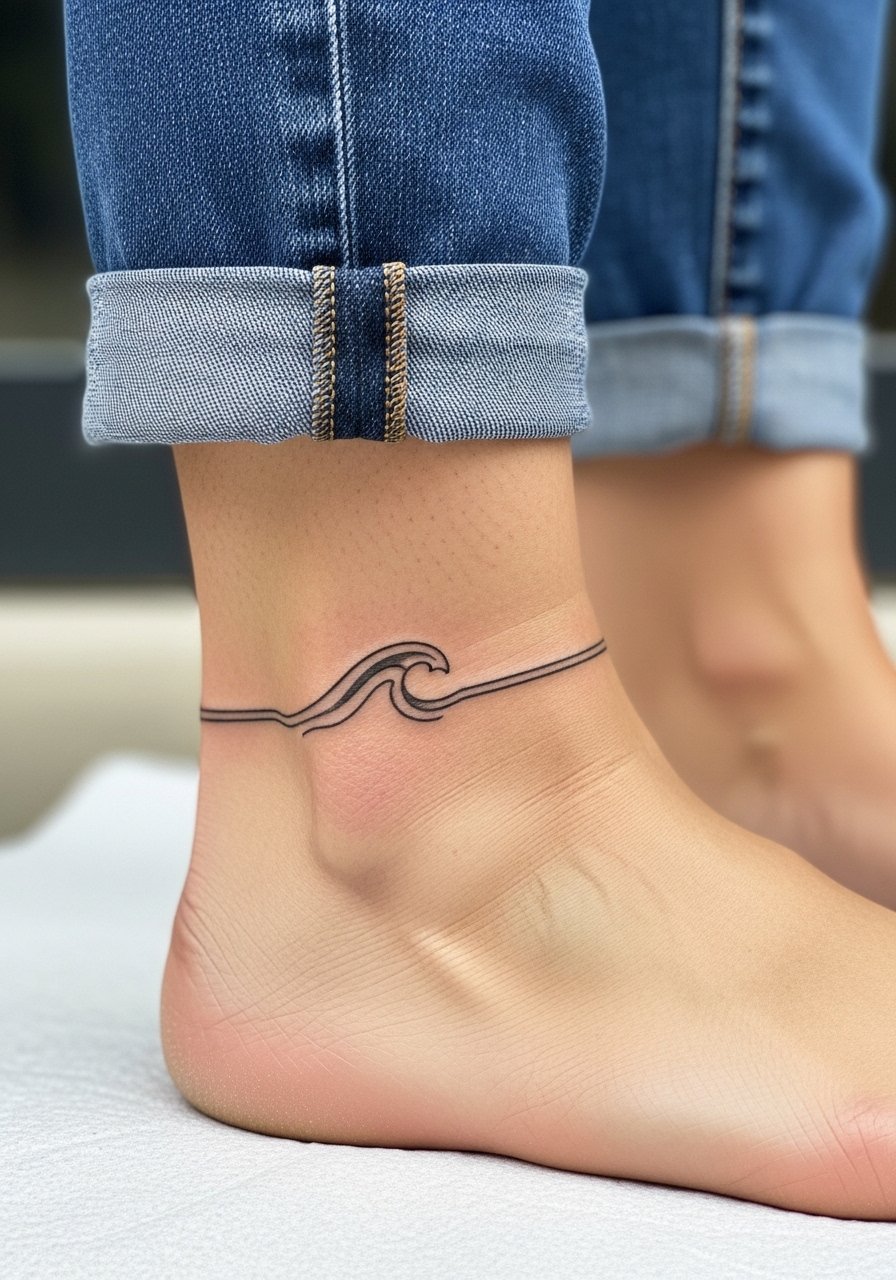
6. Small Wave Ankle Band That Wraps the Ankle
The ankle is notorious for friction from shoes and socks, so the design needs safe spacing and durable linework. The most common mistake is making the band too thin where shoes rub, which accelerates fading. Ask for slightly bolder outer lines and dot work interior to preserve texture without heavy saturation. The session is short but the area is bony and feels sharp, so pain is higher than the forearm. For the session wear, wear shoes you can easily remove and jeans you can roll up to give the artist clear access. After a year the dot work softens, and a touch-up at two to three years keeps the band crisp.
Pre-Session Essentials
The forearm, calf, and bicep pieces above ask for different prep than ankle and collarbone work, so a few targeted items smooth the session and the first week.
-
Stencil transfer paper kit. Lets you check exact placement and spacing before the needle touches skin, which is crucial for pieces like the sakura branch above.
-
Topical numbing cream. Use as directed to ease sharp ankle and inner-arm sensitivity without affecting linework if you discuss it with your artist.
-
Thin protective film roll. Helpful for ankle and collarbone pieces where clothing friction is a primary risk during the first few days.
-
Fragrance-free gentle body wash. Cleanses healing skin without irritating delicate fine line areas like the inner forearm.
-
Aquaphor healing ointment. Apply a thin layer in the first 48 hours to lock in moisture for fine line work without suffocating needle channels.
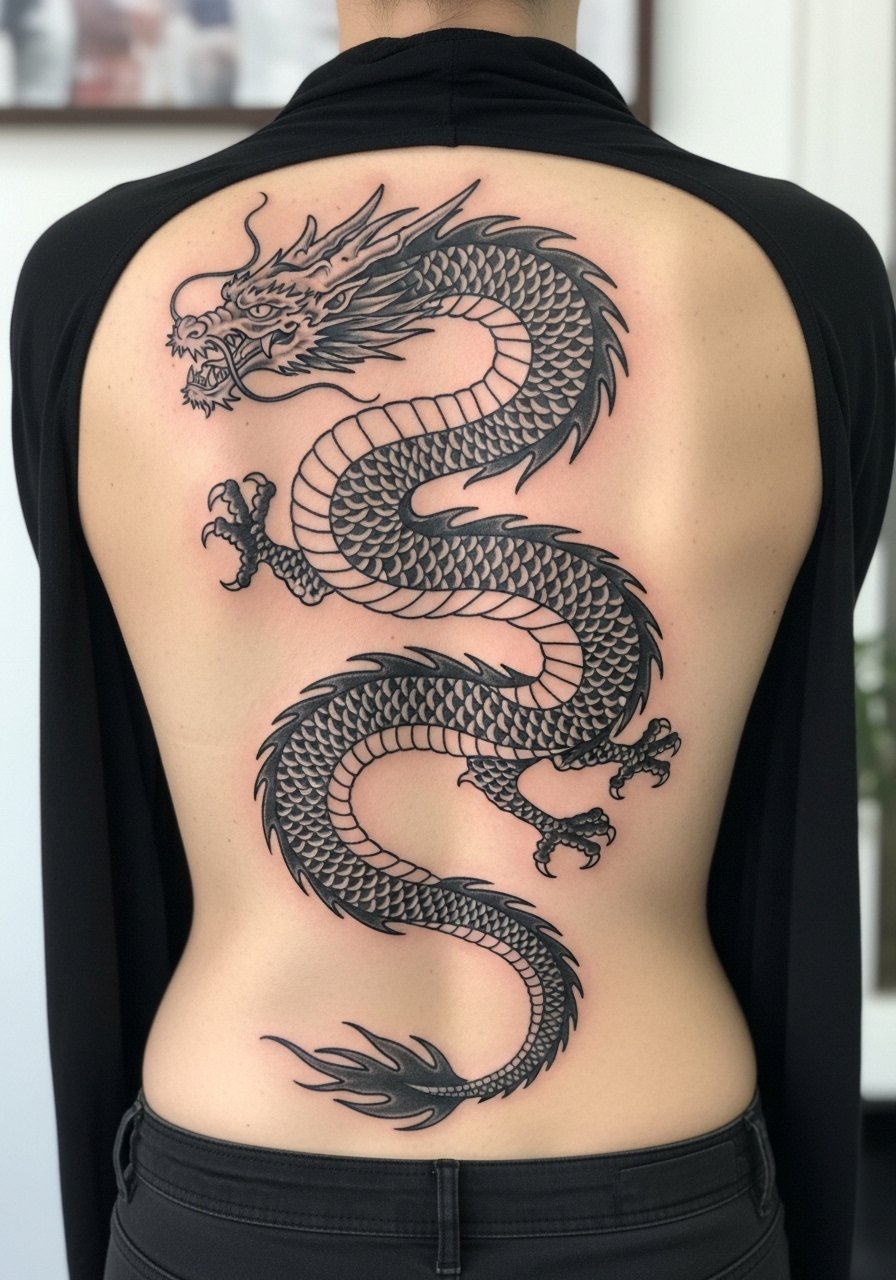
7. Full Back Dragon with Negative Space Flow
There is something about a large dragon that reads from across a room when negative space is used as part of the composition. A full back canvas lets the artist play with coils and breath that wrap the shoulder blades and spine. Expect multiple sessions over days for a large piece, and plan for long sessions that leave the area sore the next day. Tell your artist where you want the head oriented and which scales should read darker to create depth. Blowout risk is lower on the back than on thin-skinned areas, but keep saturation layered to avoid dense patches that age unevenly. For showing off, open-back tops reveal the travel of the dragon across the body.
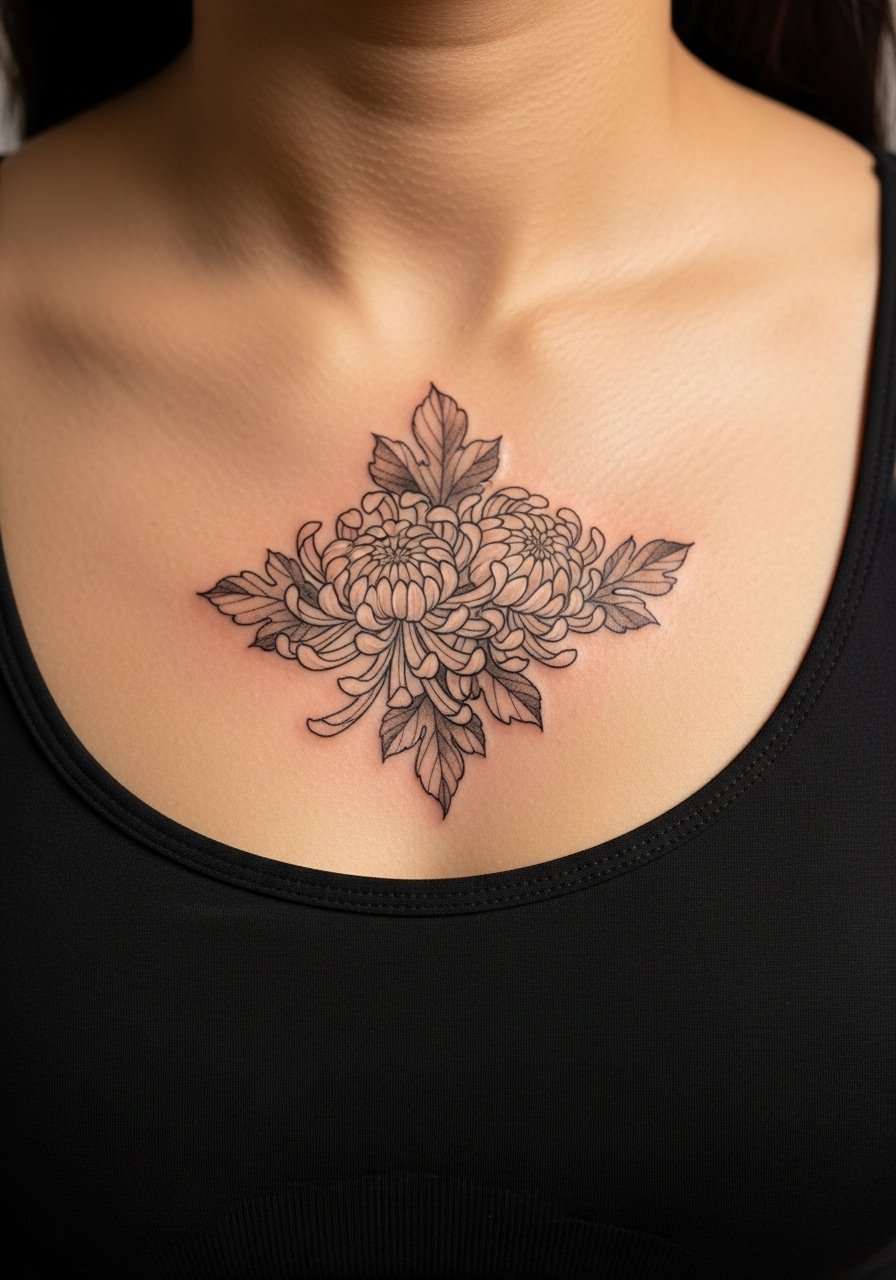
8. Chrysanthemum Cluster Centered on the Sternum
Sternum tattoos require a fitted session wear choice so the artist can work without movement from straps. The sternum skin can be sensitive and breathing can shift the stencil, so keep sessions focused and expect a higher pain rating. Many chrysanthemum versions fail when petals are jammed close to the bone, which blurs over time. Ask for layered petals with a clear focal blossom and spare internal dot work to preserve edges. This is a design with Japanese origin, so consider subtle variations rather than direct historic copies to respect tradition. For healing, the sternum often needs a few extra days of careful sleeping position to prevent rubbing.
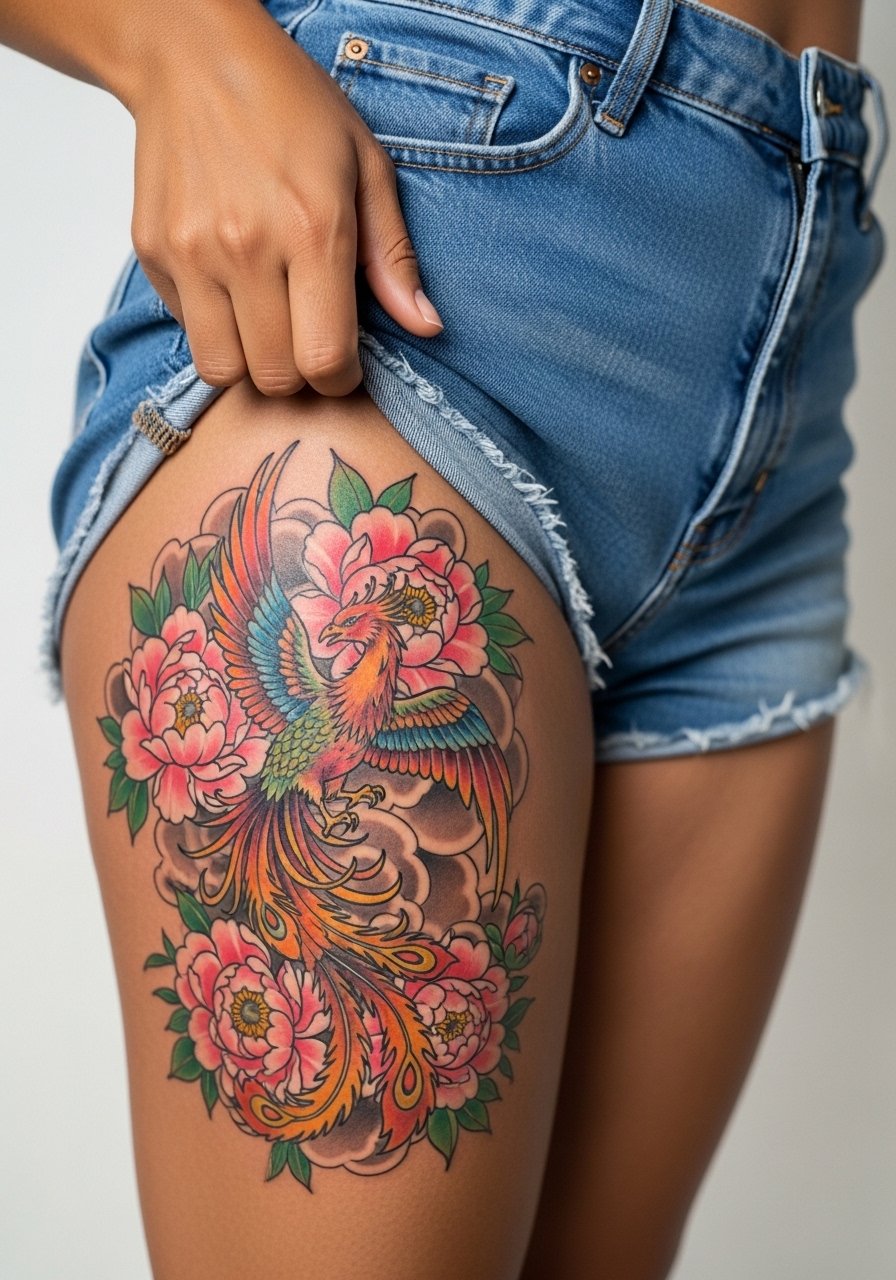
9. Phoenix Rising on the Upper Thigh with Peony Backdrop
When you choose a thigh piece, the private-to-visible dynamic matters. The thigh gives room for flowing feathers and dramatic scale transitions, which keeps the phoenix readable over time. In consultation, specify where the feathers should taper and which colors to reserve for highlight versus base saturation. Expect moderate pain and longer sessions if you go full color. For the session, wear loose shorts that you can slide or a wrap skirt, and for evenings out pair the reveal with a high-slit skirt or tailored shorts like a high-waisted denim short to frame the piece. Touch-ups for colorwork are common around year three depending on sun exposure.
10. Subtle Wave Finger Band Around the Ring Finger
I’ve noticed that tiny wave bands look best when the wave peaks are simplified and not overly intricate. Fingers suffer constant washing and friction which eats fine detail, so the trick is to ask for slightly bolder outer contours and stipple interior lines. Expect a sharp, quick session and a higher risk of fading. Touch-ups at one year are common. For showing it off, stack with delicate rings or a minimalist watch, and consider a lightweight knuckle ring to complement the band. Image below focuses on the hand area to show scale and spacing.

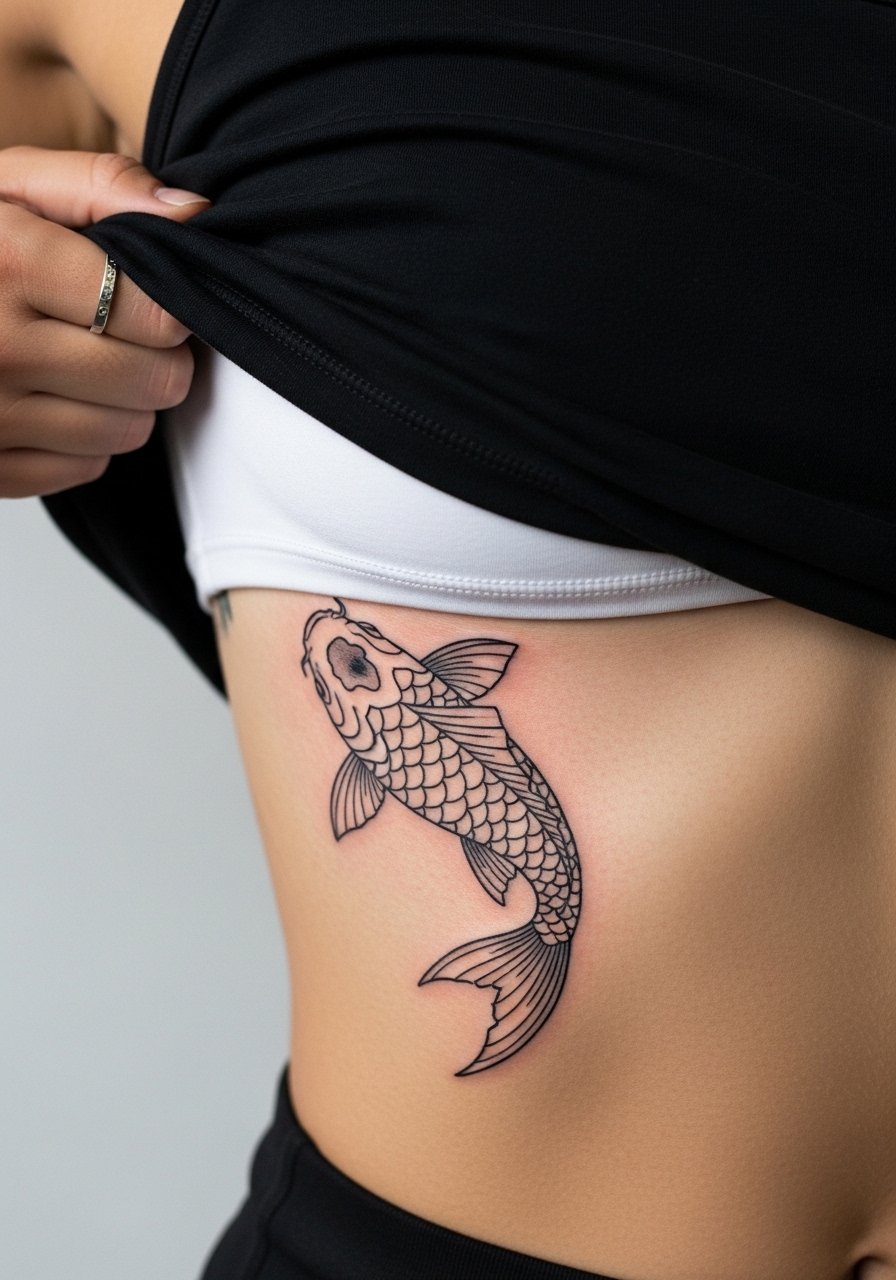
11. Geometric Koi Along the Outer Ribcage
Artists split on fine line and ribcage work. One group says ribs stretch and blur lines within two years. The other group says that with proper needle depth and spacing, fine line settles fine on the area. The truth depends on placement precision and how the artist handles breathing during the session. The ribcage is a high-pain area and many geometric designs go wrong because they are scaled too small for the curvature. For this koi, scale it larger, allow space between geometric elements, and tell the artist you want spacing prioritized over crisp tiny details. Expect touch-ups at two to four years if you want the geometry to remain sharp.
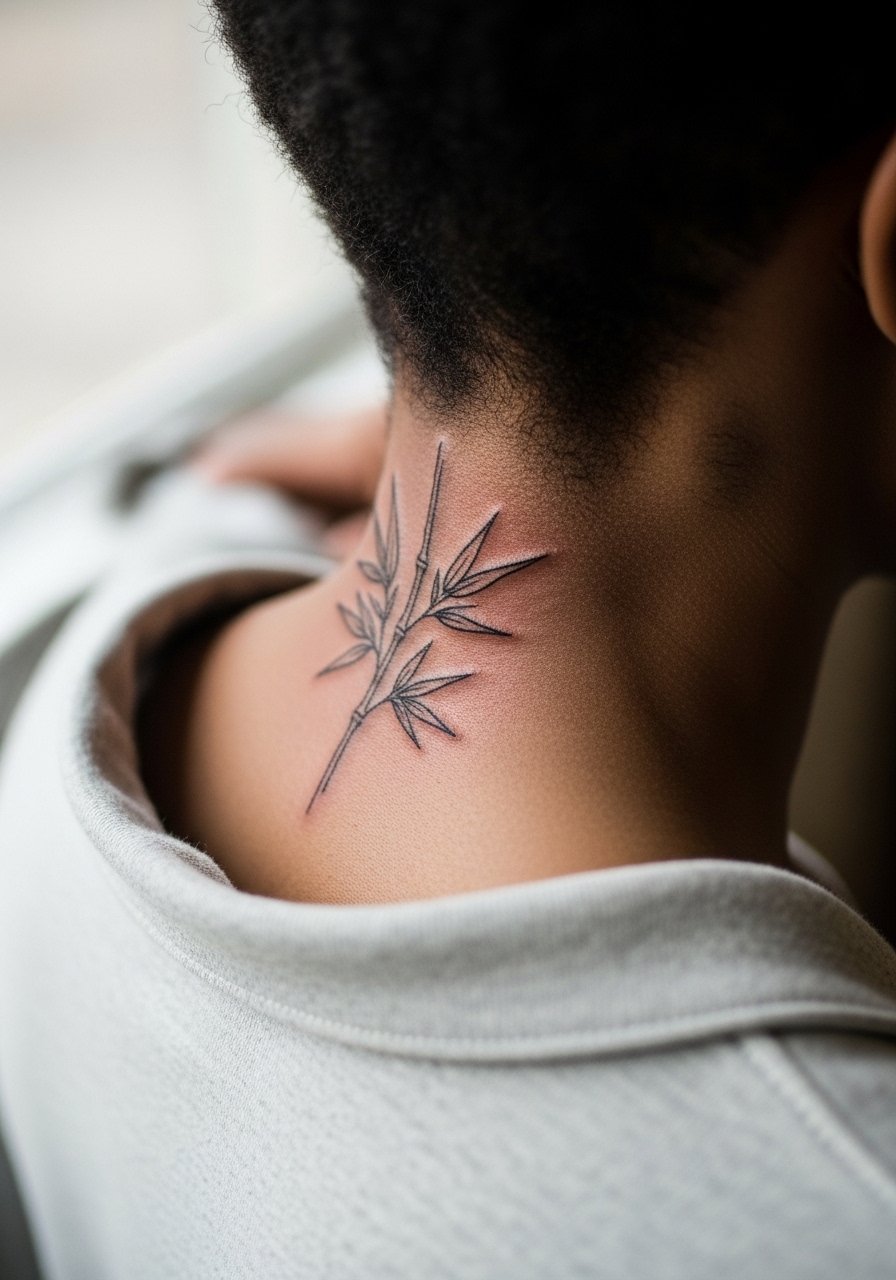
12. Bamboo Sprig on the Nape of the Neck
Fair warning, neck placements are visible and may shift with clothing collars. The nape is small but forgiving for vertical botanical elements that follow the spine line. Pain is moderate and sessions are short. Avoid tiny spaced leaves that disappear when hair grows out or when collars brush them. For tattoos on the nape, plan hair-up hairstyles for the session and the immediate healing window to prevent tangling. The nape holds black linework well, but UV exposure from short haircuts can fade the piece faster, so plan for sunscreen when visible.
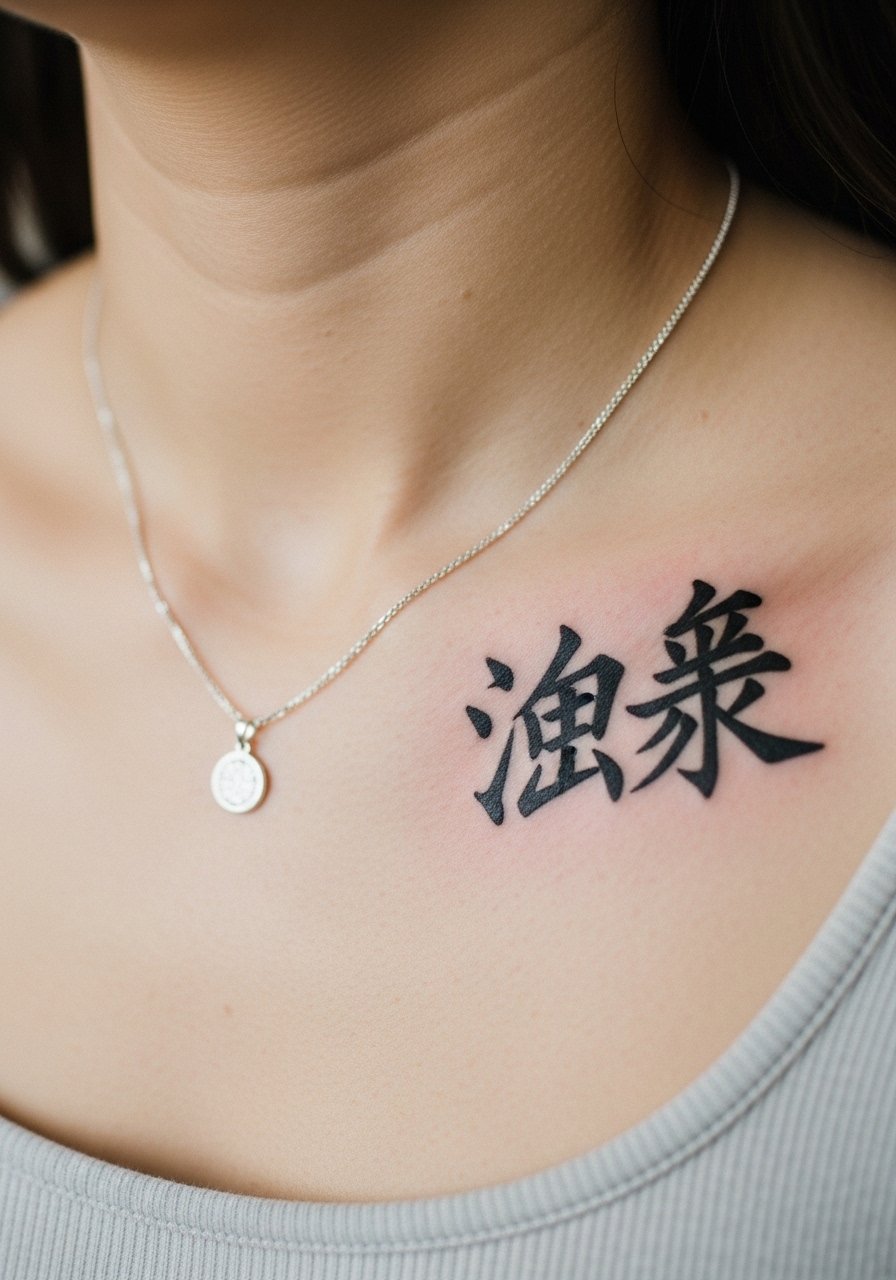
13. Single Kanji Script Near the Clavicle
When you pick a kanji or short phrase, exact text matters and must be specified in the stencil. The top failure is mistranslated or poorly spaced characters that look cramped by the collarbone. Ask the artist to set the kanji slightly smaller with breathing room on either side of the bone so the characters remain legible as skin shifts. For showing this design off, a thin chain pendant necklace sits just above the script and keeps attention on the area without crowding it. If you choose a phrase with cultural weight, consider a slight stylistic variation to acknowledge origin respectfully.
14. Maple Leaves Cascading Down a Lower Sleeve with Stipple Shading
The lower sleeve ages differently than a full arm because wrist friction and sun exposure vary across zones. The common mistake is heavy, continuous black at the wrist that grabs light and fades into patchy spots. Instead, use stipple shading for midtones and slightly bolder borders at the wrist to anchor the flow. Session time for a detailed lower sleeve stretches over multiple sittings. For longevity, plan touch-ups targeted at high-friction areas after two to three years. This approach keeps the leaf edges readable while allowing softer interiors to mellow naturally.
15. Micro-Realism Carp on the Shoulder Blade
There is a visual impact to a tiny micro-realism carp sitting on the shoulder blade when the scales are hinted with minute dot work. The shoulder blade is forgiving for detail and the skin there holds small contrasts well. Expect a short but intense session where you sit still. The main mistake is asking for too much tiny contrast in one go which can flatten after healing. Tell your artist which scale should act as the focal point and request light stippling for texture. For healing, sleep position matters because the shoulder can rub against bedding, so plan a few days of careful positioning.
16. Tiny Tsuru Behind the Ear, Below the Hairline
When the design sits on the skin behind the ear, below the hairline, precise framing keeps it legible. The area is small and moves with the jaw, so tiny radial lines can blur if placed too close together. The session is short but sensitive. Tell your artist you want the crane scaled to the visible skin area with minimal interior detail. For the session, pull hair up with a simple claw or clip and plan for a couple of days hair-up styling to avoid tangles. This placement also benefits from light contrast rather than heavy saturation to stay crisp.
17. Irezumi-Inspired Half Sleeve with Peony and Wave Motifs
Irezumi motifs read best when scale, negative space, and flow are prioritized over literal replication. For a half sleeve, tell your artist which traditional motifs you admire and ask for modern composition that respects the source. The half sleeve is a long session commitment that pays off in cohesion and longevity when the artist plans for layered saturation and breathability between elements. For showing it off casually, roll a sleeve over a linen shirt with rolled sleeves to reveal the peony and wave interplay without cutting off the flow. Expect touch-ups in saturated areas at year three or four.
Frequently Asked Questions
Q: Will fine line sakura branches blur faster than bold traditional pieces?
A: From what I’ve seen, yes, fine line sakura tends to soften sooner because the smallest strokes merge with time. Placement and spacing matter more than the label fine line. If you want longevity, ask for slightly thicker primary stems, extra negative space, and expect a touch-up around year three.
Q: Are ribcage tattoos worth the pain if I want detailed geometry?
A: It depends. The ribcage offers excellent canvas for large geometry, but lines on thin skin are more likely to migrate. Artists are split on fine line ribs. Ask the artist how they handle breathing during the session and whether they recommend larger scale to avoid early blurring.
Q: How should I dress for a sternum or chest session to keep the area accessible?
A: Wear a fitted sports bra or a wide-neck top that you can pull slightly aside so the artist has clean access without exposing more skin than necessary. Comfortable, loose bottoms help if the session runs long and you need to shift positions.
Q: What’s a realistic touch-up timeline for color koi and phoenix pieces?
A: Color saturation generally needs refreshing sooner than dense black. Expect color touch-ups in two to four years depending on sun exposure and the original saturation. Darker backgrounds tend to hold longer than pastel highlights.
Q: Are Hannya or Irezumi motifs cultural appropriation to avoid?
A: There are two camps. One treats these motifs as shared artistic language that can be adapted respectfully. The other urges caution and recommends deep understanding before direct replication. If you pick these motifs, discuss cultural context with your artist and opt for respectful variation.
Q: How do I find an artist who specializes in Japanese-inspired work without just following an Instagram handle?
A: Use discovery pathways like local convention vendor lists, specialty directories, hashtag searches plus location tags, and community threads on Reddit where people share recent session photos. Ask about portfolios showing healed photos in similar placements before booking.
